How to make a pencil case or tube for electrodes and not only from scraps of plastic pipe with your own hands.
Hello to all DIY lovers!
In today’s article I want to show one of the options for making a pencil case (tube) for various long objects. In such a pencil case you can store electrodes (in fact, it was made for them), and if you make it a little shorter, you can store drills, drills, pins, and so on. The advantage of storing electrodes this way is that, unlike a cardboard box, they will not get damp in a plastic case, even if they get exposed to rain (dampness greatly affects the quality of the electrodes), also in such a tube, due to the fact that there is It has a handle, it’s easy to carry, and most importantly, it’s very easy to make it with your own hands, literally from scrap materials.
Tube manufacturing process
We measure the size of the spinning rod, taking into account that 2 cm of foam rubber will be glued to the plugs on each side.
We add another 4 cm to the measurements. An ordinary plastic pipe will do, on which you need to mark the length of the gear, and saw off the unnecessary remainder with a hacksaw. The sawn-off part will be closed “tightly” with a plug, while the other side will be equipped with a removable lid. After these steps, a butt ring is placed in the pipe, which should move freely along the entire length.
At the next stage, we make a cover for the case and make several small holes in it to sew on the foam rubber. You can use a sponge for this. At the final stage of work, we give the tube the proper appearance - we cover it with fabric.
Video on making a tube
I also recommend watching a video on making a tube for electrodes.
The container turned out great! Everything is very durable and convenient and easy to use! I advise you to make the same one for yourself, especially since it’s very easy to do!
And that's all for me! Thank you all very much for your attention and see you next article!
We make an additional compartment for floats and reels
Plastic bottle holder
For simple rods with a reel from 1000 to 2000 according to classification, if a compartment is needed, it is small. But a reel feeder for 2500 kl-diva or shimano needs a lot of space for the so-called meat grinders.
We carry out the work in this order:
- We cut out the groove in the tube.
- Here the assembly goes the other way around. Soft foam rubber is fixed on the lid on the side where the tip of the spinning rod rests. The same cover is firmly fixed to the mounting foam.
- And from the side of the opening lid, a strip is cut out of the pipe, previously marked with a marker, in size from the beginning of the butt to the end of the reel holder. Thus, the coil remains open beyond the tube.
There are two ways to close the coil:
- Using rivets of special fittings, close the coil with a part of the pipe, separately cut in advance. Its pieces are cut in half, which will be like a lid on top of the coil.
- The second option is to put a fabric cover on top of the reel, which covers it from dust, dirt, scratches, but does not protect it from impacts. For ease of use, it can be equipped with a snake.
The first method is more labor-intensive and expensive, but in this case the coil is reliably protected. She is not afraid of falls or blows.
Preparing fishing rods for storage
To be prepared for the next fishing season, you need to properly complete the current one, namely, put in order and put away all the parts of the fishing equipment. These procedures will allow you to maintain the quality of the products, as well as be in full uniform for the long-awaited moment of the next fishing. Before placing the gear in a case for long-term storage, you should prepare it for this:
- All parts must be dried and cleaned. Depending on the degree of contamination, use warm water, detergent or a dry brush. Even slight dust or grains of sand can play a cruel joke on the rod and joints during the first fishing.
- The fishing line must not be stored under tension. It needs to be freed from hooks, weights, floats, removed from the reel, dried, and then loosely wound on a pre-prepared foam reel or reel.
- Make a thorough visual inspection of the spinning rods. If defects are detected, they must be corrected immediately.
Advice! Noticed cracks and chips on the fishing rod must be repaired before the gear is sent to wait for the next season. For this purpose, coatings with varnish and glue are used.
Only after carrying out these simple procedures do you need to remove the spinning rods to a certain place.
Hello dear fishermen. This article will focus on storing fishing gear.
Every self-respecting fisherman takes care of his gear and for good reason, because the gear should always be in working order. It is necessary to store and transport spinning rods, fishing rods, and feeder rods in special cases that protect the rods from damage.
The reel must also be transported in a special hard case. This issue is especially relevant when using expensive models that require special treatment.
If you accidentally hit the reel with the side of the spool on a metal object, then a chip will almost certainly form on the side, which will damage your braid when casting. As a result, the spool will have to be changed, which is fraught with financial costs, and considerable ones, since a new spool for a high-quality reel costs about $70.
Mono fishing line does not need to be dried, but it is sensitive to ultraviolet rays, so it should not be stored in the sun. In addition, no matter what the fishing line is, in no case should you leave it in a cold room like a garage for the winter, since by the fishing season it will be completely unusable and can be safely thrown away.
Floats and hooks also require careful handling. It is best to store floats in hard tubes - this will protect them from breakage, since very often the antennas in floats break off.
Hooks should be stored in dry boxes that close securely. No matter how good and high-quality the hook is, if stored in a humid environment, it will begin to rust and will soon become unsuitable for fishing.
Thus, no matter what gear it is, expensive or cheap, it must be stored properly, only in this case will it serve you faithfully for a long time.
Happy fishing! Fishing online store UlovSnast.ru
Workshop
Fisherman's winter clothing
Groundbaits and baits
Manufacturing
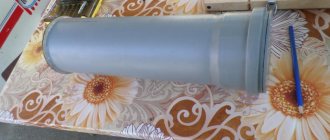
First of all, we take a piece of plastic pipe approximately 38-40 cm, depending on the purpose for which the tube is made.
Next, using a homemade angle grinder, we cut off the excess part. I showed how to make such a machine in one of the previous articles. With this machine it is very easy to cut at right angles. And we also grind all the burrs.
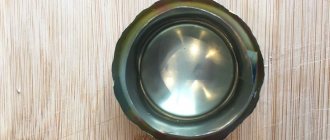
Next, we take and cut off two necks with stoppers and one carrying handle from 5-liter plastic bottles. Using scissors, we cut off all the excess so that only the neck without the “skirt” remains.
Next, using sandpaper, we clean all the places that we will glue.We will glue the well-known liquid welding “Pixol” (not advertising) on everything, so far this is the best liquid welding I have tried. (If you know something better, please write in the comments, I will be very interested in trying it out). This kind of welding glues everything and holds it perfectly.
Apply glue to all parts and press tightly. Also, don’t forget to put on a carrying handle. Once everything is glued together, it is better to press everything tightly and leave for 15-20 minutes until it hardens completely.
Now the tube is ready. Now you can fill it with electrodes. The capacity of this tube is almost two full packs of electrodes.
Tube manufacturing process
We measure the size of the spinning rod, taking into account that 2 cm of foam rubber will be glued to the plugs on each side. We add another 4 cm to the measurements. An ordinary plastic pipe will do, on which you need to mark the length of the gear, and saw off the unnecessary remainder with a hacksaw.
The sawn-off part will be closed “tightly” with a plug, while the other side will be equipped with a removable lid. After these steps, a butt ring is placed in the pipe, which should move freely along the entire length.
At the next stage, we make a cover for the case and make several small holes in it to sew on the foam rubber. You can use a sponge for this. At the final stage of work, we give the tube the proper appearance - we cover it with fabric.
Purchased types of products
There are a lot of models of such fishing accessories. They all differ in length, number of additional compartments, diameter and external design. Based on these factors, the price of these goods is formed.
Products with a small diameter are used to transport one spinning rod or 2-3 fly fishing rods. A large diameter should be chosen in cases where several feeders and spinning rods will be transported simultaneously.
The length of the magazine tube can vary from 1.1 m to 1.8 m. In this regard, they are divided into 3 types:
- short (1.1–1.2 m) – for small spinning rods and fishing rods;
- medium (1.2–1.3 m) are suitable for Bolognese rods and pickers;
- long ones (from 1.45 m and above) are used for transporting carp fishing rods and three-part feeders.
According to hardness they are divided into 3 classes:
- hard;
- semi-rigid;
- soft.
But, despite the variety of purchasing options, choosing a good tube at an affordable price is quite difficult. It is much easier and more practical to make it yourself. This will not require much expense. The manufacturing process is not complicated. So, even a beginner can cope here.
How to create a tube for a spinning rod yourself
The advantage of self-assembly is that the fisherman can add a compartment for a reel, additional gear of any size, and attach the handle in the place where he wants. Considering the fact that spinners are accustomed to transporting gear separately from reels, the tube will be assembled without pockets, and the reels will already be folded separately.
The photo clearly shows the ordinary assembly of a simple tube. Moreover, the diameters are selected differently so that one or more spinning rods can be placed there.
Don't rush to buy materials. It’s better to first conduct a thorough inspection of the garage or utility room. Many unnecessary improvised means can become an indispensable part of a future product.
In addition, before starting work, we recommend that you double-check the dimensions of your gear several times so that the tube is not too small or too wide. For clarity, it is worth drawing up a detailed drawing with all dimensions.
Making a cover for fishing rods with your own hands
Preparation of materials and tools
We will need:
- sewer pipe with a diameter of 100 mm, 50 mm;
- reduction from 100 to 50;
- 2 blanks for a tube cap (peel, a piece of thick leather);
- thin flexible insulation (a heat reflector for batteries is suitable);
- a belt from an old bag, backpack or thick fabric in the form of a ribbon;
- construction tape;
- material for decoration;
- grinder with a metal disc (an alternative is a hacksaw);
- marker;
- pencil;
- polyurethane foam, epoxy resin (optional);
- screws.
The size of all spinning rods is measured to find the longest composite half. On top of that size, it is better to take another reserve of 5 - 10 cm. The resulting figure is the length of the future tube.
Assembly
The size of all spinning rods is measured to find the longest composite half. On top of that size, it is better to take another reserve of 5 - 10 cm. The resulting figure is the length of the future tube.
The sequence of work is as follows: Take a pipe 1.5 m or 2 m long. Measure it with a tape measure. The required size is marked with a marker.
The pipe is cut in a circle with a grinder. Now you need to make a edging on the outside of the pipe on the side where there was a cut in a circle. To do this, you need to walk along it with the smooth side of the grinder disk and slowly scroll the pipe. After cutting the pipe on one side, the cover is placed on polyurethane foam or epoxy glue
This is the bottom. It is important that the tube lids are soft on the inside. To do this, place a sponge, foam rubber, or piece of foam plastic (optional) on the glue. On the other hand, the lid is removable
Since the factory seal on the pipe is very thick, you can make a homemade one. Place electrical tape or adhesive tape inside the pipe in a circle to tightly close the lid but allow it to be easily removed.
Fastening the belt
To position the belt, use a marker to mark two symmetrical, parallel points on the pipe.
There are several mounting methods:
- Drive the screws through the belt and set them in epoxy for longer life.
- Fix the belt with superglue in the places marked with a marker for ease of use. Then a thread or rope no thicker than 0.6 mm is wound around the pipe with a belt grip. Impregnated with superglue or epoxy (which is available).
- The third method is even simpler. The belt itself is wrapped around the tube. They are fastened together, you can use rivets or make a seam. The main thing is that the belt is very tight, otherwise it will ride on the tube.
The photo clearly shows how to fix the belt on the tube using the third method.
Next, the tube can be supplemented and designed:
- paint;
- cover with a fabric cover;
- insert soft insulation inside not only along the cylinder, but also under the bottom, on top of the two covers;
- make stripes from bright threads.
This is a budget-friendly way to create convenient storage for spinning rods and their transportation.
Exactly the same tube can be assembled from a ventilation square pipe, from the cover of a roll of expensive wallpaper that was left over after renovation. The last option will be the least expensive, but it will have to be waterproofed.
Sew a fabric cover
It is recommended to use a durable but at the same time elastic fabric that can fit the body tightly and can be easily removed if necessary (for washing).
It is better that the cover is 2-3 mm less than the length of the tube - this way the fabric will fit well and stretch along the entire length of the tube.
After taking measurements, a pattern for the future cover is prepared. The necessary places for cuts and seams are marked on the fabric with chalk.
First, the lower part is stitched with compacted threads along the marked straight line. After which a side seam is applied - it goes at a right angle to the bottom.
If desired, the finished case is equipped with pockets for bait. They are sewn on top or made removable and secured with Velcro. To close, a snake and buttons (optional) are sewn in.
How to create a tube for a spinning rod yourself
The advantage of self-assembly is that the fisherman can add a compartment for a reel, additional gear of any size, and attach the handle in the place where he wants. Considering the fact that spinners are accustomed to transporting gear separately from reels, the tube will be assembled without pockets, and the reels will already be folded separately.
The photo clearly shows the ordinary assembly of a simple tube. Moreover, the diameters are selected differently so that one or more spinning rods can be placed there.
Don't rush to buy materials. It’s better to first conduct a thorough inspection of the garage or utility room. Many unnecessary improvised means can become an indispensable part of a future product.
In addition, before starting work, we recommend that you double-check the dimensions of your gear several times so that the tube is not too small or too wide. For clarity, it is worth drawing up a detailed drawing with all dimensions.
Preparation of materials and tools
We will need:
- sewer pipe with a diameter of 100 mm, 50 mm,
- reduction from 100 to 50,
- 2 blanks for the lid on the tube (peel, a piece of thick leather),
- thin flexible insulation (a heat reflector for batteries is suitable),
- a belt from an old bag, backpack or thick fabric in the form of a ribbon,
- construction tape,
- decoration material,
- grinder with a metal disc (an alternative is a hacksaw),
- marker,
- pencil,
- polyurethane foam, epoxy resin (optional),
- screws.
The size of all spinning rods is measured to find the longest composite half. On top of that size, it is better to take another reserve of 5 - 10 cm. The resulting figure is the length of the future tube.
Assembly
The size of all spinning rods is measured to find the longest composite half. On top of that size, it is better to take another reserve of 5 - 10 cm. The resulting figure is the length of the future tube.
The sequence of work is as follows: Take a pipe 1.5 m or 2 m long. Measure it with a tape measure. The required size is marked with a marker.
The pipe is cut in a circle with a grinder. Now you need to make a edging on the outside of the pipe on the side where there was a cut in a circle. To do this, you need to walk along it with the smooth side of the grinder disk and slowly scroll the pipe. After cutting the pipe on one side, the cover is placed on mounting foam or epoxy glue. This is the bottom
It is important that the tube lids are soft on the inside. To do this, place a sponge, foam rubber, or piece of foam plastic (optional) on the glue.
On the other hand, the lid is removable. Since the factory seal on the pipe is very thick, you can make a homemade one. Place electrical tape or adhesive tape inside the pipe in a circle to tightly close the lid but allow it to be easily removed.
Fastening the belt
To position the belt, use a marker to mark two symmetrical, parallel points on the pipe.
There are several mounting methods:
- Drive the screws through the belt and set them in epoxy for longer life.
- Fix the belt with superglue in the places marked with a marker for ease of use. Then a thread or rope no thicker than 0.6 mm is wound around the pipe with a belt grip. Impregnated with superglue or epoxy (which is available).
- The third method is even simpler. The belt itself is wrapped around the tube. They are fastened together, you can use rivets or make a seam. The main thing is that the belt is very tight, otherwise it will ride on the tube.
The photo clearly shows how to fix the belt on the tube using the third method.
Next, the tube can be supplemented and designed:
- paint,
- cover with a fabric cover,
- insert soft insulation inside not only along the cylinder, but also under the bottom, on top of the two covers,
- make stripes from bright threads.
This is a budget-friendly way to create convenient storage for spinning rods and their transportation.
Exactly the same tube can be assembled from a ventilation square pipe, from the cover of a roll of expensive wallpaper that was left over after renovation. The last option will be the least expensive, but it will have to be waterproofed.
Sew a fabric cover
It is recommended to use a durable but at the same time elastic fabric that can fit the body tightly and can be easily removed if necessary (for washing).
It is better that the cover is 2-3 mm less than the length of the tube - this way the fabric will fit well and stretch along the entire length of the tube.
After taking measurements, a pattern for the future cover is prepared. The necessary places for cuts and seams are marked on the fabric with chalk.
First, the lower part is stitched with compacted threads along the marked straight line. After which a side seam is applied - it goes at a right angle to the bottom.
If desired, the finished case is equipped with pockets for bait. They are sewn on top or made removable and secured with Velcro. To close, a snake and buttons (optional) are sewn in.
What elements does it consist of?
Tube is a convenient and compact storage of fishing gear. Performs a protective function during their transportation.
Consists of the following parts:
- The body is in the form of a cylinder. Often they are served by a lightweight but durable plastic pipe. Diameter varies. Depends on how many forms the tube is designed for.
- Shell. Made from strong fabric. Gently covers the entire surface of the product. In expensive purchased models, the shell material is waterproof. Has a wide range of colors.
- Bottom. Lower part of the body. Equipped with soft material (full) for additional protection of gear during transportation.
- Lid. Its diameter is the same as the body. In other words, a stub. Sewn to the shell or inserted tightly into the cylinder for closure. For convenience, it is equipped with a lock and a snake.
- Short handle, long strap. Designed for carrying a tube.
- Additional compartments. These are sewn-on pockets that will be needed for separate storage of reels and fishing lures.
To prevent the tube from being too hard, its inner surface is lined with soft material, which prevents scratches on the gear during friction against the walls.
Homemade tube from scrap materials
There are many descriptions and videos on the Internet on how to make a spinning rod tube yourself. Summarizing these materials, we can focus on two options. The simplest and most popular is to use a polyethylene pipe.
From PVC pipe
Finding a plastic pipe that is suitable in size will not be difficult or particularly expensive. This material is sold at very reasonable prices. At construction sites, a two-meter section can generally be purchased for next to nothing.
The purchased pipe is cut to the length of the disassembled spinning rod and to a diameter that allows free placement of the spinning rod in it, taking into account the foam rubber folded into the pipe (photo 1.1).
Next, a plug made from improvised material is attached to the bottom of the future tube using glue (photo 1.2). This could be a plate made of thick plastic or a lid for a jar.
To make it easier to carry, the tube should be covered with some material.
In this sample, the lining is made from old jeans (photo 1.3). Making a zipper is a little tricky. It can be replaced with a regular button or push-button. The finished tube with a handle strap looks like in photo 1.4.
Photo 1.
Made from plastic profile
You can also make a spinning tube with your own hands from profile plastic used for laying the cable. This type of material is convenient because it can be easily separated, and its inside is very easy to cover with soft insulation for better preservation of the spinning rod (photo 2.1). The tube size parameters, as in the first case, are determined by the size of the fishing rod. The bottom plug is made of hard foam, trimmed with foam rubber for shock absorption and tightly glued (photo 2.2).
After this, first the entire body of the tube is wrapped with wide tape to give rigidity, and then a cover made of dense material is sewn onto it.
The top cover, also reinforced with foam rubber, is sewn with one edge to the lining material of the tube, forming a closed entrance, and is supplemented with belt fasteners (photo 2.3)
At the final stage, fittings are attached to the side plane of the tube, to which the strap is attached (photo 2.4). And you can put the tackle in the finished tube (photo 2.5)
Photo 2.
From foam plastic
Another homemade tube for spinning can be made from polystyrene foam. To be more precise, it should be called a case. It is all the more interesting because it is not mentioned either on fishing forums or on websites.
The point is simple. Two equal-sized strips are sawn off from a foam board. The dimensions of the strips are determined visually - the spinning rod handle with the attached reel is placed on the plane of the foam plate, and its outline is drawn with a marker. A knee with an apex is placed next to it and also traced along the contour. They should be stacked compactly so as not to increase the size of the future case.
Having decided on the dimensions of the first strip, it is sawed off, applied to the remaining slab, and a second one is prepared, identical to the first. Next, the contours outlined on the first strip are removed through tracing paper and transferred to the second strip in a mirror image.
The next stage presents some difficulties, however, quite surmountable. You need to use a semicircular chisel to make a recess in both strips of the volumetric parts of the spinning rod. This operation can also be performed with a sharp knife. Foam plastic is easy to process. After this, all roughness of the material should be pounded out with an ordinary kitchen rolling pin and treated with emery cloth.
When the spinning rod sits comfortably in the bed prepared for it, the strips on top are reinforced with hard material.
To do this, you can use thin plywood or some kind of plastic. This will make the case somewhat heavier, but will make it reliable in terms of bending and breaking forces.
All that remains is to cover the case with dense material so that it can open horizontally, providing open access to the spinning rod with a reel ready for action. And don't forget about the fasteners. They can also be made from the straps of an old backpack.
These are the ingenious ways that cunning Russian fishermen acquire useful and very necessary things. Not all, of course. Some people buy it. They can be understood and forgiven. They don’t know that the best thing is the one made with their own hands.
We also offer you an alternative version of the tube in this video.
Peculiarities
Anyone can make a simple homemade tube for spinning rods. It does not take a lot of time. In addition, when properly manufactured, such cases are durable, reliable structures that allow you to store and easily transport several fishing rods at once.
These products, as a rule, are lightweight, as they are made from ultra-light materials. Homemade options will cost much less than purchased models.
Tubes are considered the most reliable option for storing spinning rods; they provide maximum protection for the devices. Such products, as a rule, are resistant to shock and prolonged pressure. In addition, structures of this type are waterproof.
The most functional are those cases that are additionally equipped with zippers, compartments, and shoulder straps for carrying.
Making a spinning rod tube from sewer pipes
First, you will need to carry out measuring work to ensure that the tube is suitable for storing a particular fishing rod. Initially, the spinning rod itself is measured. You need to carefully measure the longest leg of the rod and add four centimeters to this indicator. This must be done so that there is room for laying foam rubber in a tube, the thickness of which is at least 2 centimeters. After which a pipe is taken and the required length of the rod is marked on it. The rest of the part needs to be sawed off. But it should not be thrown away, since this part is necessary to create the lower base of the tube for spinning rods. This part is not suitable for the upper part of the cover, because the hacksaw cut is very difficult to make perfectly even.
Then a butt is placed in the pipe to check its movement along it. After this, it is bent until it becomes oval. This must be done so that the tube ends up with the required shape. After such manipulation, the butt will move around the future cover for spinning rods more freely.
After completing work on the base and main part of the tube, you need to start making the lid. The spinning tube at the bottom must be pierced with an awl. They will be needed to attach the foam rubber. Almost everyone has this material at home. It can be cut from old clothes, for example. You don't have to buy it separately in the store. Small pieces are cut out of the material, the dimensions matching the parameters of the future homemade case. Then insert the foam rubber into the workpiece and secure with threads.
Next, you need to give the product the desired look using covering. First, the material is sewn from the bottom, then a longitudinal seam is made. In the upper part of the height of the product you will need to leave a small margin of 10 centimeters
It is important to remember that the covering must be made in such a way that it fits snugly to the base and does not slide along it. It is recommended to use the strongest threads when stitching the material.
This way, a homemade tube will last much longer.
After the covering is made, it is necessary to stretch it onto the prepared base of the cover for spinning rods. When tensioning, you must ensure that the sheathing along the seam does not twist. As soon as the work is completed, it is necessary to trim off the excess material, leaving a small piece that could easily be folded inside the cover made by yourself. If desired, this material can not be fixed in any way.
To make a cover for a spinning fishing rod, you will need a piece of high-quality leather material. You will first need to cut out a small piece from it, the size of which would be slightly larger than the profile of the prepared product. You need a cut that will allow you to create a lid that does not fall into the tube.
Next, you will need to take more leather material and cut two more such blanks from it. All prepared elements need to be glued together. As a result, their total thickness should not be less than two centimeters. And for a better quality cover for the product, it is necessary to make even more layers of leather. After gluing all the parts on top, it is better to make a small loop to make it convenient to open the cover of the case. Then you need to trim the workpiece a little so that it fits tightly into the finished product for storing and carrying a spinning fishing rod. The main thing is to correctly calculate how much you need to cut. Otherwise, a lot of effort will be wasted. We will have to start working again on cutting out blanks to make a suitable lid.
Advantages of a homemade tube for fishing rods
- Easy to make tube
- Preparation time
- Final cost
- Strength
- Reliability
- Appearance of the tube (you can make it unique)
- Possibility of improvement
- A light weight
PS
For example, here is a tube made according to the same scheme but using additional material and time.
I will tell you in detail how to make such a tube a little later.
Try it, all the best to you.
TO THE POINT:
How to make a wobbler with your own hands
How to make a nod with your own hands
Store tube models
There are several models of fishing cases in the fishing store:
- hard;
- from soft materials;
- semi-rigid;
- tubes.
An economical option is simple soft cases made of waterproof fabric. However, tubes are considered the most popular accessory for storing and transporting fishing rods. They will not only protect your gear from moisture, but also protect it from mechanical damage.
Sources
- https://manrule.ru/rybolovnoe-snaryazhenie/tubus-dlya-spinninga-svoimi-rukami/
- https://ribaku.info/snasti/spinning/tubus
- https://fishcam-store.ru/snasti/tubus-dlya-spinninga.html
- https://zen.yandex.com/media/klevyj/vajnyi-element-ekipirovki–tubus-dlia-spinninga-chto-eto-takoe-i-kak-sdelat-svoimi-rukami-5daaa62723bf4800b0e5084c
- https://zen.yandex.ru/media/klevyj/vajnyi-element-ekipirovki–tubus-dlia-spinninga-chto-eto-takoe-i-kak-sdelat-svoimi-rukami-5daaa62723bf4800b0e5084c
- https://34fish.ru/kriuchki-poplavki-leska-i-prochee/izgotovlenie-tubusa-dlya-spinninga-svoimi-rukami