What can be made from a gas cylinder is a frequently asked question, because most people use mains gas, and many of them have unnecessary propane cylinders. Therefore, you should not rush to get rid of them, because such structures can be used to make useful items. Moreover, even a beginner can cope with such a process. Let's begin!
What can be made from a gas cylinder
Benefits of using cylinders
It should be noted the reasons why many prefer to use gas cylinders as a material for the manufacture of structures:
- Low cost. If you already have unnecessary cylinders in stock, you will not have to pay.
- Reliable material. The cylinders make durable structures that last for many years.
- Form. Since the products have a universal shape, they are suitable for making a large number of household items.
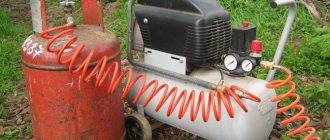
Gas cylinders are a durable material for making household items
Recommendations for choosing a location and operating a heating device
A potbelly stove is such a compact heating device that it can be placed in almost any room, the main thing is that the chimney can be taken outside. It must be remembered that the efficiency of the device and the safety of its operation depend on the correct choice of location for installing the stove. Therefore, we recommend taking the advice of professional stove makers.
- For maximum heat transfer, it is best to install the potbelly stove in the corner of the room farthest from the door.
- The installation site of the stove is covered with a metal sheet that is 20 cm greater than the overall width of the heating device and at least 60 cm greater than its length.
- The potbelly stove must not be installed under shelves or near places where flammable and explosive materials are stored.
- The room is equipped with effective supply and exhaust ventilation.
- When installing potbelly stoves, be sure to maintain the gaps between the walls of the heating device and the combustible structures of the room. For fire safety purposes, the latter are protected with special screens with ventilated gaps.
Once the safety of the heating device has been ensured, you can proceed to the firebox. For those who are encountering a potbelly stove for the first time, let us consider the process of putting the stove into operation in more detail.
The installation location of the stove must comply with safety standards
The first to be loaded into the firebox are flammable fuels - paper, cardboard, straw or rags soaked in kerosene. A few chips and finely chopped firewood are placed on top, and large logs are placed on top of them. Firewood can be placed in any way - horizontal rows, a cage, a cone, etc. After this, the bottom layer of fuel is set on fire and closed, leaving the ash door completely open. The vent is covered only when the stove reaches operating mode, as evidenced by a characteristic hum. The correct adjustment of the air supply is indicated by a slight noise, a “whisper” of the furnace - with such a load, the unit provides an optimal balance between efficiency and productivity.
You can stir the firewood only when it is at least half burning. Otherwise, normal combustion may be disrupted and the unit will switch to smoke generator mode. Coal is poured into the stove when the wood has burned through 70–75%, having previously poked through the heat with a poker.
What materials and tools will be needed during the work process?
During the work you will need:
- empty gas cylinder;
- welding machine;
- drill;
- Bulgarian;
- hacksaw;
- spanners;
- fastenings;
- pliers.
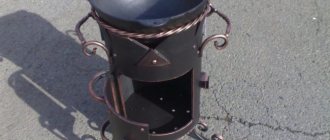
Very decorative designs can be made from old cylinders
IMPORTANT! Additional materials and tools may be required, depending on the type of product that you plan to manufacture.
Prices for popular brands of portable welding machines
Portable welding machine
Species options
The grill-steam locomotive in the basic version is designed for preparing kebabs over coals. In addition, it may have one or more additional functions. Among them:
- B-B-Q. Cooking meat, fish or vegetables on the grill. Not coals are used, but open fire.
- Grill. Products are cooked over fire in a closed container. Frying is combined with smoking.
- Cold smoking. The products are placed in a compartment through which cold smoke passes (+19...+25 °C);
- Hot smoking. Products are treated with hot smoke (+90 °C).
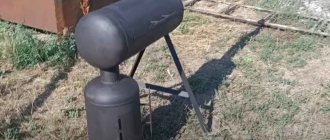
The grill-steam locomotive is a very convenient and multifunctional device.
In addition, some models have compartments for storing firewood, spices and chef's tools. Sometimes they are placed in a separate “trailer”.
Safety precautions
Even if you are sure that the cylinder is empty, there may be residual liquefied gas at the bottom. Therefore, in order not to take risks, you need to get rid of it. To do this, leave the structure open for 12 hours. In this case, it is necessary to make sure that there are no sources of ignition nearby.
Before flushing the structure, you must unscrew the valve
After this time, it is necessary to rinse the inside of the cylinder with clean water, which will remove any remaining gas. In addition, it is allowed to use lime with water or chlorine to clean the structure. True, after such manipulations an unpleasant odor may remain, which quickly disappears.
Smoking methods
There are two main methods for smoking: hot and cold. They differ:
- according to the temperature maintained in the smoking chamber;
- smoking time of products;
- shelf life of the processed product.
| Characteristic | Hot | Cold |
| Temperature, оС | up to 100 | 19 — 25 |
| Time watch | 4 — 8 | 24 — 72 |
| Shelf life, months | up to 2 | 2 — 6 |
Differences between hot and cold smoking
If the temperature or cooking time falls between these parameters, the result will be a semi-hot smoked dish.
Smoking fish
For cold smoking, which lasts several days, the products are pre-processed: salted or boiled.
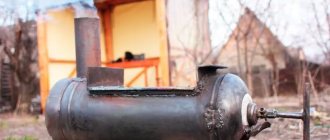
Gas cylinder stoves
Most often, stoves are made from a gas cylinder - such designs are suitable for heating a summer house or garage.
You can read more about garage ovens in our special article.
It is worth noting that the optimal shape for the design of the stove is a sphere, because such a product warms up quickly and does not require complex cleaning. The chamber must have two openings on each side: for placing coal, other fuel and heat release.
If you look closely, a standard gas cylinder has this shape. Since these devices are made of high-strength steel, even after working them out, I use them to create stoves and other products.
An example of a spherical furnace made from a cylinder
Preparing for the manufacturing process
In order to make the furnace body, it is necessary to select a cylinder in accordance with the following parameters:
- It should only be an all-metal structure. Composite products are not used for such purposes because they have poor resistance to temperature changes and explode under certain circumstances.
- The volume of the gas cylinder must be at least twelve liters, because stoves made from small-volume structures will be uneconomical. In such a stove, complete combustion of fuel will not be observed. For medium and small stoves, cylinders with a volume of up to 25 liters are suitable. If you need to make a massive product to heat a large room, it is recommended to take a 50-liter cylinder.
Only empty containers are allowed
You should not purchase pneumatic cylinders for such purposes, which are widely used in industry, because they are not suitable for the manufacture of products, and in particular furnaces. The reason for this is the thick metal, which will be difficult to cut. In addition, these cylinders are heavy and oblong in shape, which is not suitable.
Prices for popular drill models
Drill
Jet furnace: step-by-step instructions
The stove is also called a “rocket” - it is a complex product that is made from empty cylinders. This design makes it possible to use fuel with maximum efficiency, which is why it has earned popularity among users.
Advantages and disadvantages of the rocket stove
Step 1: First you need to prepare the following materials:
- round pipes measuring 7 and 15 centimeters, 0.4 centimeters thick;
- profile pipe with a cross section of 20 centimeters;
- a piece of pipe for the chimney - 12 centimeters;
- steel sheets;
- fireproof wool or other material.
Workpieces should be prepared according to size
Step 2: Next, using a grinder, cut the profile pipe, retreating 3.5 centimeters from the edge. One half will be used for the ash pan, and the other for the blower.
Having made the appropriate cuts, you should join the firebox and the pipe at an angle of 90 degrees.
You will have to make a hole in the top of the chamber where you will need to weld a hopper for loading.
Step 3: next you need to weld the firebox and riser, then secure the 15 centimeter pipe by making a cut under the chamber.
It is necessary to install and weld the bunker where the fuel will be stored. In this case, the doors of the ash pan and firebox should be secured.
Step 4: Next, you should cut off the top of the cylinder and cut a side hole for the furnace structure.
The lid should be removable
Step 5: check that the parts are assembled correctly and weld the chimney pipe into place.
This is what the finished structure will look like
Video - Rocket stove: manufacturing
Prices for angle grinders (grinders)
Angle grinders (grinders)
Making a potbelly stove: step-by-step instructions
This is a simpler, mobile version of the stove, which is suitable for rooms where communications have not yet been installed, but there is the possibility of venting a chimney. The advantage is that the potbelly stove can be quickly heated and, if necessary, moved. However, during long-term use the body part of the structure burns out, so it is suitable as a temporary option.
Step 1: first you need to take a balloon of the optimal size and mark the incision sites on it.
It is necessary to make holes in the side of the structure for the firebox and ash pan.
Step 2: Next you should take a sheet of metal and cut out from it the details of the windows for the firebox and vent. After which these parts are welded together to form a single structure.
We weld the frames and try them on the cylinder
Step 3: now you need to make a grate from the remaining metal and fittings.
Trying on the grate for the stove
Step 4: Now you should move on to making the door. In this case, you can use ready-made loops that can be welded to the product. The old key serves as a lock here.
Making a door and a lock
Step 5: Now all that remains is to weld the door into place.
The design should look like this
Step 6: Now you should weld the chimney pipe to the structure.
A jumper should be installed to allow the chimney to exit to the street.
Step 7: if desired, the stove can be painted with special fireproof paint. This will give the structure an aesthetic appearance.
Painting the potbelly stove
Making a bubafonya stove: step-by-step instructions
A long-burning stove has such an interesting name. This process occurs due to the high pressure from the piston to the fuel, which leads to the combustion of pyrolysis gases, which heat the structure.
Step 1: first you need to unscrew the valve; if there are gas residues in the cylinder, then rinse with water. After that, you should put markings in the upper part of the structure and saw off the top. For such purposes, it is recommended to use a grinder. Moreover, in the process of cutting a cylinder, it is necessary to take into account that on domestically produced products there is an additional reinforcing sheet of metal at the joint, so the cylinder will have to be cut above this strip.
Saw off the top of the cylinder according to the markings
Step 2: now you should take the top part of the balloon and cut off the top. Here you need to make a hole the diameter of the heating pipe.
We try on the pipe and make a hole in the lid
Step 3: now we will have to take another cylinder, which we will use in order to increase the height of the stove. This will increase the efficiency of the device. You should step back about 1.5 centimeters from the beginning and put a mark at a distance of 30 centimeters. It is these dimensions that a piece of pipe will be needed to extend the structure.
It is necessary to cut off a fragment of the cylinder and try it on the base of the future stove
Step 4: Next we need to weld the parts of the stove.
We weld a piece of pipe
At this stage, it is necessary to weld holes and damage to the structure (if any).
Step 5: Next, cut out a circle with a diameter of 270 millimeters from the metal sheet.
Draw a circle on the surface of the sheet and then cut it out with a grinder
In this case, it is necessary to leave a mark in the middle along which we will center the pipe.
Step 6: Next you need to make six blades. Moreover, they should not go straight, but with a bend. This is necessary to increase the path for air when leaving the hole. For such purposes, the remaining part of the second cylinder will again be useful. It is necessary to cut a metal plate of approximately 40-45 millimeters, which will go to the blades.
The result should be blades like this
Before welding, you need to try them on the circle. The parts are arranged clockwise. If there are shortcomings, they should be corrected.
Step 7: Next, you need to take an old disk or metal sheet and cut out a round part with a hole from it, which will need to be welded onto the blade. This is done so that the parts stay more securely on the wheel.
Cut out the part and weld it onto the blades
Step 8: Now you need to weld a pipe to the metal circle with blades. In addition, it is necessary to make an additional reinforcing frame around the pipe.
The design should look like this
Step 9: Next you need to make a hole at the top (as close as possible to the beginning) of the structure with a pipe diameter of 100 millimeters.
The pipe should be placed and welded
Moreover, the structure should not be located straight, but at an angle.
Step 10: at the end, all that remains is to weld the top cover to the structure, and also take the pipe outside.
Upon completion of assembly, you should light the stove and check its functionality.
How to increase efficiency?
To make your stove more efficient, there are several simple ways. First, you should insulate the chimney pipe to retain some of the heat that escapes with smoke gases. Various methods can be used to increase the area of contact between the heated metal and the surrounding air.
The installation of a kind of cap from an additional gas cylinder will help to significantly improve the thermal performance of a potbelly stove built from a gas cylinder:
Image gallery
Photo from
An ordinary stove from a cylinder in the garage
Preparing a smaller capacity cylinder
Installation of a smoke circulation chamber
Device for increasing heat transfer
Some craftsmen recommend making the chimney not strictly vertical, but curved. This will increase the path of combustion waste and allow some of its heat to return to the room. But it should be remembered that the complicated design of the chimney can negatively affect the draft, so you should not get carried away with excessive bends.
Sometimes metal wings are welded to the body of the potbelly stove, for example, made from a corner or any suitable strips of metal. If the size of the stove allows, you can weld a horizontal sheet of metal on top and make an additional hole in it not for the chimney, but for a pan or kettle.
The hole is closed with a special composite lid made of several concentric circles. By removing or adding circles, you can adjust the degree of heating.
Another option for upgrading a potbelly stove is a brick case. The masonry is done around the stove, leaving a small gap between the metal body and the brick. The brick will absorb some of the thermal energy and then gradually release it to the surrounding air.
If you wrap the chimney with a metal mesh and place stones in the resulting gap, you can increase the heating efficiency. Even after the wood burns out, the stones will continue to give off heat for some time.
An alternative version of this modernization is a metal mesh around the chimney, into which pieces of brick or stone are placed. This is a popular solution for stoves installed in a bathhouse, a variation of a heater. But it should be remembered that only river “pebbles” of uniform color and without inclusions are suitable for this. If the stone is made up of layers of different types, it may rupture when exposed to high temperatures.
If you need a stove of substantial size, the master has two gas cylinders at his disposal; you can combine them into one design. One of them is installed horizontally, and the second is installed vertically as a pipe for the chimney. The heating area increases, such a potbelly stove will work more efficiently.
Metal pipes built into the body of the potbelly stove in combination with a fan allow you to increase the rate of heating of the room, but to achieve this effect you will need electricity
Finally, you can insert pipes inside the upper part of the body through which air will circulate. If you place a fan at the end of these pipes, the air will move faster. This equivalent of a fan heater will allow you to warm up the entire room in a few minutes and distribute thermal energy more efficiently.
Do-it-yourself grill from a gas cylinder
You can make another useful device from a gas cylinder - a barbecue, which is used during outdoor recreation to cook meat.
To decide on the design, you will need to consider the types of barbecues that are made from cylinders.
Table No. 1. Types of barbecues
| View, illustration | Description |
| This option involves the possibility of frying meat over an open fire. |
| The meat is immersed in the interior of the structure, where it is processed with hot smoke. |
| This is a universal design that can be used for barbecuing and smoking. |
Before you start making a barbecue with your own hands, you will again need to remove the remaining gas from the cylinder. Moreover, it is better to do this away from the yard, otherwise the smell will take a long time to dissipate.
Table No. 2. Instructions for making a barbecue
| Step, no. | Description | Illustration |
| Step 1 | First you need to cut off the top ring from the cylinder. | |
| Step 2 | Then you should move on to the marking stage: - for the lid: take the joint in the middle, from which we retreat 25 centimeters on each side; — for air supply: we retreat 12 centimeters from the joint to the sides. Then you need to make cuts in the places where there will be hinges for the lid. Moreover, for the convenience of welding, no other cuts should be made yet. | |
| Step 3 | When the hinges and fasteners for the handle are fixed, you will need to cut the structure along the remaining marks. | |
| Step 4 | Now holes should be made on each side for air supply. | |
| Step 5 | Now you need to install metal spacers on the back of the cover. | |
| Step 6 | Next, use a drill and a drill bit of the appropriate size to make openings for the skewers. It is recommended to make them wider so that any skewers can fit there. | |
| Step 7 | Then you need to weld a metal plate with holes for skewers to the edge of the structure. | |
| Step 8 | Now you should use another piece of metal to weld the hole that remains from the valve. | |
| Step 9 | Next, you need to take pipes from a metal profile, cut them to size and weld a stand for the grill. The design should look like in the photo. | |
| Step 10 | Then you will need to make a removable table. It is made from corners and then covered with boards. | |
| Step 11 | Next, you should weld the handles to the structure and the canopy-limiter. | |
| Step 12 | The table needs to be covered with wood. |
The finished grill will look like this:
How to paint a grill?
Since the grill is used outdoors, the structure will have to be painted. The presence of a coating will protect the product from the negative effects of the environment. Of course, exterior painting is required, because it cannot be done inside.
You should be careful when choosing a coating, because it must meet the following criteria:
- the composition must contain substances that protect the metal from corrosion. You should choose a coating that is resistant to high temperatures (up to 480 degrees);
- Since the grill is used for cooking, the paint must be environmentally safe. As a rule, the packaging is marked accordingly.
Paints are sold both in cans and in aerosol form. The second option is practical because you don't have to use brushes.
An example of heat-resistant paint for a barbecue or barbecue
IMPORTANT! Before you start painting the structure, you must thoroughly clean the surface of any dirt. In addition, it is recommended to grind welded joints.
Welding the legs
The legs or stand can be welded from available material, it can be made collapsible or stationary, with or without tables. You can even use a stand from an old sewing machine, but I made do with the most economical option.
We take a corner and cut off two pieces of 14 cm each, find a longitudinal welding seam on the cylinder, which we took as the reference line. We place the cylinder on a horizontal platform or on a table, so that the seam is at the bottom and, placing a corner parallel to the platform, we weld it at a conventional distance from the edge of the cylinder so that the center of the corner flange coincides with the welding seam of the cylinder. We do the same on the second side. This is how we got the base for attaching the legs. Now let’s see if we need to make the legs not separate from the barbecue, then we simply cut a 30x30 pipe or a corner into a length that will be convenient for us for the height of the barbecue - about 50 to 70 centimeters. Next, we weld it to the corner that is on the cylinder.
And if we plan to make a collapsible structure, then we also cut the blanks into legs, just don’t weld them to the corner, but drill holes of about 8 millimeters in the upper part of the leg and in the corner welded to the cylinder. Thus, we get a collapsible design: the cylinder is separated from the legs and can easily fit in the trunk of a car for a barbecue in the countryside. It should be noted that the legs must also be mounted while maintaining the same dimensions and diagonal of the structure. It is advisable to weld support spots at the bottom of the legs, having previously cut them out of sheet metal and placed the grill on the legs on a flat surface. This is necessary so that the grill does not sink into the ground under its own weight and has good resistance to tipping over. For more convenient transportability, small wheels can be mounted on two legs.
Outdoor fireplace from a gas cylinder: step-by-step instructions
The advantage of such a product compared to previous options is that there is no need to use a welding machine. Therefore, even an inexperienced craftsman can create such a fireplace.
Step 1: You should start cutting the balloon. It is recommended to take a helium cylinder, which is used to refill balloons.
Using a grinder, you need to cut off the bottom of the cylinder. Then you will need to take a file and polish off the burrs on the structure
Step 2: secure the base. This base will be the cut bottom, which should be secured with brackets and nuts. For such purposes, you will have to prepare openings in it. Then all that remains is to insert the brackets and tighten the nuts.
Secure the base
Step 3: now all that remains is to sand the paint off the structure and make indentations for the smoke to escape.
Grinding and drilling holes
Step 4: Next you will need to paint the fireplace with fireproof spray paint.
Painting the structure
After installation is completed, the stove should be tested. In this case, you need to wait until the paint dries.
Design and drawings
The main structural element of the barbecue is the brazier. It should have a compartment for combustible fuel (coal or wood). Without this section, the grill will be a meaningless piece of hardware.
In a “steam locomotive” you cannot do without a pipe - it is used to remove smoke. For convenience, it is recommended to design a place for dishes and pickling. The grill can be arranged so that the meat will be strung next to the roasting pan. This reduces the risk that when carrying food, particles of dirt and dust will collect, or midges or other insects will land on it.
What else can you make from a gas cylinder?
We have considered only a minority of the products that can be made from cylinders. However, if desired, you can build the following structures:
- Boiler. The structure is welded, then the connections are connected and used as a water heater.
Boiler
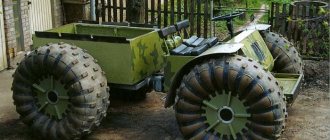
- Feed cutter. The structure is made of two cylinders to which the engine is attached.
Feed cutter
- Feeders for pets. To create the structure, you need to cut the cylinder into two parts and weld the stands to them.
Feeders
Useful additions
There are a number of additional elements that will simplify the work with the barbecue. Among them:
- Shelves and hooks for storing accessories. They are usually installed in a closed section.
- Hood. It is fixed to the front of the structure or near the vertical smoking chamber. In addition to removing smoke, it protects the grill from precipitation.
- Canopy. It protects open elements that do not have doors from precipitation, and also plays a decorative role.
Advanced designs may also have electronic components, for example, a motor for automatically turning the skewer and thermal sensors that regulate the draft to create the desired temperature.
A barbecue in the shape of a steam locomotive can become a decoration for the local area
If you make the wheels rotating and lay rails on the site, this will help transport the massive structure - for example, bring it under a canopy during bad weather.
As you can see, a barbecue in the shape of a steam locomotive is not so difficult to create with your own hands. Carefully consider all the details from the point of view of convenience and beauty, do not forget about safety precautions, and soon you will receive a useful, original and very stylish device.