For people who prefer to travel with their family in their own car and have to take a lot of things with them, a roof rack is a necessary accessory. It can easily accommodate oversized cargo that does not fit in the rear compartment of the car, and transport sports equipment, such as skis, snowboards or bicycles. Usually the trunk is not included with the car, but you can purchase it or make it yourself.
Ready box
Types and types
How to make car roof boxes with your own hands? First you need to decide on the type of trunk. The materials used and the complexity of assembly depend on this. The final choice of variety is influenced by the cargo that is planned to be transported.
Car boxes differ mainly by the type of fastening. The most familiar to domestic motorists is the drainage ditch. It can be found on many cars, located along the edges of the roof. Usually, ordinary luggage racks are attached to them, this is done using clamps with bolts. Some models have roof rails. This allows you to install fairly large car boxes on the roof. For completely smooth roofs there are special fastenings.
Based on their length, boxes are divided into 3 groups:
- Short ones
- occupy about a third of the roof; - Medium
- they are slightly more than half the length of the roof; - Long
- equal to the roof or slightly longer than it.
Here the choice depends on your needs. If you plan to transport a small number of small items, then the short option is ideal. For trips with the whole family, it is best to use medium-sized luggage racks. Long ones are ideal for transporting skis and other similar equipment.
How to secure it?
The option for installing the trunk directly depends on the car model and the design features of the roof. On the roofs of “classics” of domestic manufacturers, as well as on old foreign cars, a longitudinal drain is provided, which is used to secure the trunk.
For this type of installation, metal stops with a clamp are made or purchased. This design feature of the car roof makes it possible to fix luggage racks of different designs and dimensions.
For modern models with longitudinal rails, you can use ready-made clamps to attach the muffler or make a clamp yourself. To do this, a metal sheet is selected and bent according to size. Holes are drilled in it for screw fastening to the trunk.
How to do it?
First, decide on the mounting method. The design of the base largely depends on this. The cross members must end with fastenings. To determine the appropriate type of fastening, simply look closely at the car. After that, purchase the necessary items.
For the base you should use a lightweight but durable material. Aluminum or duralumin channels are best suited. This makes the structure not only durable, but also lightweight. Which will have a good effect on the efficiency of the car. The parts of the base are assembled together using bolts. The result is reliable and can be quickly disassembled if necessary. Also, something is usually attached to the base to stiffen the load. Polycarbonate is best suited for this.
Aluminum composite panel can be used. A bead should be made on the sides. It is usually made from the same material that is placed on the base. It is attached either with special locks or rivets. It all depends on the material.
Any material can be used. Most often they use something like a tarp. For greater aesthetics, you can take banner fabric. She is quite flexible. At the same time, it does not allow light and moisture to pass through. At the same time, you can order printing of drawings, which will make the car more attractive.
It is important to choose the right lock. Please note that if it is exposed to snow and ice, it will freeze in winter. Therefore, when cutting fabric, provide a safety valve. You should also use zippers designed for skiers.
Assembly
. First you need to cut the fabric into fragments. After which they are sewn together. It is better not to use ordinary threads. Instead, it is better to use fishing braid or fishing line. This will give the seams greater reliability. It is better to do zippers from the side of the roadside. This way it will become less dirty. And unloading will be more secure.
Having sewn the cover together, a plate is placed in it to give rigidity to the structure. They attach it all to the crossbars. Autobox can be used.
Step-by-step assembly instructions
1
.
We take the fabric, cut it into separate parts and sew them together. 2
.
To ensure high strength of the product, we use fishing line or fishing braid for work. Regular thread is not suitable here. 3
.
It will be more practical if the zippers are located on the curb side. In this case, they will not get dirty so quickly, and unloading things will be safer. 4
.
A plate is placed inside the sewn cover to ensure the rigidity of the car box. 5
. We attach the finished structure to the crossbars.
Source of the article: https://www.umeltsi.ru/avtosamodelki/5265-kak-sdelat-avtoboks-na-kryshu-avtomobilya.html
Additionally
Take the time to add a little lighting to your expedition rack. To do this, install a pair of white LEDs in front. They are connected to the car lighting. When the low beam is turned on, they will also light up.
This is done for greater traffic safety. On a night road, a car with such a design is visible much further. This is especially true for highways with a large number of descents and ascents. Oncoming drivers will switch to low beam in advance, which will protect you from being dazzled.
Manufacturing of the product
Let's take a closer look at how to make a roof rack with your own hands. To do this you need:
- Purchase materials. As a rule, an aluminum profile is used. It has sufficient strength, light weight and is not susceptible to corrosion. Purchase or make fasteners in accordance with the design features of the car roof.
- Prepare the necessary tools. You will need a grinder, a welding machine, an electric drill, a meter tape, varnish and a brush.
- In accordance with the drawings, components are prepared.
- By welding they are fastened into a common structure.
After completion of the work, the finished structure is varnished in combination with the car body. If desired, additional lighting elements and an external antenna can be attached to the trunk.
“>”>”>”>”>”>
Why do you need a roof rack on a car?
A roof rack will definitely come in handy if you:
- started renovations and transport building materials yourself;
- moving, transporting a large number of things;
- are interested in active recreation, be it cycling, snowboarding, skiing, fishing, hunting, hiking, etc.
Trunk rail - a minimalist solution for avid travelers
The main purpose of the roof rack
It is quite obvious that the main function of this element located on the roof is to accommodate various items needed when traveling or on everyday trips. Unlike a standard compartment, a roof rack on roof rails, made by yourself or made in the factory, allows you to transport not only additional cargo. Using such a simple device as roof rails, with or without a case attached to them, you can transport long objects (for example, skis) or large loads (bicycles, furniture, and so on).
Types and photos of the most common designs
First, you need to decide on the type of roof rack that you need. There are several types of structures:
- universal type trunk. It consists of several transverse slats and fixing brackets. Suitable for almost all car models: from the cargo “Sable” to the cool “Jeep”;
A universal roof rack with fastenings can be easily installed on a smooth car roof
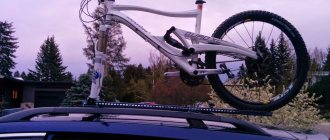
Expedition racks are most often installed on SUVs
A bicycle rack is indispensable for nature and cycling lovers
A roof rack is the most convenient, but quite expensive option.
Before proceeding directly to the process, it should be noted that the car owner undertakes the manufacture of the trunk at his own peril and risk and he himself is responsible for the possible consequences.
Video: how to make a good trunk with your own hands
And it’s also worth paying attention to the fact that you are unlikely to need the trunk all the time, so you should think about making it removable and using it as needed.
Fastening the crossbars
To attach the crossbars to the rails, holes must be made in them. Measure them symmetrically on both sides, taking into account the holes in the mounting plates. Drill carefully. Place the trunk tightly on the roof rails. If there is no tight fit somewhere, you can use rubber gaskets. Securely secure with bolts and nuts. It is also necessary to remember about safety precautions. The car roof cannot be loaded with more than 70 kg.
Motorists are often concerned about the lack of free space in the car necessary for transporting things, equipment, machinery, building materials or other items. Many cars are simply not designed to carry any additional items or cargo. If you often go on activities such as fishing, hunting with friends, or on a trip with your family to the sea, then you need to think about additional space on your car to transport cargo. Unfortunately, when purchasing most cars, the kit does not include an additional roof rack.
Homemade trunk
A good option would be to make a homemade trunk designed for the roof of a car. This option is very economical, and with a small amount of effort expended, you can acquire invaluable skills in designing, calculating and manufacturing a structure on your own. Such homemade racks are called expedition racks, since such a structure cannot be used to place too heavy things, but they can carry everything you need for a trip: tents, bicycles, skis, mattresses, umbrellas, snowboards, fishing rods, or entire sets of clothes.
Car roof box
Also a very popular type of homemade trunk is the auto box.
The advantages of this design are that the things being transported will be safe even in bad weather, and the design of the car box itself, made with a streamlined shape, will not affect the aerodynamic properties and fuel consumption of your car.
Nowadays, when purchasing a car, they very rarely provide a luggage rack included, despite the presence of a specially equipped place and mounting for its installation. Therefore, you can make a trunk with your own hands based on the required parameters of your car. Homemade roof box
Universal car trunk
It is better for an inexperienced craftsman to start with making the simplest type of trunk. In fact, there are two crossbars to be made. For this you will need:
- metal profile, for example, with dimensions of 20X30 mm and a wall thickness of 1.5–2.0 mm (ideally aluminum, since it is lighter);
- clamps for muffler - 4 pieces. With their help, the trunk will be attached to the roof (if there are roof rails);
- polyurethane foam;
- grinding machine;
- fiberglass with a density of 300 g/m2. m.;
- dye.
Step-by-step production
To make a trunk in accordance with the parameters of the car and securely attach it to the roof, follow the algorithm below:
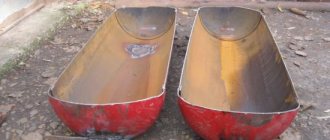
- First, we cut the crossbars. The length of the crossbars must correspond to the width of the car body.
- We cover the crossbars with foam both inside and outside. The layer should be quite dense: this will allow the crossbars to be given the required shape at the next stage.
- After the foam has dried, grind it off using a sanding machine. At the first stage, we give the profile the shape of a regular parallelepiped, and then we make design changes in order to improve aerodynamics, in particular, we grind down the corners.
- Since the foam has a loose structure, the crossbars can be additionally covered with car putty - this will make their surface smoother.
- We wrap the crossbars with fiberglass cloth in three layers.
- Paint the crossbars and wait for them to dry.
- At this time we will start making fasteners. In our case, we decided to take the path of least resistance and use muffler clamps. They need to be prepared - file the bottom of the clamp to create an even plate for a tighter fit.
- We drill holes in the cross members. There should be two symmetrically located holes on each side. The distance between them should coincide with the “ears” of the clamp.
- We attach the crossbars to the rails. To avoid damaging the crossbars with clamps, rubber gaskets can be placed at the points of their contact.
Video: features of fastening the structure to the Oka car
Cutting and welding
Cross members for roof rails are sold in specialized automotive stores. If you cannot find the cross members of the required length, they will need to be cut. The set of crossbars, like the sidewalls, consists of two products. To distribute the weight over 8 support points, it is best to buy two sets.
The crossbars are attached to a frame consisting of the same profiled pipe and repeating the perimeter of the roof of a particular car, using welding. This creates the lower base that a do-it-yourself roof rack (VAZ-2111 or any other model) should have.
After which the upper platform is performed in exactly the same way. It is very important that both structures exactly match each other in size. It is most advisable to fasten the two halves of the trunk together using the same welding. It is important to clean the welds immediately after the metal has cooled.
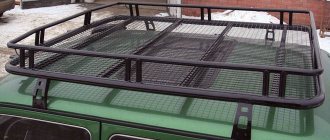
Expeditionary trunk type "basket"
The technology for manufacturing an expeditionary trunk will be much more complicated. In this case, you will need to first draw up a drawing. In addition, you cannot do without a welding machine and the ability to handle metal.
Mesh base - a practical solution for expedition luggage
Construction drawing
Let's take a homemade trunk for a Chevrolet Niva as an example. The length of the trunk will be 163 cm, width - 123 cm. To make an expedition trunk, you will need a metal profile 15X15 (approx. 9 linear meters), 20X20 (approx. 7 linear meters), 25X25 (approx. 7 linear meters) and 30X20 (approx. 6 p.m.).
It’s quite possible to make an expedition rack for Niva using this drawing yourself
Sequence of actions of the wizard:
- We start making the trunk from the base: we cook the perimeter. Longitudinal guides are made from profile 30X20, transverse jumpers are made from profile 20X20.
- We weld load-bearing lintels from a 30X20 profile into the perimeter. For them the platform will be attached to the rails.
- We reduce the distance between the load-bearing jumpers by welding additional transverse ones from the 20X20 profile.
- We make an arc that will be located in front in order to improve aerodynamics: we measure 5 cm from the edges of the profile and cut out a triangular sector, after which we bend the profile. We weld the arc on the outside of the perimeter.
- To increase the strength of the structure, we fasten the jumpers together with sections of 15X15 profile. If desired, non-load-bearing lintels can be replaced with metal mesh or stainless steel sheets.
- We make the sides. We cut the profile into pieces 6–10 cm long and weld it to the base. If desired, they can be mounted on a thread - then the sides and the upper part of the trunk can be removed.
- It was the turn of the top crossbar. It should be the same size as the bottom one, but the side crossbars should be slightly shorter, and the posts connecting them to the base should be angled to improve aerodynamics.
- We fasten the trunk in a manner similar to that described above. An important point: to evenly distribute the weight, the expedition rack should be secured to six points.
Autoboxes – 3 types
One car roof box may differ from another in its length and dimensions.
He can be:
• short – length no more than 1/3 of the length of the car roof; • medium – the length is slightly more than 1/2 of the roof; • long – the car box is the same size as the roof or even longer.
First of all, you need to decide which type of trunk suits you best. Based on this, choose materials and manufacturing method. To secure car boxes, a drainage groove is often used, which is familiar to many of our car owners. A regular trunk is attached to the groove, thanks to clamps and bolts. If you use roof rails, you can install even larger car boxes. If the roof is smooth, special fastenings are provided.
Roof rack: pros and cons
We have already started talking above about the benefits that roof racks provide to car owners. Now let's look at them in more detail.
Advantages of the design
There are many advantages of a roof rack:
- The most obvious benefit is, of course, the extra space for things. So, on the roof you can easily place three bicycles or everything you need for outdoor recreation - a tent, inflatable boat, fishing equipment, etc. And the capacity of seemingly quite compact boxes can be up to 300–800 liters;
- it becomes possible to transport non-standard, for example, very long loads (such as ladders, boards, pipes, etc.);
- due to the fact that part of the luggage is moved to the roof, it becomes much freer, more comfortable and safer in the cabin;
- Due to the roof rack, the load is distributed more evenly. So, if all the cargo is in the trunk, the car “sags”. This reduces ground clearance and creates a risk of rollover.
Possible problems
Along with obvious advantages, car roof racks have a number of disadvantages:
- they, as a rule, negatively affect the aerodynamic properties of the car. An irregularly shaped trunk will create additional resistance to air flow, which means the stability of the car will also suffer. This may also cause additional noise.
- a car with a roof rack significantly increases its height, which means it will not be able to drive along sections of the road where appropriate restrictions have been established.
- the trunk itself, even empty, weighs from 1.5 to 15 kg or more, which increases the overall weight of the car and, consequently, fuel consumption. According to some estimates, an unloaded trunk increases gasoline consumption by 0.2 liters per 100 km in urban conditions.
So, you have found out what kinds of car roof racks there are, got acquainted with their advantages and disadvantages, and found out how to make some of them yourself. Now you don’t have to rack your brains about how to place all the tents, spinning rods, backpacks and other equipment in the car - all of this will have a place on the roof of the car. All you have to do is relax and enjoy your vacation. Good luck on the roads!
Hello, dear visitors of our site! Glad to see you again. Oh, how nice it is getting outside. The birds are singing, the sun is shining, it’s warm - you just want to go on vacation, which is just around the corner. Today we will continue the topic of road trips. As always, on a trip we will need to take with us a lot of things that need to be put somewhere. This is an eternal problem - lack of usable space. And a very useful auto gadget will help us increase it.
A car roof box is a special additional roof rack installed on the roof. Not only a travel bag fits there perfectly, but also many other things that drivers and their passengers take with them on vacation, on a business trip or when traveling to the country, for example. There are a huge number of options for using autoboxes.
Car tuning
The classic representative of the domestic automotive industry is VAZ. Let's consider the advantages of a roof rack for a VAZ, which you made yourself. These include:
- sufficient strength and reliability of the structure;
- full compliance with the stated requirements of the car owner;
- saving money;
- the possibility of installing it on similar vehicles.
Such products are very popular for residents of private houses and dacha owners. On the roof of the car you can transport furniture, tree seedlings, garden tools, light building materials and other cargo.
Criterias of choice
In fact, I’m just planning to make a similar purchase for myself. It became clear that a closed box is much better than a conventional roof rack mounted on roof rails. Such designs are universal, roomy, protect the contents from precipitation and simply protect my things from attacks by thieves.
We are planning to go on vacation at the seaside soon. This time I just had to test my water skis. And the children have grown up, their needs for the number of things have expanded significantly from one swimsuit and a pack of diapers. And my wife is absolutely gold. Sometimes it seems to me that we are not going on vacation for a week, but moving there to live. Although she creates comfort and excellent conditions from things taken at sea, so I can’t complain.
But buying a car box is my immediate task for the near future. In principle, I have made my choice. All that remains is to place an order through the official website. I scoured online stores, looking online at cities such as Perm, St. Petersburg, Yekaterinburg and realized that prices were about the same everywhere. Chelyabinsk and Moscow are not particularly inferior to each other in their appetites.
If you want to buy a car box, we advise you to first read reviews, look at the rating, photo and video review. Everyone has their own selection criteria, so I will try to give the most universal advice possible.
When choosing a box, you can install it yourself. In this regard, everything is extremely simple if there are appropriate fasteners on the roof of the car.
What does it give
By installing a snowboard rack on your roof, you can solve several issues at the same time.
Such designs allow:
- empty the luggage compartment and interior of equipment;
- provide comfort to passengers and driver;
- protect equipment from possible fall or breakage;
- use the luggage compartment for other purposes;
- keep the interior clean.
The last point is relevant when skis and snowboards are put in the car after skiing. This is accumulated snow, dirt, and other unwanted components on the upholstery of your seats.
I can't say that fasteners are expensive. And they are easy to install.
DIY acoustic trunk
Trunk with acoustic effect
As mentioned above, making an acoustic trunk yourself is not so difficult. It is enough to know the basic information and technology, and then act based on the scenarios of your own imagination. The process begins, of course, with preparing the trunk floor:
- A thick piece of cardboard is taken, from which a pattern is made for the future floor.
- The sketch is transferred to plywood, preferably not too thin, and outlined.
- Then the shape is cut out.
Preparing the floor for the acoustic trunk
- We take the foam rubber and shoot it at the ends of the plywood. This is done so that the plywood does not creak and sits softer.
- We cover the workpiece with carpet and install it in place.
Now the most difficult thing is to make the boxes so that they do not make noise on bumps, and everything looks perfectly beautiful. Of course, all this is done not only from an aesthetic point of view, but also in order to significantly increase acoustic comfort.
- Again, we cut out blanks for the boxes from plywood.
- The pieces of the workpiece are held together with glue and self-tapping screws.
- The right and left homemade boxes are installed in the trunk and, like the floor itself, are covered with carpet.
- We install high-quality speakers and radio.
- Enjoy great sound.
Magnetic holders
Recently, magnetic ski holders have been gaining popularity. They have many advantages - they do not require a basic bracket and can be quickly and easily assembled and disassembled. Most models cost from 4,000 to 7,000 rubles. What is important is that they do not take up space at home and do not cause problems with storage when they are not needed. However, the ease of putting them on and taking them off can be a problem when it comes to thieves. But if there is a direct route from the house to the slope or to the hotel without long stops, they seem to be a very good solution.
Remember that in any case, the skis or board must be securely fastened so that they do not move during movement or fly out during sudden braking. If you don't like something about your car or something is missing, why not just sell it and buy a new one? will help you urgently sell your old car or find a new car that meets all your requirements.
Assembly of the finished structure
After all the above steps, the skins can be installed back in place in the sequence in which they were dismantled. Such manipulations performed with the trunk of a VAZ 2114 and its lid can significantly reduce the penetration of sound that enters the car interior through the rear wall of the vehicle, as well as from the rear wheels.
Radio with monitor Pioneer AVH-3100DVD for 2990 rubles!
A high-quality, stylish and multifunctional device that makes the driving process as comfortable as possible and prevents the driver and passengers from getting bored in boring traffic jams! More details at the link.
Source
Nets in the trunk for transporting things
Depending on its purpose, method and location of attachment, car trunk nets come in several types. Based on their main location, they can be divided into several types. Firstly, vertical ones - they press the transported objects against the walls of the trunk, preventing them from moving in its internal space. Thanks to these grids, you can more effectively manage the vertical volume along the walls and partitions. The central part of the trunk remains free.
Horizontal (floor) - presses the transported items to the bottom (floor) of the trunk. Floor nets fit so tightly and securely fix the load that moving it during the trip becomes impossible.
Small vertical ones - cover various trunk niches that are found in some car models. They allow you to place and secure containers with various automotive chemicals and some tools in niches. Such nets can also be mounted on the vertical walls of a car trunk in places where there are no niches. In this case they will be used as pockets.
Universal - can be installed anywhere in the trunk (on the floor, against the wall or side niche, on the back of the seats). Attached with Velcro or hooks. They are small in size and fit luggage on all sides. They can be mounted on the rear parcel shelf of a station wagon or hatchback, which will save space in the luggage compartment.