To creatively decorate your apartment, as well as add personality to it, you can make furniture from cardboard with your own hands; the patterns and diagrams are so simple that even a beginner can make the products. A variety of options will allow you to choose the right piece of furniture and make it, involving all family members in the process.
Cardboard furniture: design and construction
Beautiful chest of drawers made of cardboard using decoupage technique
When producing furniture from cardboard, there are several implementation options. You can create separate patterns for the side, top and bottom walls and then glue all the pieces on. Another option is to insert smaller boxes into a larger refrigerator or washing machine box. The walls will be narrower.
If you cover the inner surface of the shelves with bright fabric or colored wallpaper, and the outer surface with plain wallpaper, you will get an original open shelving unit. You can place books, photo frames, flower vases and other decorative items on the shelves.
Cardboard chest of drawers
By placing cardboard on the exterior and interior, no one will guess that you yourself made a shelving unit or chest of drawers from cardboard boxes.
Chest of drawers made of white cardboard with drawers of different sizes
Reliable cardboard shelves
There is an opinion that using a material such as cardboard, you can only make very fragile products that cannot withstand significant weight, but in reality, cardboard products can be very durable, supporting even large household appliances.
In this section, we will look at the technology for making a shoe rack that can withstand quite a lot of weight. The strength of such a product is explained by the presence of stiffening ribs inside the shelves and vertical posts. In addition, the structure can be further strengthened by duplicating its walls.
We will be assembling a bookcase with 4 shelves, and the sticks can be horizontal or inclined towards the back wall. Inclined sticks prevent shoes from falling off the shelf onto the floor. Size of the future shoe rack: height and length - 80 cm, depth - 30 cm. For work you will need:
- ruler, tape measure, pencil;
- wooden slats for cutting parts;
- paint, glue, brushes;
- a stationery knife necessary for cutting out cardboard elements;
- sandpaper, which will be used to sand the joints.
Assembly is carried out in several stages:
- Blanks for the back wall. You need to take a sheet of cardboard and draw a square measuring 80x80 cm on it, inside it you should draw another square measuring 77x77 cm. These 3 cm are the size of the ribs of the side posts, as well as the top and bottom parts. Inside the smaller square we mark the locations of future sticks. The height of the second shelf, intended for house shoes, will be 15 cm; accordingly, we set aside 15 cm from the upper edge of the inner square, and then another 3 cm on the edge. The third shelf, on which summer shoes and shoes will be placed, should be 25 cm high. Mark its location, add 3 cm to the edge. There is still 31 cm left, this space will be occupied by the lower shelf intended for winter shoes. Then you need to cut another 80x80 cm square, these two squares will form the back wall of the bookcase. Between the squares there will be stiffening ribs that increase the reliability of the structure.
- Manufacturing of shelves and side racks. For 4 shelves you will need 8 rectangles 74x30 cm, for racks - 4 rectangles 80x30 cm.
- Stiffening rib. They provide the structure with strength and reliability. To make them, you can use corrugated cardboard; it should be cut into strips a little less than 3 cm high, and then lightly cut into strips. After this, the strips need to be placed vertically on the bottom edge of each shelf, glued, and after the glue has completely dried, cover with the top edge. The same must be done with the side posts and the rear wall. If you don’t have corrugated cardboard, you can use regular cardboard, cutting it into strips slightly less than 3 cm wide. You need to glue the strips in a chaotic manner, twisting them in spirals in different directions. The number of cardboard strips is not limited; the more there are, the more reliable the design will be.
- Assembly order. It is advisable to connect the elements of the shelf using PVA or Moment glue. Most often, Moment is used to combine the main structural elements, and PVA is used to secure stiffeners. The shoe rack needs to be assembled in the following way: first, the upper, lower and side elements are connected, and then the back wall and two middle shelves are attached.
- Decorative works. When all parts of the structure are connected to each other, all that remains is to run sandpaper over the surface of the product to smooth out any unevenness. All joints and edges should be covered with paper tape, and it is better to do this across the seams rather than along them. After this, the entire shoe rack is covered with tracing paper, newspaper or thick paper. When the bookcase is completely dry, it will need to be covered with self-adhesive film, paint or yacht varnish. Such a coating will ensure the durability of the furniture and make its appearance more aesthetically pleasing.
Using this technology, you can make shelves of any shape and size, including modern and creative ones. If the master wants to assemble a complex structure, it is recommended to first prepare a drawing of the product.
Master class: surface decoupage
Useful:
- napkins with drawings;
- acrylic paints, acrylic paints and brushes;
- scissors;
- iron.
For added strength, place a second, slightly smaller box in a sturdy corrugated cardboard box.
Materials for decorating the finished product: paints, wallpaper, fabric and everything your imagination desires.
Cover the surface of the shelving with several layers of paint, allowing each layer to dry, then apply another. Do not let the last layer dry completely; it should remain sticky. Remove the top layer from the napkin, wipe with an iron and place on the surface of the product. Place a clean sheet of paper on top of the napkin and iron with a low power iron.
Instead of paint, you can use wallpaper or fabric.
The napkin should completely adhere to the surface; if not, add a little paint under it with a brush and let it dry. Do not rush to move on to the next stage; the decoupage must dry completely, otherwise the pattern will be deformed.
It should be understood that the thicker the material, the stronger the furniture will be. Note: Tracing paper or kraft paper must be torn off rather than cut before you apply it.
When the surface is completely dry, cover it with acrylic paint.
However, do not rush to get rid of the thin material; it will be useful for gluing seams.
By showing your imagination and creativity to the fullest, you will create a unique masterpiece of interior that will be admired by your family and guests at your home. Don’t be afraid to experiment, keep up with the times, because cardboard furniture is not only affordable, but is also an original option for creating comfort and a unique atmosphere.
You can use any type, but Moment glue is the best option.
Kraft paper is used to reinforce the edges of furniture; thin cardboard can be used instead.
Decor
It is not enough to make a wooden chest of drawers; you also need to decorate it so that the finished product is immediately noticed by guests. This can be done using some painting techniques. First of all, for decoration you need to prepare brushes and acrylic paints, the color of which everyone can choose to their taste. The product can be completely repainted in one color or decorated with several patterns that add charm.
Retro chest of drawers, stylized at the beginning of the twentieth century
The process of decorating a chest of drawers is not as complicated as it might seem at first glance. First you need to apply a base layer of acrylic paint, and after it dries, decorate the surface of the product with special patterns. It is not necessary to draw the patterns yourself, because for this you can use ready-made stencils that are sold in stores . As soon as the patterns are dry, the entire chest of drawers needs to be varnished. That's it, the wooden chest of drawers is ready!
Decoupage of a chest of drawers with fabric with delicate pastoral motifs
Let's start the lesson
The master class “How to make a chest of drawers” will help you cope with this task without any problems.
To make a chest of drawers from cardboard, you will need the following materials:
- Cardboard boxes or cardboard sheets;
- Vinyl glue;
- Brushes;
- Acrylic paints (shades depend on your imagination and desire);
- Various decorative elements for your choice.
- Awl;
- Stapler;
- Stationery tape;
- Scissors;
First of all, draw the so-called desired result on a piece of paper.
If you are planning to make a chest of drawers for the first time, we highly recommend making a “mini version” from regular paper. This way you can protect yourself from damage to the collected materials. Based on the completed sketch, you can proceed to further steps to create a chest of drawers.
We create the basis of the future chest of drawers. Based on its size, we will check the boxes. For boxes, you will need six boxes of the same size (for example, cereal or baby cereal). You can also assemble and glue boxes from a single sheet of cardboard. In our case, we will use ready-made oatmeal boxes.
Use scissors or a utility knife to cut the box cross to cross as shown in the photos. The cut out parts of the box must be bent inward to strengthen the walls of future boxes. You can secure the folded pieces of cardboard using vinyl glue or a stapler. Similar actions must be done with the remaining five fields. Thus, all six drawers are ready for the future chest of drawers.
Showing your imagination, you can cover the boxes with self-adhesive film, decorative or gift paper, craft paper and even fabric. Or you can simply paint it with paints, for example acrylic. In this case, the method of pasting boxes with decorative paper is used. After this, the parts must be allowed to dry.
To make shelves for drawers, you will need thick corrugated cardboard. It is necessary to cut strips from it so that you can wrap two adjacent boxes, namely:
- the width of the strip must match the length of the boxes;
- strip length = two heights and four widths.
To make the fold more accurate and even, you must first mark the strip with a light pressure of the scissors. Since the cardboard is quite dense and thick, it would be advisable to draw parallel strips at a distance of 2 millimeters from each other.
After the work is done, you can begin to cover the insides of the resulting shelf with the same decorative film that was used to decorate the drawers. To hide the edges of the shelf and the cut, be sure to fold the edges. By gluing the edges and thus forming a complete shelf, you can first check the operation of the future chest of drawers. To do this, you need to insert two drawers into the shelf. They should come out smoothly, after which you need to make two more such shelves. There should be three shelves with six drawers in total.
- The next step is to connect the three prepared shelves together. To do this, you need to put them on top of each other and grease them well with PVA glue. Then, using some weight, you need to press it and let it dry completely.
After the glue has completely dried and the shelves are securely attached, you need to use glue to cover the back of the chest of drawers with a solid sheet of cardboard. Glue should be applied to the bottom of the chest, its lid, and also on the sides. Next, you need to carefully cut out the back, top of the chest, bottom and side parts from corrugated cardboard, securing them with glue to the resulting chest of drawers. Next we cover everything with paper.
Features of cosmetic chests
Any chest of drawers is, first of all, a convenient storage place thanks to drawers and compartments. A cosmetic chest of drawers is an organizer for the numerous things every woman needs.
Peculiarities:
- unlike ordinary chests of drawers, cosmetic models can come in a wide variety of shapes and sizes - from a mini tabletop chest of drawers to a full-fledged floor chest of drawers;
- the presence of a large number of drawers, shelves, and compartments that allow you to conveniently place all your existing cosmetics and various small items;
- some models have special compartments-glasses for brushes and liquids, stands and containers for special purposes;
- The design of most chests of drawers includes a mirror, which, of course, makes the process of applying makeup easier and more convenient.
A large selection of shapes, sizes, materials and colors makes it possible to choose a design that matches the interior, the style of the room and your own preferences.
Benefits of use
It is unlikely that any woman is not familiar with the situation when finding your favorite lipstick becomes a paramount global task. It would seem that it has always been here, but now finding it is a problem. You have to turn all your cosmetics upside down, wasting a lot of time and nerves. All this can be avoided if you use a cosmetic chest of drawers to store and place your things - each drawer or stand will serve its purpose, systematizing and organizing the variety of women's accessories.
In addition, the models produced are distinguished by their attractive appearance - choosing a charming chest of drawers to suit your taste, which will fit into the interior and is the right size for the room, will not be difficult.
Such an organizer will not only save time when creating beauty, but will also make this process more enjoyable and enjoyable.
Features of cardboard and necessary tools
Cardboard is suitable for design and decoration, providing a wide variety of original shapes.
When starting to embody your creative ideas, think about the design of the future product and the place where it will be placed. Cardboard as a material has advantages and disadvantages.
Advantages and disadvantages
- Power. A DIY cardboard chest of drawers can withstand decent loads.
- Budget. You can get by without the investment if you have cardboard around the house or know where to get extra supplies.
- Flexibility. If desired, the object can be given any shape.
- Shorter service life. Cardboard is not wood; it cannot last 20-30 years. With careful use and high-quality assembly, cardboard packaging will last from 5 to 10 years.
- Use in dry environment. Cardboard is afraid of moisture. You can't put such a thing in the bathroom.
- Environmental compatibility. Easy to dispose of after use. Cardboard is a natural material that does not pollute the environment.
The main material from which the product will be made is cardboard. For it we take “Moment” or “Titan” glue, PVA. Some people use a glue gun. A ruler, a stationery knife, and a pencil will also come in handy.
Tools for making cardboard furniture
The decoration uses wallpaper, furniture film, fabrics, acrylic paints and fittings for drawers.
Small homemade chest of drawers made of cardboard, decorated with fabric
Features of small structures
A compact chest of drawers for small items is a cabinet with numerous drawers located one above the other. Thus, small items can be sorted into insulated containers, fastened into a single vertical structure, which helps to economically manage useful space.
Lightweight universal plastic boxes are made of durable environmentally friendly material with sections of the same size. As a rule, such compact structures consist of three, four or five levels. Simple wooden structures are often offered for sale in the form of sanded plywood blanks for independent artistic decoration. Containers in such devices come in different sizes, which creates additional opportunities for laying out larger items and “loading” small items.
More about materials
Approach the choice of materials responsibly. The correct approach to this problem is much more important than the process of making furniture itself.
Cardboard
The cardboard you will use should be strong, double or triple. If you take a regular cardboard box, you will need to seal it by sealing it on all sides with another layer of cardboard.
Single-layer cardboard is enough for the inner boxes, but this option is not suitable for the frame.
I used a large TV box as a frame, this will simplify the process of making the base. You can also make whatever you want from individual pieces of cardboard, but it will take more time.
It is not necessary to use a background. Any thick paper or self-adhesive film is suitable for gluing cardboard. On the Internet I came across an option where the needlewoman glued the box with crumpled paper and simply painted it on top with acrylic paint - why not. There are no restrictions here, but when choosing a finishing method, consider its functionality and durability.
If you decide to stick wallpaper, choose simpler paper ones; it will be more difficult to work with other types. It is also easier to glue if the outside of the wallpaper is not rubberized, but also smooth, so it is easier to join and overlap.
Initially, I only had normal medium-density PVA glue. Then I bought glue from another company at the office supplies store, which turned out to be much thicker than mine and had a jelly-like consistency. By diluting this PVA with water, I saved a lot.
By the way, keep in mind that you will need a lot of glue if you want all the parts to be well connected. It took me about 5 400 ml bottles for my chest of drawers. Therefore, if you are not a spontaneous person like me, it is best to purchase a liter jar of glue in advance from a hardware store.
Results
The cost of a handmade chest of drawers is much lower than the cost of a finished product from a furniture store. But this requires some skills. In addition, if you compare handmade furniture and purchased products, the first one is much superior in quality. Thus, if you buy a chest of drawers in a store, there is a risk of not only overpaying, but also getting a low-quality product.
Original solid wood chests of drawers will look luxurious in a bedroom with a suitable interior
A durable chest of drawers made of oak or other types of wood can last for many years without losing its attractiveness. Therefore, all the money spent and efforts made will not be in vain. You just need to follow the instructions exactly and anyone can do the job.
Wooden chest of drawers
Chest of drawers made of cardboard boxes (master class)
Don't know what to give to your friend or daughter? Has a DIY cardboard chest of drawers! Did you know that regular corrugated cardboard or cereal boxes can be used to make great chests of drawers?
You don't always need to spend crazy money and buy expensive gifts.
A chest of drawers made carefully and slowly from boxes can be decorated in such a way that all your friends will simply be out of breath. After all, it is so unusual and pleasant for homeowners.
A little girl will need a do-it-yourself chest of drawers for dolls. As for the dimensions of the chest of drawers, here you can choose whether to make a chest of drawers from cardboard, adhering to the dimensions presented in any of our master classes. A chest of drawers made from matchboxes is suitable for a dollhouse.
Chest of matches - master class
You can make a cute chest of drawers for dolls with your own hands from matchboxes and paper. And if you decorate it with organza roses, crocheted flowers, roses made of white felt, the child’s joy will know no bounds.
To do this, you need to prepare 3 matchboxes, colored paper, vinyl glue or double tape. For the legs, beads are used, and the handles are parts sold in scrapbooking stores.
What you need for work:
- Matchboxes (quantity – unlimited).
- Colored paper.
- Double tape or vinyl glue
- Scissors.
- Beads for dresser legs.
- Drawer handles.
- Clay moment.
After removing the matches from the boxes and removing the “boxes,” you need to assemble the empty boxes and glue them together with double tape or vinyl glue. Then use a ruler to measure the distance from one bottom corner to the other, as well as the width and height of the chest of drawers. We cut out 2 decorative pieces from colored paper and glue on our chest of drawers.
Sharp edges can be smoothed with a nail file. All that remains is to glue beads instead of legs, make a hole and screw on the handles (beads or buttons can be sewn on with thread or secured with thread).
To make a felt rose, cut out a circle of the required size and draw a spiral with a pencil. Using scissors, we make a spiral cut, cutting out “waves” on top. Turn it over and sew or glue the stem of the flower.
And you can knit cute and delicate flowers from any thread. For knitting these colors, a thin hook with a thickness of 1-2 mm is suitable. Scheme:
Our next master class is another version of a small chest of drawers made of cardboard. The cardboard chest of drawers has four shelves. For work, it is recommended to use thick corrugated cardboard. We will also need an Erich krause or Kores glue stick. Prepare a couple of sheets of office paper, a stationery knife, Moment glue, 2 beads: drawer handles, a ruler, a pencil and scissors.
When working with paper, it is important to take your time and glue all the parts carefully and evenly. Instead of white office paper, you can use thin colored paper.
Detail size:
So, let's start with the details of the chest of drawers. On a sheet of cardboard, use a ruler and pencil to draw the following details:
- 2 pieces of back wall 12 * 15cm.
- 4 sidewalls 15 * 6cm.
- 2 children bottom 12 * 6cm.
- 2 children's top 13.5 * 6cm.
- 6 shelves 12 * 5.2 cm.
Glue the parts together in pairs according to thickness. We will get:
- 1 back wall.
- 2nd side.
- 1 top part.
- 1 youngest child.
- 3 shelves.
Also, all these blanks need to be glued with plain white paper using a glue stick.
Then we take Moment glue, the bottom part and the back wall and glue them, maintaining an angle of 90 '. Keep the back wall in this position until the glue dries. Next, glue the side walls in the same way.
We arrange the shelves so that the distance between the lower ones is 4.5 cm (there will be drawers here), leaving the upper shelves open. We glue the shelves with glue.
Let's make boxes. For the drawers, cut out 4 parts of the back wall 10.7 * 4 cm, 8 side parts 4 * 5 cm, 4 parts of the front. 4 * 12cm Cut the bottom later.
On two children in front of the drawing frames, retreating 0.7 cm from the edge. Use a utility knife to cut out the frames. So, we need to cover these frames with white paper. To do this, coat the frame with glue, take a sheet of paper and put the frame on it.
We make a cut with a knife, stepping back from the frame by 1 cm. At the end of the cut line we make a triangle.
We pass glue along the paper inside the frame and carefully fold the paper onto the frame. Cut a piece of white paper measuring 4*12cm and glue it to the front piece of cardboard on one side. Then place the second card face down on top of the frame and glue it in front of the box with the card.
We should get two such white parts with a frame inside. We glue the back parts in pairs and glue these 2 children who received the paper. We do this to strengthen the box. We cover the 2 lower and 2 upper parts with paper.
We assemble (glue) the boxes with glue.
In the center children. Sew on the beads with white thread. We glue the front one to the finished boxes.
- Then the doll's chest of drawers is ready.
- The video shows how to make a chest of drawers for dolls with your own hands:
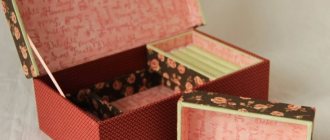
If you want to make a medium-sized chest of drawers, then this master class will definitely come in handy. This chest of drawers is useful for embroidery or for items, cosmetics, stationery and so on. Such boxes are sometimes used as boxes - for documents, bills, accessories. If you cover such a chest of drawers with a cloth or paste it with colored paper, you will get an original gift.
The product is made of corrugated cardboard and has dimensions of 27 * 20 cm. For work you will need thick cardboard, a stationery knife, scissors, Moment glue, a ruler and a pencil.
Cut out from cardboard:
- 3 parts 27 * 20cm (main).
- 3 parts 19 * 20cm (shelves and bottom).
- 2 children 18*18 (bottom of the box)
- 2 children 21.5 * 10 cm (in front of the box)
- 4 circles with a diameter of 4cm and 2 strips 1 * 17cm (handles).
- 6 children 18.5*9cm (side box.)
We took 3 main children and cut off a sharp corner for two of them (you can use a cup or saucer).
See the photo for the sequence of actions: first we glue the main parts (27 * 20) - the back and side parts. Then, at the same distance of 9 cm (the height of the box), we glue the shelves and the bottom. Then, having smeared glue on all areas (see photo), lower the second side part of the product from above.
So our job is to make a box. You will need 2 of these boxes. Glue the 3 side walls and the bottom of the box.
After assembling the box, all that remains is to glue the front part, glue the handle from two circles, and glue the handle with cardboard tape. If you are going to finish this chest of drawers, duplicate all the internal corners with reinforcing tape. This is all. All that remains is to move on to the finishing: painting, or sheathing, or pasting, and so on.
- In the video there is an empty space under the chest of drawers from cereal boxes:
- In the video, how the craftswoman decorated the chest of drawers:
Cosmetic chest decoration
A stunningly beautiful chest of drawers can be achieved by decorating it with scrapbooking paper, fabric or masking tape.
The video shows a chest of drawers made from milk cartons:
Do it yourself – Organizador porta-trecos #part 2 ✂️ Artesanato #27
Source:
Dimensions
Compact plastic mini chests of drawers consist of shallow containers the size of a palm (13*9*8 cm), into which you can pour beads, small buttons, paper clips or tacks. In addition, through the transparent walls of the containers, you can easily view the contents without opening them. Universal multi-section cabinets have the format of a standard sheet of paper: height 20 cm, width 18 cm, cell depth 26 cm, which allows you to install them with maximum convenience in a limited area of a shelf or cabinet. At the same time, you can “pour” quite a lot of the necessary “small things” into such a mini tabletop chest of drawers. Plywood chests of drawers - organizers can have arbitrary dimensions, since they can be ordered according to an individual sketch or made by yourself.
Multi-storey plastic organizers with retractable containers the size of a standard office sheet, have the following dimensions: height 50 cm, width 21 cm, box depth 29 cm. Such transparent turret chests of drawers are quite roomy, stable, so they are convenient and profitable to use for a personal workshop. Experts recommend creating a combination of several closed shelves for sorting, storing parts or small tools.
Manufacturing
Finally, having completed all the preparatory steps, feel free to move directly to this moment. It is important to have a sharp utility knife, thanks to it you
be able to carefully separate parts without damaging them. It will work in the following sequence:
- Using a stationery knife, you need to cut out the back and side walls, as well as the shelves, based on the pattern.
- All of the above components are made in several copies. Their number will depend on the thickness of the cardboard. We thicken the parts by gluing identical parts.
- We connect the components according to the drawing.
- Cover the ends and seams with paper and glue.
- Future chests of drawers are assembled in a similar way.
- Next comes decoration and installation of fittings.
The last point will depend solely on the author’s imagination. You can simply paint the chest of drawers. For those who like a more creative approach, stickers with pictures are suitable. Handles need to be selected so that their style matches the overall design of this piece of furniture. Often, creators decorate the surface of the product with crumpled paper and then cover it with acrylic paint.
How to Design a Shelf
To make a shelf or rack for shoes easy to use, you need to think through and draw up a diagram. One option is a cabinet with three shelves. The upper part can be used for house shoes, the middle part for sneakers and shoes, and the lower part for storing boots and shoes. To prevent shoes from falling, the shelves can be placed at an angle towards the back of the product or made horizontal.
As for the sizes, they can be completely different and chosen at your discretion. It is recommended to indicate all parameters when drawing up the drawing. Those who encounter cardboard for the first time may think that it will be too flimsy for the purposes in question.
Making pens
You can make any drawer handle you want. It is enough to show your imagination. Depending on his style they can be:
- bottle caps;
- various beads or rivets;
- buttons;
- small ropes attached to the inside of the boxes;
- wine bottle stoppers and much more.
In our case, satin ribbons will serve as handles for the chest of drawers. To do this, you need to make two holes with an awl, then thread our satin ribbons into them and tie them from the inside of the box.
This is such a neat and cute chest of drawers made from cardboard boxes!
History of the chest of drawers
The chest of drawers has a very interesting history. Its ancestor is considered to be an ordinary chest (remember where our great-great-grandmothers kept their things). Since a particular problem was removing things from the chest that were at the very bottom, craftsmen began to make chests with drawers. The new chests, due to their convenience, gained particular popularity, and they were called nothing more than “commode” (translated from French the word means “convenient”).
And already in the seventeenth century, chests of drawers became incredibly popular in Italy, and then in France. True, chests of drawers were originally decorated exclusively in the homes of the rich and other nobility. But, of course, they looked appropriate: rare expensive wood, jewelry made of precious stones, inlays made of metals and ivory. Such a chest of drawers was no longer just a storage place for things, but a real family heirloom, passed down from generation to generation.
Time passed, morals changed, attitudes towards furniture changed. And the furniture itself also changed. And in the 19th century, chests of drawers moved from luxury items to the category of public “convenience”. And they began to be made from cheaper materials, and elaborate decorations completely disappeared from their facades. The main thing remains - what the chest of drawers was designed for: the convenience of storing and retrieving things.
Usually the chest of drawers is located in the bedroom. It is very convenient to store linen, personal items, and clothes. And modern manufacturers have managed to do everything to expand the already wide functionality of the chest of drawers (storage of things, dressing table, bedside table for a TV or stereo system, place for placing photographs). Now you can buy a chest of drawers with special small drawers for cosmetics and jewelry, and even with a changing table.
What tools and materials are needed for the job?
The main materials and tools for work are the cardboard itself, a stationery knife and glue. If you are using boxes instead of cardboard sheets, use a knife to cut them into individual pieces.
You can also use hot glue and paper of different colors or paints. The chest of drawers will stand without it, but few people want it to be brown. In addition, the cardboard itself differs in color. There are both dark and bright lights. And in the future you will need hot glue to give it more strength.
Note! The paint will not cover the side gaps on the cardboard, so for best results you need to use paper and paint at the same time.
Shoe stands
11. Use an old picture frame (or an old painting) to hang shoes on and store under your bed, for example.
12. Attach shoe organizers to the screen.
13. If you store shoes in a pile, you will have a little more space in the closet.
14. You can purchase a wide but shallow basket.
15. You can use small baskets to store shoes, and keep the baskets themselves on shelves - and the shoes will not be visible and will look nice.
DIY cardboard chest of drawers: detailed instructions with photos
There is a creator in each of us. At a certain period of existence, a person as an individual needs to do something with his feathers, not always gold. These impulses are embodied in different ways. This directly depends on the degree of skill.
Original handmade products
A fashion trend has become the production of handmade products: soap, decorative items, jewelry, paintings, watches, interior items and much more. A cabinetmaker with carpentry skills can easily make a chest of drawers, a table or a chair with smooth lines and carved details from natural wood.
What should those who are full of creative impulses, but have no special skills, do? “Self-expression” will be helped by the design process; gluing furniture from cardboard is an inexpensive option that helps create a complete and worthy piece of furniture for a child’s room, living room from unnecessary boxes, pieces of wallpaper or a liter of paint.
Mini chest of drawers made of white cardboard
Anyone can make a chest of drawers from cardboard using any other available material. When purchasing equipment, the boxes remain. We throw them away, despite the thick walls. By gluing the cardboard in several layers, we obtain an object with the necessary strength.
Multi-colored cardboard chest of drawers for sewing accessories, covered with fabric
Cardboard furniture: design and construction
Beautiful chest of drawers made of cardboard using decoupage technique
When producing furniture from cardboard, there are several implementation options. You can create separate patterns for the side, top and bottom walls and then glue all the pieces on. Another option is to insert smaller boxes into a larger refrigerator or washing machine box. The walls will be narrower.
If you cover the inner surface of the shelves with bright fabric or colored wallpaper, and the outer surface with plain wallpaper, you will get an original open shelving unit. You can place books, photo frames, flower vases and other decorative items on the shelves.
Cardboard chest of drawers
By placing cardboard on the exterior and interior, no one will guess that you yourself made a shelving unit or chest of drawers from cardboard boxes.
Chest of drawers made of white cardboard with drawers of different sizes
Features of cardboard and necessary tools
Cardboard is suitable for design and decoration, providing a wide variety of original shapes
When starting to embody your creative ideas, think about the design of the future product and the place where it will be placed. Cardboard as a material has advantages and disadvantages.
Advantages and disadvantages
- Power. A DIY cardboard chest of drawers can withstand decent loads.
- Budget. You can get by without the investment if you have cardboard around the house or know where to get extra supplies.
- Flexibility. If desired, the object can be given any shape.
- Shorter service life. Cardboard is not wood; it cannot last 20-30 years. With careful use and high-quality assembly, cardboard packaging will last from 5 to 10 years.
- Use in dry environment. Cardboard is afraid of moisture. You can't put such a thing in the bathroom.
- Environmental compatibility. Easy to dispose of after use. Cardboard is a natural material that does not pollute the environment.
The main material from which the product will be made is cardboard. For it we take “Moment” or “Titan” glue, PVA. Some people use a glue gun. A ruler, a stationery knife, and a pencil will also come in handy.
Tools for making cardboard furniture
The decoration uses wallpaper, furniture film, fabrics, acrylic paints and fittings for drawers.
Small homemade chest of drawers made of cardboard, decorated with fabric
Chest making process
Cardboard mini chest of drawers for storing office supplies
For those who are making their own chest of drawers out of cardboard for the first time, choose a lighter model. It is better to make a classic object of a simple shape - a rectangle with 3-5 drawers.
A neat chest of drawers made of cardboard boxes covered with paper and tape handles
The production process consists of several stages.
- Draw a sketch of the furniture on paper based on the size of the place where it will be located. Determine how many pieces you need to cut and the exact size.
We make blanks for boxes according to the drawingFor each box we make compartments according to the drawing
- Cut the back and side wall blanks in half to glue them together.
Made for strength. Connect the surfaces with adhesive moment using a glue gun, then place under a weight for an hour for joining. Cutting out blanks for the future chest of drawers - Glue the parts inside the side walls so that there are gaps in the places where the shelves will be inserted.
The dimensions of the groove must correspond to the height of the shelves. Glue the frame so that there are grooves for the drawers - Assemble the outer frame, insert shelves.
Assembling the frame and inserting shelves - To clean, the edges are sealed with paper tape or paper.
Cover all edges and ends with paper - Making boxes. If the size is suitable, you can take ready-made shoe boxes and small household appliances. When they are not there, make boxes by analogy with the frame: cut out the parts, glue them.
Glue the sides of the box togetherOne of the parts to be glued must be smaller
Finished double chest of drawers
- Dry the boxes, the frame itself, and start decorating. It all depends on your imagination. Finish with crumpled paper and paint it any shade. This creates an interesting effect of genuine leather.
Decorate with crumpled paper and paint with acrylic paintsPaint it deep black
Apply gold paint to reliefs for an unusual design
Cardboard mini chest of drawers for jewelry and cosmetics, decorated using decoupage technique. The napkin design is carefully transferred to the product using a mixture of water and glue. Use a brush dipped in glue.
The inside can be covered with wrapping paper or any other colored paper
The finished product is painted and can be used! Very beautiful and original, most importantly, without extra money. We look at our creation and rejoice at what masters we are!
The finished chest of drawers will fit many useful things for needlework.
What can be done
At first glance, you might think that cardboard is a fragile material that requires special handling. On the one hand, this is correct, on the other hand, having chosen the desired type of cardboard, you don’t have to worry about its further use. Cardboard furniture will be durable and practical if you follow the sequence of work and recommendations for using tools.
To choose an option for making a furniture product yourself, you need to consider several proposals:
- Toy furniture made of cardboard - it is profitable and creative to make your own furniture for dolls. If children require the purchase of a new house for Barbie with all the accompanying accessories, the solution would be to produce this option with your own hands;
- Book shelves are considered one of the simplest cardboard products. They don’t take much time to make, and the books don’t put much stress on the cardboard;
- The original table will not be a dining table on which dishes are constantly located, but a small coffee or coffee table. A child can perform developmental tasks on such a piece of furniture, because it is designed for a light load;
- Chest of drawers - this kind of furniture is convenient for storing documents or papers; children’s accessories will also fit here. It is easier to make a chest of drawers from cardboard boxes from large appliances, such as a refrigerator;
- Shoe rack - an original shoe stand in the form of triangular cells will fit comfortably into any hallway. Entering the room, all guests will be surprised at how convenient and practical the rack turned out to be;
- A small chair for children - since cardboard is not intended for heavy loads, furniture for children is what you need. A small chair for your baby will become his favorite object, where he can draw or play.
As you can see, furniture made of cardboard is easy to make. To make it you need the simplest material and a minimum of tools.
Table
Shoe rack
Chair
Dresser
Shelves
Toy
Required materials and tools
Regardless of what type of furniture is chosen for self-production, the list of materials will remain the same. This necessarily includes the main raw material - cardboard.
To make the products durable, you should give preference to three-layer cardboard. The quality of the material can be checked by cutting.
If you purchased a single-layer analogue in advance, do not be upset. This option works well for making a dollhouse and furniture for dolls. If you use it to work on real furniture, you need to glue several layers of cardboard to give it greater strength.
List of materials and tools for work:
- Scotch tape - it is better to buy paper, regular and double-sided;
- Stationery or sharp construction knife;
- Scissors;
- Tape measure and long ruler;
- Pencil and rubber band;
- Sandpaper – for cleaning cuts;
- Kraft paper;
- Glue – depending on the type of cardboard, you may need PVA, hot melt glue or Moment.
If all the listed materials and devices are prepared, you should proceed to the manufacture of the selected furniture. Experienced cardboard craftsmen recommend that beginners choose simple work to start with, for example, shelves or a table.
Rules for working with cardboard
In order for furniture made with your own hands at home to turn out not only beautiful, but durable, a number of rules must be followed. They will help you make high-quality products that will appeal to all household members:
- Gluing layers - when working with single-layer cardboard or to strengthen furniture, it is necessary to glue the material. When gluing cardboard together, try to place the layers perpendicular to each other - this is how they give increased rigidity;
- Choice of glue - people who have already made furniture from this material recommend using Moment glue. It does not get wet after application and instantly holds product parts together. You can also purchase a glue gun and thermal sticks, which melt when heated, creating a glue trail;
- Why do you need kraft paper? Kraft paper is used to cover the edges and joints of furniture. With this move, the furniture looks neater. Before gluing, the joints are cleaned with sandpaper. You need to remember that the paper cannot be cut - it must be torn with your hands. This way the layers will become smooth, without transitions;
- Features of cutting - during the manufacture of cardboard furniture, special attention is paid to cutting the material. Usually a stationery knife is used - it is important that it is always sharp, because the accuracy of the parts depends on it. If thick cardboard is difficult to cut, you can use a jigsaw.
Using a jigsaw, the work goes much faster. It is important to carefully cut the parts and avoid mistakes, because the tool is too powerful for cardboard.
Cut cardboard with a knife
Select the type of cardboard you need
Use kraft paper
Choose your glue carefully
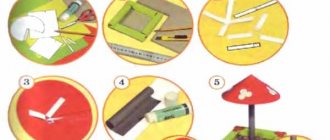
Step-by-step instruction
To ensure that production goes quickly and is not accompanied by problems, there are step-by-step instructions; a master class on cardboard furniture consists of a step-by-step description of each action. It begins with the creation of a drawing, followed by the formation of parts and their strengthening. The final stage is the assembly of furniture. Each of the stages must be considered separately.
Create a drawing
The first thing you need to do is make a drawing of the furniture. To begin with, draw it on a regular A4 sheet so that you can see a smaller version. In such a sketch, it is important to write down all the dimensions and respect the scaling. If you have the skill to work in special programs that allow you to develop product models, you should use them.
The first drawing must show the product in a general three-dimensional form. Next, you need to draw a projection of the furniture with a top, side, and rear view separately. The next step is to depict the details of the product: each detail must be drawn separately.
When the drawing is ready, it must be transferred to sheets of cardboard:
- Using a tape measure and a long ruler, draw on the surface of the raw material with a pencil, measuring the required dimensions;
- For work, you may need a square so that the corners of the future furniture are even in the drawing;
- When drawing on thin cardboard, try not to leave scratches with a pencil, and when making furniture from corrugated cardboard, draw clear and deep lines;
- It is necessary to cut out parts in compliance with all indentations and possible distance margins.
- You can use ready-made patterns or come up with your own product that meets specific sizes and preferences.
Forming parts
It is worth noting that when cutting out parts there should be no visible bends. If the work is done on a box of household appliances, it is better to cut on smooth edges. From six-layer cardboard you can make your own furniture of increased strength, for example, a shelf for shoes or books.
Medium size cardboard chest of drawers - mk
If you want to make a medium-sized chest of drawers, then this master class will definitely come in handy. This chest of drawers is useful for embroidery or for items, cosmetics, stationery and so on. Such boxes are sometimes used as boxes - for documents, bills, accessories. If you cover such a chest of drawers with a cloth or paste it with colored paper, you will get an original gift.
The product is made of corrugated cardboard and has dimensions of 27 * 20 cm. For work you will need thick cardboard, a stationery knife, scissors, Moment glue, a ruler and a pencil.
Cut out from cardboard:
- 3 parts 27 * 20cm (main).
- 3 parts 19 * 20cm (shelves and bottom).
- 2 children 18*18 (bottom of the box)
- 2 children 21.5 * 10 cm (in front of the box)
- 4 circles with a diameter of 4cm and 2 strips 1 * 17cm (handles).
- 6 children 18.5*9cm (side box.)
We took 3 main children and cut off a sharp corner for two of them (you can use a cup or saucer).
See the photo for the sequence of actions: first we glue the main parts (27 * 20) - the back and side parts. Then, at the same distance of 9 cm (the height of the box), we glue the shelves and the bottom. Then, having smeared glue on all areas (see photo), lower the second side part of the product from above.
So our job is to make a box. You will need 2 of these boxes. Glue the 3 side walls and the bottom of the box.
After assembling the box, all that remains is to glue the front part, glue the handle from two circles, and glue the handle with cardboard tape. If you are going to finish this chest of drawers, duplicate all the internal corners with reinforcing tape. This is all. All that remains is to move on to the finishing: painting, or sheathing, or pasting, and so on.
In the video there is an empty space under the chest of drawers from cereal boxes:
Empty for the chest of drawers. Watch this video on YouTube
In the video, how the craftswoman decorated the chest of drawers:
Cosmetics Dresser Decoration Watch this video on YouTube
Purpose
In the dressing room, a compact chest of drawers can be attached to a rack, and belts, gloves, scarves and belts that are used daily can be placed in the compartments. If the chest of drawers is integrated into the body of a wardrobe in the hallway, then it is convenient to lay out keys, key rings, notepads, envelopes with letters, checks and receipts in isolated compartments. A multifunctional plastic mini chest of drawers is very useful in the bathroom, since small hygiene and care items also need to be sorted into pull-out compartments for permanent placement and easy access. Moisture resistance is the main quality of this storage system. The design and tinting of the fronts of the chest of drawers sections can be easily matched to the overall interior of the sanitary unit.
Popular articles The Entry of the Lord into Jerusalem 2022 - poems, prose, SMS
A universal desktop chest of drawers organizer is simply indispensable in the office, accounting department or reception area for sorting staples, paper clips, rods and other accessories. Small stationery items, which are often used by office workers, are neatly laid out in the small compartments of the chest of drawers, maintaining perfect order in the workplace.
Mini organizers are used to store:
- stationery;
- accessories and decorations;
- accessories and fastenings for needlework;
- medicines.
Multi-tiered and multi-sectional chests of drawers are perfectly combined with other miniature furniture - cabinets with hinged doors and open shelves. Portable organizers are convenient and can be easily moved to the right place.
Particularly popular are elegant and stylish toiletries, which are designed on the principle of a combined chest of drawers - a box. Under a leather or glass lid there is a standard organizer with cells, and the pull-out boxes are mounted on hinges, which allow you to simultaneously open the compartments of all tiers for full visibility. As a rule, such decorative chests are designed to store a collection of jewelry. In this case, the inside walls of the box are lined with suede upholstery, rollers for rings and equipped with a small mirror for quick fitting.
It is interesting that elegant ornate chests - chests of drawers were used in the home life of the royal family. In Crimea, in the museum of the Livadia Palace in the chambers of Princess Olga Nikolaevna, on the dressing table and in our time there is an antique cabinet - a portable one. Behind the mirrored door there are shelves for crystal bottles and everyday toiletries, and the lower part is made of classic wooden pull-out boxes.
To store “modest” everyday jewelry, jewelry cabinets were used - caskets, upholstered on the inside with scarlet taffeta (fabric with a noble tint) and equipped with secret drawers, secret niches, and inlaid with mother-of-pearl and silver. Small chests of drawers for “golden pins” from the luxurious dresses of beautiful ladies were richly decorated with enamel medallions and pearls.
Chest of matches - master class
You can make a cute chest of drawers for dolls with your own hands from matchboxes and paper. And if you decorate it with organza roses, crocheted flowers, roses made of white felt, the child’s joy will know no bounds.
To do this, you need to prepare 3 matchboxes, colored paper, vinyl glue or double tape. For the legs, beads are used, and the handles are parts sold in scrapbooking stores.
What you need for work:
- Matchboxes (quantity – unlimited).
- Colored paper.
- Double tape or vinyl glue
- Scissors.
- Beads for dresser legs.
- Drawer handles.
- Clay moment.
After removing the matches from the boxes and removing the “boxes,” you need to assemble the empty boxes and glue them together with double tape or vinyl glue. Then use a ruler to measure the distance from one bottom corner to the other, as well as the width and height of the chest of drawers. We cut out 2 decorative pieces from colored paper and glue on our chest of drawers.
Sharp edges can be smoothed with a nail file. All that remains is to glue beads instead of legs, make a hole and screw on the handles (beads or buttons can be sewn on with thread or secured with thread).
To make a felt rose, cut out a circle of the required size and draw a spiral with a pencil. Using scissors, we make a spiral cut, cutting out “waves” on top. Turn it over and sew or glue the stem of the flower.
And you can knit cute and delicate flowers from any thread. For knitting these colors, a thin hook with a thickness of 1-2 mm is suitable. Scheme:
Making a chest of drawers for storing small items
I, like many craftswomen, have a bunch of buttons, buttons and buttons