Share on social media networks:
Do you have old CDs collecting dust at home that have long gone out of mass use? Do not rush to throw them away, but use them rationally for creative purposes. This is a wonderful material from which you can make many useful things for your home that you didn’t even know about. And if you have a lot of them, then that's even better. Today we will tell you how to make a lamp from disks with your own hands, spending money only on consumables. By following our step-by-step master classes, you can easily make an original bright table and picture from CDs.
Chandelier made of disks =)
I’ve been on Pikabu for a long time, but I’m creating a post for the first time, so don’t judge me harshly for my desire to show off =)))
I hasten to tell the whole world about my joy - the completion of a protracted chandelier project.
I won’t hide it - the chandelier was bought on Avito. Somehow she immediately won my heart with her unusualness and cheapness. People gave for a nominal fee, because... It didn’t fit them in size for the new suspended ceiling, and almost all the light bulbs had burned out.
In turn, an interesting design and the ability to illuminate the room with a large number of light bulbs were important to me.
As you can see in the next photo, one light bulb in a Soviet crystal chandelier was oh so small for a 3x5m room.
The room in which it was planned to hang the chandelier will be used in the future for games: board games, computer games, home theater viewing, in short - a “fortress of solitude.” As they say, a dream has come true and you can turn around and start arranging your lair. But. first “light”, and then “camera” and “motor”.
A thought came to mind: “Game room, hmm. I should decorate something with disks, that would be oh so cool!” Internet searches yielded no results on how people made the chandelier or ceiling.
BUT, thanks to the Internet for the advice! First of all, it is easier and more convenient to cut discs with metal scissors. The second thing is that studio and even pirated discs are cut with an even cut, and do not crumble like discs for recording/rewriting. This is probably all that the forums and blogs told me.
During the rearrangement and disposal of unnecessary trash, a bunch of discs of pirated films, games and music from the 90s-2010s were found, as well as a large sheet of hardboard. Unfortunately, the disks from our own reserves would not be enough to implement the idea. Therefore, the project was temporarily frozen, and we continued cleaning and rearranging the apartment, taking out all the garbage in bags.
In our house there is an unspoken tradition of “things in new hands” - things that are not needed are placed on top or bottom of mailboxes to find a new owner. This is how books, toys, things, flowers, whatever, are distributed around the house.
Either it was because of their ant zeal to throw out all the trash and rubbish from the house, or it was just a coincidence, but one of the neighbors was inspired and also got rid of unnecessary things.
On the day when we took out the trash and returned, we discovered a “gift of fate” from an unknown neighbor. The man successfully threw out a huge box of old CDs with music, games and films for us. Thank you, our philanthropist, we are very grateful to you! Without you we would not have made our chandelier. Thanks a lot!
It's time for handicrafts))))))
Hardboard was the first to go into use. The sheet was large, and it was necessary to use it as much as possible as a substrate. The engineer's education did not let him down, the 200*100cm sheet was used with a minimum of waste! As you can see, there are two quarters in the corners, and in the middle is half of the future circumference of the substrate. Pick up a jigsaw and get to work =)
Hot stand
Since the disk is round and small in size, why not use it as a hot stand. To implement your plan you will need:
- Two disks;
- Paper napkins
- Glue
- Stationery knife.
The process itself is insanely simple:
- The prepared discs are smeared with glue and covered with napkins.
- For reliability, the napkins can be varnished.
You can also cover the discs with rolled napkins or paper strands:
Lamp made from CDs
I received a request to make a chandelier night light from CDs, like on the Internet, indicating a specific type - so that it “shines.” Having studied various designs of such lanterns, I offer my own version of the lamp.
The design was based on 12 CD discs with a double mirror layer. To work, you will need a tool - a screwdriver with a drill with a diameter of 2-3mm, wire cutters and pliers. The disks can be connected to each other with staples made from any soft wire or, as in this design, from pieces of paper clips. The light source will be a 220-volt electric lamp with a standard minion format socket and a standard suspension mount. The cartridge will be connected by a cord with a built-in switch.
Scarecrow for the dacha
It would seem that a CD is the most useful item that can decorate a room and attract the attention of others.
But you can use it outside the home as a garden scarecrow. After all, bright glare will easily scare away birds, and therefore these plates can also be adapted for the garden.
It is enough to build a structure on which you can attach the disks so that the glare is visible from all sides. You can secure the CDs themselves with anything: paper clips (you will have to make holes along the edges), fishing line, thread, and so on.
How to make a lamp from a CD
1. Prepare a stencil disk for drilling holes. Using a protractor, we divide the disk into five sectors - this is an angle of 72° and at a distance of 5 mm from the edge we drill 5 holes with a diameter of 2-3 mm. The stencil is ready.
Materials Lamp discs Marking 5 holes Drilling stencil
2. Place disks for the lamp in the disk storage reel. We put a stencil on top of the disk with our own hands and drill the first hole through all the disks. Insert a thin wire guide or a match into the hole. We drill a hole on the other side and also install a guide. Drill the remaining holes. Guides are necessary to secure the disks from moving relative to each other.
3. Install the lamp socket into the first disc. There is no need to widen or saw the hole in the disk. The chandelier has a socket for a minion-type base, but standard sockets with threads at the input of power wires are also suitable.
Stencil in reel Discs drilled Mounting of chuck Chuck mounted
4. To secure the disks together, you need to prepare 30 pieces of fastening brackets. You can use the manufacturing method proposed in the blog about the curtain wall. But, since few staples are required, the latter can be made from soft wire or paper clips. The “U” shaped bracket has dimensions (6-8mm)+(10mm)+(6-8mm). One paper clip makes 3 staples. To make staples you will need pliers and wire cutters.
5. Consistently we begin to assemble the lamp. The staples are inserted into the holes and bent inward with pliers. The discs must rest freely on the bracket and relative to the adjacent discs.
Blank for staples Staples for assembly Connecting disks Assembling the lamp
Conclusion
As you can see, many useful devices are made from CDs that will not only delight you every time you start using them, but also bring considerable benefits in everyday life.
In addition, the process of creating all of these crafts will give you and your loved ones a lot of pleasure.
What would you make from disks first?
Required tools and materials
To make a lamp from old disks, you will need the following materials:
- about 1000 CDs;
- a circle made of fiberboard, the diameter of which is 20 cm and the thickness is 1.5-2 cm;
- steel wire with a diameter of 2 mm and a length of 5 m;
- 12 electrical connectors, selected according to the diameter of the steel wire;
- fluorescent lamp;
- 3 rubber feet with a diameter of 2 cm;
- lamp socket;
- 2 m electric wire with plug;
- switch;
- gun with liquid silicone.
Tools to help assemble the product:
- compass;
- triangle ruler;
- marker;
- a simple pencil;
- hot glue for silicone;
- mites;
- screwdriver;
- pliers;
- drill.
Wall Clock
Wall clocks can be found in any room. There are craftsmen who create watches from unnecessary media.
To implement the idea you will need:
- CD/DVD disk (you can take several disks if desired);
- Glue gun;
- Screwdriver;
- Working clock mechanism;
- Numbers for the dial;
The appearance of the watch is limited solely by your imagination.
Dream watch assembly process:
- The clock mechanism itself is removed from the old watch; do not forget to remove the hands and remember their location on the watch shaft;
- If you use one disk for the craft, then simply attach a previously prepared plate to the back side. If several discs were initially planned, then a composition is created using a glue gun;
- The dial disk is prepared using a protractor;
- We adapt the resulting clock for installation on a surface or for mounting on a wall.
Manufacturing process
Once everything you need is prepared, you can begin making the table lamp.
Preparatory stage
Before starting work, you need to collect all the tools and materials in one place (for example, on a table). If something is missing, then:
- CDs can be found not only in your closet, many of your friends want to get rid of them, they will be happy to share these unnecessary items with you;
- a circle for the base can be cut from a piece of plywood or take a stand from an old lamp;
- a compass and a triangular ruler - borrow from any schoolchild or buy, because they are inexpensive;
- other materials - in a hardware store;
- You can ask your friends for tools; if that doesn’t work, you’ll also have to purchase them.
Making the bottom
To make the bottom of the lamp yourself, you need to take a round blank from fiberboard and, using a ruler and compass, divide it into 12 sectors. To do this, you need to draw 2 perpendicular lines passing through the center of the circle, and then measure the length of 1 of the radii. By placing the leg of a compass at each of the 4 points on the rim and drawing semicircles passing through it, you can get serifs. When connecting them to the center of the circle, the boundaries of 12 sectors are obtained.
In the center of the bottom you need to drill a hole for the wire through which the lamp socket will be inserted. The position of the chuck in the workpiece should be fixed using liquid silicone. You also need to make 6 holes for the steel wires on which the disks will be located. Then rubber feet are screwed to the base using bolts and a screwdriver, and the cartridge is threaded and fixed into the central hole.
We fasten the disks for the chandelier and form the frame
You need to insert 6 pieces of steel wire into the holes located along the edges of the fiberboard circle and secure them there. The length of each segment must be at least 1 m. The edges of the wire must be bent so that their upper parts are connected in the form of a hemispherical dome, and the lower halves must be raised, leaving straight. 12 pieces of 50 cm wire should rise above the base: 6 bent and 6 straight.
Framework
Frames for mirrors, collages and photos will look great. This is especially true for mirrors that can harmonize with the surface of plastic products.
To make a frame, you need to have:
- Large supply of starting material;
- Cardboard or other frame that can be cut;
- Tools for cutting, gluing, as well as painting and varnishing.
Frame creation process:
- Cut out the frame of the required size (any shape);
- Cut discs randomly;
- Place the cut out pieces on a frame so that the resulting composition is as pleasing to the eye as possible;
- The pieces are glued to the frame;
- If there are gaps between the details of the composition, you can paint them with any color of your choice;
- Cover the entire product with varnish and leave for sufficient time for the entire composition to dry completely;
- Insert a mirror, photograph or illustration into the frame.
It looks unusual, but very beautiful.
Flower
If you've been sorting out old boxes at your dacha and found a lot of unnecessary discs, there is a great way to use them to benefit the beauty of your yard. Crafts made from disks for the garden look very original and interesting, in addition, they are incredibly easy to make.
In this mini-lesson, I suggest making small flowers from discs to decorate a garden, vegetable garden or yard at the dacha.
Note!
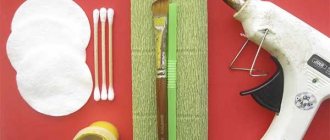
The tools for this craft do not require anything unusual: the right number of disks (it all depends on how many flowers you are going to make), a candle, scissors and paints to make the flowers more vibrant.
The manufacturing process does not require special skills, it is very fast, but at the same time it will captivate you from the first second.
All you need to do is carefully melt the disks over a candle (remember safety precautions: it is best to do this indoors and have some water nearby to put out the fire in case of danger) so that the plastic goes into beautiful waves, similar to flower petals.
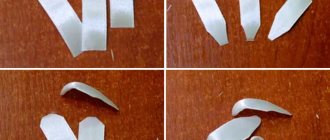
I offer step-by-step instructions for making a beautiful rose from disks:
- First you need to cut the disk evenly along the entire length of the radius and heat one edge of the cut over a candle.
- Once the plastic is warm and soft, take a pair of pliers and use them to turn the edge slightly to the side.
- Slowly turn the disc over the flame and continue bending the molten fragments.
- At the end you should end up with a small spiral, which will become a rose bud.
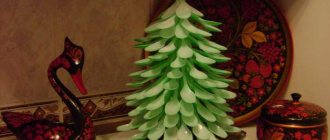
- You can paint it any color, attach a wire stem, cut leaves from other leaves and form a whole flower bed! It all depends on your imagination.
So, today you learned how to make some simple crafts from old CDs. I hope you found this lesson useful and learned a lot from it.