LiveInternetLiveInternet
Quote from Melissa
Read in full In your quotation book or community!
Good day!
Today I would like to bring to your attention a very interesting master class on creating a ship from candies, authored by a wonderful master of suite design - Irina Tsybun . After studying this wonderful master class and spending a little of your free time and energy, you will learn how to “build” your own ships, which will become a memorable and original gift for any holiday for both women and men.
Source
Below is the author's text
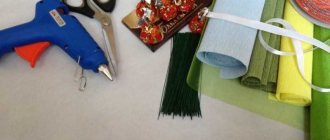
I cut out the base for the ship from penoplex of the required size.
I first “cut out” all the sails from paper. Of course, this increases the time spent working on the ship, but at this point
I need it, since I make all the sails by eye, based on the size of the base.
The sails consist of three rectangles. I start “cutting” from the bottom, its width coincides with the width of the ship, every
subsequent ones are narrower than the previous one by 2-4 cm (it all depends on the scale of the ship).
This ship has a lower sail of A4 size sheet, and a slightly larger one on the middle mast.
For the masts I use fiberglass rod extensions (they can be cut to size if necessary)
So that the flaws on the sides of the ship are not visible, I “dress” them.
Using regular pins, I attach the cardboard and cut it to size, not forgetting to mark the right and left sides, the “wrong side” and
"facial"
Trying on ship clothes)))
I cover the cardboard for the sides of the ship with polysilic or paper to match, and, if desired, cover it with mesh.
I already said that it is better to glue polysilk onto a glue stick; it does not spoil the film and allows you to change it if necessary.
her position.
Here it is - the “clothes” of our ship, its back and front...
Don’t forget that the base should also be decorated.
Using side blanks and hot glue, we refine our base.
Then I cover all the seams with twisted cord.
I cover the sails with metallic fabric tape using hot glue. I glue the tape on both sides.
This is time-consuming and expensive, but this is how you can add additional rigidity to the sails. Moreover, the organza is thin, and the sizes
I have big sails.
This will not be necessary if the fabric is stiffer, the sails are smaller, or the tape itself is thicker, for example 1 cm
I iron the sails through wet gauze. Due to this, the glue is distributed more evenly, and the sails become more
neat look.
After ironing, the sails can be slightly bent in the desired direction, pulling their edge between your fingers.
And they are waiting in the wings in this state, “forming”, so to speak)))
I glue the sails together exactly as they will be positioned on the mast
I'm heating up the nail
I suspect that normal people at this stage can use a human tool - an awl)))
Using a hot nail, I make holes in the organza; these are where the mast will be inserted.
I decorate the masts with matching paper
We make yards, pasting them to match the sails
We “string” the sails onto the masts and glue the yards so that the sails keep their shape.
Don’t forget about the “bow” triangular sail, and maybe even several))
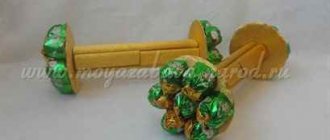
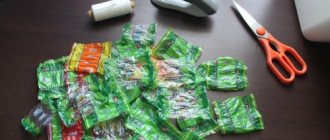
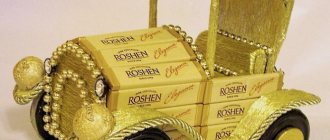
preparing the ship's sweet filling
here they are - chocolate portholes.
To make it even more beautiful, I decorate it with a twisted cord to match the ship
And this is my little “trick” when attaching medals.
The thing is that placing medals on glue is not always convenient, because the glue can bounce off the foil. That's why I'm "cunning"
So:
1. I glue a piece of double-sided tape onto the medal (it definitely doesn’t have any problems with attaching to the foil)
2. I glue a piece of paper onto the tape, and woo-a-la))
A little work, imagination, TIME)))
and here it is - the result))
“Love is an unknown country, and we are all sailing there, each on our own ship, and each of us on our own ship is the captain and leads the ship in our own way...”
Handicraft piggy bank
Video: ship making master class
Additional ideas:
Scarlet Sails
Golden blue
Boat “Pink Dream”
Wedding
This review was provided by the editors of the DIY portal.
Did you like the article?
1+
Cash gift for birthday
With a little creativity and humor, the boring presentation of an envelope with money to the birthday boy can be turned into a bright and unforgettable event.
To do this, you need to use one of the effective ideas below:
You can make a money cake in another way: roll the bills into a tube and place them together in a circle, tying each prepared layer with a beautiful ribbon. You will need a lot of banknotes to make such a cake.
Cash gift for anniversary
Therefore, the options for beautifully presenting cash gifts are as follows:
Money tree as a gift . The main methods for making a money tree:
From the box
Another paper boat, how to make step by step:
- To make a paper boat, you can use a paper box. On one side of a small box, preferably narrow in shape, the outlines of the bow of the future vessel are marked, and it is better to draw the outlines to the edges of the box.
- Using a utility knife, carefully cut out the silhouette of the bow.
- The bent part of the box “side”, which remains free, is divided in half and applied to the cut out nose part. The parts are fastened with tape and glued at the junction with the bottom.
- A base for equipment (masts, bowsprit, anchor) cut from foam plastic is installed in the middle. Masts are installed and paper sails are put on.
From foam plastic
The components of the future vessel are cut out of a piece of foam plastic using a stationery knife:
- — body (for greater stability it should be wide);
- — superstructure (a rectangle half the size of the hull);
- - another rectangle, but half the size of the previous one.
A superstructure is glued to the top of the hull, closer to the aft part, and the smallest rectangle on top of it.
A toothpick – a “bowsprit” – is stuck into the bow, and a mast is placed in the middle.
A toothpick with a piece of paper - a flag - is stuck into the smallest triangle.
To make it more attractive, parts of the ship can be cleaned or painted a little.
Tags
make a boat from make a boat from your hands a ship or with your own hands with your own hands. with your own hands a ship with your own hands. with your own hands very with your own hands to make with your own hands to make with your own hands. with your own hands. With their own hands, penoplex with their own hands. they can create a planet with their own hands. they can create ships with their own hands at their disposal with their own hands, like with their own hands, knives with their own hands. gates with their own hands.
verymyanswersviewsthanksgiveanydeckscandyseegivenraelikemanysticksideacontent weighting agent
From walnut shell
Additionally, you will need walnut shells and plasticine.
Oddly enough, but halves of walnut shells are ideal for use as the hull of a small boat.
- The shell must be completely cleaned of excess parts without damaging it.
- A small piece of plasticine is placed in the cleaned part.
- Plasticine is both a ballast that gives stability and a base for the mast, so it should be evenly distributed over the entire area of the bottom of the shell. Instead of plasticine, you can use candle wax.
- A mast (toothpick) with a sail is stuck into the base.
Craft ship: 120 photos, templates, drawings and step-by-step instructions on how to make a boat
Crafts are an interesting leisure activity and a mandatory element of the school curriculum in various subjects.
When a person is faced with the specific task of finding a photo of a ship craft and doing something similar, but only with his own hands, then he pays close attention to the possibility of doing it in a simple way and so that it turns out effectively. Fortunately, today this is quite achievable.
How to easily and quickly make a ship yourself?
If you want to make a high-quality ship craft and not be armed with special tools and expensive materials, then there are several simple solutions:
- colored cardboard;
- ordinary cardboard;
- paper;
- Styrofoam;
- regular drinking straws.
When working with these materials, additional connecting compounds or elements will be required. These can be threads, PVA glue, gun glue, plasticine and other solutions that your imagination and the possibility of convenient use with the model without damaging its appearance will suggest.
Cardboard ship for school
When you need to make a school craft, this is a very important moment for any student, because his work will definitely be appreciated, which means you need to at least try to make ship crafts from cardboard that will look attractive.
Cardboard, paints and a little imagination are great for this. You can be inspired by the Internet or ready-made solutions that are presented at school (if they exist).
- You can make a layout in applique format and accompany it with different decorative materials, which will add volume to the design.
High-quality versions of cardboard crafts can be made from several simple elements that will create volume. There are even ready-made solutions in which you can make a full bottom or a separate deck from one element.
We recommend reading:
Warships with interesting design
If you need a warship craft, then you can’t do without examples here. It could be a large aircraft carrier or another type of ship that would look attractive as a craft.
- Sometimes, to develop a beautiful layout, special models are used from many individual elements, which together create a unique composition.
The process of assembling them requires time, a lot of patience and gluing individual elements so that the seams are not noticeable, and therefore also neat.
That is why special attention should be paid to which option to choose and how long it will take to collect it. It's worth starting with simpler models with larger elements to achieve an initial inspiring result.
- Those who don’t like factory crafts can make their own version of the ship themselves, using a variety of materials.
We recommend reading:
Paper ships and boats
Sometimes children are asked to make paper crafts in the shape of a ship, but they are not always able to properly complete the task without the help of adults.
- However, there are universal assembly solutions that will help provide children with work and ensure a beautiful result of their labors.
There are many options for creating paper boats. You can take and color the classic boat that our parents used to play with. You can turn to the art of origami for help and choose a craft that will match your skills.
- There is also an option to make a beautiful three-dimensional applique from cardboard and fabric, which looks great and does not require a large amount of fastening material.
Handmade crafts
A beautiful DIY ship craft will always be an item that is worthy of admiration, because it is the result of a person’s personal work, which shows his skills and abilities. When it comes to children, parents always try to keep their child’s first crafts as a keepsake.
DIY crafts can be made from a variety of materials and you should focus on those that are available. For starters, the option of fabrics, paper, foam, etc. is suitable.
We recommend reading:
- After this, you need to find an interesting layout on the Internet, but you should definitely take into account the material available and not experiment with others, because this often leads to negative results.
After choosing the material and manufacturing method, you can proceed directly to it. If it doesn’t work out the first time, don’t be too upset.
There is always an opportunity to repeat and do it better than the last time.
Interesting spaceship options
When you need a spaceship craft, there are a lot of variations. As a basis, you can use existing concepts of such ships or those that became the central element of a feature film.
There are a huge number of options. If greater detailing of the craft is required, then for this you can always find high-quality materials and select them in such a way as to achieve the desired visual effect. Some crafts of this type even include lighting.
Children's ship to kindergarten
Children in kindergarten are subject to low demands during the learning process. That is why a ship for children in kindergarten can be made from anything. The main thing is that the child is interested in the process, uses only materials that are safe for health, and also avoids sharp objects.
Photos of ship crafts
Source: https://podelki.pro/podelka-korabl/
From a plastic bottle
Additionally, you will need a plastic bottle (a yogurt box, juice box, or plastic canister will do).
- Approximately 5 cm away from the bottom of the bottle, use a stationery knife to make an incision approximately to the middle of the bottle.
- You will need to retreat a little less from the neck. An incision is also made to the middle.
- The notched part is removed, and a foam base for future equipment (masts, anchors, etc.) is installed in the remaining part, which has become the hull of the vessel.
- Masts with sails are installed. You can add an anchor and ropes.
What may be useful
A set of tools that you may need:
- Stationery scissors and stationery knife.
- Thick cardboard and plain paper.
- Glue (PVA or special silicone for crafts).
- Wooden skewers, toothpicks, unnecessary pencils (future masts).
- Scotch.
- Styrofoam.
- Ruler, simple pencil (for marking).