Vases made using the modular origami technique are endlessly varied in patterns and design. Each master can easily create his own version by changing the design, shape or proportions of a decorative item. It is enough to assemble several models according to the instructions to understand their basic principle and begin creative experiments.
Modular origami is ideal for interior accessories, as it allows you to produce voluminous and durable structures. Origami vases are used for their intended purpose, of course not for real flowers that require water, but for artificial ones - made from any light materials.
Areas of use
Why is this origami needed at all? Basically, as mentioned above, they resort to this in order to add comfort to their home and do something original that can surprise guests.
It will also be an excellent gift for family and friends. This gift is very original. You can make an origami vase with your own hands just for your own pleasure, to keep yourself busy with something.
Volumetric paper crafts
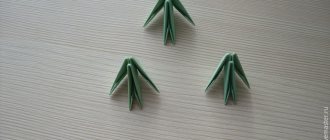
You can also make voluminous appliqués from paper. For example, an openwork floral applique, or a corrugated vase, a vase with lilies. Openwork is made from pink and white thick paper. Volumetric openwork flowers will be attached to the base of the vase.
Attach flowers and snowflakes in a chaotic manner using glue. You can attach beads to the center of the flowers.
To make a step-by-step origami corrugated vase, you will need two blue sheets of paper, a silk ribbon, glue, a pencil, and scissors with a ruler. The vase here is folded using the fan technique.
Each part should have 16 bends. The accordion is unfolded and the corner of the sheet is fixed. The vase is assembled and secured with a thin ribbon. Make stamens from pink paper and the vase is ready.
Variety of origami
Origami is a very broad type of needlework and has a large number of different types. From making entire huge crafts using a large number of tools, to banal crafts that even a child can handle without any problems.
Of all the types, the modular assembly of an origami vase stands out.
Fruit bowl
Fruit vases are especially loved by origamists. You can store both decorative and quite practical items in them - balls of yarn, handicrafts, small soft toys, jewelry. To increase the strength of products, they are glued during the assembly process.
This is what a classic fruit bowl looks like using the modular origami technique:
To make it you will need 1717 1/16 modules. Of them:
- 483 yellow;
- 658 white;
- 420 red;
- 56 blue.
Advantages of the modular type of origami
The modular assembly of a vase has a number of significant advantages:
Ease of manufacture. Yes, this is not an elementary school-level craft, but there is nothing complicated in making it.
Beauty. Due to the fact that this type of origami is made from a number of small parts, the result is a very beautiful figure.
There is a rule at work here that makes designer crafts beautiful. It is better for a person to look at a large part made from several small parts than to look at something large presented as one component.
We recommend reading:
- Origami fish: step-by-step instructions for creating a fish using the origami technique. Many photos of finished works, diagrams, master class, video
Origami rose - instructions on how to make a beautiful rose with your own hands. The best schemes for beginners to create and assemble (photo + video)
- Origami bird - 100 photos of the best patterns for creating a bird with your own hands using the origami technique. Step-by-step master class with description
If you have children, you can team up with them and work on your craft together. Children really like to assemble something large and voluminous from small parts, so the child will clearly not remain indifferent.
Dust removal
If you are sure that the varnish coating of the craft is moisture-resistant, a slightly wet sponge will help get rid of dust.
Otherwise, it is recommended to use a vacuum cleaner set to “blow” mode, or a hairdryer with cool air. It is also appropriate to use wide brushes.
Manufacturing technique
If you look at photographs of origami vases, you can find dozens of different and unique crafts. There is an example of making a standard origami vase. To do this, you will need paper of four colors: dark blue, yellow, light blue, white.
First, let's create the module itself. We take a rectangular piece of paper of any size, make two bends so that we get a kind of house, after that we turn in the remaining corners from the bottom and by slightly bending the lower ends, we give our module volume.
You can make any number of such modules, depending on the desired size of the vase. We must not forget that there are as many white modules as dark blue ones, and as many yellow modules as light blue ones.
After all the modules are ready, it’s time to form the foundation. The first layer is made from dark blue modules, and the second from light blue ones. The third row is yellow, the fourth row is white. After this, we repeat this procedure as many times as necessary.
We recommend reading:
Origami envelope - the best schemes for assembling an envelope from paper without glue. Simple instructions with step-by-step guidance + 120 photos- Origami paper swan - simple instructions with step-by-step guidance. Photo, video, master class, secrets of craftswomen
- Origami butterfly: step-by-step master class with real examples in the photo. Subtleties and secrets from craftswomen + instructions and video lesson for children
The last layer should be made a little smaller than the rest, as this will be the completion of the vase.
If you want to make a vase with a non-standard shape, then you need to make each layer with a different number of modules. The main thing is to maintain the right proportions.
If you do everything correctly, then this step-by-step instruction for beginners will help you make a very high-quality craft.
Important nuances
There are several features of modular origami. They need to be taken into account when starting work.
- Since the parts are small, you should choose paper of thin or medium thickness so that after repeated folding the parts do not turn out to be “wooden”.
- The paper must be of high quality. The colored paper from inexpensive sets for craft lessons is usually very thin, it tears easily, and such a vase will not last long.
- It is better to choose regular office paper or special paper for origami.
- Modules made from double-sided paper look better.
- The paper must have some roughness. Glossy parts will slip out and hold each other poorly.
Opportunities for imagination
If a standard vase does not suit you, then you can use your imagination and come up with something that you personally like. Among all of them, there are several good ideas:
- Floor vase
- Vase with Flowers
- Three-dimensional vase
- Vase with a pattern
Choose how you want to make a modular origami vase.
We recommend reading:
- Origami paper flower, made by yourself. 140 photos of original ideas + step-by-step instructions
Origami dog - step-by-step instructions for children. 123 photos of original ideas for creating a dog out of paper using the origami technique (master class + video)
- Origami owl: a review of the easiest ways to make an owl out of paper using the origami technique. 124 photos of original ideas + instructions with video tutorial
Precautionary measures
It is worth remembering that in addition to sharp scissors, there is also paper.
Its thin edges can cut through the upper layers of the skin. However, in addition to cuts, fire safety measures must also be taken into account. The paper burns well. There is no need to practice origami near open fire sources.
Note!
- Origami boat from childhood. We collect materials, make a classic boat, a motor ship, a sailboat. Step-by-step photo instructions for folding a boat with your own hands
How to make simple modular origami? Module assembly diagram, fastening modules to each other. Step-by-step instructions for modular origami for beginners
Origami crane - how to make it yourself? Materials for creating a crane, step-by-step instructions with photos. Application of Cranes made of paper
Three-dimensional vase
The most difficult method of all of the above, since ordinary modules are not suitable for its implementation. Here you will need three-dimensional modules, the production of which is much more difficult.
This method is not suitable for beginners, so you should only try it if you have experience in this matter.
Beauty made by you
3D origami looks incredibly beautiful. They require rough paper. Its sizes should be different. The sheets should not have white on the folds; they cannot be painted. But initially you can make multi-colored parts.
The rectangle is most often made in size 1 to 16 or 1 to 32 from the A4 sheet. After this, each square must be folded into a triangle. You can see how the modules are made in video lessons.
Check it out here too!
- Origami panda from paper: create a panda using the origami technique with a photo
- How to fold an origami shirt and tie: step-by-step master class
- How to make an origami paper butterfly with your own hands: a step-by-step master class on making original crafts with photos and videos
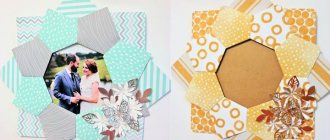
Vase with a pattern
Perhaps the most beautiful way to improve a vase.
To do this, you need to prepare a separate number of modules that will form a single pattern in your future vase. It is important to calculate the correct number of modules needed.
If you do not take this parameter into account, the drawing may turn out blurry and it will ruin the overall appearance of your vase. It is important to maintain proportions so that there are the same number of layers under your drawing as there are above it.
Options for fastening blank modules
Since the modules are part of a figure, they must be connected to each other. You can do this in two ways:
- so that the triangle looks up - in this case, the acute corner of the part must always be at the top. In this case, its short side must be folded side out. Using this fastening method, the base of the vase can be folded;
- so that the acute corner of the triangle is at the bottom - this fastening method is considered no less reliable, so it is used quite often. This technology is usually used to give an object some roundness. Therefore, such fastening is typical for the “body” of the vase. But it can also be applied at the stage of creating the foundation.
Subsequent uses of origami
Origami is not limited to this vase, it is a limitless art. You can make other household items from origami.
Lamps, jugs, figurines in the form of various birds and animals. Whatever the human soul desires. The main thing in this matter is not to limit your imagination and do everything wisely.
What you need to know before getting started
Since the modules are small, the paper for them should not be too thick. Otherwise, the folds will turn out to be inaccurate, and the product as a whole will take on a sloppy appearance. It is better not to use children's art kits, especially inexpensive ones. The paper in them quickly breaks and tears, which reduces the lifespan of hand-made origami masterpieces.
The optimal sheet density is 80g/m². It is characteristic of both office and classic origami paper - kami. It is necessary that the sheets be painted on both sides to maintain the integrity of the vase design. It is also important that the surface of the material is slightly rough, which will improve the adhesion of the typesetting elements to each other.
Typically, origamists use triangular modules. They are assembled according to the following scheme:
In bundles, the triangles are attached either at a right angle upward (“look” at the sky) or downward. There are also combined compounds. In addition, there are two types of relative arrangement of modules when docking:
- Two on the long sides, one on the short side.
- All three are on the short sides.
Shown in Fig. Type 3 connection is optimal for vases or other round-shaped objects.
Model selection
It is better to make origami paper vases from modules in a classic style. Modern asymmetrical decorative items will be difficult to “read” in such a design. Pear-shaped vessels are especially popular - many variations can be created on their basis. Amphoras are no less in demand; craftsmen even make them with handles, although this is not at all necessary.
Curly vases in the form of animals or flowers are very interesting. They are spectacular on their own, although they can also serve as a holder for a floral arrangement. Sometimes they make models with a flat, wide top on an elongated leg - the so-called fruit bowls. However, they are not used for their intended purpose, but for storing jewelry or useful little things.
Vessels can be different in size - from miniature to floor-standing. In the second case, it is necessary to take enlarged modules, 1/16 in size, and not the more common 1/32.
Photo of a vase using origami technique
Did you like the article?
1+