Family photos add personality to a home. All that remains is to make paper frames for them using the origami technique to combine them into a decorative panel or tabletop composition. Very often, pictures dear to the heart are stored in an album or phone because no suitable design has been found for them. Origami decor will allow you to do without huge expenses and long trips to the shops and at the same time create something unique, with a fashionable ethnic flavor.
Panel
A few sheets of multi-colored designer cardboard - and we have in our hands an excellent material for a collage of children's or wedding photos. The origami frame in this version is very simple, so in a few minutes the whole family can make a stylish panel, enclosing the warmest and most vivid memories in it.
Step-by-step instruction:
For one module frame we use a square, the size of which is determined by the parameters of the photograph. Please note that after folding the product will be reduced in size by half.
In addition to design paper you will need:
- a sheet of corrugated cardboard the size of the future panel;
- scissors;
- glue stick or heat gun;
- photographs of the same size.
- Cut into squares. It is best to select their size on a prototype using an unnecessary piece of paper. When everything is clear with the parameters, we move on to folding. Bend the square diagonally from corner to corner. We unfold and repeat the same action, but from the opposite side. When we open the workpiece again, a cross should form in the center.
- We bend one of the corners to the middle mark. This is the crosshair that we outlined in step 1. Repeat the same action for the other three corners.
- Turn the workpiece over to the reverse side. Fold all the corners towards the center again. We iron the folds well so that they turn out neat and clear.
- We turn the tops of the corners in the opposite direction. Using this algorithm, you can make any number of origami frames.
We crop the photos so that they fit within the perimeter of the square. Opening the frame. We check that the focus of the frame is in the center of the composition and is clearly visible after the origami is folded again. Glue the photo inside.
Using a heat gun, we fix the frame flaps from the back side so that they do not open.
Cut out the base from corrugated cardboard. Glue frames onto it, forming a multi-colored grid.
On the reverse side we attach a loop if the panel is intended for a wall, or a support if it will stand on a table.
DIY paper products for children. Schemes, templates, instructions
Paper products using various techniques are created not only by children, but also by adults. Working with this material does not require special skills and abilities. At the same time, you can make a cute greeting card, an interesting toy, or a unique piece of furniture with your own hands.
Materials and tools for paper crafts
DIY paper products are created using simple materials and tools, most of which can be found in any home.
Paper
The most popular types of paper raw materials are:
- White or colored office paper is the main material for making paper crafts. It can be used to create applications, origami, and crafts using the quilling technique.
- Corrugated, tissue paper and crepe paper are suitable for making delicate three-dimensional flowers, balls, and appliqués using the cutting technique.
- Napkins are used in cut appliqué, trimming, and decoupage.
- Magazine and newspaper sheets are used to create collages, crafts using the iris folding and papier-mâché techniques.
- Cardboard is a dense base and background for various paper products.
Masters of paper crafts also use various waste materials, paper ribbons, openwork napkins, sets of colored paper for children's creativity, leftover wallpaper, and whatman paper.
Glue
The correct choice of adhesive influences the final quality of the paper product.
To select an adhesive, the following factors should be considered:
- texture and size of bonded surfaces;
- purpose of the product;
- age of the master.
The most popular adhesives are:
- Glue stick , which is used for working with small parts. It is suitable for use by children of early preschool age, as its convenient packaging and consistency prevent heavy contamination of the work surface. The disadvantages of glue in the form of a pencil include fairly rapid drying, which makes adjustments to the craft impossible.
- Starch (flour) paste is a natural, safe adhesive. It can easily be made at home by mixing 100 g of dry matter and 1 liter of water. Initially, they begin to heat the water over low heat, pouring about 100 g into a separate container. This liquid is used to prepare a thick, homogeneous solution, which is slowly added to boiling water and stirred thoroughly.
Important! The glue should not boil, so it must be stirred constantly, bringing it to a thick consistency.
The paste can be used in children's paper crafts, without the need to use a brush to apply it, in the making of papier mache and paper figurines.
- PVA glue is a universal glue widely used in handicrafts. It reliably glues different types of paper together and with other materials. But at the same time, working with it requires care.
Scissors
A must-have tool for paper crafts is scissors. Beautiful paper crafts can be created with only 2 types, but paper craftsmen use many different cutting devices.
These include:
- Long scissors with straight blades , the shape of the ends of which depends on the age of the craftsman. For safety reasons, young children should use a tool with a rounded cutting part, the length of which is no more than 10-12 cm. Straight blades are suitable for cutting paper and cutting out large shapes.
- Small scissors with sharp ends are used to make small designs on paper. They are especially in demand when creating piercings and three-dimensional pictures.
- Scissors with shaped blades (zigzag, wave) are designed for creating decorative edges on paper parts.
- A utility knife is used to cut paper into strips or cut out stencils. When using it, it is important to remember about safety precautions and the need to work on a solid base (wooden, plastic or glass board of a suitable size).
- A figured hole punch quickly and easily makes a large number of identical decorative parts that are used to decorate paper products.
Additional items
In addition to basic materials and tools, paper art uses additional elements to make the work easier and improve its results:
- simple and colored pencils;
- brushes;
- pens;
- paints;
- rulers;
- stencils;
- decorative elements (toy eyes, buttons, sparkles, pieces of fabric, beads);
- threads and needles.
DIY paper products for children. Schemes, templates, instructions
Children of any age can make paper products with their own hands.
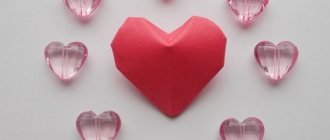
Decorative hearts
An origami photo frame decorated with hearts is a great opportunity to say: “I love you!” the closest people. To understand how to make such a paper decoration, it is best to watch the video tutorial:
For a frame measuring 7.5x7.5 cm you will need a square sheet of 15x15 cm. From the “heart” modules you can fold a ribbon-hanger:
Or add side triangular supports and place the photo on the table:
To place a photo in an origami frame, it must be cropped to 3.5x3.5 cm. If the photo is larger, the original square of the module will have to be proportionally enlarged.
But the most interesting option is obtained when a volumetric cube is assembled from photo frames.
An origami photo frame decorated with hearts can be a touching gift for Valentine's Day. Especially if you complement it with other similar decor.
Photo frame making techniques
To make a photo frame, two basic techniques are mastered:
- Preparing the base
- Design of the base
The main task of framing photographs is to highlight it from the general background.
Square frame
The following diagram is for making a simple and quick origami photo frame. This solution is suitable for a nursery, especially if you use paper with a thematic design. We will need a square sheet measuring 21x21 cm.
Step-by-step instruction:
- Fold the square in half from left to right and from top to bottom. Thus we outline the central axes.
- We bend all corners towards the center.
- Open the folds from step 2.
- Fold the corners to the new lines.
- Let's make one more turn.
- We bend the corners back.
- Ready.
All that remains is to make a stand from hard cardboard or a rope loop to complete the impressive and stylish decor.
Another similar scheme:
Ideas for origami
When learning the art of origami, it is important to know what figures can be made from paper. The most classic option is the crane, which is considered a symbol of happiness and success.
In Japan, there is a belief that if you make a thousand cranes, any cherished wish will come true.
You need to make a crane according to a pattern; this is not the simplest type of origami, but it is very exciting and useful. In addition to the crane, you can make many other equally interesting figures.
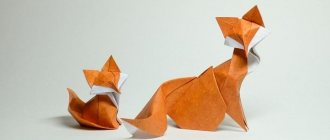
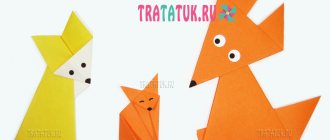
- Various animals and birds - owls, foxes, hares, crabs and so on;
- Flowers and plants;
- Geometric figures;
- Unusual figures in the form of a cup, heart, star and much more;
This or that type of origami is made according to a certain pattern. There are easy paper origami, as well as more complex options for more experienced craftsmen.
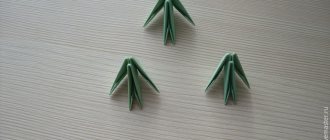
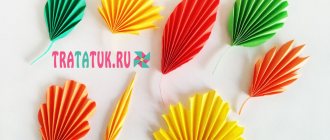
Sunflower
Origami flowers are one of the most popular decorative elements. You can also make a photo frame from them. For example, in the form of a sunflower:
We will need: a square with white and yellow sides measuring 15x15 cm.
Step-by-step instruction:
- Let's start from the inside out. We outline the central axes.
- We bend the right and left edges towards the middle.
- We mark the middle of each half of the figure, as shown in the sample.
- We open the upper and lower parts from the inside.
- Flatten it. We get the basic form “Catamaran”.
- We open each corner in the direction of the arrow and press.
- It turns out to be a large square from four small ones. We fold each of them along the dotted lines.
- We open the point from the center upward, as in the basic “Bird” shape.
- We repeat the same action for the remaining three parts.
- We open the figure along the arrows.
- We lower each protruding element towards the center.
- Glue on a cardboard square. We will attach the photograph to it.
Alternative sunflower model:
Types of materials for decoration
When choosing materials for decorating a frame with your own hands, it is important to know how to choose the right color. So, it is better to decorate color photographs with light details. When choosing a color, you can focus on a particular detail of the photo.
For black and white photos, gray, white or silver material is suitable.
- Paper: for decoupage, packaging, glossy (old magazines), geographical maps, sheet music
- Natural materials: stones, shells, tree branches and disks, cones, birch bark, corks
- Fabrics, threads, accessories: yarn, felt, cord, cord, knitted pom-poms, lace, silk, brocade, satin, wool, leather, fur, jeans, buttons, beads, seed beads
- Grains, fruits, spices: coffee, lentils, nuts, seeds, cereals, beans, vanilla, pepper, coconut flakes, bay leaves, anise stars, dried orange slices.
- Various items: puzzles, broken disks, keyboard buttons, pencils, dough, eggshells, sealing wax, spools of thread, artificial or dried flowers, jewelry.
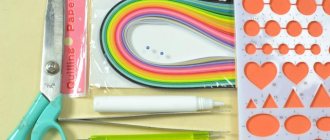
- Quilling - shapes twisted from sheets of colored paper, postcards or glossy magazines
The design of a photo frame can be made in different styles:
- Eco-style;
- Shabby chic;
- High tech;
- Classical;
- Romantic;
- Antique styling;
- Country (rustic);
- Children's.
The design style of the photo frame base should match the style of the interior and the intended photograph.
The features of each style are first studied, then they are applied correctly.
Star frame
This origami photo frame made of modules resembles either a star or a snowflake. It consists of two parts - larger and smaller, which overlap each other. Each is composed of 8 modules. For a larger ring you will need squares of 15x15 cm, and for a smaller one - 10x10 cm.
Manufacturing instructions:
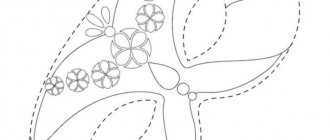
Openwork decor for scrapbooking will add elegance to the frame:
On the back of the product there are convenient “pockets” where you can store receipts, business cards and other documents. So the benefit of the model is double: it is both an elegant accessory and a mini organizer.
The benefits of origami
Anyone who has experienced the fantastic world of origami at least once will never want to leave it. In the photo of paper origami you can see amazing masterpieces that you can create with your own hands.
Origami not only develops imagination, but also makes you think logically, be attentive and focused. This activity is perfect for restless children; it will help direct energy in the right direction.
In ancient Japan, only educated people practiced origami; mastery of this art was considered a sign of intelligence. With origami, children learn to recognize geometric shapes faster than with any other activity.
Before you start practicing origami, you need to prepare all the necessary materials. First of all, this is good thick paper, the quality of which determines the quality of the figures themselves.
For all beginners, it is recommended to use patterns according to which you need to bend the paper without making mistakes. In some cases, scissors and glue are used, but this is a slightly different type of origami.