Origami fox for children in three versions from simple to complex. Step-by-step instructions with visual photos.
Materials:
- Double-sided and single-sided colored paper (origami paper);
- Glue, markers, paper eyes, adhesive moving eyes to choose from.
How to make a bookmark fox
A step-by-step diagram for folding a fox bookmark looks like this:
- Fold a square sheet of single-sided orange colored paper diagonally.
- Place the resulting triangle with the fold down, and bend it in half again horizontally.
- The result was a strip of three triangles. The side triangles need to be folded up.
- Turn the fox over and draw its nose and eyes with a black felt-tip pen. The craft is ready.
Now you can use the fox trick to attract your child to read books that have a cute face in them.
Brooch
A fox brooch is a small decorative item, the creation of which is a quick and simple process.
Flat fox
To create a brooch in the shape of a flat fox you will need the following materials and tools:
- a small piece of hard orange felt;
- small pieces of white felt;
- a small piece of black felt for the nose;
- soft simple pencil;
- scissors;
- white, black and orange threads;
- needle;
- brooch fastening element.
Master class on making a fox brooch from felt:
- First you need to cut out the parts (transfer their images onto felt using a pencil or marker and cut them out):
- main part (the whole figure of a fox, orange color) – 1 pc.;
- body (orange) – 1 pc.;
- muzzle (orange) – 1 pc.;
- cheeks (white) – 2 pcs.;
- tail brush (white) – 1 pc.;
- nose (black) – 1 pc.
- Then you need to sew the body to the base with orange threads.
- Now you should sew the cheeks and nose to the head, and also embroider the eyes of the animal.
- Next, the head is attached to the body and sewn.
- At the end, the brooch fastening element is glued to the base.
Volumetric fox
A felt fox, the pattern for which is presented below for a brooch, can turn out to be voluminous if a small amount of filler is placed inside the head and tail.
To create a brooch in the shape of a voluminous fox, you will need the following materials and tools:
- a small piece of hard orange felt;
- a small piece of soft orange felt;
- small pieces of white felt;
- button (bead) for the nose;
- bow or flower;
- white sequins;
- soft simple pencil;
- scissors;
- black and orange threads;
- needle;
- safety pins;
- brooch fastening element;
- hot melt adhesive.
Master class on making a voluminous felt brooch:
- The first stage is cutting out the parts. It is necessary to transfer their images onto felt using a pencil or marker and cut them out. You should get the following set of parts:
- body (orange) – 2 pcs.;
- muzzle (white) – 2 pcs.;
- center of the muzzle (orange) – 1 pc.;
- ear (orange) – 2 pcs.;
- inner part of the ear (white) – 2 pcs.;
- tail (orange) – 2 pcs.;
- tail tassel (white) – 1 pc.
- The second stage is assembling the base. Both round orange parts must be folded together, secured with safety pins, and sewn with orange threads with a looped seam over the edge.
- The third stage is the design of the tail:
- you should glue a white tassel to one of the parts of the tail;
- Next you need to embroider the tail with sequins;
- then you need to sew both parts of the tail together with orange threads using a looped seam over the edge;
- Closer to the tip, it is necessary to leave a hole for stuffing, after which it is sutured.
- The fourth stage is the design of the head:
- the inner parts of the ears should be glued to the outer ones;
- then you need to embroider the inner parts with sequins;
- now you need to sew the center of the muzzle to one of the white parts of the head;
- then the nose is sewn on and the eyes of the animal are embroidered;
- Now you can sew the decorated head part with another white part using a looped seam over the edge, after inserting the ears between them;
- leaving a small hole, you need to place a little filler inside the head, and then continue the seam.
- The fifth stage is assembling the product. The head and tail are glued to the body, and a flower (bow) is attached near one of the ears.
- The sixth stage is the final one: you need to glue the brooch mount on the back of the product.
A simple scheme for making chanterelles
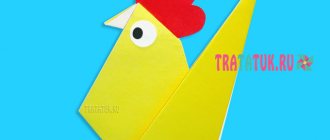
Another option is to make a fox face in a couple of minutes. Again you will need an orange square leaf.
You need to fold it diagonally, unfold it and fold it again along another diagonal. Bend both corners of the workpiece towards the middle, but leave a small distance between them. These will be fox ears.
Now all that remains is to turn the product over and paint the narrow fox face. You can draw slyly narrowed eyes, a nose, a mouth and even a short mustache.
Required tools and materials
A felt chanterelle, the pattern of which is presented in various versions below, can be made with the following materials and tools.
| Material/tool | Purpose |
| Sheet/piece of felt | If the product requires stuffing with filler, it is better to use soft felt. When padding is not required, stiff felt works well. |
| Sample | Necessary for cutting parts. If a picture is taken instead of a template, then it must be printed in 2-3 copies to ensure the integrity of each detail. Because in the picture the details are superimposed on each other. |
| Filler | Required for bulky toys. The following types of materials can be used as filler:
|
| Sewing threads | For stitching and edging parts, you can choose not only sewing threads, but also knitting and embroidery threads. It is important to remember that the thickness of the needle eye depends on the thickness of the thread. The threads should be the same colors as the felt parts. |
| Needle | It should not be short or thin, but strong enough to pass freely through 2-3 layers of felt. |
| Hot glue gun | It is hot melt adhesive that can provide a high level of strength to products. However, if it is not available, any super glue with an immediate effect will do. |
| Soft pencil or marker | Necessary for transferring the outlines of product details onto felt. It is better to choose a marker for soft felt, a soft pencil for hard felt. Pencil and marker marks will not be visible on black felt, so when using it, it is best to use tailor's chalk. |
| Scissors | They should be of two types: large (for large parts, as well as for trimming a product that has about 2 layers of felt) and small (for small parts). It is best to take strong and sharp tailor's scissors. |
| Safety pins | Necessary for fixing a pair of parts when sewing them together. The fixed parts will not be able to move - which means they will be sewn smoothly. |
| Decorative elements | Used for product design. It can be:
|
Origami diagram of a sitting fox
The authorship of this elegant figurine is attributed to the famous popularizer of origami Fumiaki Shingu.
A sitting fox is easy to make. And from several figures it is quite possible to form a club of red-haired sages.
Instructions on how to make an origami fox look like this:
- bend a square sheet of paper along one diagonal, straighten it and bend it along the second;
- the result was a triangular blank with a fold in the middle;
- fold the side corners to the fold line to form a rhombus;
- roll the diamond in the middle “hill”, that is, away from you;
- fold the side of the resulting triangle with a triple edge by one quarter, as shown in the photo;
- open the folded corners in the center; the middle corner will lower and turn into a muzzle, and the top two will become ears;
- bend the tail on the opposite side, giving stability to the entire structure;
- draw a fox's face.
Application
Even a child of primary school age can make a felt fox applique. This picture can be used to decorate the cover of a book, or you can put it in a frame and hang it on the wall.
A felt fox could be something like this, for example.
To create an application you need to prepare the following materials and tools:
- a sheet of blue or light green felt for the base;
- a sheet of orange felt (the size of the sheet depends on the expected size of the image);
- a small piece of white or beige felt (for the face, belly, etc.);
- a small piece of black felt (for feet, nose, eyes);
- scissors;
- needle;
- threads;
- sample;
- hot glue;
- soft simple pencil.
Master class on making a felt applique of a little fox:
- First you need to cut out (transfer images of parts onto felt using a pencil or marker and cut them out) the necessary parts. There should be 1 of them. except for paired ones (ears, paws, eyes), since the little fox will not be a separate figurine, but an applique sewn to the base. The following parts are required:
- head (orange color) – 1 pc.;
- face (white) – 1 pc.;
- center of the ear (white) – 2 pcs.;
- eye (black) – 2 pcs.;
- nose (black) – 1 pc.;
- body (orange) – 1 pc.;
- front paw (orange) – 1 pc.;
- foot (black) – 2 pcs.;
- belly (white) – 1 pc.;
- tail (orange) – 1 pc.;
- tail tip (white) – 1 pc.
- Then you need to outline the location of the applique parts on the base. To do this, you should lay out all the parts to create an image of a fox, and then fix them to the base using safety pins.
- Now you can start sewing the parts, making sure that they do not “move out” and fit snugly to each other. First, the torso is sewn on, since the head overlaps slightly in relation to the torso. The seam should be neat and decorative - “forward needle” or “back needle”. First you need to place the tail under the body, securing it with a seam.
- Next, you need to sew on the belly, followed by the front legs and feet, and then sew the rest of the tail to the base.
- Then the head and face are sewn on: both parts, overlapping each other, must be simultaneously stitched in the lower part (in the chin area) to the top of the body.
- Next, the seam is completed along the entire circumference of the head and the centers of the ears are sewn on.
- After this, the animal’s face is sewn on and shaped: the eyes and nose are glued into place.
Origami fox with bushy tail
A large fluffy tail is the calling card of a fox. Therefore, it plays an important role in the manufacturing scheme of the next model.
The instructions are:
- Fold a square sheet of orange paper in half and unfold it.
- Fold both halves of the workpiece to the fold in the middle.
- Fold the workpiece in half crosswise and unfold.
- Fold one side to the intended fold and bend it back.
- Convert the folded corners into triangles-pockets.
- Bend the workpiece lengthwise in the middle, with the “pockets” facing out.
- Bend over the triangles.
- Fold the triangular edge of the workpiece to the middle.
- Open the three-layer part of the workpiece in the center. This will make a muzzle and ears.
- Open the central triangle and press along the fold lines. The finished muzzle will be in the shape of a diamond.
- Make a tail on the other side of the craft. To do this, roll it twice. Once - diagonally to the upper corner, the second time - close to the fox's chest.
- Unfold both folds. Turn the middle folds in the opposite direction.
- Fold the bottom corners of the tail a few millimeters inward to give a natural shape and stability to the tail.
Case
To create a case in the shape of a fox, you need to prepare the following materials and tools:
- orange (brown) soft felt – 2 sheets of A5 format;
- a small piece of white felt;
- a small piece of black felt;
- a small piece of gray felt;
- soft simple pencil;
- scissors;
- orange threads;
- needle;
- safety pins;
- hot melt adhesive.
Master class on making a felt phone case in the shape of a fox:
- First you need to cut out the parts: transfer their images onto felt using a pencil or marker and cut them out. For the pattern, you can use the image of the finished product presented above. You should get the following set of parts:
- base of the case (according to the size of the phone, but taking into account the seam) – 2 pcs.;
- head – one piece (white) – 1 pc.;
- muzzle – middle part without ears and nose (orange) – 1 pc.;
- upper part of the muzzle with nose (orange) – 1 pc.;
- inner part of the ear (white) – 2 pcs.;
- eye (gray) – 2 pcs.;
- pupil (black) – 2 pcs.;
- nose (black) – 2 pcs.;
- tail – one piece (white) – 1 pc.;
- tail without tip (orange) – 1 pc.
- Next, you should take one of the base parts and sew a white tail part to its lower part, having previously secured it with safety pins. The orange part of the tail is sewn on top.
- Then the second part of the base is formed. First, you need to attach a white solid piece of the head to it, securing it with safety pins.
- On top you need to attach and fix the middle part - the muzzle, and then sew it to the base only in the cheek area.
- Now you should outline the location of the eyes and glue them to the muzzle.
- The inner parts of the ears and nose are sewn into place to the upper part of the muzzle with the nose.
- Next, you need to attach the fox to the head and secure the upper part of the muzzle with the nose with safety pins and sew all the parts with a decorative seam, fastening them to the base.
- At the end, both parts of the base of the cover are sewn together with a looped seam over the edge.
The felt fox figurine can be used in various ways: from a soft toy to a simple applique for the development of children in their free time. From the large number of pattern options presented, you can choose the appropriate one and create a beautiful product.
"Talking" fox head
The fox is a traditional fairy tale character. Since children really love home dramatizations of fairy tales, a fox head that you can put on your hand and “speak” with it will be a useful craft.
Below is a simple paper fox for beginning storytellers. You can create other “talking” characters to accompany her using the same model.
Cup of English tea
First graders can be offered a slightly more labor-intensive task. To work you will need white or gray cardboard, checkered or striped paper sheets, glue, scissors, thick cotton thread, felt-tip pens.
Procedure:
- Cut out the shape of a tea cup with a handle from cardboard.
- Make two exactly the same shapes from colored paper, only one of them has a handle turned in the other direction (mirror shape).
- Glue the thread to either side of the cardboard, as if you were putting a tea bag in a cup.
- Glue colored shapes on top of the cardboard base on both sides.
- Place the free end of the thread between two small squares of cardboard, glue everything together, and draw a flower on each square on both sides. This end will serve as the outer tab.
This craft is a nice gift and a stylish accessory for a book.
Scheme for creating a fox toy for your hand
You will need a square sheet of orange paper. The steps to create a fox are:
- fold the sheet in half;
- fold a double layer of paper crosswise so that the opposite edges meet in the middle;
- Open the side pockets so that triangles appear on top;
- turn the product over;
- bend the right and left edges of the workpiece towards the middle;
- fold the lower right corner diagonally towards the middle;
- form a fox ear; bend the top layer of the workpiece twice as shown in the photo of the origami fox;
- do the same with the second ear;
- carefully push the sides apart, adding volume to the middle part;
- press the product inside from the outside, forming the mouth of a fox;
- align all the folds and decorate the face with eyes.
DIY paper bookmarks for children (step-by-step instructions)
These patterns need to be woven.
I'll show you in detail how to do this. And to make the bookmark more beautiful, you can use different colored papers. Then you will get a very nice pattern. Cut 2 strips of each color of paper. The width of the strips is 1 cm.
Glue 2 strips of the same color to the edge at right angles. These are our red stripes.
Having retreated 1 cm from the corner of the workpiece, glue strips of a different color (white), one, and then the other.
We bend the top, red stripe diagonally.
And on the other side of the workpiece we bend the red strip diagonally.
Now we bend the white stripes diagonally. We do this until there are 1-1.5 cm of strips left. You can fix the braid with glue so that the structure holds tighter.
Cut off the bottom of the workpiece at an angle. And glue the edges of the strips together.
Use a hole punch to make a hole at the top of the workpiece.
Fold a thick thread or ribbon in half and thread it through the hole. We pull the tail of the ribbon into the loop. We tighten it. If it is a thread, you can cut the ends and fluff the threads.
As you can see, it's very easy to do. And stripes can be used in one, two, three or even four colors.
And another simple option - cute cats that hold the page with their paws.
They are very easy to make, your baby can also participate in the process of creating them. We measure and cut a strip 4-5 cm wide, about 10 cm long. Draw a cat’s face and two paws on it.
Using a sharp knife or thin scissors, cut out the legs along the outline, leaving the paper surface at the top of the legs intact.
The cheerful kittens are ready, isn't it simple?! Preschoolers really like them.
Realistic fox using origami technique
Having passed the initial level of simple assemblies, you can proceed to labor-intensive schemes. If you are going to create a real masterpiece in the world of origami, you definitely need to take care of high-quality material.
Only good paper can withstand complex patterns with many kinks.
Volumetric paper craft
The process may take a lot of time and will require attentiveness, but the finished figurine will be as similar as possible to a real animal, you will have plenty to admire. For young craftsmen who like to create crafts with their own hands, namely origami from “fox” paper, step-by-step diagrams for children will be an excellent helper.
They often very clearly show a detailed anatomical study of all parts of the animal’s body; by placing the document in a convenient place, you can look there in case of unclear situations. This will be especially useful when working with complex volumetric compositions, the master class of which will be discussed now.
How to choose origami paper
The most common and affordable option is regular office paper for printers and copiers. It comes in white and colored. This paper withstands all manipulations well, does not tear and does not lose color when folded.
There is also special paper for origami. It is already sold in square sheets, because most blanks must have equal side lengths. It can be plain or with ornaments.
Step-by-step instructions for assembling a fox
- Work on the fox begins with assembling the “door” blank.
- Then, on one side of the workpiece, triangles are made from the corners, the future legs.
- A zigzag fold separates the area of the head and front paws.
- The muzzle and front paws are being formed.
You can clearly see all the stages of assembly in the diagram, there is a folding guide and in video format.
What additional things might be needed?
As with any work, origami creativity requires special endurance, patience and understanding of basic actions. To do this, we offer for your reference templates and standard practices for making paper chanterelles.
Please note that the step-by-step instructions for the origami fox are quite simple to make, since we offer the most optimal templates for creativity, but then you will also find original ideas on where and how you can apply the fake.
Materials:
- Colored paper.
- Scissors.
- Pencil.
- Felt pens or markers.
- Foil.
- Rhinestones.
- Pieces of cotton wool or fur.