Basic rules for working with coffee beans
The simplest craft option using coffee beans is a decorative panel. Considering that the aroma of coffee is associated primarily with morning awakening and vigor, the theme of the panel should be appropriate.
Considering that coffee beans are a natural material, the rest of the crafts made should also be of natural origin. You can use linen, wooden elements, twine, nuts or pebbles.
The basis for coffee crafts will be cardboard, thick fabric, wood or ceramics.
It is convenient to glue the grains to the base using ordinary PVA glue; after drying, it does not leave untidy marks.
In order for the craft to delight you with a pleasant aroma, you will need fresh coffee beans.
Original ideas
Modern handmade craftswomen never cease to amaze with their fantastic crafts. Each of them is individual and carries a part of the soul of its creator. Let's look at the most interesting and unusual crafts made from coffee.
To make a mill you will need:
- a round tall jar, for example, from children's tea;
- twine and glue;
- two sheets of thick cardboard;
- barbecue sticks, matches or toothpicks;
- a piece of gray linen fabric.
The process is step by step.
- Cover the jar tightly with twine.
- For the roof, cut a circle out of cardboard, make a cut and secure with a cone. Pre-paint white cardboard brown. Decorate the roof with grains, leaving free space for attaching the mill blades.
- Cut them out of thick cardboard. Attach barbecue sticks to the sides of each blade so that they extend beyond the edge of the cardboard. Wrap the workpiece with thin twine, covering the cardboard base. Stick several grains in the center of the blades.
- Glue the finished blades to the roof of the mill and now fill the remaining gaps with coffee.
- Make the door from matches or toothpicks glued together.
- For the base of the mill, cut out a circle from cardboard and decorate it with linen fabric. To imitate a fence, place coffee beans around the edges.
- Connect both parts of the craft. Add additional decor if desired. For example, bags of flour, a horseshoe and a broom.
Flower as a gift
An original and unusual product made from twine and coffee beans will be a pleasant gift for any occasion.
You will need:
- a piece of rigid wire that will hold its shape well;
- leg-split;
- alabaster and flower pot;
- coffee beans;
- glue gun
Performance.
- Cut the wire into pieces according to the number of expected petals. Fold each one in half and twist, leaving a loop at the top.
- Using twine using the ganutel technique, braid a loop and wrap the wire just below the petal. Do this for all the petals and a couple of leaves for the flower.
- Assemble the flower itself, tightly twisting the wires together to form a stem. Wrap it tightly with twine.
- Dilute alabaster and pour it into a flower pot. Insert the stem and hold until the solution sets.
- Now you can decorate the petals and leaves with fragrant grains.
- Additionally, decorate the pot with hemp rope or twine.
Coffee crafts are a popular handmade trend. They are beautiful, made from natural materials and do not require large expenses. A handcrafted item will fit perfectly into the interior and fill the room with a pleasant aroma.
Originally posted 2018-03-19 10:27:40.
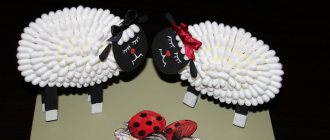
Panel "Sheep"
An easy craft to make in the form of a cheerful sheep.
To create a craft you will need:
- sheet of cardboard,
- leg-split,
- coffee beans,
- PVA glue,
- acrylic paints,
- eyes that can be purchased ready-made.
Operating procedure.
- To create a panel you will need parts of the sheep's body. You can draw them yourself or copy the image you like.
- Transfer the drawing to cardboard, cut out the parts and paint them with dark brown paint.
- Starting from the middle of the animal’s face, glue the prepared twine in a spiral and attach the eyes on top.
- Make legs from twine, and make hooves from grains, gluing them to the twine.
- Attach the legs to the body with glue.
- Decorate the body with coffee beans.
- Glue the head.
Using this master class on coffee crafts, you can create images of other funny animals: a horse, a mouse, a hedgehog or a bear cub.
coffee tree
Another relevant decorative exhibit made from grains is trees, or as they are called, topiaries. There are many video master classes on the Internet that reveal the intricacies of designing interior decorations, but it is the tree with mocha foliage that is distinguished by its elegance.
The list of raw materials and tools is as follows:
- Whole bean coffee;
- Thick wire;
- Twine;
- Styrofoam;
- Glue gun;
- Stationery knife;
- Textile;
- Lace;
- Dye;
- Cotton pads;
- Pot for indoor plants;
Manufacturing instructions
- Fill the container with a suitable piece of foam and secure. For the base of the topiary, you can use either a flower pot or a mug. So that in appearance it does not fall out of the overall picture, you should wrap it in canvas or initially select a suitable print.
- Insert the rod in the middle and bend it. If you cannot find the wire, use a pencil. You can build a covering for the “trunk” from twine, wrapping it around the circumference and strengthening it with “Moment”.
- Cut out a crown from the filler - it can be represented by a heart or just a circle. Place cotton wool cosmetic sponges on top and secure with a tourniquet.
- Paint the top with brown gouache, wait until it dries and decorate with grains.
- Decorate with ruffle bows of a different color, rhinestones or bugles. Dried rose petals at the foot of the stem will look elegant, especially if the topiary is made for Valentine's Day.
Panel “Cup of Coffee”
The image of a cup of invigorating morning coffee will serve as a classic addition to the interior of a kitchen or small cafe.
It is not difficult to make it with your own hands; the work does not require prior experience in creating similar interior elements.
For the panel you will need:
- thick cardboard A4,
- a piece of burlap, the size of which is slightly larger than A4,
- fresh coffee beans,
- glue (PVA or stationery),
- image template.
Operating procedure.
- Steam a piece of burlap with an iron and secure it to a cardboard base. You can use glue or tape for fastening.
- Stepping back 2 cm from the edge, mark the frame on the front side.
- Transfer the image to burlap.
- Glue coffee beans on the lines of the drawing and decorate the frame with them.
- The panel can be additionally decorated with other elements.
Using a similar technique, it is easy to apply any image to a canvas or cardboard base.
Tools for making a stationery stand:
- tweezers
- metal scissors or wire cutters (for wire and wooden slats)
- glue
- pencil
- tassel
- ruler
- utility knife or scissors
- drill and thin drill bit (optional)
- compass
- threads
- water container
- matches or lighter.
I don’t indicate the sizes and quantities, everything is individual and depends on what materials you use and the desired size of the coffee figurine.
Decorating a watch with coffee beans
A creative approach to decorating an alarm clock or watch dial will tell you how to make a coffee craft. Coffee beans can be used for the main background of the product, or used to decorate numbers.
To work you need to prepare:
- clock (or clock mechanism and glass),
- coffee beans,
- PVA glue,
- decorative napkins for decoupage,
- acrylic paint and clear varnish,
- stained glass paint,
- brush,
- degreaser (alcohol),
- rubber roller,
- toothpick,
- sponge
- file.
Operating procedure.
- Treat the surface of the watch glass with alcohol for high-quality degreasing.
- Prepare a napkin for decoupage, cover it with PVA glue diluted with water in a ratio of 1:2, apply it to the glass from the inside.
- In order to carefully stick the napkin, it must be carefully smoothed, covered with a file and rolled with a roller.
- After drying, coat with varnish.
- Apply a layer of paint to the dry varnish coating.
- Turn the workpiece over after the paint has dried and mark the contours on the front side for decoration with coffee beans.
- Cover the desired area with stained glass paint and place the grains on it using a toothpick.
- Having decorated the craft with grains, leave it to dry.
- The numbers can be painted with acrylic paint or made from polymer clay.
- Attach the clock mechanism.
Instead of glass, you can use a blank made of wood or plastic as the basis for the product, as well as a ready-made watch or alarm clock.
Coffee bean paintings
With your own hands, you can transform any drawing you like into a coffee masterpiece that will take its rightful place on the walls of your home. After practicing on easy subjects, you can fulfill your wildest ideas.
You will need:
- coffee beans;
- thick cardboard for the base;
- burlap or thick fabric;
- glue gun and glue stick;
- additional decorations upon request.
Progress.
- Prepare a base for a cardboard painting.
- Cut a rectangle from the fabric, larger in size than the thick workpiece.
- Coat the cardboard with glue and carefully place a piece of fabric on top of it. Carefully smooth out with your hands, expelling air and smoothing out wrinkles.
- Fold the free edges around the perimeter and secure. Leave the workpiece until completely dry.
- Apply the selected design onto the fabric with a pencil.
- The time has come for the most interesting part of the work - sticking the grains along the contours of the picture using a glue gun. In the same way, fill in the drawing inside the outline. Along the perimeter of the painting, additionally lay out a contour of coffee or decorate it in another way.
A variety of subjects are suitable for DIY coffee paintings. Appetizing still lifes will harmoniously fit into the kitchen environment. A pair of cats in love will decorate the bedroom walls. Cartoon characters will enliven the walls of a children's room.
Volumetric craft “Cup”
It’s easy to decorate your interior with an unusual craft by making a steaming cup of coffee with your own hands.
To work you need to prepare:
- a small bowl or cup without a handle,
- saucer of suitable diameter,
- coffee beans,
- leg-split,
- pliers,
- tape tape,
- glue,
- lace,
- thin rope or thread,
- wire.
Operating procedure.
- Wash the cup and dry it.
- Carefully, starting from the bottom, glue the twine inside the cup in a spiral.
- Having pasted the edge, go to the outside and paste it too with twine.
- Having finished with the cup, glue the twine to the entire surface of the saucer in the same way, starting from the middle of the bottom.
- Using pliers, make two curved parts in the shape of a horseshoe from wire.
- Place the wire parts together, wrap the tape with tape and cover with cord.
- Glue it as a handle to the cup.
- Decorate the cup and saucer with braid or lace around the edge.
- Make a curved element from wire to attach the cup.
- Attach the workpiece to the saucer and cup using glue.
- Glue the coffee beans inside the cup, masking the wire blank.
- Wrap the wire with tape, cover the entire workpiece and saucer with grains, depicting grains scattered from a cup.
- Glue a couple of grains to a thin rope and secure it with a bow on the handle.
The work is done. You can decorate the craft at your own discretion by replacing the lace with other decorative elements.
Crafts from twine and coffee
An extraordinary vase, cup or even flower pot can be made from twine and coffee beans. The simplest option would be a decorative scented candle, which you can not only use for aesthetic purposes in your home, but also give as a gift to loved ones.
Candles decorated with coffee beans look very original
To make an unusual candle you will need:
- scented candle
- leg-split
- glue or glue gun
- coffee beans
- clear varnish
Twine can be purchased at any hardware store or craft shop.
Making a decorative candle is very simple, and the end result directly depends on your imagination:
- First, you need to tightly wrap the candle with twine 2. This can be done around the entire circumference of the candle or to its middle 3. After this, use a glue gun to secure the ends of the twine to the candle so that it fits snugly to its surface, without protruding or forming a void . You can also do without glue by melting small sections of the candle and pressing the twine into the surface of the candle 4. The candle wrapped with twine is covered with coffee beans to the middle, doing this in rows, so that the layer of twine under the grains is not visible 5. At the final stage, the grains are painted with colorless varnish , which will provide shine and make it easier to wipe the structure from dust in the future
Instead of a scented candle, you can use a regular
candle. You can decorate the finished candle with beads if you want to give it a more festive look or immerse the beans inside the melted wax along the edge of the candle.
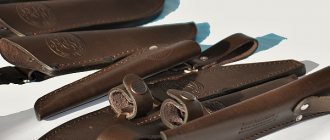
Coffee bean photo frame
You can decorate a beautiful frame for memorable photographs with coffee beans.
To work you need to prepare:
- cardboard,
- coffee beans,
- PVA glue,
- scissors,
- colorless varnish.
Operating procedure.
- From thick cardboard, cut out two rectangular pieces of the same size, corresponding to the size of the photo.
- Carefully cut out a window in one blank.
- Cover the frame with the cutout with coffee beans, placing the convex part up.
- Dry the frame and apply varnish to its surface.
- Glue the halves of the workpiece together, leaving space for placing the photo.
The grain frame can be supplemented with original details: twine, beads, lace or braid.
How to make a panel of coffee and beans
To create more interesting scenes and landscapes on panels, coffee beans are used in combination with beans. How to make a panel of coffee and beans?
It is not necessary to use coffee as the main material for the composition: an excellent solution would be to use beans for the background of the future panel
To do this, also, on the basis of the panel, approximate marks are made and the beans begin to be laid out. The beans serve as the background, the main color, and the coffee beans serve to create the shade, lines and edges. Using beans and coffee, you can create a beautiful female silhouette of a figure, a face, depict a heart of two halves, beautiful flowers, create silhouettes of cats in two colors, one cat silhouette can be made from coffee beans, and the second from beans.
Simple candles with coffee decor
To work you will need:
- candles,
- coffee beans,
- PVA glue.
Operating procedure.
- Using glue, carefully attach the coffee beans to the candle.
- You can attach the grains directly to the melted wax using tweezers.
These are the easiest ways to make original coffee candles.
What is coffee roasted on?
Roasting coffee is essentially “cooking” and the goal here is obvious - to prepare the product as tasty as possible, to reveal the maximum potential of the raw material.
They “cook” not in the kitchen, but on professional technical equipment - roasters; the roast master acts as a chef, and it is he who decides what and how to roast. A coffee roaster is, simply put, an oven that transfers heat to the beans through convection, conduction and radiation. There are two main types of roasters: some roast coffee in a pseudo-fluidized bed, mainly due to convection, while others mainly transfer heat using thermal conductivity (conduction) of drums. Each of them works differently, but is good in its own way, and you can roast coffee perfectly on any of them; here the “cook” is more important than the equipment.
Candle with coffee beans
With some creativity, you can create a unique piece of furniture using a candle, a glass vessel and coffee beans.
In this case, the candle is fixed at the bottom of a glass container and surrounded by coffee beans.
The size of the glass vessel should match the size of the candle.
A small decorative candle can be placed in a large transparent glass, but a large candle will require a large container.
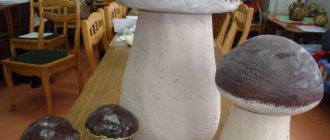
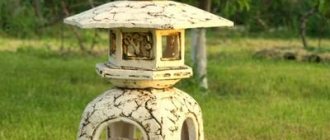
Topiary made of coffee beans as part of the interior
The divine aroma awakens the body, fills it with energy for a new day. A cup of this delicious drink in the morning puts you in a positive mood. It is quite possible to feel not only the taste, but also the smell throughout the day if you place it in your workplace or decorate your living room with such a detail. She has the ability to revive absolutely any home.
Fashion designers are happy to use such an accessory in their decoration - it can emphasize and complement the color scheme of the space in mint tones. The versatility of this element allows it to be used both in residential premises and in offices or cafes.
Topiary made from coffee beans
An interesting craft: a coffee tree can have a flower pot or a decorative “leg” as a stand.
In order to make topiary, you need to prepare in advance:
- foam ball,
- stick,
- coffee beans,
- cord,
- PVA glue,
- dry gypsum,
- small pot for indoor flowers.
Operating procedure.
- Cover the foam ball with cord.
- Wrap the support stick with cord or ribbon and secure with glue.
- Insert the stick into the foam ball and secure it.
- Glue coffee beans onto the surface of the ball as intended.
- Prepare a mixture of gypsum, place it in a pot and secure the lower part of the “tree”.
- After the mixture has hardened, form the “soil” in the pot with coffee beans.
- Decorate the tree with a bow.
The spectacular coffee topiary is ready.
In a similar way, using a cone-shaped blank, you can make a New Year's coffee tree, decorating it with miniature balls in the form of bright beads.
New Year's crafts made from coffee beans can be used to decorate your home for the holiday. These can be not only stylized Christmas trees, but also original imitations of cones or bells, decorated with coffee beans.
Photos of coffee crafts posted on thematic websites will give you new ideas for original crafts.
DIY panel of coffee beans. Master class: Coffee cup
Master class “Panels made of coffee beans. Coffee cup"
This master class is intended for middle-aged and older children, additional education teachers, educators, for lovers of natural coffee and simply for connoisseurs of beauty.
Purpose: interior design, making gifts for family and friends for the holidays with your own hands. Completed by: Stol Oksana Vladimirovna, teacher of MADOU No. 203 “Kindergarten of a combined type” in Kemerovo. Goal: making panels from coffee beans. Objectives: - introduce the technology of making a hollow mug from a plastic bottle and coffee beans; — improve practical skills in working with coffee beans and natural materials; — to develop artistic taste in children and adults, the desire to do something unusual with their own hands. Interesting facts about coffee... • Coffee is the most popular drink in the world. Among all products, coffee ranks second in popularity (after vegetable oil). • Approximately 10% of people are not at all susceptible to the effects of coffee. Vigor, tone and increased blood pressure from a cup of hot drink are not about them. • The longer coffee is roasted, the less caffeine remains in it. • Coffee tastes well with almost any food. • The aroma of coffee is in the top ten most recognizable smells. The smell of coffee saves you from stress. It is generally accepted that the smell of coffee is wonderfully invigorating. However, scientists from three countries have found that the smell of coffee beans has another property. Experts from South Korea, Germany and Japan have proven that the smell of coffee reduces the symptoms and effects of stress. Such conclusions were made during experiments on laboratory animals. Tests show that the aroma of coffee leads to changes in the functioning of 17 genes and the production of proteins in the brain, writes Web MD. Thus, the smell of coffee beans stimulates the production of substances with antioxidant properties. These substances protect nerve cells from damage and help you recover faster from stress. Coffee beans are by far the most popular material for creating various DIY crafts. Coffee beans have a pleasant smell, do not spoil, have a rich color and interesting texture. Coffee beans bring happiness to the home; they have a unique coffee aroma that creates an atmosphere of warmth and comfort. This is the kind of panel we will make from coffee beans. Let's stock up on a good mood and move forward! For work we will need:
- plastic bottle (1 liter) - coffee beans - ground coffee - masking tape - finished frame - thick burlap - PVA glue (preferably thick construction glue) - Titan glue - hot glue - decorative flowers and decorations - cinnamon - dried lemon, orange, zest roses - twine - packaging cardboard - brown gouache - brush, ruler, scissors
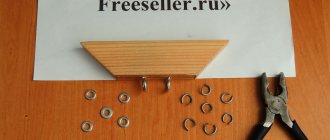
Step-by-step production 1. Cut off the top part from a plastic bottle, the length from the neck is 13 cm (two parts are obtained from one bottle) cut lengthwise in half, then cut off the neck
2.Cut out the back wall and bottom for the mug from packaging cardboard. For the saucer, it is better to cut out two parts and glue them together, since my cardboard is thin 3. Glue the parts to the mug using Titan glue 4. Glue the workpiece with masking tape, we need this for the strength of the mug, for better gluing of coffee beans and for hot glue did not melt the workpiece 5. Paint the mug and saucer with brown ink. And you can do it differently. First, spread the workpiece with PVA glue, and then sprinkle with ground coffee (I didn’t really like the second option, this option is suitable for those who glue coffee beans only with hot glue; I mainly use “Titanium”, and use hot glue in those cases , when you need the coffee to stick immediately; and I painted the top of the workpiece again with gouache) 6. Making a mug You need to choose coffee beans of the same size. Glue the coffee around the edges of the mug using hot glue. Please note that we glue the grains exactly along the workpiece so that they do not protrude beyond the borders of the mug, otherwise they will not stick to the base of the panel 7. Then we glue the coffee beans with Titan glue (I drop a little glue onto the workpiece and smear a small area with a wooden skewer) You can glue everything beans on one side And I prefer to alternate the beans on different sides 8. Making a saucer Glue the coffee beans first along the edge, and then along the entire workpiece.
Please note that the saucer on top is made of one layer of cardboard, it was impossible to bend it into the desired shape. But the lower saucer was already glued together from two parts and it was easy to give it the desired shape. 9. Trying on cups with different saucers
10. Glue the frames with burlap 11. Glue the mug and saucer with hot glue and make a handle from the grains
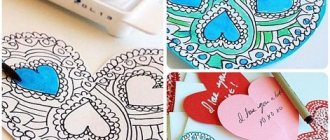
12. Decorate the panel We tie the cinnamon with twine and glue it to hot glue, on the other side a dried lemon slice. One of the options for decorating the panel is dried orange, lemon and zest roses. 13. This is how I make roses from orange zest and dry them. I buy cinnamon like this
15. We decorate the “coffee aroma” coming from the mug. Draw, apply PVA glue and sprinkle with ground coffee. Shake off the remains. 16. We decorate the panel with artificial flowers and decorations. The second version of the panel “Summer morning”
For this option, we do everything the same as in the first case. We just make the frame from cinnamon and ground coffee 1. Measure the required distance (6 cm) from the edge of the panel and glue the cinnamon with hot glue 2. Making the frame To do this, you need to outline the frame and coat it with PVA glue, and then sprinkle with ground coffee, shake off the rest on table 3. Drawing the “coffee aroma” I planned to make the frame from coffee beans, but left it that way for now. 4. Decorate with artificial flowers
That's it, all our coffee bean panels are ready! They will not only decorate your room, but also fill it with an amazing coffee aroma!
We recommend watching:
Topiary made from coffee beans. Master class Crafts from coffee beans and twine DIY coffee tree Easter egg made from coffee beans. Master class with step-by-step photos
Similar articles:
DIY topiary made from coffee beans. Master Class
DIY coffee bean figurines
DIY horseshoe made from coffee beans
DIY Christmas tree of happiness
Photos of coffee crafts
Styles of decorative panels
Ideas for decorating walls in various styles.
Modern
A design with a carefully thought-out theme, ideal geometric shapes and straight lines will be an excellent option for a multifaceted and logical modern design. Marble, glass, plastic elements or varnished surfaces are considered a relevant and winning solution.
The photo shows a plastic panel on the wall above the bed in a modern-style bedroom.
boho
This style personifies life and freedom and allows you to combine incompatible things. Here it would be appropriate to decorate the wall with woven panels using the macrame technique, compositions made of wool, yarn or floss.
Provence
For Provencal design, wall decorations using the decoupage technique, aged products, panels depicting still lifes, lavender or sunflower flowers, ancient streets, village landscapes, animals, plants or other motifs inherent in this style are perfect. This design will bring even more romantic mood, lightness, naturalness, warmth and comfort into the atmosphere.
Classic
The artistry of the classic style can be emphasized by panels in warm golden, herbal or silver tones. Plaster, mirror, fabric, openwork forged or carved wooden products, tapestries and other decorations will not stand out sharply from the overall interior design.
Country
For democratic and soulful country, patchwork compositions, quilts or appliqués, as well as ceramic installations and decor made of wood or boards are perfect.
Loft
The industrial style, filled with life, air, space and the absence of stereotypes and frames, can be decorated with photo wallpapers with thematic images of cities, bridges, roads or skyscrapers; modular installations made of rusty metal or aged wood and sections of timber with burnt or painted black marks would also be appropriate. paint, drawings.
Shabby chic
Floral light and airy compositions, products using the decoupage technique with a crackle effect, panels with a touch of antiquity, decorations made from fabric ribbons, beads or buttons will bring even more vintage to the shabby chic style interior.
Eco style
Natural and maximally natural eco-design can be created using installations made from sea or river stones, branches, leaves, fresh or dried flowers, palm fiber, jute, moss or other natural materials.
The photo shows a modular decorative panel made of moss on the wall in the living room in eco-style.
Steampunk
Decorative panels made of glass, stone, leather or metal would be appropriate for this direction. A particularly original solution would be a composition of gears with tubes, chains or plates.
Oriental
The magical and fairy-tale oriental style is distinguished by its special magnetism; compositions made of ceramic tiles, mosaics or decor decorated with carved ornaments are suitable here. The Japanese direction will be characterized by wooden, bamboo, rattan panels or products made from rice paper and fabric.
The photo shows a Moroccan-style bathroom with a wall decorated with ceramic tile panels.