It's no secret that you can't achieve good quality video without proper lighting.
Softboxes are a good help in solving this problem, both for novice video bloggers and professionals. Roughly speaking, they are indoor spotlights.
Without this device, it is impossible to get an acceptable picture at home. Such “lamps” are widely presented in Chinese online stores, but for novice users, even their price turns out to be prohibitive.
Once you become a professional in photography and videography, you will have no choice but to buy yourself one of the quality models.
More details
The issue of price will no longer be so important here. At the initial stage, a similar spotlight with decent characteristics can be made with your own hands. There is nothing complicated about it.
In terms of lighting quality, a homemade softbox is inferior to a factory one, then not by much.
If you look on the Internet and YouTube for tips on how to make it, 90% of them will start with recommendations - “take regular packaging cardboard.”
But the fact is that the reliability and rigidity of such a design is extremely unsatisfactory. The individual halves of the reflector are glued together with ordinary tape, which dries out over time and everything falls apart.
Therefore, if you want your softbox to last for a long time, it is better to immediately abandon this idea. You can also try fiberboard.
But this will have a negative impact on the overall weight of the structure. There will also be problems with mounting such a heavy “head” on a tripod.
Based on all this, the best option for making a homemade softbox is polystyrene foam 2cm thick.
This is a very light material with sufficient rigidity and strength. In a hardware store, one sheet of polystyrene foam costs about 200 rubles.
One such sheet is just enough to make your own softbox.
Making a reflector or reflector
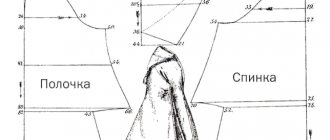
First of all, you need to draw out the blanks or petals of the future reflector. You can use the following sizes and template.
Next, using a utility knife, cut out the marked blanks.
To join them into a single structure, use self-tapping screws.
They will ensure the initial rigidity of the frame. Then finally glue all parts with polyurethane foam.
First from the inside.
And then from the outside.
Polyurethane foam will firmly and reliably connect all the pieces into one whole. You will never achieve such a rigid frame from cardboard.
After the foam has dried, and given its small thickness, 40 minutes is enough, its excess is cut off.
Next, you need to cut out a central square that will fit into the middle of the reflector.
You can first cut a hole inside it for the cartridge. Make it (the hole) end to end so that the cartridge itself is inserted as tightly and tightly as possible.
Due to the sufficient thickness of polystyrene foam, you don’t even have to bolt it.
By the way, you can cut a hole not for one light bulb, but for two at once. Suddenly you don't have enough power.
Some advise using one or two powerful lamps connected via a dimmer on a cord.
Next, this regulator sets the required brightness level.
However, one should not forget one negative nuance - the appearance of flickering when dimming LED lamps.
This will have a negative impact on the quality of video recording and your vision.
The central part is also fixed to the mounting foam. As a result, you get a tough, durable, but most importantly lightweight workpiece.
Next, we proceed to making the reflective coating. There is one important point to consider here.
Before gluing the lower part of this blank, you need to screw some durable material on the outside in advance, which will later secure the reflector to the tripod.
You can use a piece of NDF. After this, calmly proceed to gluing the inside of the softbox.
For these purposes, food foil is most often used for baking. At the same time, it is recommended to knead it before gluing it. This improves the reflection.
Softbox is, by and large, a kind of modifier. Its task is to transform a light source from a small point light into a larger diffuse light source.
If we imagine that the foil is perfectly flat and reflects the light falling on it, it will be relatively directional. And if the foil has a rough, rough surface, with many kinks, then the light will be reflected from it in chaotic directions.
That is, it will seem to disperse throughout the internal volume of the softbox. Moreover, you can’t just crumple up the foil. It will break on you. This matter also has its own nuances.
The best way is to unwind the whole roll and then gradually fold it in half. Until it turns into a small square.
Then dismantle the whole thing and repeat it again.
Instead of foil, you can use insulation or a reflective backing. These are usually stuck behind the battery on the wall.
Their surface is not initially perfectly smooth and you won’t have to wrinkle anything. Apply PVA glue to the middle of the sheet and glue the edges with a glue gun.
Make each of the four sides of the reflector separately. This will take no more than 30-40 minutes.
Next, we move on to choosing a light bulb and connecting it.
Choosing a light bulb for a softbox
The cartridge itself is connected via a power cord, with a separate switch on it. Similar ones are used for table lamps.
How to quickly and correctly connect the cartridge and not make mistakes, read in a separate article. It also has its own characteristics.
Choose LED light bulbs with a minimum heating temperature. The ideal option would be specimens with a color temperature of 5000 Kelvin.
But these are rare. Usually they go 4000K, 4500K or 6000K. Here, look at your circumstances and shooting conditions.
But never use warm yellow light. Otherwise, your face in photos and videos will resemble a person who has just woken up after a binge.
For such lamps, the color rendering index CRI is also important.
It should definitely be above 80. With a low CRI or Ra, you will not be able to achieve normal white balance. The skin color will turn green and look unnatural.
Colors in general can present surprises in the wrong light.
Homemade tripod for softbox
After selecting the light bulb, move on to the tripod. Most bloggers and users do not have a normal adjustable tripod. At the same time, I really want to get a softbox, specifically with the ability to change the height and angle of the reflector.
Everything is like the professionals.
What can help you in this matter? An old telescopic fishing rod comes to the rescue. Use her very first knee.
It is better to make a powerful, heavy base from a piece of chipboard. Cut out a circle or square and three triangles. They are needed as struts for the stability of the entire structure.
A cylindrical stick (for example, from a mop) or a thick plastic tube is placed in the center of such a platform.
Next, all these parts are connected to each other with wood screws.
A rod is inserted on top of this base. All that remains is to figure out how to connect the softbox itself to this tripod.
The cheapest and most suitable option is to select a metal-plastic tube and mounting clips of the required diameter. You should end up with something like this.
It can be rotated both up and down and left and right.
Two clips are coaxially attached or tightly glued to the outer wall of the softbox and, through an adapter tube and another clip, are mounted on a tripod. You won’t come up with anything simpler, but at the same time effective.
Diffuser for softbox
To turn this reflector or reflector into a softbox, all that remains is to select a diffusing screen. In order not to buy special material, you can use the translucent packaging fabric that comes in the box along with large household appliances (TVs, refrigerators).
Initially it is two-layer. If its density is too high for your softbox, remove one of the layers.
Stretch the remaining material and secure it on the sides using ordinary clothespins or office clips.
Haven't bought any equipment for a long time? Then ask around for translucent fabric at places that sell tulle, curtains, etc.
It's called calico. Its advantage is that such fabric, unlike packaging material, can be sewn in half at the edges.
And then, simply pull this square onto the reflector frame, without any clothespins or glue.
And it does not fade or change color.
For good lighting, two of these softboxes are usually required, placed to the right and left of the shooting point.
In order to give a beautiful aesthetic appearance, you can paint the outer part with black paint. Then the device will be no different from the factory one.
Another option for extremely cheap lighting can be seen in the video below. The reflector itself is not of very good quality, but the video is very useful for those who want to make their own tripod, entirely assembled from polypropylene pipes.
Softbox. How to make a softbox for a flash with your own hands?
A very important point in photography is lighting, especially for microstockers. In order to avoid problems with light, a whole bunch of different devices have been invented (umbrellas, diffusers, flashes and many other things).
- Today I will talk about how to make a softbox for a flash with your own hands.
- Everyone knows the problem of harsh shadows and red eye when photographing with a head-on flash (that is, it is aimed directly at the subject without the use of diffusers or reflective surfaces).
- Let me remind you that sharp shadows are one of the image defects for which photographs are rejected when sent to microstocks.
- Before moving on to the question “how to make a softbox for a flash with your own hands,” you need to dwell on what kind of device it is and what it is needed for.
Softbox is a special attachment to a light source (for example, a flash or lamp), used to create soft diffused lighting without harsh shadows and highlights. It is used mainly in studio photography.
- Soft box is a closed structure consisting of two parts – a reflector and a diffuser.
- In our case, the reflector can be made from foil, self-adhesive tape with a mirror surface and other materials that reflect light well.
- The diffuser can be made from a white sheet of paper, white fabric or other available materials (you can experiment with this).
Let's get down to business. I’ll immediately make a reservation that I made a softbox for a Nikon Speedlight SB-600 flash, but the idea is applicable to all flashes, you just need to adjust the sizes.
How to make a softbox for flash with your own hands. Materials used
We'll need it.
- A4 size cardboard. Price 60 rubles for 10 sheets. You can use any cardboard (for example, from boxes), it will be even denser. Those who don't like cardboard can use plastic from folders sold in office supply stores.
- For some, A4 format will not be enough. I made a second softbox from A3 cardboard, it turned out to be so large that it could no longer be attached to the camera. It can only be used with a flash removed from the camera. The price of a package of 10 sheets of A3 cardboard is 110 rubles, you will need 4 sheets.
- Black self-adhesive film is used to cover the outside of the softbox. One linear meter costs 150 rubles, we need 50 centimeters (the width of the roll is one meter). I advise you to choose matte self-adhesive - it gets dirty less. I used glossy, it leaves a lot of hand marks.
- Self-adhesive mirror film, roll width half a meter. We need approximately one meter. The price of pleasure is 150 rubles per linear meter.
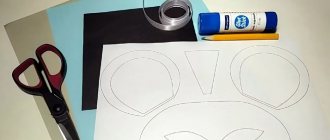
- White paper, A4 format. Needed as drafts. The price is almost nothing.
- Scissors or utility knife. Here, whatever is more convenient for you.
- Ruler and pencil.
What material is it made from?
If you look up tips on how to make this possible on the Internet and YouTube, 90% of them will start with the advice: “get a regular shipping box.”
But the fact is that the reliability and rigidity of such a design are extremely unsatisfactory. The individual halves of the reflector are glued together with ordinary tape, which dries over time and everything creeps inside.
Therefore, if you want your softbox to last for a long time, it is better to abandon this idea right away. You can also try fiber.
But this will negatively affect the overall weight of the structure. There will also be problems with installing such a heavy “head” on a tripod.
Based on all this, the best option for making a homemade softbox is polystyrene foam 2 cm thick.
This is a very light material with sufficient rigidity and strength. In a hardware store, a sheet of polystyrene foam costs about 200 rubles.
One of these sheets is enough to create a softbox.
DIY softbox
A softbox is a type of light modifier that is used specifically for studio or outdoor portraits. It creates soft diffused light by directing the light through some diffuse material. Light is reflected in its interior walls (covered with a bright surface, usually aluminum foil) bouncing off a white diffusion sheet.
It can be used with strobe lighting or continuous light sources. The main purpose of a softbox is to create a soft and uniform light, often used as a key light. Plus, it's ideal for studio lighting where every inch of bright area matters.
Step 2: Materials Needed
To create a softbox, this is all you need:
- Large cardboard
- Adhesive Tape
- Aluminium foil
- Glue
- Tape belts
- Screws and nuts
- Paper roll (wide)
- Spray can with black paint
Step 3: Drawing and Measuring
We'll be creating a softbox of a specific size, but this method will work for any size. Just keep this in mind to keep proportions in mind when you create yours!
First of all, you need to draw the four sides of the softbox in a trapezoid shape. The first two sides will be large, the remaining two will be short.
The lower part of the trapezoid will be 80 cm long. The side walls have an angle of 45º. The top of the mold will be the length of your flash, in my case it is about 8cm. Then repeat the process again to have two large sides of the softbox.
Now it's time for the short sides. The bottom is 65cm long and the top is the height of your flash. At this point the angle of the sides is not so important, it is a little larger, about 60º. To make it easier, just use the lengths of the sides of the walls you made before.
Step 4: Cutting the Four Walls
Now that you have four sides of the softbox, two large and two small, it's time to carefully cut out the cardboard. Remember to leave a small amount of cardboard at the top, about 6-8 cm, because there will be a flash there. Cut out each piece using a cutter and set the finished pieces aside.
Step 5: Creating the Interior
After cutting, use glue and cover each piece of cardboard with aluminum foil (but only on one side). You can use aluminum tape along the borders to secure it more securely. This part will reflect the flash light, making it stronger and more powerful. To be on the safe side, use two layers of aluminum foil to ensure everything stays the same for a long time.
Step 6: Adding Velcro
Then take two short walls and put two Velcro strips on them (one for each). The big one is about 15 cm and the short one is 5 cm. These straps will keep the flash from falling and will keep it stationary.
Step 7: gluing and installation
Once you have everything in order, it's time to assemble the softbox. The procedure is very simple. Take the larger side first, then the short one, then the other larger one, and finally the remaining side. Cover everything with tape. Neat and reliable!
A good way to check that it is built correctly is to lift the softbox holding the top. If it doesn't move then everything is fine. If it moves and is unstable, add more tape until everything is safe to use.
Step 8: Painting
The next step is to paint your softbox. Use old newspaper to protect parts you don't want to paint, such as the top of the hole (flash hole). After the paint has dried, add another coat of color and then leave the softbox overnight.
Step 9: Create and Configure a Tripod Adapter
Once you've finished the softbox, it's time to make the tripod adapter. Use an L-shaped aluminum bracket and place most of it on the softbox. Punch a few holes in the softbox, just in the middle of the short side. Then, using short screws and nuts, position the bracket and slide it on, making sure it is stable and does not move.
Making a reflector or reflector
First of all, it is necessary to outline the blanks or petals of the future spotlight. The following sizes and models can be used.
Then, using a stationery knife, cut out the marked blanks.
To secure them into a single structure, use self-tapping screws.
They will ensure the initial rigidity of the frame. Then finally glue all the parts with polyurethane foam.
First inside.
And then from the outside.
Polyurethane foam will firmly and reliably connect all the parts into one. You will never get such a rigid cardboard frame.
After the foam has dried and, given its small thickness, 40 minutes is enough, its excess is cut off.
Next, you need to cut out a central square that will fit in the center of the reflector.
You can first drill a hole in it for the cartridge. Make it (the hole) from one end to the other so that the cartridge itself is inserted as tightly and tightly as possible.
Due to the sufficient thickness of polystyrene foam, it does not even need to be screwed.
By the way, you can cut a hole not for one light bulb, but for two at once. Suddenly you don't have enough power.
Some recommend using one or two powerful lamps connected via a dimmer on the cable.
In addition, this control sets the desired brightness level.
However, we should not forget about the negative nuance - the appearance of flickering when LED lamps are dimmed.
This will affect the quality of the video recording and your viewing experience will not be improved.
The central part is also attached to polyurethane foam. The end result is a strong, durable, but above all lightweight part.
Size
The size of the softbox largely determines the number and strength of shadows. And in this example, we'll specifically focus on portrait photography. Let's say we're doing headshots and our subject needs something with very soft lighting. Now let's think about this:
To shoot a portrait, you need a fairly close-up shot. This is not a full body. This is usually either the head and shoulders or, in the case of business, the upper body.
In the case of photographing only a person's head, we know that it is a small object. So we need a light source larger than the subject's head. With that said, the softbox should be larger than a person's head.
For this image, we turned the model's back to the sun so that it would give us natural light for the hair. The softbox was then placed to the left of the camera.
Are you photographing your head and shoulders? You'll need a softbox bigger than your head and shoulders (and obviously more power from your flash).
Are you photographing the entire top half? Then you'll need an even bigger softbox (and even more flash power).
Why are some softboxes silver inside while others are gold or white?
The color of the inside of the softbox affects the nature of the lighting. Silver
the most common because its powerful reflectivity helps to increase the brightness of the light (which has been reduced by the use of diffusers), yet silver is fairly neutral in terms of color temperature.
White
is chosen for its completely neutral color profile and subtle softening effect.
Gold
is a rare option that is suitable for those who want to get a warmer light and increase its brightness a little.
If you don't know what color you want for the inside of your softbox, choose the standard silver
Interior
This Lastolite Ezybox has a silver interior and a white exterior baffle diffuser that really softens the light that would otherwise be very harsh.
Softboxes usually come in two colors: white or silver. White is good because it softens the light and often makes the skin look really nice. Silver adds more brightness and gives you a glow that throws a lot of light into your subject's eyes and allows you to see every pore in their skin. These interiors are variations of each other. Silver with a small amount of white is sometimes called soft silver.
Here is a photo taken with a softbox, with white color. Notice how soft and beautiful the lighting is.
In this shot I used a softbox with a silver color. Therefore, the light turned out brighter.
Here is an example of soft silver. Again, it's a combination of white and silver.
Tools
To make technological cuts, we will need either a metal file (the process will take longer) or an electric jigsaw (a couple of minutes and you're done).
Special scissors for PVC pipes will help you cut the pipe. But you can cut the pipes directly from the store upon purchase - or yourself in the product packaging department, ask the employees after payment.
Work process
If you didn't cut the pipe at the store, you'll have to do it yourself. You can cut with a file or jigsaw, but it is better to use special scissors.
Special welding machines are used to connect PVC pipes and tees. But not everyone has such equipment. Also, soldering is not suitable for us, because the plastic is joined by melting. And we want to make a collapsible design, more convenient for storage. That is why the outer diameter of the pipe is larger than the inner diameter of the tee. You can’t just connect them when it’s cold.
In order to be able to connect the pipe to the tee, it is necessary to make one cut across the pipe on each side. It is necessary to make a cut 1.5-2 cm long. No more is needed. But if you accidentally cut more, it’s okay.
With a jigsaw, such cuts are made in a second. During this time, even plastic shavings have time to melt. Simple and fast.
The accuracy of the cut is not particularly important. Just try to keep it in the middle. After all the sections have been cut on both sides, you can begin assembly.
Form
Softboxes come in a variety of shapes. The most traditional shape is a four-sided rectangular box. Softboxes with two sides that are very short are often called strips. Softboxes with eight sides are called octabanks. Shape determines the shape of light on an object.
The lighting is cube-shaped and the size of her torso. Notice how much brighter the photo is at the top. Pose: one foot in front of the other, shoulder above the back, one hand on the hip, the other doing something below the neck line. By lifting one leg forward, you shift your body weight.
An example of a photo with an octabank softbox.
Model: Bec Fordyce. An example of a shot with a very large octabank.
We shoot in the studio only with an octabox [#ProSvet No. 6]
This is already the sixth episode of the #ProLight series!
Let me remind you that in this series we share interesting techniques for working in the studio - we show and tell you how to make a cool picture using just one device and one attachment. Each episode contains a video and a text part with explanations and diagrams. So, if you haven't already, subscribe to our YouTube channel and stay tuned for updates. In this issue we will talk about an attachment that can also be considered basic (since many studios have it), and which most photographers love - this is an octabox with a diameter of 150 cm, in our case the Profoto RFI Octabox 5'.
© Ilya Kaygorodov / Photar.ru
The nozzle gained its fame and popularity due to its ease of handling (no matter how you look at it, the light will not change) and a soft, wide field of light, which is very easy to work with.
It is necessary to note one important distinguishing feature of Profoto instruments. Almost any attachment can be moved around the head of the monoblock, thereby focusing or defocusing the light.
© Ilya Kaygorodov / Photar.ru
Position 4 is the farthest position of the device, and position 10 is the closest one. In our case, we used the Profoto ProHead plus UV 500W generator head. First, let's look at the general nature of the light of this attachment (I recommend comparing it with the attachments from previous articles - links at the end).
When we zoom the attachment from position 4 to position 10, we see a slight change in brightness. At position 10, the nozzle produces approximately 1/3 stop more light. A very important nuance is that when zooming, the lighting angle practically does not change and the brightness is equally distributed over the entire area. It must be taken into account that this feature will not work if the device is located closer to the subject; in this case, we will get a more pronounced spot of light in the center. This effect is first encountered in our #ProLight articles.
Let's look at the main characteristics of the 150cm octabox attachment (Profoto RFI Octabox 5'):
Very important! It is necessary to take into account the environment (in our case, the studio) in which the shooting is taking place. The right wall of the cyclorama is large and white, located quite close to the object, which makes very significant adjustments to the contrast. So if the walls in the studio are closer/further away, lighter/darker or have a color, then all this will affect the light and shadow pattern. You shouldn’t neglect this at all, but it’s much better to use it for your benefit!
Techniques for working with 150cm octabox
When working with soft light sources, I often use a technique in which I try to shine the light on the model from the side/top and tangentially (look at this in previous videos). This allows you to get a pronounced smooth transition of lighting across the model. When working with large nozzles (more than 120 cm), it is quite easy to get relatively uniform lighting on the model, but achieving contrast is more difficult. So try to place the device closer and shine at an angle.
Source