Mini garden dump truck based on the TEXAS motor cultivator. This vehicle has many names depending on the place of its origin and sale. The purpose of these mini cars, as a rule, is one - transporting heavy loads in areas with limited access. At the same time, there are options for additional attachments. In the playlist in which this video is posted, you can get acquainted with a number of these machines produced by industry and craftsmen at home. Tags for use in search engines: Mini Transporter, mini dumper, micro dumper, Powered wheelbarrow, PowerWagon. The most successful option for independent implementation, in my opinion, is DR PowerWagon. Simple, reliable, maintainable platform. The original attracts with its magnificent appearance. The advantage of such a platform in a three-wheeled base is that it makes the chassis extremely simple, maneuverable and very stable. Unlike four-wheeled wheelbarrows, due to the single rear wheel, there is no twisting force on the frame when passing through uneven terrain. There is also no swinging rocker arm for the steering wheel beam, which does not add stability, but greatly complicates and increases the cost of the design.
Video DiY mini dumper DIY motorized car Part 2 of the “House for Alice” channel
What materials are they built from?
If the shed is located close to the house and you care about its appearance, it makes sense to use the same material as when building the house. If you don’t want to spend a large amount on outbuildings, you can choose the finish so that you can’t tell it from a distance. In most cases, this is not very difficult: there are many technologies and many materials very accurately reproduce the appearance of expensive finishing materials. A striking example of this is siding. It is available for logs, beams, bricks, stones with different textures. So you don’t have to use expensive materials to build a shed. It is more practical to use inexpensive construction technology, and then cover it with material with a texture similar to the finishing of the main building.
How to quickly and cheaply build a shed
The fastest and at the same time inexpensive option for building a shed is using frame technology. The frame can be wooden or metal, it is sheathed on the outside, a roof is installed and that’s it, the barn is ready. If the barn is planned to be made of wood, it is assembled from timber and boards. A metal shed can be more conveniently made from a profiled pipe: it has a square section and is much easier to weld and join. There is also a special metal frame. It is assembled using self-tapping screws, and the entire structure is ordered and manufactured at the factory. Such houses are considered the cheapest; barns are unlikely to be expensive. Assembling both a metal and wooden shed takes several days: it has been tested more than once.
A half-built barn: the floor and two long walls are standing, all that remains is to install the short ones and make a rafter system
The frame building is lightweight, so the foundation for the barn needs a lightweight one. In most cases, columns and concrete blocks are sufficient; sometimes screw piles are installed or bored piles are made. On more complex soils and for those who love reliability, you can build a monolithic or prefabricated (from foundation blocks) shallow strip foundation.
You can even build a shed made of building blocks or bricks on a reinforced strip foundation. In this case, even on heaving soils the building will stand normally. Even if it moves, it will move along with the foundation, so the risk of cracks is minimal.
A frame shed can be built without a foundation. Then the racks (treated against rotting) will need to be deepened by 60-80 cm, concreted, and then the lower frame will be attached to them, but which will be supported by the floor joists. But you can’t build a large structure this way. The maximum is a small closet and a woodshed nearby.
Another option. It is suitable for soils from which water drains well, and the groundwater is located deep. Then they mark out an area that is 50 cm larger than the planned barn in each direction, remove the turf and make a sand and gravel backfill. Framing beams are laid on compacted crushed stone and floor joists are attached to them (treated with anti-septic tiles for direct contact of wood with the ground). That's all. No difficulties.
Barn without foundation
This is far from the best option: even with a low groundwater level and careful processing of the wood, the shed will not last long. If you are comfortable with this, you can do it this way.
Foundation for a frame shed
All types of pile or columnar foundations require the placement of single supports around the perimeter: always at the corners of the building and at the junction of lintels (partitions), if any are provided. The installation step of the supports depends on the size of the barn and what kind of logs you plan to use. The larger the span, the larger the section required for the logs.
For example, for a barn width of 2 meters, you can install only two rows of posts and the logs will be 150 * 50 mm (in extreme cases, 150 * 40 mm). If the width of the barn is 3 meters, then either install intermediate supports (posts, piles), or take a 150 * 70 mm board. Calculate what will be cheaper in your region and choose.
Source
Shed with a gable roof made of metal tiles
This barn was built alone. The construction is also frame: the cheapest way. In this case, the assembly method is “balloon” - gradual alignment of the racks. It all starts the same way: first we made columns for the foundation. Only this time they are brick.
Foundation for a barn made of brick pillars
As you can see, there are studs built into the corner posts. Holes are drilled in the strapping beam and it is put on studs. They can be done not only in corners, but also on intermediate posts: it will hold on more firmly.
This barn has a small porch-veranda, so a cross beam is installed at the required distance. And the wall will support it. Columns were also pre-made for it.
The logs were also attached to the plates
The logs can also be attached with a notch. Then a notch in the shape of the log is cut out in the strapping beam. In depth it should not exceed 30% of the thickness of the beam, so the joist is cut so that it is flush with the frame. This method is more labor-intensive.
How to make a coal fire. How to choose the right place for a workshop
It is advisable to choose a place on the site for the workshop in an open space so that shadows from trees or other buildings do not fall on it. Due to this, in winter it is possible to save a little on heating or it will simply be warmer to work, since on fine days the sun will help with heating. And all year round during daylight hours you won’t need to turn on the lighting fixtures or you can use them minimally, since there will be quite good natural lighting, which, by the way, is better for the eyes. In addition, this will save on electricity.
If possible, the workshop should be built away from the house and buildings with pets, since even if it is not intended to house too noisy equipment, almost any work will still be accompanied by sounds that are not the most pleasant for any ear. True, the farther from the house, the more extensive the supplied communications (electricity, heating and plumbing) are, as a rule, and these are additional costs.
Place for building a workshop
It is also recommended that the workshop is not in a low area. As a rule, rainwater and melted snow water accumulate there. Even if the workshop is not flooded, then excess humidity will become a serious test for the building itself, the tools of the machines and the supplied communications. All this will quickly become unusable. Even emergency situations, for example, short circuits in wiring or equipment, cannot be excluded. You can, of course, take protective measures against flooding and humidity. When building a workshop with your own hands, make the foundation higher and waterproofed, provide for drainage from it if possible, take care to strengthen the moisture insulation of the entire structure, and the like. However, all this will require additional financial costs, as well as effort and time for arrangement.
It is desirable that the chosen location has easy access to the workshop at any time of the year. So that in winter it is not too swept away, otherwise you will have to put a lot of effort into periodically clearing the path and the approach to the entrance doors, and in the spring you will have to push a much larger volume of snow away from the walls to prevent them from flooding. And finally, if there are places on the site that are not at all suitable or are of little use for growing any plants, then it is recommended to choose one of them for a workshop.
Modern embers. Mold - transformer for casting cinder blocks and bentonite at home
At least once in our lives, each of us is faced with the problem of construction or major repairs. Two main questions immediately arise - from what, and how much it will cost. I also faced the same problem; I had to expand the garage. But I proceeded from the following - I work alone, so that the material is not too heavy, and as heat-intensive as possible (retains heat as long as possible).
I immediately refused to buy bricks or bentonite, it’s expensive here, installing formwork or T-shapes also doesn’t suit me (I work alone). I came to the conclusion that I should try to cast bentonite myself, but empty bottles should be used as filler. I searched the Internet in search of the necessary information, but in most cases I was convinced that it was impossible to make bentonite at home without the help of a vibrating table. I made the first mold and made the first casting, but as they say, the first pancake was lumpy, I didn’t oil the mold and the blocks turned out a little ugly. Once I started greasing the mold with oil, everything went like clockwork (excuse the pun). Before moving on to mass production of blocks, I made three more molds and stocked up on a ton of empty bottles.
I had 9 bottles in each block. When the issue with the garage was resolved, I had to build a new coal fire, and laying it in such blocks, to put it mildly, would have been unreasonable. I had to modify the forms. And the resulting forms were transformers.
Charcoal stove with wood burner. Do-it-yourself woodcutter.
I would like to share my report on the construction of a woodshed at the dacha with my own hands. The woodshed is the same shed, with the only difference being that the woodshed is intended for storing firewood, and the shed is for anything. The dimensions of the woodshed are 2 by 4 meters.
Let's start with the foundation. The foundation for the woodshed will be concrete foundation blocks. Small holes were dug under them, sand was poured in (to level them) and the blocks themselves were installed. It turned out like this:
He laid a layer of roofing felt on the foundation and began laying out the bottom frame of the woodshed:
I used 100×100 mm timber. Fastening using metal corners and self-tapping screws. This is how the frame of the woodshed turned out:
The roof of the woodshed is pitched. First I installed the rafters (with a 330mm overhang):
Then I laid corrugated sheets on the roof:
The floor was covered with a 40mm board, leaving a gap between the boards of approximately 25-30mm.
It's time to sheathe the woodshed. The board is 100mm wide, leaving a gap of the same width between the boards:
Finally, I painted the walls and floor with an antiseptic (Biotex Rosewood). Here's what we ended up with:
And here is a photo of a woodshed filled with firewood (5 cubic meters):
The inside is quite spacious, you can easily reach any corner. If you fill it to capacity, I think it will fit 8 cubes. Let me remind you that the dimensions of the barn are 2 by 4 meters. The internal dimensions turned out to be 1.8 by 3.8 m. Height: 2.2 m (at the far wall), 2.45 m (at the entrance).
It took 3 days to build the woodshed myself. 10 thousand rubles were spent on materials.
Charcoal project. built a kind of coal fire here
It's been a terrible year. It's raining after rain, so no meaningful construction work has gone well and is not expected. Well, I managed to do what I did. For coal, I initially thought of a room right behind the gate, so that the car could be driven to the side and dumped out, diagonally. The dimensions seem to allow it. Well, so that you can immediately sneak through the greenhouses to the house, so as not to have to clean the path in the snow across half the site.
Even then I moved one of the collars so that it wouldn’t interfere. And, as always, the testing of technologies began - it’s interesting. But first things first. In general, what happened at the beginning:
I cut off the top layer of soil. I have bird cherry growing there, so there are a lot of roots. Well, harmful maples, where would we be without them? It was 15.08. The next stage lasted more than a month. I carried beams, masonry nets, reinforcement and other formwork bars on top of the trunk of the Corolla.
Little by little, in the evenings, among other things, I assembled it all and poured it in little by little.
Since I took out a lot of soil with roots, and brought in not enough sand/crushed stone, I filled it with bottles. I spent the entire supply of my own bottles and those collected from neighbors over 2 years on refilling.
When I was still picking mushrooms in the forest, there were piles of mushrooms lying around, I had to go for a run that year and collect them for the next part - where the concrete mixer is in the photographs. I want to make it deeper, with a slope/steps. Flat slate was placed on the formwork. I thought it would be permanent. Yeah, right now. A little bit of it flies off from the flood. I'll know. I adjusted the beams to the level and grabbed them - as always, with one tip.
This is as of September 27. It was necessary, of course, to prime it right away, but it was all rain and rain. Apparently, I will paint the main part with enamel primer under the roof. The only thing left to do is the roof.
Drawings with dimensions
Several drawings to help you navigate the dimensions of the building. If necessary, adjust to your site or needs.
Shed with a pitched roof - drawing with a diagram of the arrangement of racks
A shed with three compartments under a pitched roof. The dotted lines indicate the installation locations of the racks (and supports for them)
Shed design indicating all required elements
Gable roof on a barn made of metal profiles
In houses where there is no gas supply and there are no forests around, you need to look for an alternative coolant. In some regions of Russia it is profitable to purchase coal for heating. Photos of fuel storage in a private home illustrate ways to rationally dispose of this combustible material.
In the absence of special buildings, the coal poured in bulk is packed into bags and stored under a canopy.
The higher the quality of coal, the less demanding it is regarding storage conditions. For example, anthracite can be exposed to the open air for several years without much damage to its calorific value.
If there is little fuel, you can make a special shed or container for it. It will look much more aesthetically pleasing.
In regions where coal is a traditional coolant, special sheds are built into which fuel is poured through a window along a tray.
A coal fire can be built both in the garage and in the basement of a residential building.
In any case, it is not allowed to keep solid fuel in residential premises. The coal warehouse must be equipped with everything necessary to prevent spontaneous combustion.
12V dump trailer for mini tractor
— square and rectangular pipes for the frame; - axle and wheels; — purchased tow hitch; - Sheet steel; — bearings; — 12V winch and cable; — “socket and plug” (for connecting power to the trailer). List of tools:
— paint for metal; - lathe; - Bulgarian; - drill; - Miter saw; - marker, tape measure, ruler, etc. The process of making a homemade product:
Step one. Assembling the main frame
First of all, the author assembled the main frame, in this case the author was helped by a miter saw, as well as special welding clamps for pipes. Everything is assembled from square pipes; we choose the wall thickness depending on the loads you plan to transport.
Next, the author welded another frame from pipes; this will be the frame for the body, on which cargo will be transported. This frame is hinged to the main power frame. You can use ready-made gate hinges as hinges, or you can turn the hinges on a lathe.
The pulley is mounted on a linkage structure that folds or unfolds, thereby lowering or raising the side of the trailer.
Step four. Body
We assemble the body, cover the bottom with sheet steel, and also make the walls. The side walls and the front can be welded, but the rear should be hinged so that the dump truck can dump the contents of the trailer.
We weld frames from profile pipes under the walls and cover them with sheet steel.
We also do the wiring; to connect the trailer to the tractor, the author installed a socket and plug. Of course, it’s easier to put the control panel on the trailer itself, because you still have to get off the tractor and open and close the side. The presence of a control panel on the trailer will allow you to connect only “+” and “-” from the tractor.
This completes the project, I hope you liked the homemade product and found useful thoughts for yourself. Good luck and creative inspiration if you decide to do this again. Don't forget to share your ideas and crafts with us!
Become the author of the site, publish your own articles, descriptions of homemade products and pay for the text. Read more here.
Strengths and weaknesses of a coal sauna stove
As we undoubtedly remember, ideal things do not exist in nature, however, any object has a certain set of strengths and weaknesses. The stove we are considering is no exception. Let's start, as usual, with the good. In fairness, we note that the listed requirements are overwhelmingly relevant for metal structures:
- Low operating costs. Sufficiently high fuel efficiency, especially when using anthracite group coals, characterized by low parent ash content and extremely high calorie content, or otherwise, specific heat of combustion;
- Durability. A stove made from materials, especially its hot parts, can be used for 10-12 years;
- Good maintainability. Current repairs are not complicated and their implementation does not involve any special technological or instrumental difficulties;
- Resistance to temperature fluctuations. Tolerates long breaks from work well;
- A large selection of ready-made structures made taking into account the basic technological requirements;
- Relatively low cost of self-production or purchasing a finished copy;
- The construction of a separate foundation is not required;
- Flexibility in terms of placement or adaptation of the stove for use in various rooms, both in volume and configuration.
Now, about the main and critical shortcomings:
- When used in tandem with a closed-type heater and a large volume of inert stone backfill, a stove of this type can take a long time to accelerate and slowly reach the nominal temperature regime in a steam room;
- Due to the high surface temperature, it is necessary to take special measures to reduce the fire hazard of the room and erect a protective fence to avoid burns in the event of unexpected contact with the furnace;
- There are special requirements for the thickness and heat resistance of the metal used in the manufacture of critical elements of the furnace. Substandard raw materials can cause deformations and burnout of hot parts;
- The steam generated by a stove of this type is quite harsh and is more suitable for dry baths than for classic Russian ones.
Your browser does not support GOST oven 3000-45 frames
We count the power
The thermal power of a furnace is one of the main and fundamental indicators that characterizes its efficiency and functionality.
The generally accepted practical volume norm for one person in a bathhouse is 9-11 cubic meters. m. For heating 1 cubic. m. bath room to a temperature of 60 degrees Celsius requires 55 kcal. at one o'clock. A metal sauna stove, when using ordinary coal of the DGr grade as fuel, can generate 320 kcal. from 1 sq. m of working surface. Thus, for heating to a nominal temperature of 10 cubic meters. The volume of a steam room requires 550 kcal. thermal energy, therefore, the working surface area of a coal-fired furnace to maintain the specified parameters cannot be less than 1.73 square meters. m. taking into account the minimum or close to it level of losses.
Features of the furnace firebox
It is clear that using coal as the main fuel, it will not be possible to completely abandon firewood. The overwhelming majority of the main brands of coals require sufficient temperature for reliable ignition, which can be initiated by a wood stack.
How to store coal for heating, how to make a coal storage facility for approximately 6 cubic meters on a site?
Coal can be stored in a shed, in a dry basement, even in the open air; it is not afraid of precipitation.
But frozen coal can spontaneously ignite, so buy only low-humidity coal of the highest quality. If you bought it in late autumn and do not have time to put it in storage before frost, in order to avoid freezing, it is advisable to sprinkle the coal in layers with chalk, quicklime or sawdust. Then cover with protective film. It is advisable to choose a dry, dark, but well-ventilated place in a barn or basement for storing coal. You can keep it in bags or make a wooden or metal box measuring 2x2x1.5 meters. A regular rectangular box, like for fire sand, with a hinged lid on the canopies if desired.
It is better to store coal in a dry and dark place.
This could be a shed or a special shed for storing coal and a purchased bunker (box).
Coal is stored both in bulk and in bags.
It’s even more convenient in bags, because it’s easier to transport it to the boiler room.
We choose a place for the barn on a hill to prevent flooding of the building during rain or melting snow.
The room must be well ventilated.
We decide on the size of the shed.
We decide on the material for building the shed, it could be brick and wood, or this is not a bad option,
If this is a permanent brick shed, then a marking, a trench, and a foundation have been poured.
Brick laying with dressing, windows are not needed in such a barn, you need a door, or better yet, a gate.
If we store coal in bags, then on the floor there are wooden pallets or flooring made of boards.
You can also store coal in boxes, or you can allocate storage space in an existing shed.
Here is another option for an improved canopy with a gate,
It has always been clear that fuel, be it coal or firewood, needs to be stored in a place protected from precipitation (snow, rain and wind too).
Therefore, based on this, we can accordingly conclude that for the construction of a storage facility, any shelters, buildings and structures made of any material are suitable.
The main thing is to build shelters from precipitation and provide easy access to fuel at the right time, including in winter when there is snow.
It is advisable, of course, to build some kind of elementary box (from any available material, I have seen that the doors and sides of an old wardrobe were used for this purpose) so that the coal does not crumble and the storage area can be used as much as possible.
There are those who recommend storing coal by first scattering it in bags and then putting it in piles, but I consider this to be unnecessary and an additional financial cost; it is unlikely to affect storage and safety.
Source
Shed at the dacha: planning, diagrams, materials, construction
The barn is the first and most necessary thing to begin with in the development of a plot of land. At first it will be a shelter from the weather, a workshop and a sleeping quarters. And then he will take on his main responsibilities of storing gardening tools, crops and household supplies. Perhaps it will also accept domestic animals.
Building a shed with your own hands is not God knows what kind of science, that’s what this article is about. It is much more difficult to immediately position it correctly, taking into account the prospects for your own development and the layout of neighboring plots. The barn is a source of pollution. If initially there were no plans for mice in it, then where is the guarantee that over time chickens, or even a bull, will not appear there? In modern dense buildings, it is difficult to meet sanitary standards, especially considering the future. You may have to build a mobile shed in the fall (see below), and in the spring put it where you need it forever: it’s not so easy to guess right away so that it doesn’t turn out to be an eyesore later.
An example of the location of a shed on a site
Take a look at fig. How much is there! An earthly paradise, and that’s all, not a manor. Now take the scale: standard 12 acres and a house of 120 square meters in plan, 80 residential. Having acquired land, they argued all winter about where to start, where to put things. The family's income is average; There was no way to settle down for our own without selling future agricultural products. It was assumed that within 3 years there would be only a barn on the building site, so it had to be built cheaply, but thoroughly. The garage was moved to the far corner and estimates for the road to it were made reluctantly, but there was no other way to fit a garbage dump with a cesspool into sanitary standards, and also ensure access for a garbage truck to the tank and a sanitation tank to the septic tank.
Since the construction was carried out for themselves, they decided to protect themselves from infection not only formally, but also in essence, for which purpose they planted a walnut over the utility yard with the barn. This tree exudes a lot of phytoncides, so nothing really grows under it or around it, but there are no flies and rats either; In addition, in summer it provides excellent shade. Near Lipetsk, the nut had to be nursed for a long time, but in the 8th year it still produced a harvest, by which time the arrangement was completed. This is what they noted in the gazebo by the pond, taking a sip of what they were supposed to have from the cellar; The cellar next to the recreation area came in very handy. And it all started with a barn...
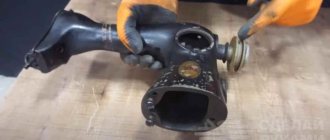
Principle of operation
The whole structure works like this: when it is necessary to lift the body, the driver moves the valve to a position that ensures oil flow only in one direction and turns on the power to the pump drive. The pump takes oil from the tank and supplies it under pressure to the hydraulic cylinder. When the body is fully raised, the power to the pump drive is turned off. The crane will not allow the body to lower under its own weight, since it does not allow oil to return. The body is lowered by moving the valve to the oil reverse position, the pressure in the hydraulic cylinder drops and the oil flows back into the tank, and the body lowers down under its own weight. In the video, a self-made UAZ-3303 dump truck:
Source
Coal storage
At high temperatures, the oxidation process accelerates.
It should be noted that the oxidation process is accompanied by the release of heat, so in a large pile of coal the temperature can rise to a critical level, which leads to spontaneous combustion. Coals with a small fraction and coals with a large amount of coal dust are especially susceptible to this. Brown coals are most susceptible to spontaneous combustion, followed by stone ones. Anthracites are the least susceptible to oxidation and spontaneous combustion.
During long-term storage of coal of small fractions (chips, seeds), periodic checking of its temperature condition is necessary. If heating is detected, do not try to cool the coal with water. Wetted coal reacts even more with oxygen, which during drying further activates the oxidation process. To reduce oxidation, it is necessary to cover the coal with polyethylene or a tarp, which will reduce contact with oxygen.
All people prefer their home to be not only beautiful and cozy, but also warm. For those who have gas supplied to their home, this is very easy to do, but for those who do not have this opportunity, they have to use a conventional stove. For a private home, the only heating option is coal. This type of heating has been relevant for many years.
The principle of operation of a coal stove: • Solid fuel must be placed in the stove. • When burned, coal produces heat. • Using a stove you can heat the entire room.
Coal is very heavy and dirty, so it is better to store it in another room. It is for this purpose that a boiler room is built near the room in which the boiler is located. It must be at hand. For the boiler room, you can buy stainless steel fencing in Krasnodar or other cities.
In order to transport coal to the boiler room, you need to make a convenient entrance for the car. This allows you not to bother and carry the coal yourself; you can simply pour it out of the car. In order to heat a house of 100 square meters. m, you need to purchase approximately more than 2.5 tons of coal. To save money, it is more profitable to purchase coal than firewood. Firewood burns out very quickly and produces much less heat. In addition, after combustion a lot of ash is produced, not heat. Coal burns for a long time and has good heat transfer.
In addition, it is much more economical and practical. Coal is the result of wood decay. Due to high temperature, coal hardens and forms into brown and then hard coal. Coal is mined from underground. Its price practically does not depend on the depth at which it is located. Coal is the most economical type of fuel. In order to extract 200 grams of coal, you need to burn a cube of wood. By burning hardwood trees, you can get dense and durable fuel. A convenient form is compressed briquettes, which, due to their shape, prolong the burning time. In addition to heating the house, coal is used for barbecues, fires and fireplaces. Most often, coal is purchased in tons.
In winter, fuel prices rise, so people try to purchase fuel in the summer.
Video about building wooden sheds
The barn turned out to be beautiful, but not cheap. But it is decent in size, strong and in appearance no different from a house - it fits into the composition. Everything is shown/described in detail, there is one violation: the waterproofing under the metal tiles is laid vertically. Even with good gluing of the strips, sooner or later the water will make a path for itself. Otherwise, everything is correct.
professor's apartment in Tomsk museum
In this case, the barn is built with your own hands on what is probably the cheapest foundation: concrete is poured into old tires. The frame stands on these “pillars”. Naturally, they need to be placed on a flat, reliable surface and they themselves must be at the same level. In terms of strength, the base will not be inferior to the best concrete blocks, and may even surpass them. Tires protruding from under the structure can be closed by making a step and subsequently placing flowers on it or using it for other needs. It will be even more practical.
Another video with a step-by-step illustration of the construction of a frame barn made of timber.
Coal storage room. UNLOADING COAL IN THE WAREHOUSE AND FORMING STACKS
It is prohibited to unload and store coal on an unprepared site. All coal arriving at the warehouse for long-term storage must be stacked (as it is unloaded from the cars) no later than two days from the date of its unloading. The warehouse must store coal separately by type (hard coal, brown coal), grade, grade, class, condition and shelf life. When unloading coal from a warehouse and stacking it, measures must be taken to reduce grinding, atomization and segregation. When laying a stack with a grab crane and other mechanisms, it is not allowed to open a bucket with coal at a height of more than 2 m from the surface of the stack.
Stacks in warehouses should be placed along the direction of the prevailing winds, and consumption of coal from the stacks should begin on the side opposite to the direction of the prevailing wind. The most rational shape of the stack is in the form of a regular truncated pyramid with a base in the form of an elongated rectangle. The formation of coal stacks is best done in the cold season, and in the summer - after sunset or at night in the absence of precipitation.
The dimensions of the stack depend on the methods used for its stacking (for ordinary coal with layer-by-layer and surface compaction, for graded coal without compaction), as well as on the properties and storage period of the coal. Depending on the tendency of coal to oxidize, the following maximum stack height is recommended: coal group I (maximum stack height, m. is not limited), II (up to 10 m), III (up to 6 m), IV (up to 5 m).
In non-mechanized warehouses, the size of stacks for Group I coals is also not limited; for coals of group II, the height should be no more than 10 m, the length and width of the stack is not limited; for coals of groups III and IV, a height of up to 2.5 m is allowed, a width of no more than 20 m, and the length is not limited.
When storing coal for long-term storage, it is necessary to compact the horizontal surfaces of the stack and slopes, especially in their lower part. Raw coals of groups III and IV are placed in a stack with layer-by-layer compaction every 0.5-1.5 m, with an even distribution of large pieces as each layer is laid. Sorted hard coals, brown coals and anthracite, as well as enriched coals are stacked to avoid their crushing without layer-by-layer and surface compaction. It is also prohibited to use scraper units when stacking graded coals and anthracite.
Stacking of Pechora and Suchansky grade Zh coal into piles is carried out without layer-by-layer compaction; compaction is applied only along the upper base and slopes of the stack. Rollers and vibrating tampers are used for compaction. Slopes can be compacted using special tampers, which can also serve to level them. Each stack must be provided with a table indicating the stack number, name of coal, brand, grade, amount of coal in tons, start and end time of stack formation, ash content, coal moisture content and volatile matter release.
Step-by-step instruction
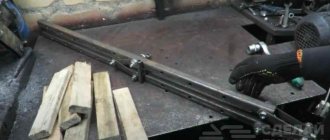
The hydraulic lifting mechanism that the UAZ will be equipped with consists of several components: a semi-frame, a subframe, an electrically driven hydraulic pump, a hydraulic crane, an oil tank, a hydraulic cylinder and high-pressure oil lines.
Half frame, subframe, hydraulic cylinder
Let's start with the half frame, it is needed to install the body. It is this that allows the body to tip over.
The half-frame consists of two parts. One part is rigidly fixed to the UAZ frame. By means of pin hinges on one side it is connected to the second part, to which the loading platform is attached.
It is better to make the longitudinal beams of both half-frames from T-beams and I-beams, and position them so that the upper part of the folded beams rests on the beams of the lower part of the half-frame.
The lower part of the semi-frame is strengthened with cross members. The top one, in addition to the crossbars, should also have transverse projections on the sides, which will provide support for the cargo platform along its entire width.
At the end where the pin hinges will be located, lugs are attached to the parts of the semi-frames, which must match with their holes. The pins will need to be installed in these holes, and they will need to be secured in the holes to prevent them from falling out.
To connect the half-frame structure, you can use welded joints, but it is better to secure the lower part of the half-frame to the car frame using bolted connections.
The second ball joint is the lower one, fixed to the subframe. This subframe should be in the shape of a bracket. This shape is made so that the hydraulic cylinder, when folded, does not interfere with the complete lowering of the body and the landing of the upper part of the semi-frame on the lower part. The dimensions and method of fastening the hydraulic cylinder subframe are selected experimentally. After this, the hydraulic cylinder is installed in place.
Hydraulic pump, its drive and control valve
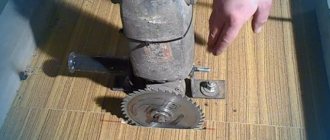
Next we move on to the hydraulic pump and its drive.
Most often, the pump is NSh-10, from MTZ-80. Its performance is quite sufficient for the operation of a hydraulic cylinder. There are several pump drives, so we will describe the simplest one, namely from the starter. To do this, a starter from MTZ-80 is taken and slightly modified to allow operation for a long time. Next you need to connect the starter shaft to the pump shaft. To do this, you can use the hinge from the steering of any passenger car. Next, the starter and pump are fixed on the platform to prevent them from moving relative to each other.
The pump and drive are fixed to the cross member of the car frame, so as to prevent their damage. Then the wiring is thrown from the car’s battery to the starter, making sure to include a switch in the circuit.
An oil tank is also attached to the frame of the car; a volume of 10 liters will be enough. Then the lines are connected from the oil tank to the pump, and from it to the hydraulic cylinder.
Solid fuel brands
The best fuel for domestic use is anthracite (marked with the letter “A”). It has a long combustion life, does not form a large amount of soot, and low ash content. However, you need to know how to use such coal, since it is difficult to ignite, and also costs a lot of money.
Most often, long-flame coal is purchased for lighting household boilers. It burns long enough, ignites easily, the flame is long and produces a large amount of heat. You can recognize the fuel by the “D” marking. It is also possible to heat private houses using “SS” and “T” grade coal, but their characteristics leave much to be desired.
In addition to the brand, coal also differs in fraction size. So, for a slab the size of the pieces ranges from 100 mm, for a large one it varies from 50 to 100 mm, a nut is sold at 25-50 mm, a small one - 13-25 mm, a seed - 6-13 mm, a piece - up to 6mm. There are no standard sizes for raw coal.
All coal is marked by the first letter of its name. However, the name may contain several letters, which indicate additional characteristics of the fuel. For example, DPK is slab coal with a fraction of 50-100 mm, DS is long-flame seed. As for raw coal, it does not have an approved composition. It can contain 70% large elements, and 30% shtyba, or vice versa.
It is impossible to say with 100% accuracy what fuel should be purchased in each individual case, since the choice depends directly on the type of boiler and the manufacturer’s requirements for operating the product. If the documentation indicates a certain type of coal, for example, anthracite, then replacing it with another is not recommended, as this can lead to large financial costs along with a decrease in thermal efficiency.
Those who primarily focus on the cost of fuel need to look beyond the price tag and characteristics. Suppliers often charge extra for delivery and may charge different prices depending on the volume purchased.
How to build a coal fire in a private house?
The desire to make your life more comfortable is quite understandable and understandable. But if there is a lack of information or practical experience, it may happen that the boiler room becomes a source of disaster. Our article will tell you how to ensure the safety of your boiler room.
For heating homes in the private sector, heating boiler houses using natural gas are the most common. Despite the well-known advantages of this heating equipment, it simultaneously poses a serious threat both to the residents of the house and to the building itself.
Regulatory documents provide for various options for placing such equipment, for example, in the kitchen, in a separate room, in the basement or basement of the house. And the first question that a home owner has is:
It is most rational in terms of safety and comfort to move the natural gas boiler room outside the residential area.
So the decision was made to make a separate attached room for the boiler. But even this is not sufficient from a security point of view.
Therefore, I will dwell on the features of the arrangement of the room for the boiler (autonomous boiler room) in more detail.
In addition, based on the practical experience gained in the construction of a boiler house, we note some important points that are poorly documented or regulated, but are significant from the point of view of the practical implementation of the work. So:
What is important to consider before starting work?
Before starting work, it is important to think through and decide on the following issues:
a) How to ensure temperature conditions in the attached room. Relying on the fact that the heat generated by the boiler during operation will be sufficient is a big mistake.b) It is better to buy boiler equipment before starting work.
dry floor screed calculate material
This will allow you to take into account the features and requirements for the placement of the boiler specified in the manufacturer’s passport, as well as clarify the dimensions and placement of technological holes in building structures for supplying pipes, chimneys, etc.
c) The location for the attached autonomous boiler room must be selected along the blank wall of the house, or if this is not possible, window or door openings in the wall adjacent to the boiler room must be sealed.
d) When determining the size of the boiler room, it is necessary to focus on the following parameters:
e) When determining the size of the boiler room, it is better to focus on the requirements for the installation of a gas boiler, even if you plan to use a different type of fuel.
Zero work cycle
Requirements of regulatory documents: the presence of an inserted conductor of the house ground loop in the room
It is most convenient to implement this requirement, if necessary, at the very beginning of the work.
The presence of a ground loop is important for old houses, as well as for owners who plan to use a volatile (usually imported) boiler.
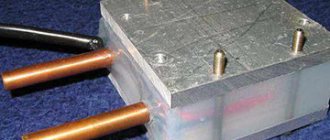
An example of a ground loop arrangement for a boiler room at the initial stage of work is shown in the photo below.
The grounding circuit is designed as follows. Four metal pipes with a diameter of 57 mm are driven vertically into the ground around the perimeter of the building to a depth of 2.5 - 3 meters.
The vertical pipes are connected to each other by welding.
The metal connection with the house grounding loop is made with steel rods with a diameter of 12 mm, they can be seen in the photo.
Requirements of regulatory documents: the presence of a sewer drain (stairway or pit)
The fulfillment of this requirement is shown in the photo below.
The pit (in case it is necessary to empty the heating system) is made approximately 45x45 cm in size and about 50 cm deep, so that a regular bucket can be installed.
When constructing load-bearing walls of a boiler room
Requirements of regulatory documents. It is necessary to provide an opening for the influx of outside air at a rate of at least 8 square meters. cm per 1 kW of boiler rated power, or 30 sq. cm per 1 kW, in case of air flow from inside the building
When constructing load-bearing walls, it is necessary to provide a technological hole in the lower part of the wall structure for fresh ventilation (shown in the photo below by an arrow).
The hole for supply ventilation is a sleeve made from a piece of ASB pipe with DN=150 mm
It is located in the center of the outer wall of the building at a height of approximately 35-40 cm from the floor level of the room. This photo shows the fulfillment of another important regulatory requirement.
Requirements of regulatory documents. The wall of the extension should not be connected to the wall of the residential building
The autonomous boiler room has its own load-bearing walls along the entire perimeter. As can be seen from the photo, the wall of the boiler room along the log house is a separate independent structure, not connected with the log house.
As noted earlier, purchasing boiler equipment before the start of construction work can significantly make life easier and avoid miscalculations when installing a boiler room.
Design features and technical characteristics
The official conversion of the GAZelle into a dump truck is carried out directly by the Gorky Automobile Plant and various organizations. New cars are used to build equipment. Owners of used trucks independently convert their vehicles by installing special bodies or modifying standard flatbeds. The design of dump trucks includes a hydraulic system with a pump driven from the gearbox using a separate power take-off shaft.
Dump trucks based on GAZelle are equipped with bodies with 1- or 3-sided unloading. Agricultural machines are produced in small batches, the platform of which tilts only to the side. To control the unloading mechanism, the cabin has a special block of spool switches that direct hydraulic fluid to different cavities of the power cylinder.
Factory dump trucks based on the Next model are equipped with an original aluminum platform and imported hydraulic system components. The basic version provides 3-sided unloading; other options are not offered by the factory. To control unloading, a joystick installed in the driver's cab is used.
How to quickly transfer coal. Unloading coal or how I wanted easy money.
Everyone knows that a passenger carriage is heated by coal or electricity. Here in our VET park there was a coal warehouse, where coal was delivered by freight cars in the fall. The warehouse was a huge pit with heaps of coal above which there was a trestle for carriages. The technology is simple: a carriage was driven over the pit, the lower hatches of the carriage were opened, coal was poured into the pit, then a loader carried the coal around the warehouse. For additional payment, in their free time from work, the workers of our workshop opened such cars, waited until the coal was poured out, brought the car into proper condition (removed the remains of coal in the car and under-car equipment) and then handed it over to the receiver in a clean condition. It took two hard workers about 4 hours to complete these operations. The payment for such work was decent, about 1/5 of a mechanic’s salary for unloading one car. Mostly, such wagons were unloaded by cunning “old-timers” workers, and in a day they could earn half their salary. At the end of November, when the temperature outside was already below freezing, the last batch of 3 coal cars arrived. To my surprise, no one wanted to unload them, so me and another newcomer agreed to this job. After we opened the hatches, there was a feeling of huge na....wa (deception), not a single kilogram of 40 tons came out. The coal was frozen. The four of us (two more people joined, or took pity on us) hammered these three cars for 3 days. First they used crowbars and sledgehammers, then jackhammers, all this was accompanied by an incredible amount of coal dust, which was everywhere, in the ears, nose, throat, hair. At the end of each day we all looked something like this
Examples of yard decoration and landscaping designs
But you can decorate the yard of a private house with your own hands; it is very important to correctly follow the above rules and have some idea about it. For this reason, it is necessary to present several visual examples of interesting designs for decorating and landscaping courtyards.
Option 1. There is a landscape style in the design (smooth paths, lack of symmetry).
Several main zones immediately stand out here: a children’s room (the presence of specialized small architectural forms), an entrance (a wide entrance and flower beds), a recreation area (a gazebo, beautiful tree and shrub compositions), and an arboretum. There is a small pond with a crossing bridge, which fits very organically into the surroundings.
Option 2. Also, everything is decorated in a landscape style. The most interesting thing here is the originally allocated economic zone: a vegetable garden, an orchard.
The emphasis is on modular rectangular beds, which will look very aesthetically pleasing when growing crops. The front area is located on the reverse side; it must be present in any design.
Basics of yard design and landscaping
1. Taking into account the characteristics of the territory . With the help of modern technologies and the professionalism of workers, it is possible to make the entire site level, which will require a lot of physical and financial investments. But is it worth breaking all this?
After all, in place of a hill you can build a beautiful and modern alpine slide, and in the depression there is a transparent reservoir. But if the differences are simply huge, then you can use the services of a vertical planning specialist who will make the desired picture for you and turn it into reality.
2. Harmony with the building and various small structures. The design of the courtyard of a private house should be adjusted to the structure itself, which plays a dominant role. With the help of landscaping, you can hide outbuildings and create a beautiful approach to the main element on the territory. The opening of the view of the front of the house should be smooth and organic.
Source