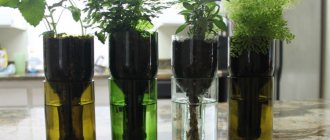
For true connoisseurs, not a single meal goes without a glass of wine. This magical drink has long gained wild popularity and still has no plans to lose its position. But what to do when a large number of bottles of wine have accumulated at home, and there is nowhere to put them for a long time? There is an exit!
An original, home-made wine rack will not only add extra zest to the interior, but will also make your life much easier by freeing up a lot of space.
A wine rack is a functional element of your home, which can also be decorative.
All you need is a few elements: imagination, tools, a little free time and some money.
The following couple of ideas for homemade shelves will help you decide on the choice of design for your own, original, unique shelf.
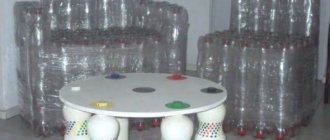
The simplest option of all is a wine rack made of plastic pipes.
For this you will need:
- PVC pipes (with a diameter slightly larger than the diameter of the bottle);
- old bedside table.
Process:
We start by upgrading the old cabinet. In order for it to look attractive, you need to sand the edges of the bedside table and cover them with the color you like or just varnish.
Then we cut the pipes to the appropriate size. We treat the resulting “nests” for wine with acetone and also paint them in the color we like, but using paint sprayed from an aerosol can.
You can fasten the pipes using any available means: rope, tape, chain, glue and much more.
Beautiful examples
- You can decorate a lampshade at home, for example, with a texture reminiscent of colored stones or ice floes of a frozen coffee drink.
- A glass with a long stem, for example, is trimmed with lace. It, in turn, is impregnated with colored varnish or a colored adhesive base so that it hardens and does not peel off later. You can also line a measuring cup.
- Any glass can be given a matte shine. But, being applied to a smooth surface, such a candlestick requires extremely careful handling.
- Flat-cylindrical glasses with a stem, the bottom of which is equal in area to the inner surface of the main bottom, are decorated with thuja branches, “embalmed” in transparent glue or varnish. Once sealed in a hardened compound, they will retain their fresh green appearance dozens of months later.
Another way to create a simple shelf is a wine rack made from two crossed planks
For this you will need:
- Two identical wooden planks.
Next, we will consider two options for the location of such boards:
Letter "X"
To do this, you need to saw through each of the boards to the middle so that the width of the cut is equal to the width of the board.
Snake
This type of arrangement is suitable for rectangular structures. In this case, the planks are fastened together with glue using clamps.
This option for shelves is suitable for placing them independently, for example, on the wall, as separate furniture, as well as for placing them in existing furniture: You can create an entire mini-bar from a kitchen sideboard. To do this, however, you will have to sacrifice space inside ready-made cabinets, sideboards and other furniture modules.
Creating New Year's decor
Holiday decor with candles can greatly reduce the number of other decorations. The warm glow in itself creates a fabulous and inviting atmosphere, and combined with glass surfaces it also creates a play of light with shadow and highlights. Glasses are the simplest option to create a beautiful candlestick without resorting to buying expensive analogues. In the future, even just being next to the beaded Christmas tree, it will remind you of the New Year and Christmas.
Another simple option for a wooden wine rack is a round shelf made of plywood sheets
For this you will need:
- Two sheets of thick plywood.
Process:
We take two sheets of plywood and make round holes in them in the same places. The diameter of these holes should be slightly larger than the diameter of the bottle itself - 10-12 cm. Then we fasten two plywoods at a distance of 15-20 cm from each other.
The holes can either be scattered across the entire area in chaos, or they can be arranged in any specific order. It's up to your discretion. Also, if desired, the shelf can be painted or some accessories can be added: additional carved elements, artificial fruits, etc.
Looking for inspiration
Not only a professional, but anyone can create handmade candlesticks. The only things that matter are imagination and the desire to create. Very often, candles are decorated in a duet with glasses and wine glasses. You can get an idea from artists and paint the glass surface with paints.
Decoupage masters share the secrets of their technique and teach even children how to work with napkins. A sophisticated candlestick will be made from a wine glass decorated with beads, rhinestones and delicate lace. Exclusive independent work will always attract attention and will not leave anyone indifferent.
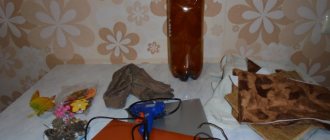
Bottle stand made from newspaper tubes
For this you will need:
- Newspapers;
- Ruler;
- Knife;
- Paints;
- Cardboard;
- skewers for mini kebab;
- PVA glue.
Process:
First we need to make newspaper tubes. We take kebab skewers and wrap pieces of newspaper pages around them. We make the edges of the stick with a bevel.
Next, we lay out the made newspaper tubes in a row so that they touch each other as tightly as possible. We evenly apply PVA glue to them and fix the tubes as accurately and efficiently as possible. We wait until the product dries.
The next step is to cut out polygons measuring 30mm*30mm*33mm*16mm. We glue the edges together and secure them with a folding clamp.
When the polygons are dry, you need to cut out a circle, the size of which should correspond to the size of the bottom of the stand.
We secure the bottom and, at the end of the work, coat the stand with wood varnish. Apply it in at least two layers. If you want to make the stand for your wine bottle brighter, you can paint it with acrylic paint.
With dry filling
A transparent glass looks beautiful when filled with bulk ingredients. Their roles may include:
- cereals and beans (looks especially appropriate with an ethnic theme for Christmas);
- acorns;
- cones;
- beads and Christmas balls;
- sea pebbles;
- anise and cinnamon sticks.
The “filling” can be combined, layered, and shiny New Year’s elements can be added.
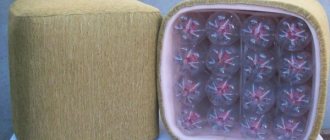
Stand for wine bottles made from tin cans
For this you will need:
- glue;
- spray paint;
- fabric (so as not to smear everything around with paint);
- canning knife;
- cardboard;
- tin cans 8-12 pieces (absolutely any cans will do: peas, corn, beans, etc.).
Process:
First of all, we clean the jars of labels: soak them in warm water, as this will help remove the paper from the surface quickly and will not allow small shreds to remain. Next, dry the clean jars.
Then you need to cut out the bottom of the can, and process the sharp edges and bend them inside the can.
Place the jar on a stand and apply paint first to the inside and outside. When the jar is dry, start applying paint to the outer edges and leave to dry again.
The number of jars used depends on how many tiers in the stand you planned to make.
After all the jars have dried, we begin to assemble the structure. We make the first row and fasten the jars together with superglue. We fix this row with clothespins, glue the subsequent rows and let it dry.
Ready!
Armed with a brush
You can simply buy a set of cork coasters and give them a unique look by painting them. Acrylic is suitable for painting. And if you use stencils or tape, you can easily make a geometric pattern.
You can also make beautiful “watermelon” coasters.
Photos: modernvintageevents.com, kittenhood.ro, oneartsymama.com, simplydarrling.com, purlbee.com, modpodgerocksblog.com, abeautifulmess.com
Add to favorites4
- Tags
- with your own hands
- kitchen
DIY, kitchen
Wine rack
For this you will need:
- Sanded birch plywood sheet (1.5m*1.5m);
- Propylene black rope;
- Dowels (thickness −4mm);
- Sanding paper (120cm and 220cm);
- Acrylic impregnation for wood;
- Brush;
- Old laminate (for template).
Process:
We cut the plywood lengthwise so that you get 5 vertical elements. Then we cut out a round hole with a diameter of 10-12 cm from a piece of old laminate, which we will use in the future as a template.
Using this template, we measure and draw circles on vertical sheets of plywood. Next, we make a hole inside each circle so that we can freely insert a jigsaw into it and then cut out holes for bottles with it. But it’s worth making these holes a little smaller than you originally drew.
Next, using a cutter, we bring the circles to the finished form, that is, we adjust them to your template.
The next step is to cut out the top and bottom covers of the shelf-rack and, again, using a cutter, make grooves so that their thickness is the same as the thickness of the plywood. This is necessary so that the vertical sheets fit into the grooves as tightly as possible.
After this, we make a 6mm rounding on all holes and edges of the parts using a router. At this stage, your wine rack is already starting to look like an almost finished product.
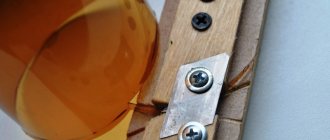
At this point in the process, you can give your imagination a reason to run wild. What can be done to prevent bottles from falling out? As an option - a mesh of rope on the holes in the outermost vertical wall.
We mark the holes, then drill holes where we will subsequently insert the rope and treat them with a sanding attachment so that the rope does not catch and does not break off pieces of the plywood sheet. We sand your almost finished product using a sanding machine.
Now you can paint the wine rack in the color you like along the grain with a regular brush.
To complete the process, we drill holes for dowels in the top and bottom covers, glue them in and in this way connect all the vertical and horizontal parts of the shelf-rack.
Let the glue dry. This will take at least a day. Then we lace up the holes in the back wall with rope, ribbon or whatever you like best. Your wine rack is ready! You can arrange the wine.
How to make a candlestick from a wine glass with a long stem?
If you still have a glass or plastic wine glass or glass, you can turn it into a candlestick. This method belongs to the list of easily and quickly implementable ones - in conditions when there is little time left, but you still need to decorate the table additionally. There can be several candlesticks if the table is large and there are a dozen or more guests. A candlestick made from a large glass will serve as a decoration in the center (or closer to it) on a spacious table designed for 10-15 people.
But not only the festive table is the place where such candlesticks are used; they are placed in other prominent places within the kitchen-living room. Important: before using any candlesticks, make sure that the base is made of fireproof material so that the holiday does not suddenly become an incident or even an accident.
Also read! DIY New Year bottle decor: 20 ideas
With an inverted glass
To make one such decorative element - a candle on an upside-down champagne glass, use a candle that stands confidently on any surface. Check how stable it is before setting it on fire. An inverted glass or wine glass creates a space at the bottom that can be filled with something decorative.
The glass is left transparent when any figurative decoration or decoration that fills the entire volume is placed inside, into the cavity formed by its inverted state. It doesn’t matter what it is - a piece of garland, an LED lamp, a three-dimensional inscription on a workpiece, a figurine, a polyhedron or something else - this element must be clearly visible, otherwise the meaning of its insertion into this cavity is lost.
For example, they place figurines of characters from films or games, or a small matryoshka doll there. For a New Year's candlestick, this is a Christmas tree toy in the form of a ball with sparkles. If you don’t yet have such paraphernalia, use a decorated, painted spruce cone, a Christmas tree shower, or a piece of plastic garland.
As a special option - a small battery-powered flashlight with LEDs with a warm glow, the color and shade reminiscent of a candle flame or smoldering coals of a fire. Cold-colored light (from white to blue), as well as green and other backlight colors that create absolutely unnecessary contrast, do not suit the range of a candle flame.
When, for example, a triple candlestick is created, the old glasses are placed upside down on a worn CD or a neat blank made of natural wood or plywood, pre-painted and decorated with sparkles. To prevent them from moving, the candlestick, made in the form of a non-demountable structure, is glued together with epoxy or hot melt adhesive. Gluing the glasses prevents them from falling off the round base. Before gluing, do not forget to insert the selected attributes of additional decoration into the cavity under the inverted glasses (if the glasses remain transparent).
Lampshaded
Glasses are also suitable for making mini lamps with candles. Important: the lampshade must be fireproof. To do this, use a cone-shaped wine glass.
Step-by-step instruction.
- Select paper of the required color.
- Glue the cap for the future lamp. The layers of paper are joined together in an overlapping manner.
- Impregnate it with non-flammable compounds and varnish. This is important - the paper should not smolder, because it is located not far from the candle light.
- Paint the stem of the glass, for example, with acrylic paint of the desired color. Place a piece of candle on it.
- Place a lampshade on the stem of the wine glass.
Before lighting such a lamp, it is recommended to additionally decorate both the lampshade itself and the inverted container.
Painted with colored paints
Do not use a glass with cracks or scratches - the appearance will be ruined. It is quite difficult to paint chaotically spreading cracks with a “web” and thus disguise them.
A glass goblet accidentally split into two or several parts is glued together, painted and decorated. An outside observer will never guess that the product is broken - all defects are hidden very reliably.
Paint the stem of the glass - preferably to match the tone of the paraffin from which the candle is made: the color should be opalescent, whitish, vaguely reminiscent of a creamy tint.
Cracked glasses that are unsuitable for further use are covered with a decorative layer based on waterproof varnish or paint, and then painted according to the wishes of the owners of such a candlestick. To prevent the coating from falling off over time, sand the walls of the glass until matte. Next, the glass, which has become matte, is coated with colored varnish. For example, a coating made of silver paint (made from aluminum powder) or “golden” paint (made from brass or bronze powder) is considered especially chic. A copper shade can be obtained from the same copper - powdered copper is mixed with colorless varnish, then this composition is applied to a wine glass. After the layer applied to the product has dried, it is additionally painted with any paint interspersed with glitter.
Do not miss! Patterns of protruding cones for the New Year 2022 for cutting out onto the window
Crescent Moon Shaped Balancing Wine Rack
Due to its original geometry, this wooden stand holds the bottle in perfect balance, creating the illusion of weightlessness. To make it you will need a wooden blank with dimensions 260x140x48 mm. Using a band saw or jigsaw, cut the stand according to the pre-transferred template, leaving a small allowance for finishing sanding. Using a feather drill, drill a hole d 35 mm. After thoroughly sanding the profile, you can begin applying the finishing coat.
Simple corner holder
The idea of this project captivates with its simplicity and expressiveness. To make such a table stand, it is enough to select the desired wooden blank and cut a corner from it according to the dimensions indicated in the drawing. To create a hole, it is convenient to use a feather drill (d 35 mm).
Cut the product along the outer contour of the template, leaving a small allowance for sanding. Sand the profile with sandpaper and round the top of the stand. If desired, you can cover the product with a decorative finish: wax, stain, oil or varnish.