An interesting way to teach children is applications made from colored paper. They develop children's thinking and hand motor skills in preschool and school age. Children love to do such an exciting activity as appliqué; they can be on different topics: flowers, vegetables, animals. This develops their horizons and gives them a good feeling that they can create something themselves.
Working with children's applications on the topic “Vegetables” usually takes place together with adults, who show children how and what to do, and talk about options for various approaches to this creative work.
What and how to make an applique from leaves
What we need:
- 1. Natural material: leaves of various sizes, shapes and colors (they can be dried in advance), twigs, flowers, herbs, seeds.
- 2. Colored paper, felt, glue, scissors, paints, pencils, cardboard.
- 3. Varnish can also be useful to fix the finished work and give it shine.
How to work with leaves:
To start working on crafts from leaves, they must first be dried. This can be done between the leaves of books, or using an iron. Store the leaves between the pages of books or newspapers.
Pictures made of pebbles, shells, sand
Don't limit yourself to just dried flowers. Try making a picture using pebbles, sand, river and sea shells.
How to prepare shells:
Collecting shells is a fun activity. But first of all, you need to make sure that no one lives inside. And in order to avoid unpleasant odors in the future, they must be properly processed. First you need to remove organic particles that will be a source of stench.
The most effective method that does not require special tools or skills. Cooking and boiling help to easily remove all excess.
1. Place the collected material in a pan with water. Make sure they are completely immersed in liquid.
2. Then place the container with the contents on the fire. Cook after boiling for 5-10 minutes, it depends on the shape and number of shells.
Next, when removing products from boiling water, be careful not to get burned.
How to paint stones
Dense, smooth, light-colored pebbles are the best basis for drawings. They need to be washed thoroughly with soap and soda solution. Then dry. You can paint with gouache, watercolor or acrylic.
The first two types are quickly washed off with water. Acrylic paints dry better and are more durable. Before painting, first apply a primer to the stones. It provides good adhesion of paint to the surface.
We draw strokes and details with felt-tip pens or an outline. The final touch to give the product brightness is to varnish it.
How to paint sand?
White sand will make stylish beautiful paintings. This material is sold in specialized stores for creativity. Colored sand can also be purchased, but it is very easy and simple to color it yourself at home. For this you will need: coloring matter (colored crayons, dry tempera, liquid food coloring), plastic containers (for mixing paints, storing dry material), paper towels.
Dry tempera painting method:
Start painting with small volumes. Mix a glass of sand and 1 teaspoon of dry paint. Add it until you get the desired shade. Experiment with different colors and get your own color scheme.
Second method with food coloring:
Pour water into a convenient container. So much so that the sand is barely hidden in it. If there is more liquid, then you will need to add more bulk material.
Add dye 1-2 drops at a time. Mix and add it in small portions until you get the shade you want.
Then drain the water through cheesecloth. Let the sand dry by scattering it on napkins.
Create your masterpiece.
Types of applications made from natural materials
- Overlay applique. A simple look that does not require additional work with leaves - they are glued to a sheet of paper or cardboard, creating the intended plot. These can be animals, trees, mushrooms. You can add some details.
- Mosaic or modular application. This technique involves gluing leaves that are identical or similar in shape. This way you can make a bird's tail or fish scales.
- Symmetrical applique. In this case, it is necessary to select similar leaves to create mirror images. This way you can make an image in water, a butterfly, a dragonfly.
- Ribbon applique. A type of symmetrical applique, but in this case you can make several similar images.
- Silhouette applique. The leaves are trimmed to create the desired pattern or shape.
Children become interested in applications and crafts even at the stage of collecting material. Kids like to collect leaves on the paths while walking, look for cones and chestnuts. Therefore, it will not be difficult to persuade your child to use all this to create a beautiful applique.
Simple autumn applications for kids
It is always more difficult to work with the youngest children and you need to find an approach to them. They cannot be forced to sit on one job for a long time. Therefore, the craft should be as simple as possible. How to make an interesting autumn-themed craft in just a few minutes to inspire your child to continue.
It seems that nothing simpler than this application can be found.
Take one beautiful yellow leaf. Turn the wide part down. Glue it onto cardboard. You can finish drawing the arms and legs, and insert the drawn umbrella into your hand.
A leaf like this with eyes will look funny. They can be made from plasticine or cardboard, or maybe you can find small buttons and glue them on. Don't forget to make it cheerful by drawing a smile.
Autumn from palms: applique
We will need:
- Colored paper
- Scissors
- Glue
- Sheet of cardboard
1. We need brown paper to create a tree trunk.
2. Trace children's palms on colored paper, making several multi-colored blanks.
3. Glue the tree trunk and leaves onto the cardboard
Options for appliqué on the theme of autumn made from palms:
Application for the younger group: autumn tree
Another applique option for the little ones is a tree.
It’s easy to make: collect thin branches of approximately the same size and glue them in a bunch on cardboard. We lay the leaves above like a crown. You will get an autumn tree from leaves.
You can make a torn applique from colored paper.
Using cereals you can make a beautiful autumn tree.
Paint the millet with different colors. Draw the trunk and branches. Using PVA, glue the cereal to create a tree crown.
How to make a hedgehog?
Autumn hedgehogs are a very popular idea for creativity. Its needles can be depicted with leaves, seeds, plasticine, well, you will soon see for yourself.
Here is an application for little ones. With button decoration.
Or seeds and cereals.
Character from the cartoon "Tilimilitryamdia".
This template will come in handy.
The hedgehog bears rowan on its needles.
Parts in the shape of children's hands also form a composition.
Or from long strips that are glued together in the shape of a drop.
The circles we already know will also come in handy.
Just draw this cute animal using watercolor.
It is possible to cut out a handsome man from a postcard and decorate his needles with natural materials.
Also a fabric hedgehog.
Look at the finished results of children's creativity, taken from the school competition exhibition.
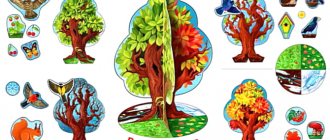
You may find these diagrams and drawings of hedgehogs useful in your creativity.
They can be painted, filled with plasticine or cut along the contour.
Application for the younger group on the theme of autumn
Applications made from natural materials in kindergarten are not very complicated. For them you can use not only leaves, but seeds, acorns, twigs. Colored paper and cardboard are also used.
Autumn flower applique
Beautiful colorful leaves that fall to the ground from trees can be transformed into an autumn flower. You can create such a flower using glue and a sheet of cardboard.
If one flower is not enough, then you can make a vase with flowers from autumn leaves.
Beautiful umbrellas will be made from pieces of colored paper. This type of applique is called cut-off.
Wall panel
Children, as a rule, create with great passion and joy. Therefore, if you offer them to decorate a playroom, corridor, dining room or bedroom in the garden in an autumn style, they will agree without hesitation. In this case, applications can be made directly on the walls. All the guys in the group will be involved. Some draw leaves on colored paper, others cut them out, and others, under the guidance of a teacher, design a wall panel. Applique elements are glued either in random order or forming specific patterns. A huge advantage of this activity is that children learn to work in a close-knit team and gain important skills in arranging their home in a playful way. And it’s just very interesting for them to watch how their usual environment changes. And after such an event, children will be more willing to come to kindergarten, to their group.
Autumn applications: preparatory group
Applications made from natural materials in kindergarten occupy a large part of the children's development program. Autumn gifts of nature open up many possibilities for activities with children. Therefore, autumn fairs are a place where you can show off your talents.
You can invite the children to come up with a real composition of leaves.
If you combine drawing and applique, you can make such a cute hedgehog from seeds.
Using flower petals and grass sprigs, you can make beautiful applications
How to prepare leaves
In order for the application to be neat and stored for a long time, the leaves must be prepared in advance. Drying in a loose position will not help; as moisture evaporates, the material will curl. Gluing such leaves is much more difficult, as is cutting out even shapes for a modular applique of leaves.
There are two options for drying natural material. You can put the leaves under a press, for example in a large book. But we must take into account that the pages are deformed, even if they are additionally padded with a napkin - the reason is evaporating natural moisture. Such drying is a long process, taking at least a month. Solid large veins should be cut lengthwise in advance so that they dry and do not begin to rot.
Express drying with an iron is much faster. It is enough to place the leaves on a newspaper and iron at medium temperature. In this case, the natural color may be distorted. To prevent this from happening, it is worth drying in several stages and not setting the iron to maximum.
To prevent the material from deteriorating before class, you can store it in a box with salt or rice sprinkled on the bottom. The absorbent will absorb residual moisture and prevent rotting.
Leaf applications: senior group
Leaves are the most accessible material for embodying your talent in creating bright and colorful paintings and applications on the theme of autumn. By choosing leaves of the correct shape, you will get a variety of animals and insects.
Applique: fox made of colored paper
It is very convenient to make applications with children using ready-made templates. To do this, just print the blank and cut it out.
Another version of the fox template made from colored paper made of geometric shapes.
The fox cubs may turn out completely different, but adding them with a drawing will result in interesting works:
Unusual three-dimensional applique made of colored paper
Applique Autumn tree: middle group
The change in nature in autumn is noticeable to everyone and even children see the difference when the trees turn yellow.
We will need:
- Sheet of cardboard
- Colored paper
- Glue
- Scissors
Create a tree trunk and branches from brown construction paper.
Glue the tree onto a background sheet of cardboard, having previously made a tree crown
Glue leaves of different colors onto the branches of the tree.
Autumn mushroom: applique
You can always find mushrooms under a tree in the fall, so learning how to make mushroom appliques is also useful.
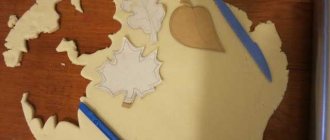
Mushroom cutting templates for appliques
If classic appliqués are already boring and you want some variety, then you can combine drawing and gluing natural materials. Such works are quite suitable as applications made from natural materials for elementary school.
Children can already give a gift to their mother by drawing her portrait and adding leaves and other natural materials to the picture.
Original, creative, fun
Applications “Autumn” for children can become not only a creative craft, but also a very unusual and original one. Invite your students to bring a little pasta from home to their next art class - shells, spirals, pasta. For what? Let's explain now. Again, cut out the silhouette of a tree from brown paper. First, of course, by drawing it on the reverse – white – side. Paste onto the base sheet. Now, in a picturesque manner, using PVA glue, glue the pasta “leaves”. And then it’s simple. Take gouache paints and paint the “foliage” from the dough in autumn colors. And now you also have an unusual three-dimensional composition, right?
Autumn applications made from natural materials
With the help of activities with natural materials, you can also strengthen children’s understanding of changing weather conditions, explain to them what the seasons are and what happens with their changes.
The late autumn applique will help reveal to the child a new stage of nature that precedes winter weather. After all, in late autumn we observe a cooling, the leaves become less and less and the last leaves are blown away by the wind from the branches of the trees.
Application: autumn has come
An application on this topic will reveal to the child the concept of how summer changes to autumn, what happens in nature during this period. After all, there are still many leaves on the trees, some green, but also red, orange and burgundy.
Take unnecessary puzzle pieces, paint them with different colors, whatever color you want the leaves on the tree to be. The tree trunk can be drawn, or it can be glued from paper.
Merry corn
Continuing the theme of the gifts of autumn, invite the children to depict corn cobs on the applique.
Children generally love cheerful yellow and green colors and use them most often in creativity. Because they will like the idea. And the composition is easy to make, so even little ones can cope with the task. First you need to draw, cut and glue the cob itself. Explain to the children the features of its shape. Boys will understand you perfectly if you compare it with the body of a rocket. Then leaves. They should cover only the lower part of the cob, diverging in different directions. All that remains is to depict the grains. You can simply cut out random small pieces from multi-colored paper and stick them on the cob. This is such a funny little corn!
Volumetric applique on the theme of Autumn
Autumn is accompanied by rains and an attribute that can be found in any apartment is an umbrella. It’s quite simple to depict an umbrella and create a voluminous applique on an autumn theme.
Take a white sheet of paper. Starting from the corner, draw any pattern. You need to cut the corner in a semicircle. We fold the cut out part of the sheet like an accordion.
Glue this part onto a piece of paper
You can draw raindrops on a piece of paper.
You can also use a ready-made template to make an umbrella.
We cut out the template, having previously printed it, and make patterns on it.
Just like in the previous version, we fold the umbrella blank like an accordion
You can make such funny umbrellas
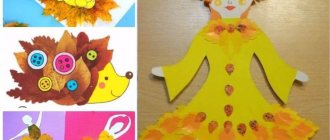
Draw or print out an image of a girl and glue an umbrella to her hand.
Types of autumn crafts
If desired, you can create an almost endless variety of crafts from the autumn wealth:
- individual products;
- panel;
- applications on a particular topic;
- herbariums;
- real autumn compositions.
What is noteworthy is that you can make simple crafts, medium-complexity, and very complex, that is, highly artistic, from autumn gifts. This means that this kind of creativity is available to children of all ages - from first-graders to high school students.
Well, now let’s start a specific conversation about crafts from the gifts of autumn.
Leaves applique: autumn
It is not necessary to use only whole leaves for appliqués. There is a separate direction in creativity - broken applique. You can use not only leaves, but also colored paper. Its principle is that the silhouette of the figure is created from torn material.
To make the application, we will need:
- Sheet of cardboard
- Leaves
- Glue
- Dye
Dried leaves must be crumbled.
Draw a tree trunk and branches on cardboard.
Once the paint is dry, apply glue to the trunk and branches where you want the leaves to be.
Sprinkle pieces of leaves onto the glue.
Press down the leaves a little to secure.
Shake off excess leaves from the appliqué.
The same tree can be made using colored paper.
It is not so easy to cope with such an application. The main thing here is to choose the right leaves
Positive aspects of creating applications
This type of crafts has a very beneficial effect on the development of the child. The main advantages of creating applications:
- Development of fine motor skills of the hands;
- Development of creative and logical thinking;
- Trains perseverance and accuracy;
- While working, the baby remembers what objects look like and what they are called.
Also, in this way, a child can create not just a simple standard craft, but also present the work as a gift or interior decor.
Applique Autumn bouquet
This craft is quite suitable as a gift for a teacher or mother from a schoolchild. After all, such a bouquet of leaves will last much longer than a fresh bouquet of real flowers.
Pre-dry leaves from different trees. Prepare glue, scissors and a sheet of cardboard.
Form a vase from the leaves by gluing them onto cardboard. And then help your child create a beautiful bouquet of leaves. To make it bright and neat, use light leaves for the craft, without holes or stains.
A vase for an autumn bouquet of leaves can be made from colored paper, or you can create a bouquet not only from leaves and do without a vase.
Hedgehogs from seeds
Sunflower seeds are one of the most common autumn gifts. It’s not at all difficult to make various crafts with them. For example, cute hedgehogs. There are several ways to do this.
Here's the first method.
- We sculpt the hedgehog’s body from light plasticine, and his nose and eyes from dark plasticine.
- We take sunflower seeds and stick them into the body with their sharp tips. These are needles. The seeds need to be inserted tightly so that there are no gaps on the back and sides of the hedgehog.
- We leave the muzzle, as well as the paws and belly bare.
- For greater beauty, we sculpt one or more mushrooms from plasticine and attach them to the hedgehog’s back.
Here's another way. In fact, this is not even a hedgehog in itself, but a whole autumn composition with the participation of a hedgehog.
- We take thick white cardboard.
- Draw the outline of a hedgehog on it with a pencil.
- Then we take sunflower seeds and glue them onto the back and sides of the drawn hedgehog. We do not stick seeds on the face, belly and paws.
- We paint the cardboard with autumn colors. That is, we depict an autumn landscape on it. Something (such as the sky, sun and clouds) can be drawn with paints or markers. And it is better to depict vegetation using real autumn leaves, flowers and twigs.
Beauty!
And more about hedgehogs...
Hedgehogs are generally a favorite craft for children of all ages, so we’ll tell you about some more ways to make these cute animals from autumn gifts.
If you look closely at an ordinary pine cone, you can easily notice that its shape is very similar to the body of a hedgehog. Have you been paying attention? Amazing! This means that it won’t be too difficult to “finish” a hedgehog out of a cone so that it turns out just like a real one.
What is needed for this? Just a little:
- sculpt a muzzle from plasticine along with a nose and eyes;
- glue it to the base of the cone - that is, that part of it that is attached to the branch.
That's all. It turns out to be a real hedgehog, where the scales of the cone will play the role of needles.
Or you can complicate the task a little. That is, stick a muzzle molded from plasticine to the cone, and glue pine needles to the scales of the cone with plasticine or glue. The result will be not just a hedgehog, but a prickly hedgehog. As expected.
By the way, about landscapes
The autumn landscape was mentioned above, and this topic should be discussed in more detail. Because simply wonderful paintings and crafts can be made from ordinary autumn leaves, flowers, berries, herbs and twigs. Moreover, you don’t even need to have any special artistic abilities to do this.
Read more about the process of making such landscapes.
- We prepare a sheet of colored paper, or even better, thick cardboard or a flat plywood board.
- We stock up in advance with all the necessary decorative materials: colorful autumn leaves, berries, pine needles, dry twigs, flowers, etc.
- Don't forget about colored pencils, paints and a brush or felt-tip pens - they will definitely come in handy.
- We also stock up on glue.
- We decide what kind of plot will be depicted on the canvas.
- We begin to depict him. It could be an autumn meadow, an autumn meadow or field, an autumn forest - in general, everything that your creative imagination suggests. We glue the stored gifts of autumn onto paper, cardboard or a plywood board so that we get the intended picture.
- We fill in the missing details and strokes with paints or felt-tip pens.
The end result will definitely look like in these photos. Well, isn't it beautiful? In general, we try ourselves as landscape artists. There will definitely be a result.
Volumetric autumn landscapes-crafts
And a variety of voluminous crafts and landscapes are made from autumn gifts. Of course, they are a kind of pinnacle of craftsmanship, but at the same time, there is nothing particularly difficult about them. This means that, with desire and diligence, any child can make such a craft.
To do this, you just need to stock up on all the necessary materials:
- autumn leaves;
- fruits and berries;
- flowers, grass, twigs and pine needles;
- nuts, acorns, chestnuts, cones;
- glue, paints and brushes, colored paper and cardboard, scissors;
- wire and twine, etc.
It’s not a fact that all of this will be needed in full for the craft, but it won’t hurt to have the listed supply on hand. You never know where creative imagination will lead?
And here are samples of three-dimensional crafts made from autumn gifts. Of course, this does not mean that you need to make just such crafts. These are just examples, but you can make anything you want - so to speak, in the image and likeness.
Making a bunny from a fir cone
This is a very simple, but at the same time elegant and beautiful craft.
- Take a straight, whole fir cone. Unlike a pine cone, it is oblong and large, so it is more suitable for crafts.
- Next, take two wooden sticks. We attach them with plasticine to the sides of the cone. These are bunny paws.
- We sculpt legs for a hare from plasticine.
- We make eyes, nose and mouth from colored plasticine. We attach them to the thicker part of the cone.
- Making the bunny's ears. They can be fashioned from plasticine, or even better, from two “propellers” that are found on maple seeds. There are a lot of them on the maple tree in the fall; they fly away as soon as the wind blows. The ears will turn out wonderful!
- And from pine or cedar needles we make a mustache for the hare.
- If desired, we sculpt a carrot from plasticine and attach it to the hare’s hand. Indeed, what kind of hare is this without a carrot?
From fir cones using the indicated method, it is not at all difficult to make one bunny or an entire hare family.
And here is another version of a bunny made from a fir cone - along with the process of making it.
Pine cone owl
And the pine cone is very similar to an owl. If so, then it won’t be too difficult to attach the missing parts to the pine cone, and the owl will turn out just like a real one.
Such an owl can be made in different ways. Here is the first, easiest way.
- We take a suitable, that is, large and undamaged pine cone.
- In addition to this, we stock up on a small pine cone, as well as two cups for acorns and two “propellers” for maple seeds.
- Don't forget about the glue that we will use to glue all the parts of the future owl, as well as paint and a brush.
- Let's get creative:
- glue the acorn cups, bottoms up, to the top of the cone (the one that is attached to the branch). These are the eyes of an owl;
- paint dark or green circles in the middle of the cup – pupils;
- over the eyes we glue two maple “propellers” - the eyelids of an owl;
- below the eyes, in the middle, glue a small bump - an owl's beak.
That's all the wisdom.
And these are other options for making an owl from a pine cone.
Owl and owlets in a hollow
But there is a second way, more complicated. In this case, the owl is made not from one, but from many pine cones. So, what do you need to stock up on to make such an owl craft:
- plasticine;
- lots of pine cones;
- bird feathers;
- colored paper and scissors;
- glue;
- purchased owl eyes - if you don’t want to sculpt them from plasticine.
Let's start the craft.
- We sculpt a large outline of an owl from plasticine.
- When the outline is ready, we begin to decorate it with cones. That is, we stick the cones into the owl’s body with the scales down and the wide part out.
- In this way we design the entire owl’s body.
- We make wings and ears for the owl from bird feathers. There is nothing complicated here. You need to stick (or glue) several feathers into the appropriate places. If these are wings, then on the sides of the body, and if they are ears, then there are bumps on top.
- Alternatively, wings and ears can be made from autumn leaves, but they spoil very quickly. So it’s better to make it from feathers.
- Just below the ears we glue the eyes - either by sculpting them from plasticine or purchasing them.
- Cut out a triangle from yellow, orange or red colored paper. Glue it point down under the eyes. This is the nose of an owl.
- There is another option for the nose - make it from a small pine cone.
The owl itself is ready. But it will be even better to make it part of a beautiful autumn landscape. That is, make another hollow and owlets. First, let's talk about owlets. They are made exactly the same as an owl, but smaller in size. How many there will be is up to the artist who makes the craft.
Now about the hollow. Here everything is a little more complicated. To make it, you need to take a part of a pine or some other branch (it should be thick enough), cut it evenly with a saw on both sides, and cut a round depression (hollow) in the middle. Of course, the child himself may not be able to cope with such a task, and therefore the help of someone older is needed.
Next we do this.
- We take a flat rectangular plywood or plank. Vertically glue the trunk with the hollow to it.
- Glue a large owl nearby.
- We plant the owls in the hollow and fix them with glue.
- We cover the entire board with autumn leaves. To prevent them from falling apart, it is better to glue them.
The autumn composition is ready!
Birds from autumn leaves
Oh, what wonderful birds fall leaves make! And the main thing is that there is no special work here. All you need is to be able to notice and not be lazy to select suitable leaves. A little work and a little imagination - and the leaves turn into wonderful fairy-tale birds. The only job is to glue the leaves to each other correctly and artistically. Well, and also - attach eyes to them. And, finally, stick the finished composition onto paper, a sheet of cardboard or a piece of plywood.
Fishes from autumn leaves
The same thing, in principle, applies to another craft - fish made from autumn leaves. Each autumn leaf already looks like a small silver or gold fish. And if you add to this a little diligence and creative imagination? For this:
- you need to select leaves according to size and color;
- using glue, make a fish from several leaves;
- cut out the eyes of the fish from a piece of white or colored paper and glue them to the appropriate place;
- Glue the finished fish onto a sheet of colored paper or colored cardboard.
By the way, in this way it is not at all difficult to make a real composition - fish in an aquarium.
- First, take a white sheet of paper and color it accordingly. We paint the main part of the sheet blue (this is water), and the lower part yellow (this is sand). The aquarium is ready.
- We make algae from leaves, needles and twigs and glue them throughout the aquarium.
- Next, glue small acorns or nuts all over the aquarium sheet. These are pebbles that, as you know, must be in an aquarium.
- If you can get real shells, even better. They must be glued to a sheet of paper, and the drawn aquarium will look just like the real one.
- We make fish from the leaves and place them in the aquarium. To make them look beautiful and always be in place, we glue them on a certain part of the painted sheet.
- For greater beauty and persuasiveness, draw white circles on a blue background (or cut them out of white paper and paste them on). These are air bubbles, which are known to be present in any aquarium.
It was a wonderful composition!
Animals made from autumn leaves
And it’s not at all difficult to make funny little animals from autumn leaves. Again, you need to stock up on leaves of different shapes, colors and sizes and use glue to build all sorts of animals from them. The creative process in this case is so simple that there is no need to talk about it in detail. It will be enough to look at the photos of such animals, and everything will become clear.
Wreath of autumn leaves and fruits
This is a very common and very easy craft to make. In addition, it is beautiful, and if so, then the wreath will decorate any room and the entire home interior as a whole. In addition, the craft is stored for a long time, and this is an additional plus.
The wreath is made as follows.
- First, we prepare the base - a circle made of strong wire or flexible wicker. Made from vines – better because it’s more natural.
- Next, we glue onto the finished base, tie with twine or thin soft wire leaves, bunches of berries, sprigs of pine needles, cones, acorns, nuts - in a word, everything from the autumn gifts that we consider necessary.
- The wire or wicker base should not be visible - so we attach the autumn beauties to it in a thick layer. Better yet, make a wreath of several layers.
- That, in fact, is all the wisdom. When the wreath is ready, we attach a loop to it from wire or twine so that it can be hung on the wall or door if desired.
What size should an autumn wreath be? Any way, depending on the wishes of its manufacturer.
Animals and other funny creatures
It’s easy to make all sorts of funny little animals and various fairy-tale and fantasy creatures from autumn fruits, vegetables and other fruits. For example, these are the piglets made from ordinary potatoes. Isn't it very cute?
Or - this horse and dog made from acorns.
Or – such “apple” people. It’s not clear who they are or what their names are, but that doesn’t matter. The main thing is that it is beautiful.
You should not neglect the autumn pebbles, of which there are so many underfoot. If you pay attention to them, pick them up, wash and dry them, and then use your imagination a little, you will end up with such wonderful crafts. Which, moreover, are easy to make.
In general, create and dare, and let autumn with all its gifts be your helper. To make the creative process easier and more fun, watch these three videos.
Craft ideas on the theme “Gifts of Autumn”
Autumn paintings, panels: applications
Using the appliqué technique, you can create beautiful and original paintings from a variety of natural materials.
Collect various leaves, twigs and flowers, dry them as a herbarium and start creating real panels and paintings.
The following are perfect for such a picture: moss, straw, spikelets, seeds, small flowers
Painting “Autumn Girl”
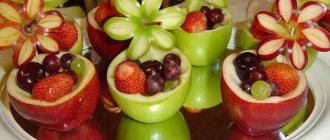
Volumetric applications of vegetables and fruits in the preparatory group
Every child will be interested in making a variety of fruits and vegetables out of paper, which they eat from an early age. They can be made as appliqués on paper or in volume.
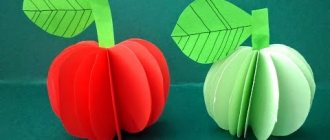
How to make an apple out of paper
We will need a sheet of red double-sided paper. Fold it in half and cut it. We also fold the halves in half and draw the silhouette of half an apple with a pencil.
Glue the apple halves onto a piece of paper and create a core, stalk and leaf.
New Year's applications for children
Christmas tree applications
The winter beauty of the Christmas tree can come in a variety of designs. In addition to crafts, children will also love the “Paper Christmas Tree” applique, especially since you can choose any desired option from the ten presented below. This is some kind of collection of all the works together, with links to detailed reviews with photos and instructions.
More details: paper Christmas tree applique
Funny deer
The New Year's applique "Deer" is suitable for children of all ages. It is very easy to make, and then show your creative talents and decorate it festively and brightly.
Read more: New Year applique with deer
Volumetric snowman
A postcard with a snowman is a wonderful three-dimensional applique that a child can make for his loved ones on the eve of the New Year holidays.
More details: applique with a snowman
Toy on a branch
A New Year's card with a three-dimensional branch and a toy is an excellent holiday applique, a gift to loved ones that a child can make with his own hands.
More details: applique with a toy on a branch
This is not all applications for children; the selection will be supplemented with new and interesting ideas, voluminous, using different materials and techniques.
To be continued…
Fruit applique: senior group
Making strawberries out of paper
Cut out tails from green paper.
Fold two pieces of red paper in half and cut out a heart.
Glue one part to the base of the sheet, and glue the second along the fold line.
Glue a green tail cut from a template on top and draw dots with a black felt-tip pen.
Volumetric cherries made of paper: applique
From red paper you need to cut 4 circles (diameter 5-6 cm).
Fold the circles in half and cut out the green strip.
Take a green sheet 12*6 cm and cut out the leaves by folding the paper in half
Glue a strip folded in half onto a sheet of cardboard. Glue leaves on top and a cherry on each branch.