- November 1, 2018
- Crafts
- Legina Marina
It's time to collect autumn leaves. This is waste material that is lying around in huge quantities underfoot. But it can be harvested, dried and then used throughout the winter. Dry material will retain the warmth of autumn for a long time and delight with wonderful colors. And on long winter evenings you can spend time with your children creating beautiful compositions. Today we’ll look at how to make an owl from leaves with step-by-step instructions.
Choosing leaves
The first step is to choose the leaves that will be the basis of the composition. It is better not to use large ones with carved edges, because it will be difficult to give the painting the correct contours. Cherry leaves are best. They are small, have an even contour, so they can be laid out on the selected pattern and get a good result. But small maple ones will also do.
Little Owl
Children love toys with moving elements. The easiest way to make an owl's wings move.
To work you will need:
- One-piece bird and wings template;
- Cardboard for the base;
- Two small buttons;
- Two pieces of thin wire;
- Durable, lint-free thread;
- Wooden bead;
- Scissors, glue, pencils, awl.
First of all, you need to print the template. If it is black and white, immediately color it with pencils or markers. Then cut out the parts and glue them onto cardboard.
Give the workpieces time to dry under pressure.
- Cut out the parts and make two holes in the wings, as shown in the photo of the craft. The owl will raise and lower its wings thanks to this mechanism.
- Using buttons and wire, attach the wings to the body. Insert the wire into those holes that are further from the edge.
- Thread a thread into the nearest holes and secure it from the inside of the body.
- Test the operation of the structure several times, and if everything is satisfactory, tie the threads at the bottom. For convenience, tie a large bead at the end.
“Twitch” is ready. The span of its wings depends on the location of the holes on the wings.
Let's get started
Now let's find out how to make an owl from leaves. You can find step-by-step instructions below:
- Draw the outline of an owl on a piece of cardboard and cut it out. This is the basis of our preparation.
- Now we gradually apply glue and begin to fill the outline with leaves. If you are doing a craft with a small child, then you need to choose a glue stick.
- We begin to lay the leaves from the bottom, gradually rising higher. We continue to lay the material overlapping each other until we completely fill the entire workpiece.
- For the ears you need to choose oblong leaves.
- Cut out eyes, beak and paws from colored paper.
As you can see, there is nothing complicated. Make an owl from leaves. Anyone can do it with step-by-step instructions.
Button mosaic
Take colorful buttons and beads. Fill in the outline of an owl drawn on plain paper with them. If the resulting composition suits you, take a photo of it and then proceed to gluing the elements in the same order to the cardboard template.
If you don't have enough buttons, lay out only the outline with them, and fill the inner space with beads.
Big and small
You can choose the size of the materials yourself, using the instructions as a basis, preferably step-by-step. We have already discussed above how to make an owl from leaves, but then everything depends on your imagination. You can simply lay out the applique on a sheet of cardboard. If you cut out the figure and then cover it with leaves, you will get an excellent gift option. Acorn caps can serve as eyes.
Make it a little more difficult. To do this, prepare an additional thick twig and yarn. Separately, you can make legs from cardboard and tighten them into a ring using thread. Now pass a stick through the two circles and secure this structure to the owl. The illusion is that she is sitting on a tree in the forest. Making an owl from leaves with your own hands, as it turns out, is easy and simple.
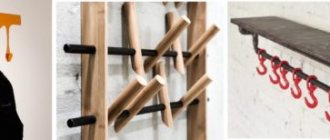
From logs or wood cuts
A log can produce a large owl, and cuts from trunks and branches can produce a smaller specimen. Even a small figure will look very colorful, so there is no need to chase size. In addition, you will need bark, branches, cones, as well as buttons, plasticine, and fluffy wire.
Step-by-step instruction
A log or large cut will become the body of the bird. You'll have to work hard with a hacksaw. For the remaining parts (head, wings), prepare smaller parts. The thickness of the cuts is not significant, but they should be the same and preferably not too heavy.
The plumage is made from thin saw cuts, twigs, cones, and pieces of bark. Give them the desired shape and secure. Instead, you can apply the corresponding design by burning.
Glue buttons in place of the eyes, attach a cone in place of the beak, and make ears from the tips of branches. The paws are sculpted from red plasticine or fluffy wire. If you have textured fabrics in bright colors, use them. Paper and cardboard are also suitable.
Do-it-yourself voluminous craft
It is very simple, but at the same time effective. To make it, it is not at all necessary to collect the most beautiful and even leaves. Even plain brown ones will do. The idea is well known, but the craft turns out to be very interesting. At the same time, it is done quickly and very simply.
To make an owl from leaves in a bag with your own hands you will need:
- Leaves that you find in the garden.
- Threads.
- Transparent plastic bag.
- Colored paper.
- Glue.
- Transparent tape.
- Double sided tape.
Soft toy
From fabric or felt, a soft owl craft will be born in one evening. With your own hands or with the help of children, the parts are cut out and sewn together.
For stuffing it is used:
- Cotton or synthetic cotton wool;
- Holofiber;
- Sintepon.
It is very useful for children to stuff toys with granulate - small balls of artificial origin. This develops imagination, trains fine motor skills and tactile sensations.
You just need to be especially careful that this filler cannot spill out of the owl. All seams should be treated with the utmost care.
Ready-made sketches and patterns are available online. But if the child has his own drawing of an owl, you can try to make a toy exactly according to it. Such a craft will be unique, especially close and dear to the baby. Irregularities and disproportionate features must be left, as they will add charm to the owl.
Execution steps
The first step is to dry the collected leaves. You don’t have to dry them under a press, just scatter them on the bottom of the box. This is a mandatory step, because even seemingly dry leaves can contain a small amount of moisture. After packaging in a bag, condensation will form on its inner surface.
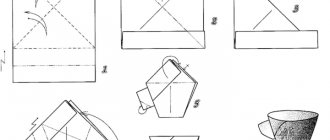
Now let's look at how to make a three-dimensional owl from leaves:
- Fill the bag with leaves.
- Tie the upper corners with thread, forming ears.
- Now you need to cut out eyes, beak and paws from colored paper.
- Fold the bottom corners of the bag towards the middle and glue with transparent tape.
- With its help, secure all the parts, including the paws.
Now your craft is ready. If it is intended for the street, then the paws can be omitted, and the eyes and beak can be glued in from the inside before folding the leaves. Now the owl can be placed on a garden tree. It’s even better if it has a hollow. Then the craft will decorate the garden all year round or welcome guests.
What other options are there for making an owl from autumn leaves? Based on the principle described above, you can make a model of both an owl sitting on a branch and a flying one. To do this, you just need to cut out the base with the wings turned upward and attach rings to them, into which you will thread a twig.
Autumn crafts from acorns, cones and leaves for kindergarten
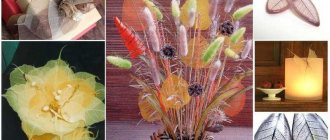
Now another idea for collective creativity, although such a wonderful bouquet from natural material can be made independently at home. Everyone has everything they need at their fingertips, especially at this time. Go to the park outside and collect everything you need according to the list, prepare your equipment.
This is undoubtedly great, so I suggest you start making it.
We will need:
- leaves
- roll sticks
- cones, acorns
- vase or jar
- plasticine
- gouache paints
- glitter
- tassel
- glass of water
Stages:
1. Take plasticine and attach a piece to a sushi stick, and place a pine cone or acorn on it.
2. Next, dip the brush in paint and paint the cones. Sprinkle with glitter and decorate the stick in any color you like. The result is a magical flower.
3. Now collect a bouquet from fallen leaves and stick sticks with cones and acorns into it.
4. The bouquet turns out bright and beautiful, it can be an excellent gift for a teacher, a mother, or make it as an interior decoration. Good luck!
After browsing the Internet, I saw some other cool thoughts that might be useful to someone.
Forest composition
If your fantasy runs wild and you don’t want to stop, you can continue to create. Make a model of a tree from cardboard. It will need to be covered with leaves, and for the crown, select those that still have green color. Or you can improve the situation a little with the help of gouache. If you make several such models, you will end up with a grove in which a family of owls will live.
Now you can move on to making birds. One can be attached to a hollow in a tree, the other can be performed with open wings - in flight. Also add a nest with little owlets. The result will be a wonderful craft that will definitely take first place in the autumn competition at school or kindergarten.
More interesting ideas
Photos of a wide variety of owl crafts can become the basis for your own original solutions. To make it easier for you to decide, we offer several more options: made of clay and ceramics; edible owls made from dough, lined with seeds or cut out from fruits and vegetables; made using the quilling technique; woven from beads or beads; crocheted and knitted; sewn using patchwork technique (from shreds). Now it’s your turn to invent and create.
Other creative ideas
We now know how to make an owl craft from leaves. But this is not the only idea how this material can be used. This is a natural raw material that is very pleasant to deal with. The leaves smell like autumn and forest. Children always have great fun rummaging through leaves. And if you have the opportunity to create a real masterpiece out of them, then the evening is a complete success.
And when your craft is finished, you can try making something else from the leaves.
This could be a crown for a girl, which will allow her to become a real queen of autumn. Or make a cardboard blank of a carnival mask and cover it with leaves. It will be enough to fasten the elastic band at the back, and the craft is finished. You can even wear it.
From twine
Not only natural materials are used in making owl crafts. Here's an alternative. Another technique is used here:
- Inflate two balloons of different sizes. The large and oblong one will become the body, and the small and round one will become the head.
- Throw a roll of string into a container with glue (silicate or PVA) so that it is completely saturated.
- Wrap the twine around the balls and wait until dry.
- Now you can pierce both balls. Connect the remaining pieces of twine.
- It remains to arrange the small details according to the previous advice. For the eyes, you can take two cotton pads and two buttons.
- Tie a bright ribbon around your neck.
Preparation of natural materials for their further use
Nature is the best artist; she creates natural materials that, in skillful hands, turn into works of art!
It is better to collect leaves in the fall, when they are especially beautiful. Leaves of oak, maple, and chestnut can be used to create all kinds of applications:
Birds made from leaves
Insects from leaves
The shells of these snails are made according to the principle of assembling a rose from leaves:
Examples of other leaf applications:
Wreaths made of bright leaves are the most atmospheric autumn decor!
This option for assembling a wreath is much simpler than the previous one - even children can handle it:
For long-term storage, the collected leaves are placed between paper sheets and ironed with a warm iron. Then they are laid out with old newspapers, thin cardboard and pressed down on top with a small weight.