From ancient times until today, various handicrafts have been decorated with natural patterns. Intricate interweaving of herbs and flowers, berries and leaves often make a handmade household item a real work of art. Beautiful flowers and leaves can be drawn or embroidered; crafts using a real leaf look even more impressive. But a freshly picked or dried leaf is not always harmonious with the intended product in color and texture. But the thin openwork base of the leaf, which preserves its veins, can be a real decoration of the thing. To obtain such a base, leaves are skeletonized.
Beautiful and original decor for crafts
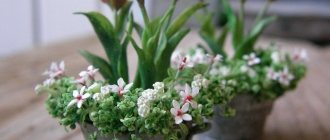
Skeletonized leaves amaze the imagination with their openwork and graceful shapes and are used for stylish decoration of finished products.
Using such a natural material, which can be easily made at home, you can decorate glasses and candlesticks, full-fledged installations and postcards, and make paintings.
Unique decor will look great in the interior as part of decorative accessories and helps highlight the design concept.
Often, such materials are used to decorate paintings or themed cards, greeting cards and bouquets of fresh or dried flowers, for which they can be painted.
New crafts made from leaves for kindergarten children
Now let’s look at job options for slightly younger children. Although all the ideas from this article can be applied to any age.
Again, the most suitable thing for kids is applique. You can glue different panels - butterflies, insects, fish, turtles, etc.
You can use this layout as a basis. Find the appropriate shape of leaves and make a cute cat.
What a gorgeous tree! It's simple and looks great.
But owls are a completely separate issue!
For example, my daughter and I made a craft from an ordinary bag. We filled it with leaves, gave it a shape, glued on the eyes and voila, everything is ready!
As additional materials, take colored paper, plasticine, cereals, seeds, etc.
The child will be delighted with this work. I know, in practice, children really love to sculpt).
You can also build a base for kids, for example a web like this. And then the child sticks on the leaves himself.
Or take the spotlight on children's hands. Also a very interesting idea.
I liked this picture here. Draw a background, and then with your child, stick on leaves to represent trees and bushes.
If you have more time, then work harder. You can make different masks, crowns and even angel wings!
In general, the scope for creativity is enormous. Choose - I don’t want it!
What is skeletonization technology?
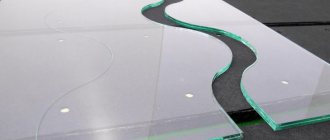
Looking at the photos of leaf skeletonization, you can see how fragile and elegant the finished products look, already prepared for decoration.
By coating them with varnish or paint, such openwork products receive additional strengthening, and the technology for their creation itself is not particularly complicated.
It is important to understand that the leaf of any plant consists of soft tissues and a sinewy skeleton, which creates the shape of the leaf itself.
Having removed the fleshy part of the leaf plate using a pre-selected method, the master receives a ready-made skeleton with thin veins, which can be used for decorating and decorating crafts.
Advice from professionals
The success of separating the pulp from the skeleton depends mainly on the stiffness and thickness of the leaf. The leaves of the following plants skeletonize more easily than others: poplar, plane tree, linden, oak, blueberry, birch, aspen, ficus. Experiment with cherry and currant leaves.
Also think about decorating the skeletons: painting them, laminating them, additional coating.
Painting skeletonized leaves can be done at several stages:
- in the process of separating the pulp from the veins, whiteness and potassium permanganate will help you;
- after the final drying of the product, use watercolors or gouache, spray paint cans.
Coat the finished product with varnish or a fixative to make it more durable. Use sparkles, rhinestones and beads for decoration.
Which leaves are best to use for skeletonization?
It’s good when the craftsman already has leaves of different shapes and configurations at his disposal, which will greatly facilitate the process of decorating crafts.
If such material is not available, you can make it yourself by choosing the best and most convenient technology for implementation and choosing the right consumables:
- leaves with well-developed veins that stand out on the leaf blade;
- fresh and undamaged leaves that can retain their shape after processing;
- leaves having different shapes or configurations, suitable for decoration.
Depending on the size and density of the leaves, the technology for processing them is selected; in the process of its implementation, the structure of the leaf must not be damaged.
The leaves that are best suited for processing are fairly fleshy leaves, in which the skeleton of the veins is clearly visible; such decor, after processing and dyeing, will look great on any product.
Types of needlework
Leaf skeletonization is only the beginning stage. Thanks to their openwork appearance, blanks began to be used to create a wide variety of do-it-yourself products.
Below you can see several popular uses for skeletonized leaves.
Leaf paintings
They draw twigs or other patterns on the finished background, glue blank sheets - the result is a wonderful picture.
In addition, skeletonized sheets often act as a canvas for images themselves. And not only images - recently such a type of needlework as artistic carving on leaves has appeared.
Texturing
The leaves are also used to add a special texture to some materials.
In quilting and patchwork techniques, skeletons are sewn into the fabric. And masters of wool felting roll the blanks onto the products so that the pattern of the veins can be seen from the inside.
But the most amazing invention is pressing leaves under a press into paper. Thus, skeletonization contributes to the appearance of beautiful sheets for crafts and photo wallpapers with skeletons inside.
Decoration
Scrapbooking and decoupage techniques were among the first to take note of leaf skeletonization as an economical way to obtain new working material.
Decoupage with openwork blanks is used for dishes, lamps, and furniture. And leaves, carelessly glued to cards and albums, add airiness to the product.
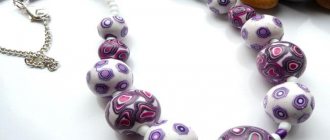
Bijouterie
Jewelry with pieces of skeletonized leaves has recently been rapidly gaining popularity. Almost every craftsman considers it his duty to try creating pendants by pouring skeletal leaves with epoxy resin.
The following technique is also common: an openwork sheet is coated with gold or silver plating, fixed with a fixative varnish and used as an independent pendant.
Existing methods for skeletonizing leaves
The proposed master class on skeletonizing leaves will help you independently evaluate the ease of performing a simple and simple procedure.
To independently process the collected material, you can use different methods, which depend on the level of skill and desire of the master himself, and allow you to obtain different results.
DIY autumn crafts from leaves for school
Of course, most often we have to imagine in this area in order to help our children take part in school and kindergarten exhibitions. So let’s begin a review of works for children who study in primary and secondary schools.
The easiest thing would probably be to collect a bouquet or make a cool wreath. Moreover, you can always supplement the composition with different berries and fruits.
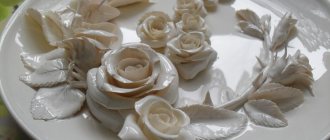
You can create a very simple bouquet, or you can get a little confused and roll up not dry leaves to make roses.
Or you can assemble an unusual ekibana.
Or make a topiary.
Or make these funny and cute flowers.
You can also do handicrafts in the area of applique. If you know how to draw well, then complement the composition with a drawing.
Using glue and other materials, build a basket, vase or queen “Autumn”.
And I was very impressed by the bird - an owl, just gorgeous!
I think I gave you some great ideas, don’t you agree?
Boiling with soda
The boiling procedure allows you to significantly soften the leaf plate, and the alkaline environment created by soda accelerates this process.
In hot boiling water, the leaves must be simmered over low heat until the green mass is completely dissolved; for different leaves this period can last from 20 to 40 minutes.
Method 3
If desired, the process of skeletonization of leaves can be accelerated. To do this, you need to boil the leaves in a soda solution. The solution is prepared according to the following recipe:
- soda – 90 g;
- lime – 40 g;
- water – 1 l.
If you need a larger amount of solution, then follow these proportions.
Mix the necessary ingredients and boil for 10 minutes. The leaves are boiled, the procedure takes an average of 1 hour. Leaves must be turned over regularly. When water evaporates, it must be added periodically.
Boiling with chemistry
The skeletonization procedure can be speeded up as much as possible by using aggressive chemicals and preparations during the boiling process.
Liquid for washing windows or breaking through blockages is excellent for these purposes, but it is important to remember that during the boiling process it is necessary to organize high-quality ventilation of the room.
Materials
To prepare for creating a painting you will need the following materials:
- freshly picked leaves;
- glycerol;
- tray or basin;
- plastic plates;
- paper towels.
If you need to compress the leaves, have wax paper and heavy books ready. Directly to create the picture you will need brass frames and double-sided tape.
Not only carrots: nutritionist names foods that are good for eye health
Sense of community, success and more: how TV affects children's development
Carrots growing between boards: how to sow seeds to reap the harvest twice
Soaking in water
The harmful effects on the body can be minimized by using the technology of soaking the leaves in ordinary water for 5-7 days.
This procedure differs in duration, but allows you to obtain the most intact and beautiful leaves, used in the design of beautiful and stylish, original crafts or decor.
What parts does the sheet consist of?
You all know what a leaf looks like, but what does it consist of? If you examine it under a microscope, you can distinguish...
- The epidermis
is a layer of cells that protect against the harmful effects of the environment and excessive evaporation of water. Often, on top of the epidermis, the leaf is covered with a protective layer of waxy origin (cuticle). - Mesophyll, or parenchyma
, is an internal chlorophyll-bearing tissue that performs the main function of photosynthesis. - A network of veins
formed by conducting bundles consisting of vessels and sieve tubes for the movement of water, dissolved salts and sugars.
On the lower part of the leaf there are also stomata - special complexes of cells located mainly on the lower surface of the leaves; Through them, water evaporation and gas exchange occur.
The network of veins in this complex is the strongest and most resistant. It needs to be carefully separated from the sheet, and everything else needs to be gotten rid of.
Knocking out leaves
Another simple way to do skeletonization at home is to knock out pre-collected and carefully dried leaves.
Carefully dried natural materials are placed between sheets of paper or fabric and knocked out with a regular brush with soft and flexible bristles, which will help turn them into real jewelry.
How to make autumn leaves from paper
The simplest option is leaves cut out of colored paper. For this it is better to use double-sided paper. A template is attached to the paper - a natural analogue brought from a walk. It is outlined with a pencil and then cut out. A minimum of effort and creativity - and the decoration is ready. From such foliage you can make applications or toys depicting an owl, butterfly, bird, hedgehog and other representatives of the animal world.
How to make autumn leaves from paper
You can make a piece of paper differently: take regular office paper, put a real piece of paper under it so that the veins protrude upward, and paint with strokes using soft pencils or pastel crayons. The leaf will appear in the drawing, and all that remains is to cut it out.
You can decorate the room with original corrugated foliage, which is very simple to do. To do this, use colored paper, a ruler, a pencil or pen, as well as scissors and glue.
To get original decor, follow the steps in this order:
- Fold the A4 sheet in half, securing along the fold line.
- Using a ruler and pencil (pen), draw a diagonal line.
- Using scissors, cut the workpiece along the line.
- Place in front of you the part that unfolds. Unfold it and fold it like a small accordion from the base to the top of the triangle.
- Bend the workpiece in the middle.
- Cut a strip of paper from the remaining part, and then twist it to form the tail of the leaf. All that remains is to glue the resulting leaf and petiole (tail).
From such corrugated leaves you can create an unusual applique, picture or collage, which, in turn, can be used to decorate the walls. How to create an autumn mood in your apartment, read our article “Do it yourself autumn decor”.
Photo of leaf skeletonization
Preparation of the composition
In a bowl or basin, mix 1 part glycerin and 2 parts water. The volume of liquid depends on the number of leaves collected. The mixture of water and glycerin should completely cover the plants. To stabilize 15 leaves I needed 2 cups of glycerin and 4 cups of water.
I set a goal, found funding for the project: around the world by bike from Chris
She was born 8 years before her father’s death: how did life turn out for Ots’s youngest daughter
Should you be afraid of magnets on refrigerators?
Craft Volume Umbrella
You will need three A4 sheets of any color, a disk, scissors, glue, a piece of wire.
1. Place the disk on the sheet and trace it. One sheet will make three circles. And the umbrella will take 9 circles. Cut it out.
2. Bend the circle in half and in half again. It turns out to be a quarter circle. Apply glue from the center of the circle to the outer edge and glue it together. One piece is ready.
We do the same with all the circles.
3. Glue the quarters together. We also apply glue only to the strip of the center of the circle towards the outside.
4. We connect the first and ninth parts of the ball, we get a hemisphere.
5. Attach a wire leg to the center. Our umbrella is ready.
Paper techniques
Model for a doll
You can make your own accessory for a doll in the form of a closed cane umbrella.
This craft option is suitable for experienced craftswomen. Will be needed
- fabric, preferably dense;
- glue “second” (instant action);
- thick elastic wire;
- a piece of polymer clay to match the fabric;
- needle, thread, scissors, iron;
- sewing double-sided adhesive web;
- pliers.
We begin work by designing the cane. We bend the wire with pliers on one side, forming a handle. From polymer clay we form the braid of the handle and a sharp tip with a cap.
From a square of fabric with a side equal to 2 lengths of wire without a handle and tip, we fold a cone and cut off the protruding corners.
Without unfolding, iron the future dome to mark the folds.
The next step is to process the tissue sections with adhesive web. We bend the material, place the web inside the fold, and iron it.
We iron the edges of the umbrella so that the folds alternate - one “looks” inward, one outward.
If you want to decorate a craft, then it is better to do it until all its details have been collected together. The fabric can be embroidered with beads, lace, or a narrow braid or satin ribbon along the edge.
Let's start assembling. We remove the tip from the cane, pierce the center of the dome with it, and fix both the woven material and the polymer clay part with glue.
The folds, ironed inward, are pulled to the cane using a needle and thread, and secured.
We carefully wrap the folds, ironed outward, around the cane as if we were going to put the umbrella in its case. We fix the shape of the craft with a hot iron, trying not to touch the clay parts.
The work is finished - the original and unique accessory for the doll is ready.
You can make an open puppet umbrella, but this will require skills of a different level, and other materials and details. But you need to try, because without mistakes there will be no experience.
Pressing
This process is optional. But if you want to get flat leaves, then you need to put them under a press.
Lettuce leaves will remain crisp for a month: the jar and water trick
Note to beauties with oval nails: 10 trendy manicure ideas for 2021
18% will travel throughout Russia, 7% abroad: Russians spoke about plans for the summer
Take a heavy thick book. Cover both sides of the sheet with wax paper and place it between the pages in the middle. For this, you can only use unnecessary books, since moisture spoils the paper.
If you put several small sheets on one page, then they should be placed at a short distance from each other. Otherwise the leaves will stick together.
Place a few more books or a heavy object on top. Leaves should be left under this pressure for 2-3 days.
Volumetric umbrella made of cones
Prepare colored paper, glue, scissors, pencil and maple leaf templates.
Trace a circle on colored paper according to the template and cut it out. Divide the circle into six segments. For the umbrella we only need four.
Roll the segments into little balls and glue them together.
Glue the bags onto the base, bringing the sharp ends of the bags together at one point. We mask the top of the bags with a triangle. Cut out and glue the umbrella handle. Decorate the umbrella as desired.
Using the template, trace and cut out the maple leaves.
We decorate the umbrella with leaves, gluing only part of the leaf. This helps create volume and liveliness to the leaves. Our autumn umbrella is ready.
Creating a painting
Remove the backing from the brass frame. Place leaves on it. You can experiment with their placement until you find the right composition.
Once you have the picture you want, secure the leaves to the backing with a few pieces of double-sided tape. The adhesive tape should be located on the back of each sheet.
Then place the leaf backing back into the frame. Your painting is ready for display!
Ships
We will need:
- Twig;
- leaf;
- Walnut skin;
- Plasticine.
Cooking:
- It is better to choose maple leaves. They look nice. Pierce one of them with a twig.
- Glue the plasticine inside the nut skin.
- Stick a twig with a “sail” into the plasticine.
All! You can set sail on a boat you made with your own hands!