Many people think about how to make a wardrobe themselves, without the help of specialists in this field, everyone has their own reasons for this. This will be interesting to someone, fortunately when time allows, plus the hands are properly sharpened. Others, planning this bold act, plan to save their hard-earned money. My personal opinion is that every specialist should do his own thing, what he is good at, but not everyone will agree with me. I am not going to convince you, but I will try to help you implement your plans. But of course, it would be easier for you to order a wardrobe in Minsk from us, especially considering that the cost savings when making it yourself are insignificant.
DIY wardrobe. Metering
First of all, you need to think about the design of your planned wardrobe, content, depth, number of shelves, drawers, number of doors.
Let's look at the example of a common standard version of a sliding wardrobe in a niche (from wall to wall), 1500 mm long, 600 mm deep, 2500 mm high.
In the photo above there is a two-compartment filling, a solid mezzanine shelf on top, a compartment with five shelves on the left, a hat shelf on the right, a clothes rail, and a shoe shelf on the bottom.
Let's assume that this filling of the wardrobe suits you, then it's time to move on to measurements. We will need a tape measure of at least 3 meters and a level to check the evenness of the walls.
First, we measure the height in at least three places, right, left, center, then the width, depth of the cabinet. If, for example, the width of the cabinet at the top is 1480 mm and at the bottom 1520 mm, you definitely have a wall blocked, or even both, but let’s hope that they are even at the top and bottom 1500 mm. Otherwise, it would be necessary to make side podiums (boxes) to level the plane. Otherwise, the doors will stand crookedly in the opening, which is not at all good and ugly.
So let's assume we have given dimensions of 1500 mm width, 600 mm depth, 2500 mm height. It's time to move on to calculating the details.
DIY wardrobe. Calculation
The most common and inexpensive, s-18, using its example we will calculate the detailing of our cabinet.
Under s-18, 10 mm is subtracted, if the mezzanine is 500 mm in depth of the cabinet, then the rack will be 490 mm, and the shelves 480 mm, and so on.
There is no need to take away anything under PVC and “melamine”; all filling can be given at a depth of 500 mm.
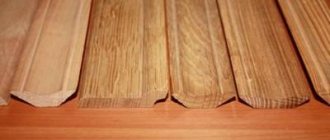
With a cabinet depth of 600 mm, the filling is 500 mm (100 mm is allocated for the sliding door system). There are several ways to frame the ends of chipboard.
S-18 profile (photo bottom left). It simply snaps onto the chipboard, is easy to install, and does not require glue or machines to install it on the chipboard.
PVC edge (photo bottom right)
Glued on a machine, the most modern material for finishing the ends of laminated chipboards.
The main manufacturer is REXAU AND POLKELMIK.
We have a cabinet width of 1500 mm, a depth of 600 mm, which means the mezzanine shelf will be 1500 * 500; if the walls are crooked, then it is better to give it a margin (+20 mm to the length) of 1520 mm.
The standard height of a vertical partition is 2100 mm, the indentation under c-18 along the depth of the part is 10 mm, 500-10 = 490. We get 2100 * 490 1 pc.
For the depth of the shelves we subtract 10 mm from the size of the vertical rack 490 - 10 mm = 480 mm, the standard width of the shelves is 500 mm. We get 500 * 480 5 pcs.
To get the size of the shelves on the right, from the width of the cabinet we subtract the width of the shelves on the left by 500 mm and the thickness of the vertical stand by 18 mm (chipboard thickness)
1500 — 500 — 18 = 982.
If the walls are crooked, then it is better to give the size with a margin for adjustment + 20 mm.
Mezzanine shelf 1500 * 500 1 pc.
Vertical stand 2100 * 490 1 pc.
Shelves on the left 500 * 480 5 pcs.
Shelves on the right 982 * 480 2 pcs.
To frame the shelves in the closet you will need: white s-18 4 pcs, rod 982 mm, two flanges, about 40 white mounting angles. About 50 screws 4.0 * 16 yellow (for shelves), screws 3.5 * 35 about 15 pcs (for concrete or brick walls), screws 3.5 * 55 15 pcs (for fastening false panels, podiums, dowels 6 * 35 about 20 pcs, (preferably red, they are the most durable).
For the outer part of the wardrobe, you need two false panels 2500 * 90, and a lower podium (see photo below), so that the lower guide does not lie on the floor, and the doors are raised, it will be more beautiful and less debris will get clogged in the lower runners, yes and the floor, as a rule, is not always, or rather almost everywhere, not level.
The dimensions of the podium are 1500 * 90 1 piece and 1500 * 60 2 pieces (it is assembled in the letter p, the 60 mm strips are placed on the edge at the bottom, one 90 mm is placed flat on top.
How to install a closet yourself
Table of contents:
DIY wardrobe. Metering
First of all, you need to think about the design of your planned wardrobe, content, depth, number of shelves, drawers, number of doors.
So let's assume we have given dimensions of 1500 mm width, 600 mm depth, 2500 mm height. It's time to move on to calculating the details.
DIY wardrobe. Calculation
The most common and inexpensive, s-18, using its example we will calculate the detailing of our cabinet.
Under s-18, 10 mm is subtracted, if the mezzanine is 500 mm in depth of the cabinet, then the rack will be 490 mm, and the shelves 480 mm, and so on.
There is no need to take away anything under PVC and “melamine”; all filling can be given at a depth of 500 mm.
S-18 profile (photo bottom left). It simply snaps onto the chipboard, is easy to install, and does not require glue or machines to install it on the chipboard.
PVC edge (photo bottom right)
Glued on a machine, the most modern material for finishing the ends of laminated chipboards.
The main manufacturer is REXAU AND POLKELMIK.
We have a cabinet width of 1500 mm, a depth of 600 mm, which means the mezzanine shelf will be 1500 * 500; if the walls are crooked, then it is better to give it a margin (+20 mm to the length) of 1520 mm.
The standard height of a vertical partition is 2100 mm, the indentation under c-18 along the depth of the part is 10 mm, 500-10 = 490. We get 2100 * 490 1 pc.
To get the size of the shelves on the right, from the width of the cabinet we subtract the width of the shelves on the left by 500 mm and the thickness of the vertical stand by 18 mm (chipboard thickness)
If the walls are crooked, then it is better to give the size with a margin for adjustment + 20 mm.
Mezzanine shelf 1500 * 500 1 pc.
Vertical stand 2100 * 490 1 pc.
Shelves on the left 500 * 480 5 pcs.
Shelves on the right 982 * 480 2 pcs.
For the outer part of the wardrobe, you need two false panels 2500 * 90, and a lower podium (see photo below), so that the lower guide does not lie on the floor, and the doors are raised, it will be more beautiful and less debris will get clogged in the lower runners, yes and the floor, as a rule, is not always, or rather almost everywhere, not level.
The dimensions of the podium are 1500 * 90 1 piece and 1500 * 60 2 pieces (it is assembled in the letter p, the 60 mm strips are placed on the edge at the bottom, one 90 mm is placed flat on top.
Detailing
In addition to the laminated chipboard sheets, we will need a melamine self-adhesive edge. To assemble the cabinet design shown in the picture we will need the following parts:
- Two sidewalls measuring 2433x650 mm.
- The bottom measures 2367x650 mm.
- The cabinet cover measures 2400x650 mm.
- Large shelf - 2367x550 mm.
- Seven small shelves - 778x550 mm.
- Two partitions - 1917x550 mm.
- Rear and front plinths - 2367x100 mm.
- Side parts of the base box in the amount of 3 pcs. and size 550x100 mm.
- Two edges of the base box measuring 1159x100 mm.
Hardboard back wall details:
- Wide part for two compartments - 1940x1595 mm.
- Narrow part for one compartment - 1940x800 mm.
- The part for the top of the cabinet is 2395x410 mm.
It is better to order cutting of the parts of the future wardrobe from a cutting service, which is sure to be available at any construction supermarket. Show the specialists your cabinet design and accurate measurements. In our case, there is already detailing and it is better to show it to the sawing experts.
Calculation of wardrobe doors online
In order to find out the sizes of wardrobe doors, you can use the online sliding door calculator. Added the ability to calculate swing senator doors. From us you can order ready-made doors for sliding wardrobes
The height is calculated equally in both open and closed profiles.
In addition, you will need S-18 to match the color of the laminated chipboard on the outside, 3 pieces, pile (10m felt), glued to the profile of the cabinet doors on the side, so that the doors do not knock when closing, stoppers, 4 pieces, are inserted into the bottom track so that the doors do not roll away spontaneously.
The stoppers are placed in such a way that when the door is closed, the center of the wheel coincides with the center of the stopper. The door guide usually comes with the doors and consists of two parts, top and bottom.
DIY wardrobe installation
First of all, we mark out a compartment with shelves on the right, 2 corners per side, knock out a level, drill holes 40 mm deep using a 6 mm drill, hammer in 6 * 30 dowels, screw the corners using a screwdriver.
If we mark the shelves at equal distances in height (taking into account the height of our rack is 2100 mm), then from shelf to shelf, provided that there are 5 of them, it will be 330 mm.
The second stage is to adjust the shelves using an electric planer along the wall so that there are no gaps, and attach them to the right and rear walls.
Provided that the right wall of the cabinet is level, otherwise you first need to set up a vertical partition and only then adjust the shelves.
When the compartment on the right with shelves is installed, we mount the shelves on the left, the bottom one is usually attached 300 mm from the floor, the top 250 mm from the mezzanine shelf (top of the vertical partition).
We hang the rod, with a cabinet depth of 600 mm, the rod is marked 240 mm from the wall and 40 mm from the shelf to the top hole in the flange.
The next stage is installation of false cabinet panels, outer depth 600 mm, set them vertically, fasten them in 3-4 places using 3.5 * 55 screws and dowels, put plugs on the screws, assemble the lower podium, adjust it in length (it should stand between the false panels, then adjust it to the level).
We fasten the lower guide in the center of the podium (first by inserting stoppers into it, one into one guide, the second into the other), fasten the upper guide, almost flush with the false panels along the front, now you can insert the cabinet doors, first insert the top of the door into the guide, then insert the lower wheels.
The back door is inserted first, then the front door, we adjust the wardrobe doors using a hexagon (lower adjustment screw), and glue the pile on the door.
Source
Calculation of door width
When the door slides to the side, it should allow full access to the section and not interfere with the pull out of a drawer or the lowering of a scissor lift. Let's take an example of a 2100 mm wide compartment consisting of three parts:
- Measure the width of the inner hole. In our example with chipboard it will be 2068 mm.
- 2. subtract twice the width of the protective tape glued to the edge of the housing door. Each one is 6mm thick, so you get 2068 minus 12 - 2056mm.
- 3. This takes into account the overlap of the doors, which in a three-section cabinet is 26 mm on both sides, giving a total of 52 mm. The total width of all doors is: 2056 mm plus 52 mm or 2108 mm. Divide the total width by three and you get 703mm.
This simple calculation will ensure easy access to partitions.
Calculation of cabinet door width
Make a cabinet with your own hands. Workshop from FORUMHOUSE users
A large selection of ready-made furniture, pleasing the consumer, is overshadowed by the impressive cost of designs or difficulties in selecting a model that fully satisfies requests. For many, searches on selling sites and trips to furniture stores end not in a successful purchase, but in the clear realization that making the desired cabinet is easier than buying it. The reason may be either the very high cost of the item you like, or the lack of furniture from a trusted manufacturer on sale. Making an individual order to a specialized company is also not a cheap pleasure. Users of the FORUMHOUSE portal are not afraid of difficulties and undertake to make furniture themselves, and share their successful experience with like-minded people.
Content
Universal furniture – wardrobe
A type of cabinet furniture with a sliding door system is a sliding wardrobe, one of the most popular models that will fit equally well into a nursery, a bedroom, or a hallway. Coupes are not only stylish, compatible with almost all areas of interior design, but also practical - they take up less space than swing models.
If there is a niche in the house, you can make a built-in wardrobe that does not require external racks - the door system will be attached directly to the ceiling, floor and walls. Also, instead of a niche, they use the blind part of the room in the house, building a closet from wall to wall along the entire height at the end of the room.
The ancestors of the coupe were built-in, not even closets, but doors that covered niches and slid to the side along guides using attached rollers, which spread in America in the middle of the last century. In our country, wardrobes with a sliding system appeared in the late nineties, but the peak of popularity occurred in the 2000s and continues to this day.
The sliding wardrobe door system consists of a set of parts:
Based on the type of fastening, sliding doors should be divided into two types - those supported on the lower guides and those fixed on the upper track. In terms of stability and durability, systems with bottom support win; they are more common than top door fastenings. Everything you need to make a wardrobe is sold in construction hypermarkets; you can select the elements of the system to suit your preferences and initial data.
The filling of the closet depends on its purpose - most often these are convenient shelves for bedding and things, additional drawers for linen, compartments with rods for wardrobe items: outerwear and shoes. However, at the owner’s request, behind the sliding door there can be anything, for which numerous shelves are made. The number of doors depends on the dimensions and functionality of the structure; usually there are two or three doors, but four or more can be installed.
Design options
Built-in option
If you want to install a wardrobe in an apartment or house, you need to make accurate measurements of the intended installation location of the furniture item and place an order from a company that manufactures cabinets. The second option would be to measure the installation site, design the structure yourself, order cutting parts and install the wardrobe.
Corner cabinet
You have a choice - built-in structures, corner cabinets and models of separate walk-through structures. Once you have made your choice, you can begin to assemble it yourself.
Types of sliding wardrobes differ in design. If you have never assembled furniture, it is better to start with a walk-through model. This universal model can be installed in almost any room.
Walk-in wardrobe
In many apartment projects, the hallway was made small in the shape of a rectangle. If you install an ordinary wardrobe with a swing door, there is absolutely no space left. The sliding wardrobe with a sliding door became a real salvation. Its height basically goes up to the ceiling, which gives maximum use of the area. Mirrored door panels visually increase the space.
Materials
Today, the bulk of wardrobes are made from laminated chipboard (LDSP). It differs from ordinary chipboard in its protective and decorative coating, a laminated layer with a surface that imitates various types of wood. Laminate not only increases the decorative effect of the material, but also protects it from external influences, and protects us from formaldehyde used for gluing slabs together. For the production of furniture, chipboard of two classes is used - E1 and E2. The first class emits a minimal amount of resins and is conditionally safe, while the second is prohibited as a raw material for furniture in children's rooms. To minimize the harmful effects of resins, cuts on cabinet parts should be sealed with a special edge. One of the forum members was convinced of this by contacting the government agency.
There is a lot of talk about the fact that furniture emits harmful substances - you need to roll up all the ends of the parts and there will be no emission (checked, the furniture was handed over to the SES).
The laminated edge prevents resin release, preserves the cut from external influences and improves the appearance of the product, but is somewhat inferior to the plastic edge in terms of practicality and durability. Plastic cladding has higher strength and rounded edges, which significantly reduces the likelihood of chips and scratches. The standard sheet height is 1830 mm, the width is 2440 mm, 2500 mm, 2750 mm, 2800 mm, depending on the manufacturer.
The facade of the cabinet can be made either from the main material or from a more decorative one - mirror, glass, hardboard, plastic, with inserts. Unlike swing doors, the maximum leaf width for a sliding door is practically unlimited, but one that is too wide may warp over time, and one that is too narrow will begin to pop out of the guides. The optimal width is 90 cm for steel systems, there are also aluminum ones - 120 cm each. But when choosing a facade, the limitation is not so much the size of the doors as their weight - door systems are designed for a certain load, and a square of chipboard and a square of glass, hardboard or plastic, weighs differently. If you exceed the permissible limit for the guides, they will quickly fail.
Models of cabinets made of natural wood are less in demand, since even those made from laminated boards, and not from solid wood, are much more expensive even if manufactured independently.
More information about furniture made from natural wood is described in the article “Do-it-yourself wooden furniture and utensils - Shrek style from a portal participant.”
Pros and cons of drawers
Furniture parts that can be rolled out are one of the most functional and convenient parts of different types of furniture. With their help, you can store various things anywhere, be it a kitchen cabinet, dressing room, desk or cabinet.
A drawer has many advantages.
The advantages of such boxes are obvious:
- To get something you need to put in a minimum of effort.
- You can install partitions in the boxes to allow you to conveniently sort the contents.
- This is an ideal device in which you can organize vertical storage.
- You can make drawers with your own hands; it will not take a lot of resources or time, which is a big advantage of this piece of furniture.
A drawer is a fairly convenient device for storing various things.
The disadvantages of the design include the possibility of rapid clutter, which makes it difficult to find things. But this is not a question of design features, but of user habits.
If you carefully approach all stages of product manufacturing (fastening the bottom, durable fittings, installation of guides), then it will definitely please the owner with its quality, appearance and durability.
If you approach the work responsibly, the box will please the owners for a long time.
How to make a cabinet yourself
At home, to create a sketch of a future design, you can use your own drawing skills, transferring the desired functionality and dimensions onto paper. Or you can call for help with a built-in graphic editor, such as SketchUp and the like, or draw a drawing in an online designer. Before drawing/drawing the project, you will need to correctly take the dimensions of the niche with a tape measure (for a built-in one) or decide on the parameters based on the future location and functionality.
It is necessary to take into account the dimensions of the sheets so that when cutting there is a minimum of waste. The sliding door system creates certain restrictions on the depth of the cabinet - a typical mechanism requires a distance of about 100 mm of free working space. Therefore, when designing, not only the thickness of the sheet is taken into account, but also the clearance for the system. If the closet has a compartment for outerwear, the calculations take into account the minimum depth of 50 mm, plus space for the mechanism. If possible, it is worth adding another 10–20 mm so that the doors move freely and things do not wrinkle.
Important addition
I would like to draw your attention to the fact that the side walls here are shifted 20 mm inward each (on both sides). Therefore, when assembling, it is very important to open the drawing of this chest of drawers in electronic form (for example, in the Compass or AutoCAD programs) and view all the necessary distances!
If you do all the necessary work, you will realize that there is absolutely nothing wrong with it, and the effort expended is definitely worth the money saved.
If for some reason this model does not suit you, you can look at the drawings of other chests of drawers.
Sliding wardrobe from lexanik85
After creating the project, the following materials were purchased:
Services for cutting parts are usually provided by trade organizations that sell materials and accessories; you can also contact a furniture company. This simplifies the process of creating a cabinet, although it makes it somewhat more expensive. If you have the necessary tools and work skills, and the parts are straightforward, you can cut them yourself and without instructions.
Lexanik85 began assembling the cabinet by attaching the plastic lining to the external parts, after which he used a level to mark the position of the shelves and corners and mounted the first compartment to the wall and the side vertical stand. Then he continued to expand the structure according to the project.
The first step was to draw a project using an online wardrobe designer, after which I went to a construction supermarket to get the material. In total, with all the materials, fasteners and other things, I spent no more than 15 thousand rubles on everything.
The forum member prudently asked to bring the leftovers after cutting along with the parts, and assembled them into a compact computer desk with hanging shelves.
Preparation of materials, accessories and tools
The optimal raw materials for a chest of drawers are considered to be dense sheet surfaces: wooden furniture board, laminated chipboard or LMDF with a thickness of 16 mm or more. The area of the slabs is calculated based on the nuances of detailing; the material is purchased with a small margin. The same rule applies to fasteners and fittings. When choosing the latter, preference is given to reliable guides (purchased immediately in a paired set), confirmed screws (European screws) with a length of at least 50 mm, and self-tapping screws from 16 mm. The parts used must not show any signs of corrosion.
The standard set of tools required when making a chest of drawers from chipboard includes:
- jigsaw;
- drill;
- screwdriver;
- square;
- roulette;
- stationery knife.
Trimming parts with a special edge is done using an iron or a hair dryer. Drills and bits for confirmations, jigsaw blades, materials and tools for decorating a chest of drawers, legs or wheels are purchased separately.
Furniture board laminated chipboard
MDF
Accessories
Tools
Sliding wardrobe from toly23
Forum member toly23 decided to get a wardrobe instead of a formal cabinet. After monitoring the market, my wife and I came to the conclusion that it was better to make the cabinet ourselves. The sketch was drawn by my wife, the design is complicated: not only shelves and a hanger for outerwear, but also several drawers of different sizes. To avoid having to redo it, toly23 calculated all the dimensions and selected the fittings taking into account the gap under the door system.
I specifically looked for handles (measured by height) that were low and didn’t even catch when closing the mirrored door. The drawer in the right section is a pull-out drawer for bedding, it pulls out perfectly and doesn’t get caught in the doors. I found a calculation of doors for cabinets on the Internet, and I managed to make everything myself.
The cabinet is full - with a base, sides and top, with three doors, the middle one is mirrored, the side one slides in, as the child loves to frolic with the ball. Unlike the previous case, the parts were cut out independently, and improvised tools, clamps and a glass cutter were used for direct cutting.
The forum member ordered the doors from a furniture company, with an aluminum frame. The total cost was around 18 thousand. If you look at catalogs of ready-made models with similar functionality, the savings become obvious.
toly23 began the step-by-step assembly with the frame - first the frame and the top shelf, then the vertical racks and shelves in the compartments, installation of the hanging rod, assembly of the drawers. The final stage was the installation of a door system with a middle mirror door, which was carried out after the installation of the cabinet in the nursery.
Petrovich 32 also made itself a sliding wardrobe of a similar design. It further complicated the task - it also has a mezzanine compartment that can be closed separately from the main compartment. The product has successfully passed the strength test for the sixth year without any complaints.
Conclusion
It is not only the material side that forces forum members to take up the instrument. Making cabinets with your own hands is a way to get an exclusive, high-quality product that will fit well into the decor.
The topic of making sliding wardrobes with your own hands is discussed on the forum, and you can find out what tools you may need for home carpentry from the article “Furniture workshop for beginners...”. If you want to experiment with natural wood, you should read about gluing technology - furniture panels are stronger and cheaper than solid wood. In a video about the manufacture and assembly of a sliding wardrobe, a designer who is professionally involved in creating furniture shares the intricacies of the process.
Source
We make a wardrobe ourselves from design to assembly with our own hands
If you make a wardrobe with your own hands, then it can rightfully be considered the most functional piece of furniture.
It fits easily even in a limited area and at the same time you can put almost all things in it.
Such a cabinet is a real find for small apartments and small hallways.
But even in spacious houses there is a place for it, where it can become a real decoration of the room.
In a word, a wardrobe is a universal piece of furniture, which nowadays is difficult to do without.
Looking at the finished wardrobes, it seems that making them is quite difficult. In fact, there is nothing complicated about this, you just need to correctly calculate all its parameters.
Preparing for assembly
Once the finished parts have been delivered, you can begin preparing them for assembly. You will need an iron for this work. Carefully attach the purchased edge to the end of the part so that the beautiful side is on top. Carefully walk over it with a heated iron. Make sure the iron is not on steam mode.
Press the heated edge well and wipe thoroughly. Carefully sand the cut edges with sandpaper. There is no need to rush when preparing parts. Try to achieve the highest quality of work so that your wardrobe looks neat and beautiful.
From the base parts, assemble the base of the podium for the bottom of the cabinet. The base must be present.
Making a wardrobe with your own hands
Basically, cabinets are made from laminated chipboard sheets. If you decide to make a cabinet yourself, it is better to go to a workshop that has special woodworking machines to cut sheets according to prepared templates. At home, it is impossible to obtain high-quality cuts, not only due to lack of experience, but also due to the lack of necessary tools.
Also in the workshops you can make cuts of complex shapes, shelves with rounded corners, cut out patterns, etc., make edging of ends, additives for hinges.
And here a completely logical question arises: what then is included in the concept of a “do-it-yourself wardrobe”, since almost all of its parts need to be ordered from a workshop? The fact is that, with rare exceptions, almost all companies that sell sliding wardrobes do not have their own workshops, but order the production of individual parts “outsourced”.
Their responsibilities include designing furniture according to the customer’s wishes, drawing up cutting and edging plans for products, purchasing the required amount of material, delivery and assembly. For this they charge a fee, which can exceed the cost of the cabinet by 1.5-2 times, or even more. The cost of cutting chipboard sheets and processing them is a small part of the cost of the cabinet as a whole.
Thus, by drawing, calculating and assembling the cabinet yourself, you will save a lot of money.
It is more profitable to make a closet yourself and take time.
When ordering it from a company, you will have to wait about two months, which, you see, is not always convenient. It is quite possible to assemble it yourself in two weeks, including design and calculations. Take a closer look at the manufacturing sequence of the wardrobe.
The result of cutting furniture panels onto a wooden chest of drawers
As a result, a set of blanks is obtained. The photo below shows mostly the details of the drawers. These are the most labor intensive pieces of my dresser. Five boxes are: five fronts, fifteen walls and five bottoms. And besides, there are many holes!
While cutting, a full 10 liter bucket filled up. The cyclone separator greatly saves vacuum cleaner bags. It can be seen in the rear view in the photo.
Also using a plunge-cut saw, but with a larger guide bar, I reduce the width of the panel for the table top and the bottom of the drawer.
Wardrobe design
The first step in making a wardrobe is designing it. To do this, you can schematically draw a cabinet with all dimensions, designation of internal compartments, cabinets and drawers.
This “old-fashioned” approach is quite lengthy and inconvenient, especially in the presence of high technology. Nowadays, almost all companies use special computer programs to design furniture, allowing them not only to evaluate the future result, but also to fully calculate the specifications of the product.
One of such programs is “Basis-Furniture Maker”.
This is a fairly powerful design tool that includes a number of supporting programs. The basis is designed to create both simple and quite complex furniture elements. If you are interested, you can go to the manufacturers’ website and familiarize yourself with it in more detail.
To design a cabinet, it is not necessary to complete the full “young fighter course”.
A fairly simple and accessible interface allows even beginners to use the program effortlessly. To install Basis, you need an emulator, since it uses hardware protection, but for “confident PC users” this has long ceased to be a problem.
If you have never used Basis, you can watch demo videos on design.
In our case, this is the video “Basis-Closet 7.0 Video Clipboard Construction”. Viewing it will clearly introduce you to all stages of design, as well as the capabilities of the program.
It will take a little time (about 30 minutes), but even a beginner will be able to figure out what’s what without any problems.
Designing a wardrobe in the Basis-Furniture Maker program takes about 1 hour, taking into account the calculation of the specifications of the necessary materials. Manually it would take much longer and would not eliminate possible errors in the calculation.
The process of creating a virtual closet includes the following steps:
If you wish, you can also print out a three-dimensional image of the finished cabinet, which can then be used to easily assemble it.
Guide fasteners
It is also necessary to provide markings for attaching guides with rollers or balls to choose from.
For ball parts, the fasteners run along the central part across the box. The rollers will have to be secured under the bottoms of the drawers. Experienced collectors practically do not use specially compiled calculations in these cases.
The procedure is quite simple:
- The height is divided by eye. The internal riser is divided into a total number of boxes, for example, four. The center needs to be drawn. This will be the place to attach the guide parts;
- When the guide is divided into two parts, then one of them must be screwed to the side of the box, and the other to the inside of the box;
- Any box will move easily if there are no distortions and compliance with the axis is maintained;
- The facades are secured with tape on both sides;
- After distributing each of the facades, holes are drilled for the handles. They must be placed on long screws and secured with metal or silicone washers.
Making cabinet parts in a workshop
The next step is to make the cabinet parts in the workshop. So that in the workshop you don’t have to explain “on your fingers” what you need, just print out the specifications of all the elements and their drawings in advance and give them to the craftsmen. In addition, Basis can also make a cutting map, for which the workshop requires a separate fee.
To do this, you just need to use the Basis-Cutting module, specifying the dimensions of the original chipboard sheets. This card is a pattern according to which structural elements will be cut from a sheet of a certain size, taking into account indentations, thickness of cutting materials and other subtleties. True, some nuances still need to be coordinated with furniture makers, so it is better to entrust the cutting map to them - they have a better understanding of these issues, and when cutting they will take into account the tools they have.
As an example, let's consider the manufacture of a wardrobe with a height of 2.5 m, a width of 1.2 m, a depth of 0.4 m. According to calculations, it turns out that for its manufacture you will need two sheets of chipboard with an area of 4.08 m2 and a sheet of fiberboard with an area of 4. 67 m2.
What should you pay attention to when making a wardrobe?
When choosing a color, you should not rely on names like “Milanese walnut”, etc. Each manufacturer has its own understanding of what this very nut looks like, and there are no uniform standards. So it’s best to go and choose the color of the material yourself, based on its type, and not on its name.
After all the elements of the cabinet are cut out in the furniture shop, you may be offered to take with you the scraps of the sheets from which they were cut, because you bought a whole sheet, which means the scraps are yours.
If you don’t need them, furniture makers will keep them and give you a small discount. This solution seems more attractive to many. It seems like we got rid of garbage and also saved money. But it is not so. During the assembly process, some elements may become damaged, and you can use the scraps to replace them.
If you order a separate part from a workshop that is not made from your own material, you can overpay up to 25% of the cost.
One more nuance. You need to pay not for the manufacture of each individual part, but for cutting the sheet. At first glance it seems that these are one and the same thing, but in fact this is not entirely true. Therefore, when calculating the amount of starting material, you need to clearly determine the number of sheets and send them for cutting.
Programs like Basis will help you decide on the issue of material consumption quickly and accurately. Manual calculations often give inaccurate results, especially if there are a lot of parts.
A separate expense item is the production of shaped elements, for example, side shelves with a rounded corner or baseboards. The cost of such cuts is higher than cuts of a simple rectangular shape, which must be taken into account and agreed upon in advance, so that later there are no misunderstandings when paying.
Let's summarize. The costs of making parts in a workshop consist of:
Drilling. Drawings and diagrams
When making your own chest of drawers, drawings along with a drilling diagram for all types of parts will also definitely come in handy. Regardless of what size chest of drawers you choose, the basic design looks universal for all cases.
If it is necessary to attach furniture to the wall, the back bar for attaching the tabletop must be turned at a right angle.
Marking of parts is carried out according to the diagram.
There is a separate instruction included in the package, from which you can take markings for ball and possibly roller guides. In addition, it is quite easy to find it on websites where suppliers display furniture fittings. For example, this may be a MDM kit.
Applying edging to cabinet parts
After all the parts have been cut out, you can start edging. Usually this is also done in the furniture workshop where the parts are made, since this requires special equipment. For edging, edges made of PVC of different thicknesses are used depending on the position of the ribs. Hidden ribs (bottom or rear) are edged with thinner edges, the thickness of which is 0.4 mm. For visible ribs, thicker edges made of 2 mm PVC are used. The edges of adjacent parts that are connected end-to-end do not need to be edged.
To make it clearer, here are a few examples:
These subtleties seem confusing at first glance, but using Basis, you don’t have to worry or think too much, because the program selects and places edges of the required thickness and in the right places on its own.
Like manufacturing, edging of parts with complex geometric shapes is paid separately at a higher price.
Thus, the cost of edging, including materials, consists of the following items:
On average, the production of cabinet parts and their edging takes up to 5 working days, but for an additional fee “for urgency” all these operations can be completed in one day. Some workshops also include home delivery of products in the cost of work.
Accessories for wardrobes
Cabinet fittings are selected depending on the number of drawers and compartments. In our example, the cabinet has 3 drawers and a main compartment. Drawers need guides and handles. The main compartment has one caveat. Since, due to limited space, the depth of the cabinet is small (only 38 cm), the hanger for hangers will be non-standard - end-mounted. This hanger will allow you to hang clothes parallel to the back wall and save space. The length of the end hanger is 30 cm.
Euroscrews (confirmats) with plugs will be used as fastening. It's better to buy more of them just in case.
So, from the accessories you will need:
Examples
Double door wardrobes
A two-door wardrobe fits organically into a small space.
Three-door wardrobes
Fans of classic solutions will appreciate the variety of three-door cabinets.
Schemes and drawings of sliding wardrobes of a rectilinear configuration
The internal content of a three-door bedroom closet can be as follows.
The diagram shows that the owner has more long clothes on his hangers than short ones. And also that the wardrobe will also be used as household storage - there is a niche on the left for storing an ironing board and a vacuum cleaner. Drawers are more convenient for storing laundry, but they increase the cost of the entire product. So, if the issue of economics is of any importance, then it is better to replace them with open shelves.
For three-door wardrobe designs in the hallway, the predominance of sections with shoulders for long coats, coats and short jackets, and down jackets in two rows is more typical. Drawers are often used to store scarves, hats, gloves and shoes.
A pantograph can be provided for storing seasonal outerwear if large “garbage” shelves on the mezzanine are not particularly needed.
Sources
- https://dekoriko.ru/shkaf-kupe/svoimi-rukami-chertezhi-opisanie/
- https://shkaf-kupe-info.ru/chertegi-shkafkupe/shemy-i-chertezhi-shkafov-kupe-s-opisaniem-poshagovo.html
- https://MebSam.com/shkaf-kupe-svoimi-rukami-chertezhi.html
- https://obustroen.ru/komnaty/mebel/shkaf-kupe-svoimi-rukami.html
- https://mebeldok.com/katal/03_shkafi_kupe.html
Assembling a wardrobe with your own hands
When everything is prepared and purchased, you can begin assembling the cabinet. Here again I would like to say a few flattering words about Basis. This program not only designs the cabinet structure, breaks it down into components and calculates the consumption of materials, but also marks on the drawings the locations of the screws, along with their sizes and distances between them.
So when assembling, you don’t have to think about where it is better to connect certain elements.
Ideally, all holes should be made on a CNC woodworking machine under the guidance of the “Basis-CNC” module, but this is quite expensive, and sometimes it’s not easy to find a computer-controlled machine. It is quite possible to make the holes by hand.
To do this, you will need a pencil, a square, an awl, a drill with a special drill for Euro screws, a screwdriver with a hexagon bit and, of course, printed drawings of the cabinet with holes marked for fasteners.
First, the bottom and walls of the cabinet are installed in the place where the cabinet is planned to be placed in order to double-check that the overall dimensions are correct.
Markings of fastening locations are applied to the bottom surface, holes are drilled for fasteners, after which a base of two strips and a central partition are attached. The side walls are attached to the bottom with confirmations.
The edges of the side walls and base must be protected with a special waterproof profile, which prevents water from getting onto the PVC surface, as well as dust from getting under the cabinet. The edges themselves, which rest on the floor, must be made of PVC 2 mm thick.
Next, the upper shelves are attached and a stiffener made of chipboard is installed. The stiffener is attached to the rear wall of the cabinet to fix the entire structure in the correct position. The wall itself is made of HDF.
When installing the cabinet cover, it may be difficult to secure it. The fact is that the height of the cabinet is usually taken to be the maximum possible, and it is quite difficult to tighten the fasteners. In such cases, you must first use pliers and then an end ratchet. It is better that the gap between the cabinet lid and the ceiling is at least 7 cm.
Installation of side shelves
To fasten open side shelves with rounded corners, confirmats are used - 4 for each shelf. The shelves are attached to the surfaces of the side and rear walls with 2 fasteners for each. The top and bottom shelves are slightly larger than the others, which needs to be taken into account when installing.
The installation sequence is as follows: first attach the top shelf, then all the others from top to bottom.
The lowest shelf is located on the same level with the bottom of the cabinet, so confirmations are not suitable for fastening it - they simply cannot be screwed in. In this case, dowels are used instead.
Wardrobe door assembly
Wardrobe doors are a separate mechanism, the selection and assembly of which must be approached with all responsibility. It is the cabinet doors that determine its appearance, and their serviceability and ease of use make its operation as comfortable as possible. First you need to decide on a profile.
Its quality determines how long the doors will last and whether they will jam, so in this case there is no need to save. The profile is sold disassembled, and in order to fold it, you must strictly follow the manufacturer’s instructions, which can be found on the company’s website or received upon purchase. The instructions contain all the necessary assembly diagrams, as well as calculation formulas for determining the length of the guides and door leaf parameters.
The door profile consists of the following elements:
To choose a profile for sure, it is better to first assemble the entire cabinet and then measure the parameters of the resulting opening.
Profiles are usually selected with some margin in size, so that if necessary, the excess can be cut off.
The standard dimensions for the side frames only are 2.7 m; other elements are ordered based on the dimensions obtained.
You can use various materials to fill the profile, but most often the choice is glass or mirror. The use of a mirror cloth can further visually increase the space of the room; in addition, it can be decorated with various patterns, decorative elements, etc.
Mirror installation
The mirror is selected on a film base with a thickness of 4 mm.
Usually, when ordering a mirror, the required size is immediately indicated (preferably with a small margin). It should be taken into account that the mirrors are quite fragile and heavy, so when transporting them you need to be careful, carry them together and one at a time.
To install the mirror in the profile, a silicone seal is used, which is placed on its edge. The sealant must be applied evenly along the entire length of the edges without folds.
Next, the mirror is inserted into the profile frame. To get it into the desired position, you can use a rubber hammer, tapping it on the profile until the mirror is completely inserted into the profile and the seal is hidden inside the structure. It is important to maintain the perpendicular position of the frame relative to the mirror, otherwise the mirror may be installed crookedly. The sequence of installing the mirror is as follows: the mirror is laid on a horizontal surface, the upper and lower frames of the profile are put on it, the excess seal is cut off with a knife. Then the side frames are attached, turning the mirror vertically and resting it on its edge.
Installation of a sliding wardrobe door
Next, the profile frames, after they are placed on the door leaf, are fastened together with self-tapping screws, which should be included in the profile kit. Holes for the self-tapping screws are pre-drilled in two passes: first for the thread, then with a wider drill only in the front strip to hide the head.
The lower profile fasteners are also fasteners for the lower rollers. The screws for fastening the rollers are made adjustable so that, if necessary, the height of the rollers can be changed.
The holes for fasteners at the ends of the side frames do not have to be made neat and even - they will still be hidden under the schlegel - a strip of pile that is glued on both sides. When using a C-profile, it even has specially cut out places for the Schlegel, so gluing it is not difficult.
The door leaf guides are secured with self-tapping screws and press washers. Holes for self-tapping screws are pre-drilled.
The top guide is installed first, flush with the side frames of the profile. Based on it, the lower guide is set using a building level. The guides must be strictly one below the other to avoid tilting or skewing of the door leaf. Special stoppers are inserted along the edges of the lower guide to secure the door in the closed position.
To install the door leaf, rollers are inserted into the upper guide, the lower rollers are pressed and the leaf enters the profile, resting on the lower guide. It is imperative to check the verticality of the canvas and the tight fit of the ends to the sidewalls in the closed position.
If the door is mounted at a slight angle, its position can be adjusted using the lower roller adjustment screws.
The lower rollers also adjust the height of the doors, raising or lowering them. If the upper rollers pop out of the guide during use, the doors need to be raised. After installing the blade, you need to adjust the stoppers on the lower guide.
Cutting lumber for a chest of drawers in the bedroom
I unravel and trim the panels on a tabletop sawing machine. Since the wood is soft and quite resinous, I use a disc with not a very large number of teeth. This disc went to the saw, although it was for construction purposes, the quality of the cut was good! The disadvantage will be the large width of the tooth.
The main problem with conifers is that they leave resin and carbon deposits on the teeth. If they are not washed, the sharpness and quality of the cut will seriously suffer.
To create supports for the chest of drawers, I beveled (sawed at 45 degrees) a furniture panel, 28 mm thick, and cut off the corners using a miter gauge:
Very wide workpieces cannot be trimmed on a table saw without extensions and without a large pendulum saw with a broach. I'll use a plunge-cut saw with a guide bar. I put a mark on one side and align the tire using this mark and a square. The tire must be secured, because the contact area between the tire and the board is small. It is very likely that there will be displacement without fixation.
To minimize chipping, the saw tooth should not protrude too much under the workpiece. An excellent option if the saw protrudes the length of a tooth.
Thanks to this setting, the tooth will work along the entire length and cut the fibers instead of tearing them.
It would be great to use an MDF or plywood backing. This will allow dust removal to work as efficiently as possible.