A special place in children's handicrafts is occupied by work using natural materials. It’s comfortable and safe to work with, and your crafts get a natural look. The time to collect raw materials for crafts is the end of summer and beginning of autumn.
Before making crafts from natural materials, you should carefully study photos of crafts made from seeds. They are presented in huge quantities on various thematic sites.
Young children are encouraged to participate in such crafts.
The motor skills of the fingers are directly related to the child’s speech apparatus. By developing finger motor skills, children begin to speak and connect words into sentences earlier.
They have fewer speech defects and develop other abilities that will help them in adulthood.
Maple, elm and ash seeds for creativity
Unusual tree seeds are ideal as an addition to ready-made figurines. They make interesting wings and ears. You can also make the following original crafts separately from these natural materials:
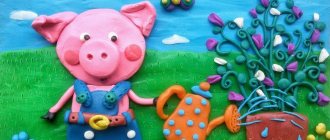
- From ash seeds you can make a three-dimensional chrysanthemum or a real porcupine. To do this, plasticine is glued to a cardboard base in the shape of a circle, and the seeds themselves are glued to it.
- And maple seeds can be made into an applique in the form of a Christmas tree or unusual snowflakes. Such natural materials are very well suited for making simple crafts for the New Year.
- “Fluffy” elm seeds will be an excellent basis for creating applications with different flowers. You can use pea halves as the centers of the inflorescences. But the ash seeds themselves will become beautiful petals. Such applications can be supplemented with butterflies made from dry leaves and branches and stems.
DIY tools
To create a beautiful craft from natural materials, you will need additional tools and materials.
It can be:
- colored paper;
- cardboard;
- leather scraps;
- scraps of fabric;
- bird feathers;
- Styrofoam;
- plasticine;
- wire;
- PVA glue, “Moment”;
- gouache;
- stain;
- varnish, etc.
Paper is very often used as a complement to natural materials. Children, bending and gluing it, make the work much more interesting.
Plasticine is used to hold together individual parts of simple toys at the initial stage of work. It is not very durable, but as an addition it is often used in kindergarten and elementary school.
The frame of a toy and the connection of its parts are most often made from wire. Copper wire with a diameter of 0.29-0.35 mm - soft, flexible and durable - is most convenient. And for the frame, wire of a larger diameter is used - 1-1.5 mm.
It is better to take thick, multi-colored threads (No. 10).
It is better to use white PVA, BF, etc. glue. However, in kindergarten it is better to use PVA glue.
They also use foil, pebbles, cherry pits, and bristles.
It is better to store additional material in a small box with compartments for each type of material.
The use of additional material depends on the plan, the skill of the children, and the degree of development of imagination! Offer your options, but rely more on children's intuition and desire.
It is also additionally necessary to have certain tools for making crafts from natural materials:
- knife;
- art scissors;
- awl;
- jigsaw;
- tweezers;
- pliers and wire cutters;
- sewing needles;
- brushes for glue and paints;
- a cotton cloth for wiping off glue residue.
Scissors for children should have blunt ends, small, and have rings that are comfortable for a child's hand.
The awl should be made of durable material with a handle length of about 6 cm, a diameter of about 2 cm, and the piercing part is 3.5 cm.
You need a large sewing needle. Be sure to store it in a pincushion with a thread threaded into it.
Attention! Only adults use pliers, pliers, and drills!
To draw the outline of the cut part, you need a simple pencil. For example, a dress, hats for a doll, etc. It is better to take a soft pencil (2M).
It is recommended to use gouache or acrylic paints in special sets.
Brushes (soft for painting, harder for glue). It is better to buy squirrel tassels (No. 4 and 6). For glue, use brushes with hard bristles.
A stack is a tool necessary for processing a surface made of clay or plasticine. The length of the stack for children is about 12 cm. You can make the stack yourself from a worn-out brush: round it on one side and sharpen it on the other.
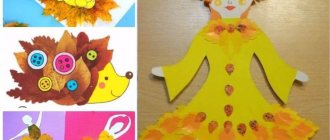
Quilling dress
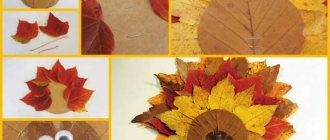
You can make a “Queen of Autumn” craft from a doll using the quilling technique. The dress is made from strips of paper twisted in a special way. The combination of autumn colors will add brightness to the image. For work, you can use double-sided colored A4 paper, cut into strips 5 mm wide, or buy ready-made tapes at a craft store.
The simplest elements in quilling are circles. To simplify the process, you can use a toothpick, the tip of which should be slightly split. Insert the tip of a paper strip into this gap and roll it tightly. Carefully remove the wound element and slightly unravel it if necessary to form a spiral. Secure the free end with a drop of glue. To ensure that all the circles are the same size, you can use a stencil with holes. The blanks can be shaped like droplets, hearts, or triangles. Simple elements make up more complex ones - flowers, leaves, twigs.
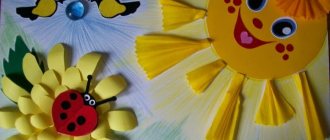
Using colored paper, you can create autumn leaves, daisies, cornflowers. It is also easy to make chrysanthemums. To do this, you will need a strip 2 cm wide. Using sharp scissors, make frequent cuts along one of the long edges of the paper, not reaching the edge 2-3 mm. Then the prepared workpiece is rolled into a tight roll and sealed. Fluff the ends and the paper flower will come to life.
Prepare the individual elements, and then use PVA glue to glue them onto the cardboard skirt to create the image of the “Queen of Autumn” doll.
Application from maple and ash seeds
Maple and ash are trees familiar not only to rural but also city dwellers. And their seeds, which are found in abundance every year, are an excellent material for children's crafts. If necessary, you can get lionfish seeds even in winter. It is enough to dry them and use them in classes with children of different ages.
For kids it is better to choose simple plots. For example, try making dragonflies flying over colorful flowers. To work you will need a landscape sheet, multi-colored plasticine, maple and ash lionfish, and gouache.
Before starting work, say what will be depicted in the picture: how many flowers and dragonflies, how and where they will be located, and so on. In this way, the child will learn the idea of the craft, and based on the ideas received, it will be easier and more interesting for him to complete the work. For clarity, you can draw the outlines of future flowers and dragonflies with a simple pencil.
So, we’ll sculpt the dragonfly’s body from plasticine, and make the wings from maple seeds. Stick ash seeds into the plasticine center cakes with a sharp tip along the entire circumference, you will get unusual flowers. To make the picture more elegant, let’s color the flower petals. Using green paint we will draw stems and all kinds of leaves. It turns out that dragonflies are fluttering over the flowers. Perhaps the little artist will want to add to the picture. Let him draw, for example, a ladybug or a bug. Be sure that this craft will only benefit from this.
It seems like there is nothing complicated, but in order to achieve the desired result, the child will have to draw, sculpt, and tinker with natural materials. All this will require attention, perseverance, and accuracy. During the work, fine motor skills, imagination, thinking, and speech will develop. The adult’s task is to suggest, help, maintain the child’s interest in all ways, and at the end of the work, be sure to praise or even encourage him with something. The picture can be hung on the wall in the children's room or given to grandma for her birthday.
Autumn gerberas from maple lionfish and plasticine. Master Class.
Autumn gerberas from maple lionfish and plasticine. Master Class.
Bright, unusual gerberas from maple lionfish can be made with middle and older children. The manufacturing technology is very simple. Children will enjoy doing this during class. The simplest techniques for working with plasticine and natural materials will allow your children to do this kind of work. This type of work develops fine motor skills, dexterity, imagination and artistic taste.
For work we will need:
- maple lionfish,
- plasticine,
- wooden skewers or twigs,
And most importantly - a good autumn mood.
Roll plasticine balls, then flatten them and insert maple lionfish. We place the lionfish close to each other (it is important that their direction coincides)
These are such wonderful flowers.
Now let’s paint our flowers in our favorite color.
Our gerberas are ready.
We wish you good luck and creative ideas!
Volumetric flowers
Dyed or white pumpkin seeds make beautiful three-dimensional crafts that can be used as packaging decorations, scrapbooking pieces, medallions, or stylish interior decor.
When seeds are glued together in multiple layers, an inflorescence is obtained, the center of which is filled with any relief material: yellow peas, coffee beans, or simply small polystyrene balls.
Lionfish helicopter
This craft is a little more complex, and therefore the process of making it will be more fun. In addition to maple seeds, we will need material for the helicopter body. A chestnut or walnut, or a peach pit, would be suitable here. Without them available, you can make the body entirely from plasticine.
The first step is to sculpt the main part of the helicopter. If you are using a nut, then stick plasticine on it to form a body. Next we make the top and rear blades, attaching the winglets to the cockpit. The helicopter will also need windows and landing gear. They can be made from plasticine.
Dragonfly
The simplest craft for children of any age will be a dragonfly, for the manufacture of which you will only need maple helicopters, corn kernels or peas. Grains are needed to depict eyes, but if you don’t have them in the house, you can use plasticine. Before making a craft, you should show your child what a dragonfly looks like if he is not familiar with them.
The creation of a dragonfly begins with sculpting an oblong body, which can be solid or molded from several parts. Helicopters - wings - are attached to the sides of the body, and eyes made of grains or plasticine are attached to the head.
Applique from maple lionfish for preschool children step by step with photo
DIY lionfish applique. Master class with step-by-step photos.
Master class using step-by-step photos “Dragonfly on a flower.”
Description: Master class for preschool children, intended for kindergarten teachers, additional education teachers, and parents.
Purpose: The applique can be used to decorate a home or exhibition.
Goal: To form imaginative thinking and creative imagination through the transfer of the characteristic features of the depicted object.
Tasks:
- Strengthen the skills of manufacturing and processing the surface of a mold using various techniques and methods;
- Develop fine motor skills, imagination and imagination while working on the expressiveness of the image of a dragonfly or flower;
- Cultivating interest in knowledge of living nature and caring attitude towards it;
- Fostering accuracy and a rational approach to the use of materials.
Materials for the lesson: On the TV panel there is a photo with an image of a dragonfly on a flower, photographs depicting the sequence of work on the application, a sample of work, dried maple seeds (lionfish), scissors, a sheet of A-4 paper, plasticine. “Dragonfly on a flower” Riddle about a dragonfly:
“A helicopter landed on the daisy at the gate - Golden eyes. Who is this? (Dragonfly)
Step-by-step process for making an applique:
Materials and tools for work.
We construct a core for the flower from a plasticine ball and plant it in the middle of the circle.
We stick the lionfish with its sharp end into a plasticine circle. We place the lionfish close to each other along the entire diameter of the circle
If desired, you can lay out the lionfish in a second circle.
We roll out the body of a dragonfly from a plasticine sausage and from two small balls-eyes. We stick two lionfish on both sides to the dragonfly’s body. These are wings. We plant a dragonfly on a flower. The work is ready!
How to decorate a doll's outfit with your own hands with autumn leaves?
Do you want to decorate your doll's outfit with autumn leaves with your own hands ? Natural material has always been in first place for any needlewoman. This material is very pleasant to work with and makes simply magnificent creations. Autumn is in full swing and nature generously gifts us with its gifts - beautiful autumn leaves. So why not use them!
Do you have beautiful dolls? Are you tired of the boring dresses of your dolls? Now you will learn how to transform the dress of your favorite doll and turn her into a real Autumn lady with the help of autumn leaves. Decorating a doll's outfit with your own hands with autumn leaves is very simple! You just need a little time, imagination and, of course, desire.
So, let's start decorating the doll's outfit with our own hands with autumn leaves. To do this, go to the forest for a pleasant autumn walk and at the same time collect maple leaves. They come in very different shapes and sizes. Take silver maple leaves and dry them with an iron through newspaper or other paper. Then paint each maple leaf with gold paint. The most convenient way to do this is to use aerosol paint in cans, which allows you to carefully and evenly paint the leaves over the entire surface. Put a fluffy dress on the doll and glue leaves along the entire perimeter of the skirt. You can also decorate with sequins or rhinestones. It turns out to be a very bright and original autumn outfit for the doll.
If you do not process the maple leaves in any way, they will curl a little, creating tiers for the dress. For this doll outfit, you need to attach the leaves to the fluffy hem of the skirt in rows, starting from the bottom. When the leaves are dry, you can paint them with glitter to make the dress look more elegant. This is not an ordinary multi-tiered skirt.
Decorating a dress like this for a doll will lift the spirits of both you and your doll! Decorating a doll's outfit with your own hands with autumn leaves is very simple!
Copying materials from the Portal The Magical World of Dolls is strictly prohibited.
Crafts from leaves and maple “helicopters”
The easiest and most accessible job, even for kids, is leaf applique. If this is your first time making a composition with your child, offer him a picture that will serve as a template. Don't rush to do everything yourself. Invite your child to choose leaves as desired so that the work turns out similar to the sample. This will develop your child's creative abilities.
Material for application:
- colorful leaves;
- thick sheet A-4;
- glue brushes;
- PVA glue;
- scissors;
- sample.
To make a simple arrangement, you need even, dry leaves. Place them under a press or in a book. In two days the material is ready. Cut out the appropriate pieces with scissors and lay them out on a sheet of paper.
Now you can glue it. First the background and lower layers, and then the finer details. For example, if you want to make an elephant, then first make a body and head out of leaves, and then glue on the trunk, tail, and legs. If you don’t have enough eyes, you can add them in with a marker or make them from tree seeds.
You don't have to do everything according to a template. You can come up with a picture yourself and create an original composition from leaves.
Use colored paper, felt-tip pens, and paints as an addition, so your applications will be even more interesting.
Along with leaves, maple “helicopters” are also ideal as a basis for crafts made from natural materials for kindergarten. Just look at this miracle!
Fairy wings made from maple seeds
Dragonflies from maple "helicopters"
Now you have seen how beautiful and original leaf applications can be. Use these ideas for spending time with your children.
Decorating with seeds
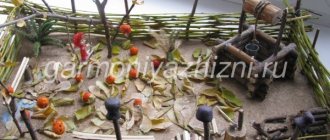
Plant seeds can become one of the materials for compositions using branches, cones, textiles, and three-dimensional figures. With their help, an original background or substrate is created for handicrafts in country style.
To create such a surface for handmade crafts, the seeds, after selection and drying, are poured onto a layer of glue and leveled.
To mask possible gaps, use a base of similar color - thick cardboard or plywood. The same method can be used to decorate frames, wreaths and other details with a smooth surface.
Crafts from maple parachutes for children: photos
Important: The imagination of creative people is limitless. In the process of creating crafts, not only maple leaves are used, but also parachutes, or earrings, they are called differently.
Craft “Dragonfly”
A very simple craft that even the little ones can handle (with the help of their mother, of course).
Dragonfly from maple parachutes
For production you will need:
- Maple parachutes
- Paints
- Brush
- Glue
- small twig
Paint the parachutes with paints, then let the paint dry. Then glue the parachutes onto the branch. The craft is ready!
You can make a whole collection of colorful butterflies, dragonflies and other insects this way.
Insects from maple lionfish
Crafts from maple parachutes
Applications from maple seeds
It's easy to make a hedgehog from maple seeds. Draw a hedgehog on a piece of paper; you can also print the finished picture. Instead of needles there will be maple parachutes.
Hedgehog from maple seeds
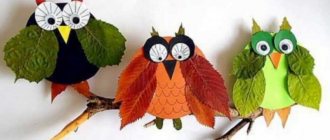
In addition to the hedgehog, you can make any other applique. For example, an owl.
Owl from maple seeds
Decor on the bottle
Monochrome black, brown or spotted watermelon seeds can be used to decorate glass bottles and jars. The working surface must be degreased and covered with two layers of acrylic paint in a contrasting color.
Then the pattern (inflorescences, lines) is marked. Specialized glue is applied to each part, then it is fixed with a complete fit.
The neckline is decorated with decorative yarn, and its use in the open spaces adds aesthetic completeness to the project. At the last stage, a transparent varnish coating is done.
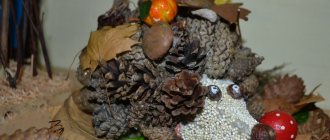
Owl made from natural materials - master class
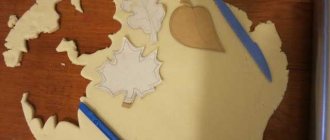
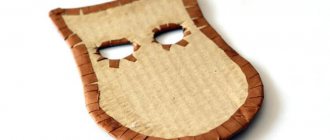
I simply drew the template for the owl by hand. This is what he looked like.
I transferred it to the back side of the cardboard, simply tracing it with a pencil.
I cut it out with scissors clearly along the drawn outline and I got something like this.
Now about maple seeds. Unfortunately, I do not understand the correct botanical names of plants, so I cannot accurately say the names of the trees from which these seeds were collected. I know for sure that these are some types of maple. All our lives we have called these maple seeds “helicopter seeds” for their ability to spin as they fall, much like a helicopter propeller. So, my children and I collected these two types of “helicopters”. Both of these types are required.
These narrower and straighter ones will serve as the plumage of the owl’s body.
But these - large, wide and curved towards the top - will replace the feathers of the wings of our owl.
The kids sorted the seeds for me into two piles so as not to have to sort through them for a long time during the gluing process, since I used hot glue, which hardens very quickly. I started making an owl by gluing “feathers”—seeds—to the owl’s body. To do this, I applied a strip of glue and glued narrow “helicopters” onto it, but not just like that, but observing the direction of their “wing”. They seem to have to look to the center, to the left, to the right.
The direction of work goes from bottom to top.
Above the previous row, at a short distance, she repeated the same thing.
And in the same way she filled the owl’s entire body with “feathers”.
When the body was “dressed”, she moved on to the wings, taking wide curved seeds for them. I also used hot glue for gluing (be careful, you may inadvertently burn yourself). Only all the seeds on one wing are directed in one direction.
The second wing is also only the seeds are directed in a mirror way.
When the wings and body are ready, you can “tackle” the head. First I made the beak. To do this, I cut out this shape from yellow felt, slightly reminiscent of a triangle.
When I made the first owl, I cut out the beak from velvet paper. But I didn't really like this option because the paper was stiff and it was difficult to bend it nicely. This time, having taken felt, I realized that I was not mistaken in choosing this material. I made the beak quickly and easily by rolling it into a “ball” and gluing the joint.
The beak was glued to the owl's head.
I did the following steps quickly until the glue hardened, so I didn’t take separate photos. First I glued the button eyes, around them there were like “glasses” made of pea seeds. I smeared the rest of the space with glue and simply poured in a handful of buckwheat, and when the glue hardened, I shook off everything that didn’t stick. The result is this “face” of an owl.
I finished it all off with one small touch - I glued two maple seeds above the eyes to create “eyebrows.”
My daughter happily took such an owl made from natural materials to a school exhibition of crafts made from natural materials. Try making this craft with your children yourself.
Materials for creating your own applique
List of materials needed to create an applique at home
- Maple earrings;
- Foamiran brown;
- Eyes;
- Scissors;
- Plasticine yellow;
- Buckwheat and lentils;
- Owl template;
- Glue gun.
Preparation of natural materials for their further use
Nature is the best artist; she creates natural materials that, in skillful hands, turn into works of art!
It is better to collect leaves in the fall, when they are especially beautiful. Leaves of oak, maple, and chestnut can be used to create all kinds of applications:
Birds made from leaves
Insects from leaves
The shells of these snails are made according to the principle of assembling a rose from leaves:
Examples of other leaf applications:
Wreaths made of bright leaves are the most atmospheric autumn decor!
This option for assembling a wreath is much simpler than the previous one - even children can handle it:
For long-term storage, the collected leaves are placed between paper sheets and ironed with a warm iron. Then they are laid out with old newspapers, thin cardboard and pressed down on top with a small weight.
Noses like wings
While walking through the forest with your children, collect maple seeds - “spouts”, thin sticks and some leaves. We will make interesting and simple crafts from them. Children of all ages enjoy crafting from natural materials. Let's help the little ones, right? Who would have thought that maple lionfish are so similar to the wings of a dragonfly or moth. Especially if you paint them with gouache. Having made one craft, you want to try again, because despite the simplicity of execution, it turns out very expressive and interesting.
We will need: maple “spouts”, thin twigs, beautiful fallen leaves, toothpicks, gouache, a brush, a jar of water, plasticine
Making a blank for a dragonfly. Cover the stick with plasticine and attach a small ball to it.
We paint the maple “noses” - these will be the wings.
Attach the wings to the stick and get a dragonfly.
We make a similar preparation for the bird.
Once you've attached the wings, don't forget the tail! This is such a wonderful bird.
Using the scheme you already know, you can make any flying creature. Only the shape of the head and body will differ. I decided to add a moth to accompany the dragonfly and bird.
Crafts made from natural materials are a very exciting activity. Have a good mood and let your imagination run wild!
Noses like wings. After a walk through the forest While walking through the forest with your children, collect maple seeds - “spouts”, thin sticks and some leaves. We will make interesting and simple crafts from them. Children of all ages enjoy crafting from natural materials.
Maple, elm, ash seeds
A ready-made set of small cones for crafts.
Maple seeds - “spouts” - are interconnected and easily separated from each other.
The bright green seeds dry out and take on a beige hue.
Elm seeds are round, transparent, with a brown center.
Ash seeds are light brown in color and resemble an elongated droplet in shape.