Paper, fabric, cardboard, cotton pads, leather scraps and natural materials - all this is suitable for children's creativity. The “owl” applique is considered a completely accessible theme for nurturing creative inclinations.
Owls are often found in catalogs in the form of jewelry, fashion decor and accessories. A relevant character does not cause difficulties in performing work when there are aesthetic role models. We offer different types of techniques, templates and materials for making a mysterious night bird.
Owl applique made from paper palms
An owl or eagle owl is a popular theme for crafts. They are knitted and crocheted, made from paper and scraps of fabric, and painted with paints and felt-tip pens.
For children, the most accessible type of artistic creativity remains appliqué made from paper and fabric. A sample made according to a template often evokes admiration among others. A preschooler is able to create a completely recognizable character with his own hands using scrap materials.
Application is part of the educational process in kindergarten and school. Children are taught to think creatively, to look at familiar materials as a source of inspiration, when there is a desire to create something with their own hands.
One of these materials is ordinary cotton wool. Invite your child to make an owl out of it.
As a template for the owl applique, you can use children's palms, which are traced with a pencil on napkins. It is easy to lay out the body and wings of an owl from these soft “palms” - they will resemble fluffy feathers.
To complete the application you will need:
- pointed scissors,
- PVA glue;
- a pack of napkins;
- scraps of colored paper for the eyes, beak and paws of the owl;
- thick dark cardboard as a background.
The main stage is to prepare the “palms”. Children willingly participate in this process, tracing their palms with a pencil on napkins.
Important! Adults can join in the cutting process so as not to damage the rather fragile material. If the child is good at it, let him cut out the base of the future owl himself.
The background of the application needs to be demarcated so that the fragments of the owl’s body do not extend beyond the sketch. To do this, use a pencil to outline the outlines of the character where the napkin blanks will be glued.
Once the formation of the owl's silhouette is complete, you can move on to reviving it. You can use convex buttons for the eyes - black with golden rims. You can place eyelashes cut from dark paper under your eyes.
Some elements can be drawn; it is better to make the beak from a piece of cardboard, adding a little volume. The composition can be supplemented with elements of a night landscape - stars and the moon.
Wayne Brown model
The design of this origami owl is simple, but the figure benefits from the combination of two contrasting paper colors. Against the background of neutral “plumage”, the bird’s eyes seem to light up with yellow or emerald fire. For greater effect, you can use a metallic finish on one side, but the folds in this case must be very precise and neat; they should not be repeated several times.
For the model from British origamist Wayne Brown, you will need 2 square sheets of light gray (or brown) and green paper. The optimal size is 10x10 cm. For small cards it is better to take 8x8 cm squares.
Folding origami owl step by step:
- We start from the light side (with the color that is intended for the owl's eyes). Fold the square from right to left and open it.
- We bend the side edges towards the center (the basic shape of a “door”).
- We bend all corners towards the central axis. And then, using the reverse fold, we bring it inside the workpiece.
- We lower the upper triangle and return it to its original position. We lift the bifurcated lower part.
- We bend the corners to the sides.
- Open the top “pockets”. Smooth it out.
- The corners of the lower part, opened to the sides - “legs”, are placed inside the figure.
- At the top we open the corners indicated by arrows diagonally.
- We make folds along all the dotted lines indicated on the diagram.
- We lower the upper triangular valve. It turns out to be the head of an owl. The light parts on both sides are the “eyes”.
- Fold the bottom triangle in a zigzag.
- We “round” the figure by bending all the outer corners (you can secure them with glue on the back side).
Branch:
- Let's start from the inside out. We outline the diagonal.
- Fold the workpiece in half and open it. Place a diagonal line vertically.
- We bend the right corner along the dotted line.
- Combine the right and left edges as shown in the diagram. The figure turns out to be asymmetrical.
- Fold the left side again, partially overlapping the right.
- We close the resulting triangle with a “valley”.
- Bend it in half using a reverse fold to make a branch.
- All that remains is to secure our owl to the support.
Externally, this model resembles a Scops Owl, one of the smallest representatives of the owl family. Due to its small size and peaceful nature, it is often kept at home.
Although an owl, no matter how big or small, is not the most suitable indoor pet. It is better to decorate your house with a figurine of this bird, and admire it alive in nature. Among the origami models of owls, there are several three-dimensional ones that look very naturalistic. Like, for example, the Scops Owl from the video lesson:
Owl
If the scops owl is one of the smallest owls, then the eagle owl is one of the largest. In many countries it is considered a symbol of wisdom and Japan is no exception. The Ainu people, who inhabit the north of the country, have a legend about the god of the earth and owls, Chikap Kampue, who, with the help of an owl, saved people from hunger. The wise bird was able to fly to the sky and find out why drought constantly destroys the harvest. As it turned out, the rain god was angry that the farmers showed him little honor and, thus, decided to attract attention to himself. The eagle owl was able to appease the celestial being and the rains finally watered the earth, yearning for moisture. Since then, the largest of the owls has been held in high esteem by the Ainu.
Origami owl is a talisman that attracts wealth. It is believed that a house where there is a figurine of this bird will never be visited by hunger or disease. In addition, the Japanese often place images of an eagle owl in the nursery, not only as a symbol of protection, but also to bring the desired pregnancy closer. The most common origami model is folded based on the basic “Bird” shape and will take no more than 10 minutes.
Step-by-step instruction:
- Fold the sheet on the colored side diagonally. It is recommended to take a square of 15x15 cm.
- We turn it over and, by bending it, draw a vertical and horizontal axis.
- Using the marked folds, we form a “Double Square”.
- We bend the extreme points of the near layer towards the center. The free edge “looks” at us.
- We lower the upper triangle. Opening the folds.
- We raise the lowest point “all the way”. At the same time, the sides are lowered, we press them and smooth them out.
- The basic “Bird” shape is ready. We repeat the same algorithm on the back.
- We lower the top point down.
- We repeat the same on the reverse side.
- Fold the right and left sides towards the middle. Repeat on the back.
- We take out the inner parts and bend them at right angles using a reverse fold. These are the wings of an eagle owl.
- We lower the upper acute angle until it intersects the folds on the bird’s chest.
- We lift with an offset.
- We lower it again, making a repeated zigzag fold.
- The beak is formed, all that remains is to make the paws. To do this, cut the lower end of one - the first layer - with scissors.
- We separate the ends to the sides.
- Turn the workpiece over. We make corner cuts on the head.
- We raise the formed “ears” of the eagle owl, or rather the eyebrows, upward. The bird is recognized precisely by these characteristic feather tufts above the eyes, which give its gaze an amazing awareness.
Owl applique made from geometric shapes
Children are most willing to do crafts on a familiar topic. Younger schoolchildren like to make appliqués from scrap materials using various techniques.
The theme of wildlife can be reflected in geometric shapes. A good example is the original “owl” applique made from cut colored paper. Feathers on the belly and wings - geometric figures:
- triangles;
- oval elements;
- small circles;
- diamonds.
Let's look at the photo as an example of making an owl applique from triangular corners. The color of the feathers can be varied, but variegation is inappropriate. The belly and breast may be lighter than the wings and other parts of the image.
Helpful advice! The application must be done with a creative approach. It is better to glue the triangles in rows onto the oval body or fix them chaotically, but within the limits of the sketch.
Wings can be formed from halves of a circle, complemented by triangular feathers. The parts can first be laid out without glue to make a preliminary assessment of the result. Once completed, you can complement the theme with landscape elements.
Owl from broken elements
A popular technique is cut-off appliqué. Laying out an image of an owl from pieces of paper or napkins is a fun activity. It shapes the child’s thought processes - fragmentary fragments create a complete picture.
This technique is suitable for preschoolers and elementary school students. Paper scraps to form the body can be easily made from different materials using color variations. You can limit yourself to colored fabric or paper, but fragments of napkins will give the fluffy owl more volume.
Note! As a basis for the owl, you can use scraps of napkins, white Whatman paper or cut toilet paper. They can be complemented with feathers.
It is important that the image is harmonious - think about what to make the pupils, ears, beak and paws out of. It is suggested to buy haberdashery “moving eyes” if they fit the size of the head.
The composition can be supplemented with elements of the landscape visible in the distance - city outskirts with illuminated windows. Offer the children your own design option for the composition - a tree with a hollow and owlets or two owls under the moon and stars.
Fabric wise owl applique
Invite younger schoolchildren to create something together - a large panel with an owl in glasses and an academic cap. It is worthy to become a decoration of the classroom. The character can be used at school parties and quizzes.
Children themselves can use templates to make a “wise owl” applique from thick fabric - wearing a funny “academic” cap with a tassel. It's a pleasure to do this craft.
The owl can be dressed up in pants with suspenders, a white shirt with a bow tie or a tie - it depends on your imagination and desire to tinker with the panel a little longer.
“Smart Owl” is done exactly like other types of applique, the thematic decor is different. Otherwise, the same tools (glue, scissors) and materials are used:
- fabric for background or base
- flap for the main image;
- colored cardboard (brown, orange, black) for eyes and beak.
The body can be made using an owl stencil for applique from a plain or colored fabric that matches the color of the bird’s feathers.
It is better to make image fragments using ready-made templates so that there are no errors in the proportionality of the details. If the feathers are made separately, they need to be prepared in advance.
The critical stage is to form the wings and head. The individual elements are glued to the bottom with an overlap so that they overlap the lower parts. The wings are attached to the shoulder part of the body. One wing can be raised up with a pointer.
Ready parts can be cut out of cardboard, leather or thick fabric. Eyes with glasses and a hat are the main attributes of a “smart owl”, so adults must participate in their production. The applique can be supplemented with a corner board with letters in the background.
How to choose a craft
When choosing what kind of paper craft to make, you need to start from whether it will be made by an adult or a child. For children, the most simple products that do not take much time are more suitable. If you yourself love origami and have been into it for a long time, choose more complex models.
How can you understand how complex a craft will be according to one scheme or another? First of all, look at how many stages it contains. If there are less than 15 of them, then most likely this is a simple origami owl pattern for children.
If there are more stages, it is most likely intended for advanced paper crafters. Start with something simple and gradually move on to more inventive designs.
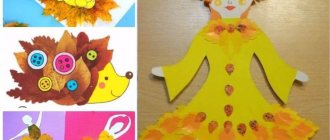
Owl applique made from leaves
Creating compositions from natural materials is an important part of a child’s development. Applications made from autumn leaves do not require the use of templates, but they contribute to the formation of a creative approach when performing simple tasks.
At the same time, fine motor skills and abstract imagination develop.
A pleasant pastime - applications from autumn leaves. Children learn to sort them by color and shape, and evaluate for which part of the autumn composition they can be used.
Note! The best analogue of feathers is willow leaves, but they are not always found in your area. A full-fledged replacement is any oblong-shaped opal foliage. For wings with “fingers”, oak leaves are suitable.
It’s easy to create a beautiful owl applique after a walk in the autumn forest or park, when there are a lot of leaves of different colors around. Often such crafts are prepared for a children's exhibition.
Although the leaves will quickly dry out, it is advisable to photograph the child with his own “work” in order to preserve it as a good memory of the stages of children’s creativity.
An excellent ornamental material is the autumn leaves of trees growing in the central zone:
- maple;
- cherry;
- Linden;
- chestnut;
- oak;
- willow;
- aspen;
- Rowan.
Additional material for autumn applique is glue, thin colored cardboard. In some cases, thread, fishing line and double-sided tape are used.
The owl can be assembled from individual fragments on a rigid base - plywood, colored cardboard, unnecessary facing tiles or a piece of plastic.
It is better to glue the applique with PVA, having first laid out the layout on the table. It is better to assemble the body from the bottom up, row by row, outlining the contours. You can take 2-3 large sheets as a basis, gluing them from the inside with tape.
If the body is ready, we decorate the head in the same way, connecting it with tape. The pointed leaves can be immediately secured in such a way that the owl’s “ears” stick out. It is better to make the eyes and beak from colored cardboard, draw them in with a felt-tip pen, and then glue them to the head.
In a similar way, you can make a “flying owl” using a cardboard mold to hang it on a fishing line in a child’s room.
History of the art of origami: where and how did it originate?
Before we look at the origami owl pattern in more detail, we cannot help but mention the history of this art. Today it has gained great popularity. There is probably no person who does not know about its existence. Many adults and children are trying to master a variety of techniques in order to learn how to create masterpieces from paper.
But for some reason, some people are convinced that art originated in Japan. This is a common misconception, since the birthplace of origami is still China. It was the Chinese who were the first to learn how to create paper. They used paper figurines exclusively for carrying out various rituals on religious grounds.
Moreover, all nobles who had a high status were required to master not just the basics of origami, but its complex techniques. Because this was considered a sign of good manners. In those years, none of the common people could even dream of trying to master this art. Only much later did publicly available diagrams appear that helped ordinary poor people learn how to fold paper figuratively.Today there is no consensus as to why many consider Japan, and not China, to be the country of origin of this art. However, it is safe to say that this is directly related to the fact that it received its development in Japan. That is why those people who are just beginning to master paper folding techniques believe that Japan is the birthplace of art. However, it is important to remember that this is not the case.
To draw up diagrams, special signs are used, with the help of which each individual stage of work can be conveyed to the master. Most of these iconic symbols were introduced into practice in 1954, when the art of origami had already become widespread. The author of this symbolic system is Akira Yoshizawa. He became a very famous origami artist who came up with several designs himself.
Classic origami is the shaped folding of sheets of paper, which does not involve the use of scissors. But the instructions on how to make origami correctly do not prohibit the use of glue.
But this only applies to individual cases. For the most part, the schemes are designed in such a way as to allow the master to refuse to use additional tools.This material is not prohibited, since some complex origami models require the use of glue. It is necessary in order to give it the desired shape after impregnation of the sheet with an adhesive composition.
Three-dimensional owl applique
From scrap materials and cardboard you can make a three-dimensional applique in the shape of an owl.
Method No. 1 – cover a plastic bottle with the top cut off with autumn leaves. When the base of the body is ready, add eyes, eyebrows and beak.
The wings and paws of an eagle owl can be made from any dense material that does not require edge stitching:
- felt;
- cloth;
- artificial leather or suede (offcuts from an old wallet or bag).
An improvised “Owl” can become a favorite decoration on a shelf with educational supplies. Something similar can be built in the form of a pencil holder.
Method No. 2 – volumetric applique of colored circles attached to a small cylindrical roll of thick paper or wallpaper. When forming it, you need to immediately wrap the “owl ears”.
Children may find it difficult to shape the cardboard base of the figurine. But they will willingly take part in the process of covering the body with elements of colored paper.
Advice! It is better to cut the lower part of the cardboard blank so that it resembles feathers. An option is to glue the base onto a backing in the form of paws in the front and a small tail in the back.
Wing blanks are made separately. The wings can be attached so that they go around the body, or inserted perpendicular to the base.
The head can be made separately by placing a “cap” on top of the body blank. The shape of the eyes and beak is arbitrary. The owl can be seated on a stump made of brown crumpled paper, pasted over toilet paper rolls or a cardboard blank of the desired shape.
Music, costume designs, noise library and much more for a children's performance
Communication
There are currently 302 guests and not a single registered user on the site
DOWNLOAD!
PLAYS WITH MUSIC
Our button
If you liked our resource, you can place our button on your website or blog. button html code:
Dear theatergoers! Our site exists thanks to the enthusiasm of its creators. Recently, there has been a shortage of funds to pay for hosting, even with advertising. Therefore, we ask all concerned visitors to use the support form below. This would help the resource survive and get rid of advertising. There are three payment methods on the form: from a bank card, from a mobile balance, from a Yandex wallet. The transfer amount can be changed. THANK YOU!
Update: Friends, thanks to your financial help, we were able to completely clear the site of advertising! Thanks to all! We hope that your support will continue to help keep the site clean, without resorting to forced clogging of it with “yellow” garbage.
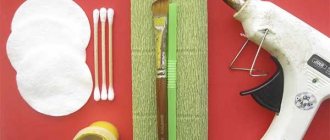
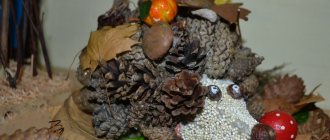
Owl applique made from cotton pads
Cotton pads are a good material for children's creativity. A funny applique made from cotton pads – a white owl. Minimum materials and maximum emotions from the results of labor.
The technique is close to working with felt, but cotton pads are softer and more pliable; they are easy to cut with sharp scissors, forming something like feathers.
To complete the work you will need:
- sheet of colored picture - background;
- glue stick;
- 4-5 cotton pads;
- foil for stars and crescents;
- scraps of colored paper (black, brown, dark gray and white).
Work order:
- The owl needs to be seated somewhere - we prepare a “landing place” in the form of a thick branch made of brown cardboard. It may be part of a trunk with a hollow.
- We prepare the body of the owl from a cotton pad, making notches. Glue it above the branch.
- The owl's head is made from the same cotton pad and is attached above the body.
- We cut the third disk in half and make deeper notches along the rounded parts - these are the wings. We fix them end-to-end to the body.
- We make eyebrows or ears in the form of tufts with notches, insert them into the disk, complementing the character’s head.
- When the body with head and wings is ready, the owl needs to be “revitalized.” To do this, cut out the eyes from yellow paper and add black pupils. Then we glue the beak and paws from brown cardboard or paper.
Decor - optional. The branch can be supplemented with green or autumn leaves. Behind the owl in the night sky, stars and a Moon made of foil, glitter or yellow paper will look good. If the design is winter, add snowflakes to it.
In the same way, it is easy to make a fabric applique of an owl from scraps of felt or cloth.
Assembly of subsequent tiers
To create the second row of a modular panel in the form of an origami owl, you will need 19 blue and 9 white parts. They need to be glued in a circle, forming the white belly of the owl;
For the third row you need 10 white and 19 blue parts;
For the fourth row, take 9 white and 19 blue modules;
After all the parts are glued, the entire structure needs to be pressed down a little;
For the fifth row you need 20 blue modules and 8 white ones;
For the sixth row - 21 blue and 7 white;
For the seventh - 22 blue and 6 white;
The eighth row is made of 28 blue modules;
The ninth row (this is the neck of the future owl) is made of 28 blue parts laid flat;
The next five rows consist of 28 blue pieces each, the modules are stacked as in the beginning.
Paper owl applique
The simplest application for preschoolers is made according to templates. Finished parts are made in stages, superimposing elements on each other. They are glued to the base - a sheet of dark colored cardboard will do.
The advantage of this owl is a small number of simple shaped parts. To begin with, prepare templates and colored paper to cut out the details of the owl and a tree branch for its “landing”.
Advice! Teach children to place symmetrical patterns on the wrong side of colored paper. It should be colored differently from different sides.
The first part is the torso. A branch is placed on top of it below - the owl must sit on it, even if its paws are not visible. Next the paws are fixed.
For a child, the most difficult part of the process is the head. It is advisable to help him if difficulties arise. Do not rush to connect the parts until all the elements are ready - eyes, ears and beak.
Lay out the pieces to see how cute the owl turned out. Perhaps you want to replace something - attach “running eyes” to the finished applique base.
The wings and beak can be colored with a felt-tip pen. The branch can be supplemented with leaves on the tree, lubricating the ends, they can be slightly wrapped for volume.
We offer ready-made owl templates for application and ready-made options for completing the work.
Mosaic
Mosaic art has a very original place in creativity. Thanks to the ready-made sleeve frame, you can simply use paper to cut out the necessary blanks and glue them onto the finished form.
Here are the details that will come into play:
- ears (2 pcs.);
- beak;
- eyes (you can buy ready-made ones at a craft store, 2 pcs.);
- paws (2 pcs.);
- wings (2 pcs.).
If desired, you can decorate with a variety of sparkles, rhinestones or beads for decoration.
To begin with, paint the base in the desired color and wait until the workpiece dries. Alternatively, you can use foil. Simply wrap the roll and secure the foil with tape or glue.
Next, using super glue or a glue gun, we secure the parts. The bottom of the sleeve can be closed using a jar lid.