DIY bicycle - a collection of master classes using various materials
Indoor plants help make your home or apartment more comfortable and fill your home with fresh, clean air. Home flowers can create not only an aesthetic appearance, but also give a feeling of summer all year round. With their green foliage and bright, beautiful flowers, plants lift your spirits and fill the space with a fresh aroma. Many species not only purify the air and release oxygen, but also maintain the level of humidity in the room.
In order for the plants to fit harmoniously into the interior of the room (office) and not experience discomfort during active growth or flowering, it is worth considering not only the place where the flower pots will be located, but also their design. On sale you can find a huge variety of interesting options for flower pots. Manufacturers have taken care of a diverse range of these products: designs and colors can be chosen to suit every taste!
Interesting to know! The term "pot" means "hidden pot". Very often, owners plant indoor plants in ordinary, unsightly containers. For the plants themselves, it is best to select clay pots with holes at the bottom so that excess water can flow out when watered abundantly. But decorative flowerpots, inside of which the pot with the planted plant is placed directly, help to add aesthetics and the ability to harmoniously fit house plants into the interior of the room. There is no bottom hole in the flower pot, so the moisture released from the flower pot will not leak out and stain the surface on which the flower is located.
Basket of sweets
The basket looks luxurious and elegant. It can decorate a room for a long time and delight the person to whom it is presented. For this craft you will need a very ordinary basket made of wicker. They weave it from paper tubes or build something similar to a bed from long sweets.
In the process of making a candy basket, you will need corrugated paper. Sweet flowers will be held on a wire wrapped in paper. As a base, you will need a circle of foam, which is placed on the bottom of the basket. Wire branches are fixed in it.
When the sweet design is ready, it should definitely be decorated. Beads, satin ribbons and other decorative elements are suitable for this.
DIY candy crafts are suitable for any event in the life of children, women and men.
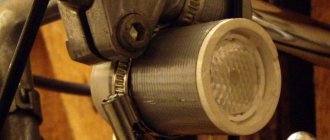
Let's make a decorative flowerpot-bicycle from twine and aromatic coffee beans
For work we will need:
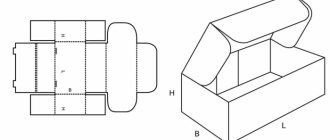
Using a compass, you need to draw circles on cardboard, as shown in the photo below, and cut them out using scissors.
Then these blanks must be wrapped with twine. In the cocktail tube, you need to trim off the excess, leaving about two centimeters from the bend on both sides. You need four of these blanks to make one bicycle wheel. Next, each tube needs to be tightly wrapped with twine. Now you can assemble the wheels, as shown in the photo below.
Then you need to take two tubes, stretch one, and cut off the top of the other and connect them as in the photo below. Two such blanks need to be wrapped with twine.
The steering wheel must be created by cutting off the upper part of the tube, leaving two centimeters before the bend and three after it. Wrap them with twine.
The next blank for the steering wheel is an eleven-centimeter long tube wrapped with twine.
The wheel should be decorated with coffee beans. It is necessary to insert two blanks into the front wheel and secure them with polymer glue. You need to insert a straight tube between the rear wheels and secure it with glue. A piece of tube must be inserted between the upper ones. And wrap the place where they are attached with twine. The role of a flowerpot here will be played by an empty jar. You can decorate according to your taste.
Lady with a surprise
Suite design does not deprive the stronger half of humanity. Of course, it’s not a good idea to give them candy, but strong drinks can easily be used. And if you also decorate the treasured bottle in an extravagant way, what could be better and more desirable for men.
Birthday, New Year, February 23 – absolutely any holiday will be enjoyed with pleasure by this craft:
So, let's look at what this lady with a bottle inside is made of:
- cardboard template;
- a piece of penoplex (sold in hardware stores);
- foam ball (look for it in craft stores);
- corrugated paper;
- glue;
- braid;
- lace ribbon;
- a small piece of organza;
- thin tape;
- a string of small beads.
First, we cut out 2 blanks from penoplex using a template in accordance with the proposed dimensions. The dimensions can be changed if desired.
Cut the foam ball in half. These are future breasts (no need to glue them on yet). Then we mark the place where we are going to place the bottle and cut it out.
Next, we glue the 2 penoplex halves together and sand them so that they are even. Cover the hole for the bottle with corrugated paper.
We cover the perimeter of the craft with strips of cardboard, then glue corrugated paper onto it. You can use double-sided tape.
We cover the entire craft with paper.
We take the braid and use glue to attach it around the perimeter of the craft; we also decorate the area of the bottle.
Let's move on to the magnificent breasts of our beauty. We cover two parts of the foam ball with red and white corrugated paper in half.
We cover the hemispheres with organza, attach braid and lace ribbon at the border of the two colors, and it looks like a bodice.
We glue the breasts to the base, decorate with braid, beads, feathers, flowers and so on, whatever your imagination decides to do.
We close the hole for the bottle with lacing made of thin tape, catching it with the braid.
A bold and memorable gift is ready and can’t wait to fall into strong male hands and melt the harshest heart.
You can present alcohol using a suite design in different ways. The luxurious ship, made by hand, also deserves special attention.
With such a schooner, even a person who has never seen the sea will feel like a seasoned pirate or an experienced captain.
For a teetotaler who leads a healthy lifestyle, instead of a bottle you can put, for example, a pineapple, only the hole will need to be made in accordance with the shape and size of the fruit.
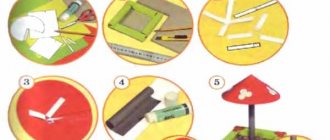
How to make a bicycle
How to make a bicycle out of paper? Beginners in needlework are advised to follow a simplified pattern. It is advisable to prepare all the necessary materials in advance so as not to be distracted from work.
Required materials and tools
A bike for children is made using the following items:
- scissors;
- printed templates;
- paper;
- cardboard;
- glue;
- scissors;
- wire;
- a simple pencil;
- a roll of toilet paper and wide tape;
- ruler;
- corrugated paper;
- markers;
- colored paper;
- dye.
Everything you need can be found at home, especially if children live in it. Such toys are often made during creativity lessons in elementary grades.
Assembling a three-dimensional model from origami modules with step-by-step photos
Modular origami seems complicated at first glance, but if you figure it out, a bicycle from modules can be assembled in 30-40 minutes. You must first prepare the details. For one model you will need:
- 223 yellow modules;
- 62 brown;
- 169 white.
After preparing the parts, assembly begins in stages:
- Make the first 2 rows of 24 yellow modules.
- The third row alternates between brown and yellow.
- Shift the pattern in any direction and repeat 3 more alternating rows.
- Another 24 yellow modules are put on.
- The eighth row is made yellow, but turned inside out. The parts are put on with the long side inward.
- Yellow modules are used to assemble a handle. Place the parts opposite each other until they close together.
- Assemble the front wheel by placing the white modules on top of each other until they form a circle.
- For the spokes, use 4 white and 8 yellow elements, assemble them in the form of a cross, then insert them inside the wheel.
- For the rear wheels, spokes are made from 7 white and 7 yellow modules in the shape of stars.
- Glue the spokes to the rear wheels with glue.
- The cocktail tube is covered with white paper and placed on the edges of the wheel.
- A basket is glued in the middle.
- The steering wheel is assembled from two parts, which consist of 7 yellow modules, and they are fastened together.
- In the middle, at the junction, a white module is inserted, 2 more white parts are put on it, bending them at an angle.
- The front wheel is glued to the bottom, the rear part is connected to the rear wheels.
For the modular origami technique, it is better to use ordinary office sheets to make the craft look more delicate.
The photo below shows a detailed diagram for making a bicycle from modules.
Origami with a simple diagram
To work, you will need a roll of toilet paper and wide tape, scissors, glue and paper, and wire. Step-by-step instruction:
- Two identical circles, at least 1 cm wide, are cut from the toilet sleeve.
- Cut one circle 1 cm wide from the tape sleeve.
- Wire is used to make spokes for a wheel and insert it inside.
- Cover all parts with white paper.
- A wooden skewer is covered with paper, small wheels are put on the sides, and fixed with glue.
- The wire is cut in half at the top and bottom and covered with paper.
- The parts are connected with wire to form a frame, and they are also covered with paper.
- Roses are made from corrugated paper, a basket is formed from cardboard and painted. Flowers are glued inside.
The frame and steering wheel can be decorated with rhinestones and beads. The photo below shows a detailed diagram for making a paper bicycle using scrap materials.
Applications for children
The bicycle applique is made from colored paper. Choose a white background sheet. Cut out 2 identical circles from blue paper, 3 stripes and one month from green paper, three long ovals from red paper, and 2 months of different sizes from yellow paper. Connect all the parts on the sheet, as in the photo below.
Progress:
1. First you need to prepare the wheels. Wheel size is 7-10 cm in diameter.
Decorative bicycle. DIY twine crafts.
I cut out circles from thick cardboard.
You can glue cardboard in 2 layers of cardboard for density. When I cut out the wheels, I wrapped them with jute thread. Fixed it with a glue gun.
“spokes” from bamboo
and also wrapped it in jute. When 3 wheels were ready, I measured the remaining parts, cut bamboo sticks, wrapped them in jute and glued all the parts.
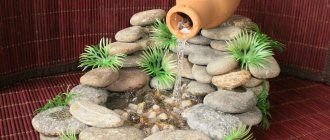
3. For the flower pot I used a plastic container from a children’s toy. You can take a regular paper disposable cup. It was also wrapped in jute and placed on glue. We assemble and glue all parts of the Bicycle .
DIY decorative CART
4. Decorate the steering wheel and wheels with coffee beans, carefully glue them onto our “ Bicycle ”
.
The bicycle is decorative. DIY gift.
5. We decorate our flowerpot with artificial flowers.
DIY miniature SWING / IDEA, DIY decor
6. Depending on the time of year, for example, in winter, you can decorate flowerpots with fir branches and New Year’s toys. In autumn, you can put dried flowers in a flowerpot and put decorative fruits .
BICYCLE decorative/do-it-yourself/DIY
I wish everyone creative inspiration and ideas!
“Bicycle” (master class) Good day, dear friends and colleagues! I bring to your attention a master class on making an original bicycle, which...
DIY gift / Decorative Well master class
Decorative fireplace made of cardboard boxes. Master class Hello, dear colleagues, Happy New Year 2022! Happiness, health and all worldly blessings to you in the New Year! And I want to share.
Decorative wicker umbrella. Master class I bring to your attention a master class on making a decorative wicker umbrella. Can be used as: design element, on.
Master class “Decorative fireplace” The fireplace is a source of heat and a symbol of well-beingFor children of senior preschool age and junior schoolchildren [/ Goal: to create conditions for development.
DECORATIVE BICYCLE. GIFT WITH YOUR OWN HANDS. MK
Master class “Decorative birdhouse” Good day, dear colleagues, friends, guests of my page! I would like to present to your attention a master class on decorative design.
Master class “Decorative hive for bees” Municipal budgetary preschool educational institution “Kindergarten No. 15” in the city of Aleysk, Altai Territory Master class “Decorative.
How to make a bicycle for decoration? DIY decorative bicycle! Master Class
Master class “Decorative New Year's wreath” I am glad to welcome all guests of my page! I’m very glad that you found a moment and came to visit me! Congratulations on the upcoming year.
Original do-it-yourself decorative bicycle
To make a bicycle, we will need several cardboard blanks, toothpicks, a piece of thread, a small wooden stick, glue, and scissors.
First we will make a cardboard basket. The first part is the bottom, to which we glue cardboard strips.
We weave the basket itself from the glued strips.
And this is what should happen:
Then, in the same way, only without weaving, we make 3 wheels.
We take a wooden stick, thread, two cardboard strips and make a fork for a bicycle.
Glue all the resulting parts together. And this is what should happen:
We make a bicycle handlebar from cardboard and thread. You can also decorate it with some figured detail. In this case, a wooden flower.
Our bike is ready. Now you can use the bike basket as you wish