Snow Maiden kokoshnik made of cardboard and fabric - step-by-step master class
Kokoshnik, as a decoration, can be made for both an adult lady and a little lady for the New Year holiday.
There are several technologies that can be used to make a kokoshnik. They are not complicated and if you do everything step by step, you can get a beautiful and original product. To make a kokoshnik for the Snow Maiden in a master class, you need to take thick white cardboard, ordinary sheets of white A4 paper, fabric, glue (PVA and silicone), ribbon, beads and rhinestones for decoration.
The first thing to do is take measurements and transfer them onto regular thin paper, and then onto cardboard. Draw a template on the same sheet and cut it out. The form can be chosen either classic or original - depending on personal fantasies and wishes.
After this, cut two strips of different thicknesses that will be used for the rim. Cut out a template from the fabric that will be used to cover the product. When all the elements are ready, first make the headband, and then proceed to gluing the fabric to the kokoshnik stencil. For gluing it is best to use PVA. The inside of the rim is taped with blue tape. It is better to temporarily secure the edges of the kokoshnik with clothespins for better grip. All that remains is to decorate the product according to the proposed scheme or to your taste.
Kokoshnik templates
Wearing traditions
The exact time of the appearance of the kokoshnik is unknown, as is the full history of its origin, but already in the 10th century, products similar to it were a common part of clothing in Rus'. Until the twenties, it was part of the bride's headdress, which the young wife wore until the birth of her first child, and then took off and put on only on holidays. Now this item of clothing has practically disappeared from everyday life and is used as part of carnival costumes and clothing for performances.
The kokoshnik was made to order. It could be bought from professional craftswomen - kokoshnits, who possessed all the skills necessary to create a headdress and knew how to handle not only fabrics, but also natural pearls, gold threads and beads. The price of especially expensive products reached up to 300 rubles in banknotes (for comparison: a strong peasant horse cost 60 rubles), so kokoshniks often became family heirlooms. They tried to carefully protect them and passed them on from generation to generation.
This dress was worn only on holidays - it was intended to emphasize the solemnity of the occasion. On ordinary days, women wore braids and warriors. The traditional hairstyle for a kokoshnik was two braids arranged in a wreath or bun. The headdress completely covered the hair of a married woman, but there were also girls’ kokoshniks, which made it possible to do other hairstyles.
A distinctive feature of the dress is the comb. It could be in the shape of a crescent, or in the form of an arrow, a circle, a triangle, a crown, or a fan. In ancient times, by the shape of this headdress one could determine the province from which the girl came. Ornament also played an important role. Traditionally it consisted of a frog, which symbolized fertility, and two swans, associated with marital fidelity. The back side of the kokoshnik was also decorated - usually there was a drawing of the tree of life.
Test: Can you guess the country?
This dress is usually associated with weddings. It is sometimes mentioned in the texts of ancient prayers for marriage and family. When the kokoshnik began to replace traditional scarves and hats, in some places it was still preserved as part of the wedding tradition - for example, newlywed girls wore them for three days after the celebration. For such a special occasion, it was customary to wear a pearl kokoshnik - even if the bride’s family could not afford it, they had to borrow an element of the costume from neighbors or acquaintances.
The word “kokoshnik” was first documented in the 17th century. Under Peter the Great, it was prohibited from being worn among courtiers, but was preserved as part of the wedding tradition. Tsarina Catherine II brought part of the traditional Russian costume back into use. During the Napoleonic Wars, it came back into fashion due to the subsequent surge of patriotism and renewed interest in tradition. Even Russian empresses wore it.
According to the decree issued by Nicholas I, the kokoshnik became part of the court dress. Maids of honor wore it until the revolution. In the 19th century, there was another surge in the popularity of this attribute. Court ladies wore richly decorated and often “exaggerated” versions of traditional kokoshniks to balls and special events, which demonstrated the luxury and richness of the costumes.
Kokoshnik for the Snow Maiden made of wire and fabric step by step
Draw the base of the kokoshnik on a paper base. To do this you need to take measurements. After it is cut out of paper, make the same product along the contour, but from wire. For increased strength, it is better to create a double frame. It is better to wrap a thin layer of rain on top. According to the shape of the kokoshnik, cut out two identical products from organza, which are sewn together on the kokoshnik and fill the space between the wires.
As a decoration, sew silver or golden braid along the contour. The central part should be decorated with beads, sequins and other decorative elements. Attach white pom-poms to the bottom of the kokoshnik. All that remains is to make a mesh of beads and sew a bright shiny blue fabric onto the back of the kokoshnik.
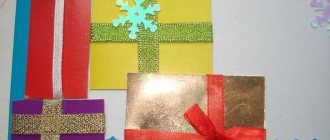
Snow Maiden kokoshnik made of ribbons on the rim – MK + template
To make such a work of art, you should make sure that you have the following supplies nearby: paper and scissors, Moment glue and PVA, white foamiran and a durable rim, guipure fabric and tinsel, fringe, beads, satin ribbons 5 and 2.5 wide cm (white and silver, respectively). For decoration, prepare cabochons, rhinestones, and beads.
Draw the outline of the product on newspaper or plain paper. It is best to choose the classic form, which consists of 5 conventional petals. From plain paper, draw the finished product onto thick cardboard. It is worth considering that there should be at least 1 cm left at the bottom for bending and attaching to the hoop. The margin for accurate fixation should be cut with teeth.
Apply glue to the base and apply guipure to it, pressing well. To decorate the top part, it is better to attach a thread of beads (it is not recommended to glue such a decorative element). A fringe is glued to the bottom of the kokoshnik.
Only after such manipulations can you fix the crown to the hoop, which should initially be covered with a white satin ribbon. Attach the hoop to the kokoshnik using previously prepared teeth.
To make the kokoshnik look elegant, decorate it with rain and handmade petals made from satin ribbon.
Materials used
To make a kokoshnik with your own hands, a variety of materials are used. The base is of paramount importance: it must have a dense structure. Currently, to create a frame they use:
- cardboard;
- plastic;
- wire.
When choosing a material for covering a headdress, pay attention to ensure that it stretches well, does not form folds, is dense, and opaque. It can be a fabric with a pattern or a plain one. Most often used:
- brocade;
- atlas;
- guipure;
- satin;
- taffeta;
- velvet or velor.
Particular attention should be paid to fastening. A thick satin ribbon must be sewn to the inner edge of the kokoshnik to secure the headdress well. A properly made product has a wide rim that fits well to the head.
Satin Velvet Guipure Brocade Satin Taffeta
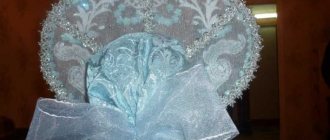
Snow Maiden kokoshnik made of foam plastic and chintz - master class
The kokoshnik is made very simply and quickly, but it turns out beautiful and original. Initially, you should make a pattern with the expectation that the height of the product will be 8 cm, and at the edges the width will narrow to 6 cm. Having received the pattern, it needs to be folded in half. Make the same blank from very thick cardboard. Cut two identical pieces of fabric (the shape should cover the base of the kokoshnik) and glue it with Crystal glue.
Cut and shape flowers from dark blue fabric and decorate the product with them. The composition can also be supplemented with artificial centers for flowers made of fabric and stamens of white or blue color. Cover the lower and upper parts of the kokoshnik with thin lace. If desired, you can decorate with other elements. Please note that the back of the product remains without decoration.
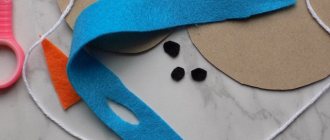
Processing a stand-up collar
Cut out two pieces from fur, width = 12.0 cm, length = half the length of the neck. Then cut out pieces from the main fabric with a width of 10.0 cm, length = half the length of the neck. Add 1.0 cm allowances on the parts along the cuts. To give the collar a shaped shape, decorate the top cut of the stand with a concave line that turns into a decrease in the width of the collar.
Connect the fur parts with the fabric parts using a sewing machine, along the concave cuts.
Then sew the wide ends of the collar, bending the fur part by 1.0 cm.
Turn the rack pieces right side out and straighten the corners. Thanks to the rolling, an edging was formed on the front side due to the fur detail.
Collar-neck connection
Sew the collar into the neckline, aligning the center of the neckline with the wide ends of the stand-up collar. Make a 0.7 cm cut in the center of the neckline. Sew the collar into the neckline.
Do-it-yourself Snow Maiden kokoshnik made from beads – step-by-step photo instructions
To get such a product, you need to have bead embroidery skills. The product turns out to be very beautiful and effective, but it is important to do everything carefully, taking into account the features of the design.
Initially, measurements are taken and a pattern is made. A diagram of the placement of elements is also outlined on it with a simple pencil. After this, transfer the kokoshnik shape to a denser base (cardboard or thin foam rubber), covered with canvas. The canvas is sewn on both sides. Be sure to form a base with which the product will come into contact with the hair. First, you need to sew or glue large decorative elements in a certain order, and then proceed to stitching the material with small beads. All that remains is to weave a mesh of small white beads at the bottom of the kokoshnik.
Crochet Snow Maiden kokoshnik - diagram and description
To make a knitted kokoshnik you will also need crocheting skills.
For the product you will need blue and white yarn (120 and 100 g each, respectively) and a No. 5 hook. As auxiliary materials, you should take scissors and chalk, which are used by tailors, a measuring tape and a blank with which you can make pompoms.
Keep in mind that when making a kokoshnik in this way, you will need the ability to knit double crochets, double crochets, chain stitches, make connecting loops and increase stitches. Initially, the base hat is knitted. To make it, you can use any pattern according to which you can make the base of the hat.
As soon as the base of the hat is ready, its lower part should be decorated with a white border in the form of a knitted pattern. For this you can use either the method indicated in the diagram or any of your own.
After this, use chalk to mark on the base of the cap where the kokoshnik crown will be placed. Lay a straight chain stitch along the marked line. On a knitted chain, it is worth marking the central loop. Next, you should put aside work with the base and make a pair of white pom-poms. It is better if they turn out to be up to 5 cm in diameter.
Next, continue tying the upper part of the kokoshnik with white thread in the form of a crown, making an openwork edge. It is worth tying the white part of the crown with a blue thread. Sew pompoms to the sides of the crown. The base of the kokoshnik can be additionally decorated with snowflake stripes.
More crochet kokoshnik patterns
Back
- First we have to work by hand, and only after we connect all the seams with a basting stitch and make adjustments to them after trying on the suit, we sew the parts together on a sewing machine.
- We begin preparing the parts for basting by manually sewing all the darts on the back and front, getting acquainted with the process of how to sew a costume for the Snow Maiden.
- We baste the details along the shoulder line and connect the side seams, do a preliminary fitting, and, if necessary, adjust the armhole, neckline and overall width of the bodice.
- If we are satisfied with everything, we sew all the basting seams on a machine.
Basque
- Now we make the peplum, sew all three parts, then along the waist line we make two parallel lines with wide spacing. By pulling the ends of the threads from the resulting seams, we assemble the peplum into gathers, ensuring that the size of the waist line matches the size of the bodice.
- If the resulting basque does not seem too fluffy to you, then we baste it along the waist line to the bodice, otherwise we adjust the degree of gathering.
Sleeves
- We baste the sleeves, first gathering the sleeve cap into an assembly, just like we did with the peplum.
- We sew the sleeve cap into the bodice armhole using a basting stitch, do a preliminary fitting, correct the result and sew it on a machine.
- At the bottom of the sleeves we sew finishing cuffs made of fur fabric. We did not make a special pattern for this part, we simply cut out the cuffs of the desired width and a length equal to the length of the sleeve bottom line. Next, we apply the cuff so that we sew its edge from the wrong side to the wrong side of the bottom of the sleeve, fold the cuff to the front side, fold it and stitch it.
Collar
- We prepare the stand-up collar by sewing together two pieces cut out for it, one from the main fabric, the other from fur. If the fabric is too soft, then we also cut out a special paper spacer for the collars to maintain their shape.
- We turn the resulting design right side out and baste the fur side to the neckline of the bodice. Cover the top with the fabric side and sew on the machine.
- We sew a fur trim strip along the entire length of the front shelf, starting from the top of the neck, passing along the bottom of the peplum and ending at the neck of the other shelf. For greater effect of the costume, we also sew silver braid along the entire finishing strip.
- You can use Velcro as a fastener, the bodice of the costume is ready, you can try it on, because you already practically know how to sew a costume for the Snow Maiden.
How to sew a skirt
- We sew the two parts of the skirt that we received when cutting the fabric along the side seams. We make two folds at the top, one 0.5 cm along the entire length of the waist line, and sew with basting. Then we bend it again to a width determined by the width of the prepared elastic band, baste it and stitch it on a machine. We take an elastic band for the skirt that is not too wide, 1 - 2 cm will be enough, measure the length equal to the waist circumference and thread it into the skirt.
- We sew the prepared fur trim strip from the bottom of the skirt from the inside out, similar to the operation that we performed with the cuff. Next, we wrap the fur strip onto the front part of the skirt in exactly the same way and sew it on first with a basting and then with a sewing machine.
- So we made with our own hands an excellent stylish costume for the Snow Maiden, in which you can not only go to a children's party, but also to any adult party and be the center of attention. Such creativity will definitely not go unnoticed and will create a sensation.
Video:
https://youtu.be/SVc5uDhZCDs
The Snow Maiden's kokoshnik made of plexiglass on a hoop, decorated with paper snowflakes
The process of making such a kokoshnik is not complicated, and the materials themselves are not expensive. Initially, measurements are taken and transferred to a sheet of paper. To make it easier to work, the entire product can be divided into petals.
To make the base of the kokoshnik, you should attach small circles of plexiglass to the hoop. You should attach beautiful paper snowflakes to the circles. It is better to take purchased decor options, one of the sides of which will be covered in sparkles. To prevent the crown from flying off your head, you should attach strips of satin ribbon or lace to the edges of the kokoshnik, with which you can tightly attach the product to your head. The lower part of the kokoshnik is decorated with lace or knitted patterns.
Headdress for children's party
Making a kokoshnik from cardboard with your own hands is quite simple. To do this, you should also initially make a template. At the same time, head measurements and all necessary calculations are made. Then the sketch is done. The resulting stencil is cut out and tried on.
To make a kokoshnik from cardboard, you will need:
- the cardboard itself;
- suitable fabric;
- satin ribbon;
- decorating elements.
You can make a kokoshnik out of cardboard for a girl if you follow simple instructions. The manufacturing process occurs in stages:
A frame is cut out of cardboard.
By applying a template, all the details of the future product are cut out from the selected fabric, making allowances of about one and a half centimeters.
The base is sheathed.
A rectangle is cut out of the canvas. Its length is equal to the bottom part of the base.
This element is folded up, and its edges are stitched on a typewriter.
The resulting structure is sewn to the base in such a way that the maximum fit of the visor to the head is observed.
A ribbon is sewn into the side parts to ensure reliable fixation of the product.
When creating an accessory for a children's party, it is recommended to give preference to natural materials. Thanks to this, it is possible to prevent the occurrence of an allergic reaction.
The finished product must be decorated. There are no special rules in this case. You should start based on personal preferences. For example, embroidery, all kinds of appliqués, rhinestones and beads can be used.
Kokoshnik for the Snow Maiden made of tulle and wire - master class
This kokoshnik crown turns out to be delicate and beautiful. It will look impressive on the head of any girl.
To make a crown, measurements are taken and a stencil is cut out on tracing paper. It is worth fixing the paper product tightly on the board (using, for example, tape or moistening the paper). Drive in small nails at a distance of 6 cm along the prepared contour. Wind the wire tightly along the contour of the nails and firmly connect all the elements to obtain a frame blank.
Using the resulting shape, cut out a shape from a thin mesh, the dimensions of which would exactly correspond to the parameters of the frame. Using light, shiny fabric, sew a hat onto the back of your head. It must strictly correspond to the outlines of the head. Cover the edge of the crown with decorative ribbon. Use large beads and pearls as decorations. For beauty, it is worth weaving a head net from beads. The rim of the crown is additionally decorated with silver and gold sequins.
The Snow Maiden's kokoshnik made of tulle on a wire frame – MK + diagram
Stages of making a kokoshnik:
- Take 4 sheets of A4 paper and tape them together into one. Fold the sheet and draw the planned outline of the crown on it. It is imperative to know the exact contours of the rim. Attach the resulting template to the plywood and trace it.
- Drive in small nails every 1-1.5 cm along the contour outlined on the plywood. Apply several layers of wire along their contour and secure them firmly so that they do not bend. If desired, additional fastenings are made for better fixation on the head.
- Place matte organza and white fleece together and redraw the outline of the kokoshnik along the fabric. Keep in mind that you need to leave 1.5 cm for the hem. Cut strictly along the drawn contour and tightly cover the frame with fabric. Additional fastenings need to be covered with the same material. After this, all edges should be stitched with white bias tape.
- Next, a mesh is woven from medium-sized beads. Prepare pieces of white fabric 100 cm long and up to 40 cm wide. They are used to attach the product to the head and are sewn in the lower back part of the crown.
Kokoshnik for the Snow Maiden made of plastic thermal napkin and satin fabric
Using this master class it is easy to make the Snow Maiden’s kokoshnik. To make the frame of the kokoshnik, plastic thermal wipes are used. They are given the desired shape and covered with satin. The surface is decorated with rhinestones, braid, and sequins.
Tags
Snow Maiden's costume with Snow Maiden's costume Snow Maiden's costume was Snow Maiden's costume with her own Snow Maiden's costume Skokoshnik Snow Maiden's costume Snow Maiden's costume Snow Maiden's costume is being built Snow Maiden's costume to sew a New Year's costume for a New Year's costume New Year's gift My New Year's adventures New Year's costume children's New Year's costumes New Year's Snow Maiden's costume to sew a Snow Maiden's costume ami.New Year's Snow Maiden costume Snow Maiden costumebeautiful granddaughter costumesew a Snow Maiden costumePresentation of the Snow Maiden costumeSnow Maiden costume pattern
articlesholidayshavenessnecessarygiftsscript
Do-it-yourself Snow Maiden kokoshnik made of tulle
To make a kokoshnik of this shape, you need to take measurements and transfer them to a sheet of paper, on which to draw the shape of the kokoshnik itself. Apply tulle in three layers to the cut piece and cut it out. Decorate the outline of the kokoshnik with sequins and narrow lace. Initially, it is recommended to make the cladding in the upper part with large blue elements and only then move on to other decor.
Kokoshnik for the Snow Maiden made of whatman paper and fabric - step-by-step instructions
The kokoshnik turns out to be so beautiful and impressive that it can be actively used for photo sessions and at the same time get fabulous photos.
At the initial stage of the master class, the shape of the kokoshnik is drawn on paper. The paper pattern constantly needs to be tried on and adjusted to the desired shapes and parameters. Next, cut out a piece from the openwork lace that could cover the upper part of the stencil. Keep in mind that there must be allowances so that they can be bent and secure the material in this way. Next, the product is well stitched along the edge. The second part is stitched in the same order.
Sew openwork lace at the bottom of the kokoshnik. All that remains is to sew the details and start decorating the crown. This stage completely depends on the imagination of the master. You can use fur, beads, lace, ribbons, sequins, stones, rhinestones and other elements.
Sun-flare fur coat with round yoke
You can quickly sew such a Snow Maiden costume with your own hands. The photo demonstrates how elegant, elegant and even luxurious it can turn out.
For the yoke, cut out a circle with a radius equal to the height of the chest. The front yoke has a slit. In the center you need to make a neck of any size.
The lower part is also cut in the shape of a circle. Its radius is equal to the length of the product minus the radius of the yoke. In the middle of the pattern there is a concentric circle, the circumference of which is equal to the girth of the body in the place where the yoke will be connected to the bottom of the outfit. You can calculate the radius of the inner circle using the formula: half the length of the body circumference divided by 3.14.
The yoke is trimmed with fur and embroidered. The skirt (lower part) is sewn from below to the yoke so that the upper part overlaps.
Not a flat hem, but a curly one, looks very beautiful. Fluffy pom-poms made of fur sewn to the bottom of the robe look simply gorgeous.
The sleeves of this outfit can be of any style, at the request of the master.
The Snow Maiden's kokoshnik made from dublerin - step-by-step master class
Stages of making a kokoshnik of this shape.
- Make a crown pattern on paper and cut it out. Using the same shape, cut out and fold the materials in the following sequence (from the bottom ball to the top): calico, dublerin, gossamer. Lay out the layer three times in the same sequence. The topmost layer will be organza. This same side will also be the front side. Iron the folded crown well and sew silver-colored braid along its edges. Thus the base of the kokoshnik is made.
- All that remains is handmade - decorating the product with decorative elements in the form of sequins, rhinestones, and decorative stones. Patterns can be laid out either by eye or by drawing the outlines of the layout in advance. After finishing with braid and sequins, sew on small shiny snowflakes. It is recommended to crochet the mesh for such a kokoshnik using white thread. It should fit tightly on the back of the head. Make pendants from beads of different sizes. The very base of the kokoshnik can be additionally decorated with snowflakes or rain pom-poms.
Product forms
The combs of kokoshniks can vary greatly in shape. Their differences were originally due to the characteristics of traditional hairstyles in different regions of the country. The traditional comb was decorated with blades and other details. There are the following forms of attire:
- One-horned. Traditional kokoshnik. It was usually combined with a mesh bottom that hung from the headband and covered the upper part of the girl's face almost to the level of the eyebrows.
- Two-horned. A headdress with a high headband in the shape of a triangle or crescent with the ends lowered at shoulder level. It is distinguished by its large size - the span of the ridge could be up to 60 cm.
- Taper. Has an elongated front part. Traditionally, it is decorated not only with gold thread and pearls, but also with pine cones - a symbol of fertility.
- In the form of a hat. A kokoshnik with a high headband that ends in a flat top with slightly rounded edges.
- Cylindrical. It is distinguished by small blades that barely cover the ears. It is attached to the head with a solid strip of fabric sewn at the back, and decorated with mesh at the front.
- Odnodvorchesky. Worn together with a tunic and a forehead protector. It has no blades, nape lining or mesh.
- Oval. It has a flat oval top, a protrusion above the forehead and lobes above the ears. It is secured at the back with a rectangular piece of fabric.
- Double-comb. The top of such a kokoshnik is shaped like a saddle with a slightly raised front part and a high ridge at the back.
Earrings “Blue Mother of Pearl”
The most ancient type of these headdresses are considered to be those in which a straight comb sits on a flat base that covers the head from ear to ear. There are also more exotic kokoshniks in the shape of a dome, crown, and so on.
How to decorate the Snow Maiden's kokoshnik
The means used to decorate the kokoshnik depend only on the imagination of the master. Most often, materials such as rhinestones, beads, beads, lace, braid, products made from satin ribbons, rain, pompoms are used for this purpose. In addition, there may be embroidered or crocheted elements.
Help us improve: if you notice an error, select a fragment and press Ctrl+Enter.