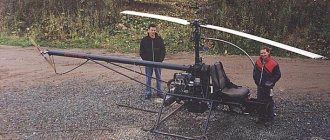
The simplest jet engine is a valveless pulsating unit. After its invention, it became obvious that it could propel a rocket even in vacuum. Due to the fact that turbojet engines began to be used everywhere, the development of this type of propulsion was suspended. But many amateurs continue to be interested, study and even assemble the unit themselves. Let's try to make a jet engine with our own hands.
Drawings of an aircraft model turbojet engine.
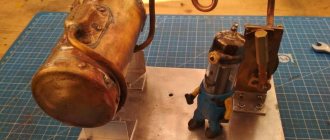
The way I designed and built a homemade jet engine is not the best way to do it.
I can imagine a million ways and schemes to create a better model, more realistic, more reliable and easier to manufacture. But now I've put together one. Main parts of model jet engine:
- The DC motor is strong enough and at least 12 volts
- A DC source of at least 12 volts (depending on what kind of DC motor you have).
- A rheostat, the same one sold for adjusting the brightness of light bulbs.
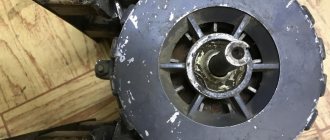
- A gearbox with a flywheel is found in many car toys. It's best if the gear housing is made of metal because plastic can melt at such high speeds.
- A sheet of metal that can be cut to make fan blades.
- Ammeter or voltmeter.
- Potentiometer at approximately 50K.
- Electromagnet coil from a solenoid or any other source.
- 4 diodes.
- 2 or 4 permanent magnets.
- Cardboard to assemble a body similar to a jet engine body.
- Filler for car bodies, to create an exterior.
- Rigid wire to support everything. I usually use wires from cheap hangers. They are strong enough and flexible enough to be molded into the desired shape.
- Glue. I prefer hot glue for most parts, but pretty much any glue will do for now.
- White, silver and black paint.
Required Tools
To successfully assemble an engine with your own hands, you need to carefully prepare for this. First of all, you need to prepare a set of keys of various sizes. You may also need a universal gas wrench. In addition, you need a special tool for pressing in the piston pins and a torque wrench to correctly calculate the tightening torque of the bolts. Socket wrenches and socket heads are best suited for assembling the motor.
Many foreign-made internal combustion engine models have special bolts. To unscrew them you will need special keys, which can be found in stores that sell auto parts.
To remove large, heavy engines from the car body in the garage, you may need a crowbar to pry the engine from underneath and disconnect the transmission and clutch from it. To protect the vehicle's paintwork from possible mechanical damage during the process of repairing the power unit, cover the fenders and radiator of the vehicle with a thick cloth.
To remove and install the engine, a crane is usually used, and in its absence, a rope or a dense and strong cable.
When all the necessary tools are prepared for the upcoming work, you can learn how to assemble the engine of a scooter or any other vehicle.
Running in the car
After overhauling the engine, it should be properly run in. Otherwise, new malfunctions may occur, and resources will not be used up even by 50%. The simplest scheme for proper break-in is at idle. After starting, the engine warms up for 10 minutes at idle speed, and then turns off until it cools down. Repeat several times. This action allows you to identify malfunctions or unacceptable leaks.
The next method is to idle for about ten hours. In this case, you should sometimes check the condition of the car, stopping the engine every hour for a break. The coolant temperature should not exceed +80°C.
During break-in, new parts are worn in, and too much mileage will immediately cause harm. The average norm is two three thousand kilometers.
Important! Avoid extreme driving and speeding over 60 km/h.
What is a major overhaul and why is it needed?
Overhauling a VAZ engine is quite a labor-intensive job that requires knowledge of the structure and operating principle of the unit.
This process will take a lot of time. You will have to remove the engine from the car and completely disassemble it. All removed spare parts are checked for suitability for further use and, if necessary, replaced with new ones. Particular attention is paid to the crankshaft: it is restored and brought into perfect condition. The existing systems are also checked: cooling, lubrication, fuel supply, and the crank mechanism is repaired.
During repair work, internal combustion engine parts and components are brought to perfect condition. After assembling the unit, its condition and performance should be identical to a new engine just released from the assembly line. Capital is needed if the engine has fully or partially exhausted its service life, and corresponding signs have appeared indicating this. It is impossible not to pay attention to them. With further use of the car, the engine may completely fail and cannot be restored. There is only one option left - purchasing a new part. Naturally, purchasing spare parts is more expensive than repairing them.
The service life of the engine before overhaul can be extended if you follow simple rules when operating the machine.
- Monitor the oil level and change it regularly.
- Monitor the coolant level to prevent the machine from overheating.
- Fill with high-quality fuel recommended by the manufacturer.
- Operate the machine wisely and avoid overloading.
- Limit the vehicle's idling time to a minimum.
- Avoid extreme driving that requires high speeds. Do not allow the tachometer needle to enter the red zone.
Thermoreagents
Thermoplastics are used in cars less often than thermoplastic materials, but they are found in both the interior and exterior of cars. They are almost always hard and inelastic. They do not react to heat in any way. That is, it is usually not possible to remove a scratch from them with a hairdryer; polishing with abrasive materials often helps. Please note that sometimes a large scratch on plastic does not need to be sanded down to its full depth. It may be enough to partially reduce it and smooth out the edges - and it will become almost invisible, especially if you periodically treat the part with a properly selected polish.
How to make a jet engine with your own hands
The simplest jet engine is a valveless pulsating unit. After its invention, it became obvious that it could propel a rocket even in vacuum. Due to the fact that turbojet engines began to be used everywhere, the development of this type of propulsion was suspended. But many amateurs continue to be interested, study and even assemble the unit themselves. Let's try to make a jet engine with our own hands.
Motor based on Lokved's patent
The device can be built of any size if the required proportions are strictly observed. A DIY jet engine will have no moving parts. It is capable of operating on any type of fuel if a device is provided for its evaporation before entering the combustion chamber. However, the start is made on gas, since this type of fuel is much more convenient than others. It’s easy to build the structure, and it won’t take much money. But you need to prepare for the fact that the jet engine will operate with a lot of noise.
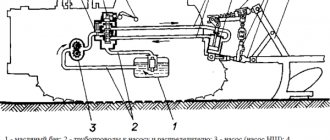
I also install an evaporative atomizer for liquid fuel with my own hands. It is placed at the end of a metal pipe through which propane enters the combustion chamber. However, if you plan to use only gas, then installing this device is not necessary. You can simply run propane through a 4 mm diameter tube. It is attached to the combustion chamber using a ten millimeter fitting. Sometimes different tubes are also provided for propane, kerosene and diesel fuel.
At the start, gas enters the combustion chamber, and when the first spark occurs, the engine starts. It is not difficult to purchase cylinders today. Convenient is, for example, having eleven kilograms of fuel. If a large flow rate is expected, the reducer will not provide the necessary flow. Therefore, in such cases, simply install a needle valve. In this case, the cylinder cannot be completely emptied. Then there will be no fire in the tube.
Amateur rocket science, how I make rockets and my mistakes from which I learn (part 1)
What is written in this article is not instructions for use. You do everything at your own peril and risk. Follow safety precautions
Hull - Material Options and Various Factors in Hull Selection
Each body chooses its own for its rocket and each has its own material selection factors as a priority. I choose cases taking into account the least weight and the greatest strength
. The weight needs to be reduced for a more stable and high flight, and strength is needed so that the body does not melt in flight and does not fly apart from the pressure.
Jet engine design
The jet engine was invented by Dr. Hans von Ohain , a prominent German design engineer, and Sir Frank Whittle . The first patent for a working gas turbine engine was obtained in 1930 by Frank Whittle. However, it was Ohain who assembled the first working model.
On August 2, 1939, the first jet aircraft, the He 178 (Heinkel 178), powered by the HeS 3 engine developed by Ohain, took to the skies.
The design of a jet engine is quite simple and at the same time extremely complex. Simply based on the principle of operation: outside air (in rocket engines - liquid oxygen) is sucked into the turbine, there it is mixed with fuel and burned, at the end of the turbine it forms the so-called. “working fluid” (jet stream), which moves the car.
It’s so simple, but in reality it’s a whole area of science, because in such engines the operating temperature reaches thousands of degrees Celsius. One of the most important problems of turbojet engine construction is the creation of non-melting parts from melting metals. But in order to understand the problems of designers and inventors, you must first study the fundamental structure of the engine in more detail.
Jet engine design
jet engine main parts
At the beginning of the turbine there is always a fan that sucks air from the external environment into the turbines. The fan has a large area and a huge number of specially shaped blades made of titanium. There are two main tasks - primary air intake and cooling of the entire engine as a whole, by pumping air between the outer shell of the engine and the internal parts. This cools the mixing and combustion chambers and prevents them from collapsing.
Immediately behind the fan there is a powerful compressor , which pumps air under high pressure into the combustion chamber.
The combustion chamber also acts as a carburetor, mixing fuel with air. After the fuel-air mixture is formed, it is ignited. During the combustion process, significant heating of the mixture and surrounding parts occurs, as well as volumetric expansion. In effect, a jet engine uses a controlled explosion to propel itself.
The combustion chamber of a jet engine is one of its hottest parts - it requires constant intensive cooling. But this is not enough. The temperature in it reaches 2700 degrees, so it is often made of ceramics.
After the combustion chamber, the burning fuel-air mixture is sent directly to the turbine.
The turbine consists of hundreds of blades on which the jet stream presses, causing the turbine to rotate. The turbine, in turn, rotates the shaft on which the fan and compressor “sit”. Thus, the system is closed and requires only a supply of fuel and air for its operation.
After the turbine, the flow is directed to the nozzle. The jet engine nozzle is the last but not the least part of a jet engine. It directly forms the jet stream. Cold air is directed into the nozzle, forced by the fan to cool the internal parts of the engine. This flow restricts the nozzle collar from the super-hot jet stream and causes it to melt.
Deflectable thrust vector
Jet engine nozzles come in a variety of different types. He considers the most advanced to be a movable nozzle mounted on engines with a deflectable thrust vector. It can compress and expand, and also deflect at significant angles, regulating and directly directing the jet stream . This makes aircraft with thrust vectoring engines very maneuverable, because maneuvering occurs not only thanks to the wing mechanisms, but also directly by the engine.
Engine tuning
The quality of serial engines, as you might guess, was not suitable for serious competitions. Therefore, a small-scale pilot production appeared next to the plant in 1984, providing the national team with its products. Particularly notable were the engines privately manufactured by master Yuri Gapon.
What exactly is the difficulty of production? At its core, a model rocket engine is the simplest device: a cardboard tube with DRP-3P black powder pressed inside (smoky gun powder 3rd composition for pressed products) with a ceramic plug with a nozzle-hole on one side and a wad with an expelling charge on the other . The first problem that serial production could not cope with was the accuracy of the dosage, on which the final total impulse of the engine depended. The second is the quality of the cases, which often cracked when pressed under pressure of three tons. Well, the third one is the quality of the pressing itself. However, quality problems arose not only in our country. The serial rocket engines of another great space power, the United States, do not shine with them either. And the best model engines are made by microscopic factories in the Czech Republic and Slovakia, from where they are smuggled for especially important events.
Nevertheless, under socialism there were engines, albeit unimportant and in short supply. Now they don't exist at all. Some children's rocket modeling studios fly on old, Soviet reserves, turning a blind eye to the fact that the expiration date has long passed. Athletes use the services of a couple of lone craftsmen, and if they are lucky, then smuggled Czech engines. The only way left for amateurs is to first become Glushko before becoming Korolev. That is, make the engines yourself. Which, in fact, is what my friends and I did as children. Thank God, everyone’s fingers and eyes remained in place.
A look into the past
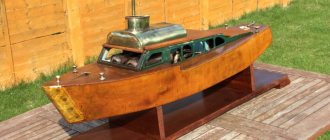
To make a false product (bottom block) of the boat, plasterboard, pine block and construction putties were used.
Construction putty is much cheaper than automotive putty, which is usually used. When people hear about drywall, they immediately ask: “What about a boat made of drywall?”
No, it's made of fiberglass. But to make it, you need to make a life-size model - a fake product made of plasterboard. This is a very labor-intensive process. Then you need to make a matrix, and from the matrix - the boat itself, using the matrix as a child's sand mold. Having such a matrix, with a certain skill, you can make one boat a day. Just smear and glue, smear and glue. The more boats are produced, the lower the cost per copy. It seems that we are the first to master the technology of creating a model from cheap building materials.
Advantages and disadvantages of PuVRD, scope of application
The main advantages of pulsating air-breathing engines can be considered their simple design, which results in their low cost. It is these qualities that have led to their use as power units on military missiles, unmanned aircraft, flying targets, where it is not durability and super speed that are important, but the ability to install a simple, light and cheap motor capable of developing the required speed and delivering the object to the target. These same qualities brought PuVRD popularity among aircraft modeling enthusiasts. Lightweight and compact engines, which you can make yourself or buy at an affordable price, are perfect for aircraft models.
PuVRDs have many disadvantages: increased noise level during operation, uneconomical fuel consumption, incomplete combustion, limited speed, vulnerability of some structural elements, such as the inlet valve. But, despite such an impressive list of disadvantages, PuVRDs are still indispensable in their consumer niche. They are an ideal option for “disposable” purposes, when there is no point in installing more efficient, powerful and economical power units.
Download New Year status
What clothes will be fashionable in summer
New Year is a time of fairy tales and magic
Homemade barrier which one to choose
Basically, such mechanisms are installed in houses with a large number of apartments, in parking lots, in suburban areas, in private areas into which the passage of unauthorized vehicles is not allowed. It is worth choosing which version of the protective agent will be installed. Barriers are divided into the following categories:
Making a barrier yourself depends on the area of its application. It is also worth paying attention to the opening principle: horizontal or vertical. It all depends on the type of site and the preferences of the owner. For example, in order to install a horizontal opening mechanism, you need additional space where the barrier will open. This option is the simplest.
When space is limited, it is best to install a vertical opening system. The mechanism can be sliding, like a sliding gate, but such a device is the most complex and requires large financial costs and high-quality material.
How does a barrier with a rotating mechanism work?
When building a rotary fence, the main thing is the correct drawing. This barrier consists of an arm with a rotating mechanism and a post with the possibility of attaching a lock to close the protective fence. This option is the easiest to manufacture; It is not difficult for a person who has the skills to work with metal, wood and a welding machine to make such a structure. It is worth considering that if you need to close a passage approximately 10 m wide, it is best to install a barrier consisting of 2 arrows.
Barrier with sliding system
This protection system is a barrier that rolls to the side perpendicular to the road by pressing a button that activates an electric drive mechanism. This model is difficult to make on your own.
Attempts at improvement
After the end of the war, the pulse jet engine remained in military development for some time. It was used as a propulsion device for air-to-ground missiles. Low efficiency, weak starting speed and the need for acceleration at startup are the reasons that became key in the further reduction of the ramjet engine's position to zero.
This type of motor has recently begun to interest engineers and hobbyists again. New developments and other improvement schemes appear. It is quite possible that updated modifications will again appear in military aviation equipment. Its practical application today is the modeling of prototypes of rockets and aircraft using modern structural materials.
Technology - youth 1951-07, page 39
it appears this way. A nail (6) 1-1.5 mm thick is inserted into one end of the film roll (1). Then the roll with the nail is tightly wrapped with thick paper (2) with foil (7) (chocolate or capacitor) and tied tightly with wet, harsh thread. Now the nail can be removed, and a hole for the nozzle will remain in the paper. The second end of the engine is tied with thread even tighter and stronger, tightly.
Most often, failures with the operation of the engine occur from insufficiently strong and tight binding of its blind end. After working for 1-2 seconds, the gases break through the shell, leaking through the blind end.
Methods of installing the engine on different models are visible in the figures.
A paper tube is strengthened inside the model, in which a replacement motor is installed. Installation angle of the door-
SIMPLE JET ENGINES FOR MODELS
Before our eyes, the prophetic words of K. E. Tsiolkovsky are coming true: “The era of propeller airplanes must be followed by the era of jet airplanes.” Naturally, young technicians and, above all, aircraft modellers strive to implement jet technology in their models.
At the Central Station for Young Technicians named after N. M. Shvernik, a simple jet engine running on solid fuel was developed. This fuel is ordinary photographic film or film, accessible to everyone.
With a dead weight of 12-15 g, such a jet engine produces a uniform thrust of 50-70 g within 8-10 seconds. This thrust is quite enough to lift a model weighing several tens of grams into the air or make a jet car race along the asphalt for a distance several tens of meters. Finally, the same engine, installed on a floating model, ensures its rapid running along the surface of the water at a speed of up to 3 m per second.
Redans
The plaster strips fixed to the block were followed with a spatula, in which an arc close to a semicircle was cut out, giving the shape to the pre-applied gypsum mass. The strips served as a filler and a ruler at the same time.
Meanwhile, things were approaching a very interesting moment - the creation of the matrix. Drywall and timber are just a prototype, a dummy, but I wanted to get something real that you can knock on, that you can move without fear of damage.
Content
- 1 Key characteristics 1.1 Afterburner
- 1.2 Hybrid turbojet/ramjet
- 1.3 Adjustable nozzles
- 1.4 Scope of application
- 1.5 Bypass turbojet engine
- 1.6 Thrust vector control (TCV) / Thrust vector deviation (VTD)
- 1.7 High bypass ratio turbofan/Turbofan engine
- 1.8 Scope of application
- 3.1 Notes
What it is
DIY Stirling engine, diagram and drawing
Any device that operates using any kind of energy will stop working if it is disconnected from the source of that same energy. A perpetual motion machine solves this problem: once you turn it on, you don’t have to worry that the battery will run out or gas will run out and it will turn off. The idea of creating such a device excited the minds of people for quite a long time, and there were a lot of attempts to create a perpetual motion machine.
Since such a system must work forever (or at least for a very long time), it has special requirements:
Gravity drive
It's no secret that gravitational forces operate in our universe. Now they are at peace, as they are balanced with each other. But if the balance is disturbed, all these forces will come into motion. A similar principle can theoretically be used in a gravitational perpetual motion machine. True, no one has yet succeeded in achieving this.
Magnetic gravity engine
Everything here is a little simpler than in the previous version. To create such a device, you need permanent magnets and weights of certain parameters. It works like this: in the center of the rotating wheel there is a main magnet, and around it (at the edges of the wheel) auxiliary magnets and weights are located. The magnets interact with each other, and the loads are in motion and move either closer to the center of rotation or further. Thus, the center of mass shifts and the wheel rotates.
The simplest option
To create it you will need simple materials:
The bottle must be cut into two parts horizontally. Insert a wooden partition into the lower part, make a hole in it in advance and come up with a plug for it. Then a thin tube is taken and installed so that it passes from bottom to top through the partition. Any gaps in the components must be sealed to prevent air from entering the bottom of the bottle.
Through a hole in the wood, you need to pour a highly evaporating liquid (gasoline, freon) into the lower part. In this case, the liquid level should not reach the wood, but the cut of the tube. Then the plug is closed, and a little of the same liquid is poured on top. Now you should close this structure with the top of the bottle and place it in a warm place. After a while, liquid will begin to drip from the top of the tube.
Water version of perpetual motion machine
This is a fairly simple design that can be built even at home. You will need a couple of flasks, valves for them, one large container with water and several tubes. Based on the picture, you can assemble such a device - it will pump water.
This topic is very interesting and fascinating. Scientists all over the world puzzled over this mythical device. There were many charlatans who passed off their ingenious machines as ever-running engines. To date, no one has been able to create such a device. Many scientists deny the possibility of the existence of such a machine, since it violates the fundamental laws of physics.