DIY tool for removing dents from tie rods
Hello to all DIY lovers. In this article I will tell you how to make a tool for removing dents from a tie rod with your own hands. All the necessary parts for this homemade product are easily accessible and can be found by every car owner. This tool will help remove dents from thin metal, such as a car door.
Before reading the article, I suggest watching a video that shows in detail the process of assembling this tool and also a little testing of it in operation.
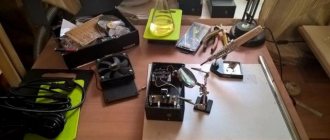
In order to make a tool for removing dents from a tie rod with your own hands, you will need:
* Old steering rod * Welding machine, electrodes * Angle grinder * Cutting and cleaning disc for angle grinders * Metal lathe * Metal drill with a diameter of 13 mm * Metal rod or piece of scrap * Sandpaper * Safety glasses, gloves, gaiter, welding mask * Bench vice * Can of hammer paint * Clamp * Steering end * Metal corner with a shelf width of 40 mm
Step one.
The first step is to clean the steering rod from traces of rust.
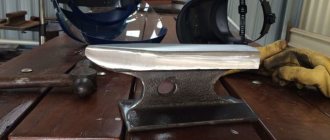
After grinding, the tie rod looks like this.
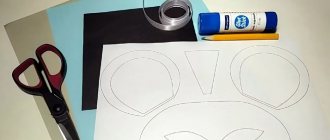
Then we fix a metal corner with a shelf width of 40 mm in a vice, and saw off a part of it measuring 70 * 30 mm using an angle grinder.
Step three.
After the workpiece is sawn off, it must be cleaned of rust. We do this using an angle grinder and an installed grinding wheel with a metal brush.
The last piece is the back hammer stop. We saw off a piece about 10 mm long from scrap metal, after which we drill a hole with a diameter of 13 mm in the workpiece on a lathe and make a small chamfer.
Step four.
All the parts are ready, all that remains is to assemble them into a single whole to make a tool.
Source
How is the DVR bracket held in place?
A “suction cup” type fastening element is held on the plane due to a pressure difference; when a silicone or rubber circle is flattened on the surface, a reduced pressure is formed inside it. But the bracket is fixed only when the material is absolutely sealed and no outside air gets inside the circle. If there is even a microscopic hole in the rubber band, there will be no suction effect, such a holder can be safely thrown away. The suction cup can only be secured if it is completely sealed, and you cannot press it and immediately release it, in which case it is guaranteed to fall off.
Paintless Dent Removal Tool
Homemade device for removing dents without painting on a car body: photo of the device, description of its manufacture , and also a video showing how to pull out dents with your own hands.
If the car body is damaged by small dents, you have to contact a tinsmith, but if you make this simple device , you can pull out the dents yourself without painting.
The design of the tool is the simplest:
The frame is made of plywood, fastened with screws and corners.
The adapter for fungi is a bayonet type air fitting.
Quick release 6mm herringbone, the carburetor cover repair stud is inserted into it (on one side M5 and on the other M6) M5 into the inside of the quick release and screwed in the M5 nut with a few sawn off edges.
The rod is made of an M6 stud, connected to the adapter with an M6 connector (I couldn’t find it in my village, I had to weld the nuts) and there should be an M6 wing on top.
Soft base - cut from an old construction float (sanding), but can be made with any rubber or 8 mm isolon Fungi - foam fastening fungi (preferably with as few holes as possible and harder) cut to the desired shape, screw 5m * 40 washers, nuts.
Also for work you will need:
The device really works and removes dents, I tried large and small dents, all the ribs can be lifted! I tried it on painted and unpainted ones, but on the wing painted from a spray can, the glue tore off the paint!
The photo shows the process of pulling out dents on a car body.
The fungus is glued to the degreased surface of the dent with hot glue.
By rotating the lamb, we pull out the glued fungus along with the metal.
We watch a video where the author shows in detail how to use a homemade device for removing dents on a car body.
Source
Making a suction cup stand for a mobile phone
Phone stands continue to gain popularity. This is due to the increase in smartphone displays, as well as their capabilities, because now you can watch movies, favorite videos, listen to music by connecting speakers to the phone, and so on. A phone stand can be purchased at a specialized store that sells accessories for smartphones, or you can order it online, but we suggest you make a stand with suction cups with your own hands.
Before we start making the stand, let's watch the video
What do we need: - two suction cups - large and small; - bolt; - felt-tip pen; - screwdriver.
The suction cups can be removed from the toy gun or bow that shoots them. The materials are ready, which means you can start making our suction cup stand.
Take a bolt or self-tapping screw and screw it into a small suction cup. We screw it to the very end so that the structure is stable. In fact, the first version of the stand is ready. To use it, you just need to slightly wet the Velcro and attach it to the phone cover. The bolt that we screwed to the suction cup will hold the phone and prevent it from falling. The phone can thus stand in both vertical and horizontal positions.
The only thing to consider is the head of the bolt, which can scratch the table. In order to avoid this, you can cut it off and put a pencil eraser in its place.
Let's proceed to the second method of making a stand. To do this, take a large clothespin and a cap from a felt-tip pen. We insert the cap into the hole in the suction cup.
This stand is attached in the same way as the first one. Compared to the first, the second stand is much safer because it does not have metal elements and will not scratch furniture.
In the end, we would like to add that if you wish, you can use your imagination with both stands and modernize them using your own imagination.
Thus, in just a few minutes you can make two stands at once, which will allow you to use your phone more comfortably, especially when watching movies and videos, as well as surfing the Internet.
Source
How the tool works
This tool is distinguished by its main feature - the ability to provide mechanical loads and at the same time not destroy the surface of the body. In other words, working with hammers, sledgehammers, and other tools with an impact effect is not suitable. With this condition, the craftsmen become somewhat limited in their actions, but nevertheless, there are absolutely effective tools available to ordinary users that allow you to remove dents without painting.
This is done using vacuum suction cups, which differ in their gripping method and structural configuration. Hook-shaped devices are also popular, which differ in their features in action. Tools in both categories have in common the fact that they provide an extremely gentle effect on the paint surface of the body and thereby reduce the cost of repairs. But along with the advantages, such non-destructive methods also have some disadvantages.
Which is more practical: NBR or silicone?
The designer of a new vacuum suction cup and the buyer often have a question about the choice - NBR or silicone. Both materials have both advantages and disadvantages for specific applications.
NBR (nitrile rubber) is the most economical option for suction cup material. The main properties of rubber are resistance to petroleum products and durability. NBR is used in a wide variety of applications.
NBR remains stable at temperatures up to 80°C. If suction cups are used in conditions of elevated temperatures (up to 200°C) or cold (up to −60°C), then silicone becomes the first choice material. Silicone is more expensive than NBR, but is UV resistant and approved for food contact. The last factor is of key importance for the entire industry.
A wide range of Shore hardness values from 25 to 60 allows silicone suction cups to be used for a wide range of applications. Silicone vacuum suction cups work with easily broken food products. The suction cups smoothly and accurately lift and transport chocolate marshmallows and rich cupcakes.
We suggest you read: How to clean an electric stove from grease and carbon deposits?
Silicone suction cups have limitations in the automotive industry. Its use is prohibited as a “paint adhesion inhibitor”: do not apply paint to surfaces that have been touched by silicone products.
DIY tool
When small dents appear on the car body, you need to resort to the services of a tinsmith. However, you can create a simple tool yourself with which you can easily pull out a dent with your own hands, and the body will not need to be painted.
What does the device consist of?
To make the frame, plywood is used, which is fastened with screws and corners.
The adapter for fungi uses a bayonet air fitting.
In the 6 mm herringbone quick release, insert the carburetor cover repair stud (one side is M5, the other is M6) M5 inside the quick release, and tighten it with an M5 nut, the edges of which are slightly sawed off.
An M6 stud was used for the rod, an M6 connector was used to connect to the adapter (there were none in my locality, so I welded nuts), it was necessary to have an M6 wing in the upper part.
A part cut from an unnecessary construction float was used as a soft base. It can also be any rubber or 8 mm isolon.
It is better to take the fungi that fix the foam more rigidly and so that there are fewer holes. We cut them to the desired shape. Screw 5m*40, washers, nuts.
Next, we will show the principle of operation of how a dent on a car body is pulled out.
Fix the fungus onto the grease-free dent using hot glue.
We rotate the lamb and pull the mushroom - the metal will be pulled with it.
This is what happened as a result.
Video demonstrating how to pull out dents yourself.
Source
Tips for different types of surfaces
Different types of surfaces, for example, tiles, plastic, glass, have some nuances in the process of gluing the suction cup.
Tile
Most often, it is on the tiles in the bathroom that you have to glue a variety of hooks, shelves and holders. In order for the adhesion of the suction cups to the tile surface to be as effective as possible, you should adhere to the following recommendations:
- Ventilate the bathroom if it is damp.
- Prepare the surface of the tile by washing it thoroughly, for example, using dishwashing detergent or ordinary soapy water. If necessary, additionally use alcohol-based degreasing agents.
- Wipe the tiles dry.
- Place the suction cup on the tile and press it firmly.
Important! Do not overload shelves and hooks. Try not to pour water on the area of the suction cups, as the weight of the water may cause the suction cups to move or fall off. If you need to glue the suction cups inside the shower stall, use transparent silicone sealant, this fastening will be more reliable.
«>
Plastic
To properly glue the suction cup to the plastic, you need to pay attention to the surface. If it is smooth and even, then there will be no problems with fastening. © https://ydoo.info/qa/kak-prikleit-prisosku.html The algorithm of actions is simple:
- Surface cleaning.
- Degreasing.
- Suction cup gluing.
If the suction cup needs to be attached to a car dashboard and similar surfaces where there is a “pattern” on the plastic, it is best to use a special suction cup with a lever, which during the fastening process creates a vacuum under the suction cup. Conventional suction cups do not adhere well to textured surfaces; they must be additionally secured with self-adhesive PVC films.
Glass
How to properly attach a suction cup to glass? It is this surface that causes the most problems. Thermometers attached to the window, as well as holders for video recorders on the windshield, very often fall off due to exposure to high temperatures in summer and low temperatures in winter. Attaching suction cups in an aquarium causes no less problems. It is quite possible to securely fix the suction cup if you follow the recommendations below.
DIY tool for removing dents from tie rods
The body of any vehicle has a limited service life. Dents are one of the most common problems faced by car owners.
Typically, such damage is not large in size, but there are also large dents. To eliminate them, special equipment is used.
A tool for removing dents without painting will ensure quick restoration of your car.
Under what conditions is it difficult to install the holder?
The most common reason for weak fastening of the DVR bracket is low temperature, usually the suction cup falls off in the cold. This happens because rubber or silicone hardens at low temperatures and loses its elasticity. Also, the rubber band does not hold up in the heat; if you left the car for a while in the sun, you should not be surprised that upon your return you will find a fallen recorder.
It will be difficult to install the holder on glass covered with dust; the rubber circle itself should not be dirty either. The suction cup holds very poorly on uneven glass, for example, if it is silk-screened. Here it is no longer possible to level the surface; you need to figure out how to ensure tight contact. Another thing to consider is that there are a lot of Chinese products on the Russian market, and the fastener may initially be defective.
But if you can’t immediately secure the bracket well in the car, there is no need to despair; there are many different tricks and folk methods that you can use to securely install a portable device on the windshield.
Lighting
Bright lighting is one of the most important conditions for successful coating restoration. It is recommended to straighten the damaged surface in daylight outside. Sunlight helps detect even minor defects.
If there are no conditions for street repairs, the garage should be equipped with bright lighting . One lamp is not enough for this. To save on electricity costs, LED lighting is used.
Levers and bump stops
Levers and bumpers are used to straighten out dents from the inside. The lever is easy to make with your own hands. It can be an oblong pin or a flat bar. The dimensions of the tool should be no larger than the technological hole through which it will be used.
PUR: Wear resistant
Polyurethane (PU) is available in a wide variety of compositions and a wide range of groups. Elastomers or thermoplastics, hard or soft, elastic or brittle - polyurethanes have different properties.
What all variants have in common is a high degree of wear resistance!
The high quality properties of polyurethane material make it relatively expensive. This cost pays off for specific applications: fewer breakdowns mean lower costs.
Vulkollan® is a special polyurethane compound: It leaves no marks on the surface, is oil resistant and has excellent durability. Vacuum suction cups made of Vulkollan® polyurethane provide very short cycle times. Combined with its high wear resistance, Vulkollan® is well suited for processing glass, sheet metal and packaging.
Car dent removal kit (mini lifter) PDR
Hi all! Today in my review I’ll tell you about a kit for removing dents on a car, whether it works, and whether it’s possible to straighten your car like this without experience. Details under the cut It so happened that I didn’t protect my car from bad weather and got caught in a hailstorm, something like this
The hood and roof received a lot of dents and were not pleasing to the eye at all, it doesn’t seem to affect the speed, but it’s not pleasant :) A couple of days later I went to see the craftsmen who pull out such dents without painting, they quoted a price of 200-250 dollars and wait for my turn until November -December. I didn’t really want to give money, much less wait. Then I remembered that I had seen dent removal kits in China, but I couldn’t find a review of the minilifter, only a video of how easy it was to pull everything out. I decided to take it for review, if I can’t remove the dents, then besides the time spent, I won’t lose anything, and I can share my experience with you. PDR technology is the repair of dents on a car body without painting, that is, with full preservation of the factory paintwork. The first tool that a PDR specialist picks up is a special lamp that helps to “read” the dent, that is, assess its size, depth, and the condition of the paint layer. Repair is not complete without hooks, which are used to squeeze out dents from the inside out, and without an adhesive system that allows you to correct the geometry of the part from its outside if there is no access to the inside. The main method of removing dents is done using various hooks, like these
I will only use glue technology, although this is not correct, because it takes a long time and is not so effective.
Vinyl suction cups for the packaging industry
Polyvinyl chloride, PVC or vinyl, is an amorphous and thermoplastic synthetic material. The possibility of using PVC in technology appeared thanks to the addition of plasticizers and stabilizers. It does not have the elastic properties of Tepuflex®, but does not lack the wear resistance that is preferred for use in the packaging industry.
Vinyl suction cups have a soft sealed edge and can adapt to uneven, corrugated surfaces or non-flat workpieces. They reliably adhere to film-packed products, cardboard containers and blister packaging. Vinyl suction cups are used where temperatures range from −20 to 80°C.
Source
DIY Dent Removal Tool Without Painting
Homemade device for removing dents without painting on a car body: photo of the device, description of its manufacture , and also a video showing how to pull out dents with your own hands.
If the car body is damaged by small dents, you have to contact a tinsmith, but if you make this simple device , you can pull out the dents yourself without painting.
The device really works and removes dents, I tried large and small dents, all the ribs can be lifted! I tried it on painted and unpainted ones, but on the wing painted from a spray can, the glue tore off the paint!
Homemade author: K-Nemec. source
Laundry soap
If the “suction cup” falls off on the way, and there are no special products at hand, then you can use regular soap. You need to moisten it a little with water, rub the rubber generously and wait until it dries. When the soap acquires viscosity, you can attach the membrane to the glass and tighten the console clamp. The soap will set and prevent air penetration, like a thick sealant.
Car dent removal tool
Let's try to make an interesting and simple tool that can help straighten out a simple dent in a car and remove annoying dents. When creating this tool, you will need simple and affordable materials. First you need to get a long M8 or M10 pin.
In general, an ordinary round timber on which you need to make a carving will also do. A piece of half-inch tube approximately 10 cm long, in which you need to drill a through hole in the center. Now the handle needs to be attached to the hairpin. This can be done in two ways. 1. using nuts.
Second way. The handle can be welded on. This way there are no protrusions that could interfere during operation.
You need to take a piece of round timber as long as a handle. Drill a through center hole to fit the pin. You can pick up some thick-walled tube and the effect will be the same. Now all that remains is to cut off the round timber. The result is a weighty round piece with a central hole that fits freely onto a hairpin and moves along it.
General principles of fastening
It will be possible to securely fix the suction cup if two basic conditions are met:
- The surface on which the suction cup will be located must be flat and smooth.
- The suction cup itself should not have obvious defects on the inside.
Basic principles of fastening:
- Surfaces must be cleaned and degreased. This applies to both the mounting location and the suction cup itself. Dirt, dust, soap and lime stains, rust and other contaminants will not allow the suction cup to attach firmly. As for degreasing, for this purpose you can use detergents, soap solution, and alcohol solution.
- It is necessary to glue only a dry suction cup and only on a dry surface.
- Under extreme temperature conditions, increased loads on the suction cup, and also if the surface for fastening has a non-uniform texture or unevenness, you should use means to improve the adhesion of surfaces: Vaseline, self-adhesive PVC film, silicone sealant.
Master's secrets: pothole repair
December 27, 2013
Why does the first pancake often turn out lumpy? Because no instructions can replace experience. Correcting dents without damaging the paint is somewhat more difficult than baking pancakes, as we recently discovered. The market is full of devices, having bought which someone immediately feels like a car repairman. We also acquired a modest set of hooks and other things. The purpose of the hooks is to press on the dents from the inside out, where there is no direct access.
This is only a minimal set of tools: a lamp with a suction cup for fastening, hooks, a core, a plastic drift, an elastic attachment... This is only a minimal set of tools: a lamp with a suction cup for fastening, hooks, a core, a plastic drift, an elastic attachment...
What should you practice on? There were several small dents on the trunk lid of the editorial Citroen, so we decided to deal with them.
First of all, those that are covered from below with lid reinforcements - they cannot be overcome without hooks. And the educational and advertising film convinced us that we could easily do this.
In full accordance with it, we polished the car, illuminated the dents with an oblique light from a lamp in order to better show them...
First pancake
Dent number one is on the cover, right above the amplifier. You'll have to drill a hole in it.
When working in such places, a drilling depth stop is very useful.
It’s difficult for someone who is not used to working blindly. And it’s easy to make a mistake by exceeding the effort!
We check the result in the light of a lamp. Remove this squiggle again, and the job will be completed!
In short, we spent almost the entire day just on the first “hole.” It's time to learn from the professionals!
The opportunity presented itself quite soon - when our driver discovered an impressive dent on the rear wing of the Volkswagen Caddy, next to the lamp.
The dent on the “Caddy” hurts the eye, but it’s located well. The dent on the “Caddy” hurts the eye, but it’s located well.
I contacted one of the Moscow services. Naturally, each specialist determines the strategy for editing a specific area himself, based on his experience, knowledge, etc. The sequence of actions in our case is shown in the pictures. Having removed the rear light, the master had good access to the dent from the back side - naturally, for working with hooks.
The lantern has been removed. Access to the reverse side of the damage is open. The dent is highlighted by a lamp. The lamp is removed. Access to the reverse side of the damage is open. The dent is highlighted by a lamp.
We, of course, already knew that it was possible, for example, to first “pull out” a dent using devices like glued mushrooms, suction cups, etc. These days these are quite popular technologies. But not required. Our master did not waste time on them, but started with something else.
Turning on the backlight, he thoroughly (and for quite a long time) tapped the entire perimeter of the dent with a plastic core... inward! Someone will say: where is the logic here? And here's what she's talking about. The metal in these places, gradually straightening out, seemed to pull the middle of the dent outward, which should have made subsequent actions easier with hooks.
As we can see, what the master did was not easy even from the point of view of strength of materials, and even more so in practice!
After the initial editing, the master proceeds to finishing the surface with hooks. After the initial editing, the master proceeds to finishing the surface with hooks.
Having finished this matter, the tinsmith began to “massage” the dent from the inside. Crochet movements are soft, calculated, without fuss. The process is long - several hours with breaks for short rest for the eyes: they get very tired from the tension and blinding light of the lamp.
It is curious that at first the master did not particularly care about the ideal shape of what he got - pits, tubercles... Some of the spectators even began to show concern, but after some time the irregularities began to miraculously disappear, and the Caddy's wing was all more like new.
Such is high art! The result is shown in the last picture.
The dent was gone. And the master’s eyes need a long rest. The dents are gone. And the master’s eyes need a long rest.
The described operations cost our accounting department 5,000 rubles. But everyone knows that repairing a wing using traditional methods would cost many times more.
The most important thing is that our car, if you check its paintwork with instruments, will remain in the undamaged category! So why is putty still held in high esteem? It's simple.
The instantly hardening polyester mass allows you to frankly hack things: you can fashion out of it even something that has long since rotted, then paint the car and get a lot of money from the owner. Of course, the owner of an ancient car can put up with layers of putty while “it” is still driving.
But we advise the owner of a new car not to rush to the unfortunate masters under any circumstances. Traditional repair methods create a lot of problems - from corrosion of the dented area to troubles when selling: after all, putty cannot be hidden from modern devices.
So, not all technologies are worth mastering, ignoring specialists. Let us recall the joke: “It’s not at all difficult to walk along a rope stretched across a gorge, just keep your balance!” Would you like to try?
Specifics of working with glass jacks and what to do if the glass suction cup stops holding
General recommendations for the selection and use of glass suction cups
Today, the market offers a huge range of suction cups for glass with a folding lever (aka glass jacks) from various manufacturers. The principle of operation of such suction cups is to create a vacuum by lowering the folding lever. Models of glass jacks will differ from each other in the following parameters:
- suction cup body material (it can be aluminum or plastic)
- number of working cups (from one to four)
The load capacity of the suction cup will depend on these parameters, from approximately 20 to 160 kg
What to look for when choosing a glass suction cup
If you are choosing a professional tool for regularly carrying large sheets of glass or double-glazed windows, you should pay attention to the following characteristics:
Handle material: plastic suction cups are most likely not suitable for you, since their load capacity is much lower than that of metal (aluminum) ones. Under regular heavy loads, they can quickly become unusable beyond repair.
Working disk material: it is worth paying attention here so that the rubber disk does not have a strong smell of burnt rubber. If such a smell is present, then it is recycled rubber. This suction cup is not suitable for professional needs, because it will quickly “tan” when the temperature drops and its performance will significantly decrease in the cold. Also, a working rubber disc will wear out and tear much earlier than the same disc made of high-quality rubber.
Types of window feeders
Depending on the materials used and the bird feed, feeders differ in their design. The simplest design is the suspended model. This type of feeder is also called edible. It is made from a mesh in the form of a ball filled with food. They hang him with a rope. Birds easily reach and peck food through the mesh cells.
The basis of an edible hanging feeder is usually a nylon mesh.
Feeding platforms are made without a roof. The design is made of a pallet with sides. It is attached to the window glass with suction cups. Can be fixed on the wall. The disadvantage of this design is the lack of a roof. The food will be covered with snow or rain.
The platform can be attached to the window glass with suction cups
The tray feeder is an extended version of the platform. The sides are made high. Often the tray is divided into several sections. Each is filled with food for a specific type of bird. The tray can be improved by adding a roof, for example, made of plexiglass.
It is optimal to make a tray feeder with a canopy
The house is a classic and common version of the feeder. The basis of the structure is a platform over which a single-pitched or gable roof is built. The food under cover is always protected from precipitation. Birds can peck grains in any weather conditions.
The plexiglass house will be held freely by suction cups on the window
Hullers are an analogue of a hanging edible feeder, only the body is made of metal mesh. Usually the cylinder is bent and a bottom and a lid are attached. Sunflower seeds or other grains are poured inside. Only birds with long beaks can reach it.
Shellers are designed for birds with long beaks
Hopper models are suitable for automated feed supply. Typically the feeder is made from an inverted can or bottle. There is a gap between the neck of the container and the tray through which bulk feed is supplied as the birds eat it.
In the bunker feeder, feed is supplied automatically
Safety rules for installing sandwich panels
Before starting work, prepare workplaces:
- mark dangerous areas;
- protect openings;
- post signs that warn of danger;
- install scaffolding, the height of the fence should not exceed 1 m;
- if work is to be done at night or in cloudy weather, ensure sufficient lighting of work areas.
Attention! At the preparatory stage, slings and grips are checked with double load.
Adults over 18 years of age are allowed to work with sandwich panels. They must complete a safety course.
Weather conditions must be taken into account , especially wind speed.
There are two methods of installing panels - vertically and horizontally . The method is chosen before work begins.
You cannot lift loads if their mass is higher than that allowed by the grip.
Prohibited:
- operation of faulty or insufficient equipment;
- use lifting equipment if the load capacity data is difficult to read;
- lift damaged loads;
- lift loads when there are people underneath them.
When moving sandwich panels in any direction using mechanized means, lifting is possible only in its longitudinal position. The gripping devices are attached to the sheets by the side, less rigid, walls.
Sandwich panels prices
Sandwich panels