You can’t live without a good broom in an apartment or private house. The equipment is used for indoor cleaning, and although it is inexpensive, many people prefer to knit brooms with their own hands.
This is especially true for owners of country houses who have at least a small plot of land. They can easily sow black sorghum on the plot and tie a broom for sweeping.
Part of the inventory can be used for your own needs, the rest can be sold on the market and receive financial benefits.
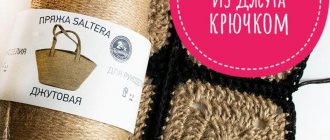
Introduction to jute thread
Even beginners can weave simple crafts from jute threads. Experienced craftsmen use jute to weave more complex unique items using other decorative elements. Several master classes on do-it-yourself twine crafts will help you master this unusual technique.
Before beginning craftsmen weave something, they need to become more familiar with jute thread. This durable dressing material is most often used in everyday life. In addition, due to its strength and neat appearance, it is used for bandaging, packaging and stitching various products. There are several types of twine, each of which is used in a specific technology:
- polypropylene - able to withstand high temperatures up to 50 degrees. It is not afraid of either moisture or alkali. It is the strongest thread, which is why it is called cord;
- textile - used for packaging and stitching products;
- jute;
- linen;
- flax-hemp;
- linen polished.
Before starting work, you should choose the type of thread and prepare everything you need so that you do not get distracted during the process, but completely surrender to creativity.
Broom-amulet
Beginners should start with the simplest crafts. This is exactly what a broom-amulet is. It is simple to make; you will need: scissors, jute thread, a book.
Making a broom:
- wind the thread on the vertical side of the book in one layer, tie the end of the rope in a knot;
- carefully remove the thread from the book; the resulting skein should not be confused;
- hide the end of the rope with a knot inside the threads;
- retreating about 2-3 cm, tightly wrap the top of the broom with another thread;
- Having secured the top, without cutting the thread, continue to wind it around the fibers, this will be the handle of the future broom;
- not reaching the end about 1/3, fasten the winding and tie it with a knot. Thus, the lower part is the future twigs of the broom;
- Carefully cut the lower part lengthwise;
- Divide all the twigs in the lower part into small bundles and wrap each one with additional thread. The broom will look better if you wrap the bunches in a checkerboard pattern.
Such a talisman should be in the house. It would be correct to place the broom on the handle. That is, upside down. In this position, he will definitely bring good luck and save the house from troubles.
Jute rug
Another master class on DIY jute crafts accessible to beginners is rug weaving. Thanks to its strength, twine makes good jute rugs. They are woven using a large hook.
Making a jute rug:
- cast on 8 chain loops on the hook and close them in a ring;
- Next comes 1 chain lifting loop and knits a row of single crochets, adding a few loops;
- In this way, several rows are knitted to the desired diameter of the rug.
Such rugs can often be seen on the floor in the hallway or bathroom. If desired, the threads can be dyed or bleached.
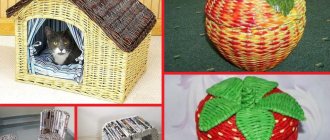
Twine basket
A very interesting craft made from rope is a basket. Such an exclusive item, which is not only original, but also useful, can perfectly serve as decor in the kitchen.
For a master class on making a twine basket with your own hands you will need:
- hook;
- scissors;
- plastic bottle;
- glue gun, you can use silicone glue;
- twine.
You can take a plastic bottle for this craft of any diameter depending on the size of the planned basket.
Making the basket:
- Cut a plastic bottle crosswise. Only its lower part is useful for work. The craftsman can choose the height of the product himself. It is necessary to make small notches on the upper edge of the container, which should be at the same distance from each other;
- you should start winding the jute rope in a vertical direction, passing it through the notches each time;
- at the end of the circle, fix the rope with glue and cut off its end;
- Now the twine needs to be woven in a horizontal direction, passing it with a hook through the vertical threads, in a checkerboard pattern. In this case, it is necessary to ensure that each subsequent turn of the thread fits very tightly to the previous one;
- weave the walls of the basket to the desired level;
- Then you can start weaving the bottom. To do this, the bottom of the plastic bottle is well coated with glue. Then from the middle you need to start laying out the twine in the form of a tight spiral, let the workpiece dry well;
- If desired, you can make a lid for the basket in a similar way.
It will look very interesting if you use twine of different colors. It can also be decorated, for example, with a rope flower.
Knitting
Making sorghum brooms with your own hands is quite simple. You need high-quality raw materials and special tools.
Procurement of material
Weaving a broom from millet is not difficult. At the preparatory stage of work, the required number of stems is selected. Each product will use 25–30 thin branches or 20 thick ones. The raw materials are placed in a large container, then poured with boiling water. An important condition for softening sorghum is keeping the shoots in warm water for 2 hours. After this, the stems need to be dried a little.
Brooms are produced in a factory using a special machine, which allows you to produce from 150 to 200 products per shift. We don’t have such equipment at home, so we knit a broom from twine or tie the stems with rope and cut off the end part. It is important to familiarize yourself with the features of the workflow.
Manufacturing technology
Step-by-step process for making a broom:
- The dried and seeded twigs of the crop are placed in small bundles with a diameter of about 10 cm. The panicles are trimmed and tightly tied with wire or twine near the base.
- In tying (with rope, wire or other material - each person has the right to choose independently), the main thing is to tie a tight bunch, the stems of the crop should not crumble.
- Divide the lower part of the broom into three parts and tie the bundle in these places (you should get three bundles).
- On the side bunches, several upper stems are cut obliquely, which will help reduce the diameter of the handle to convenient parameters. The shoots are cut about 5 cm higher from the bottom trim.
- Squeezing the handle of the broom, make sure that the shoots fit tightly one to the other, and tie them in several places, every 8–10 cm.
To give the product a neat appearance, the panicles in the lower part are trimmed with scissors, and the upper protruding rods are cut with a knife. If something is unclear about the technology for making a broom at home, you can watch the video.
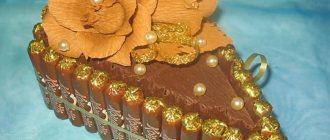
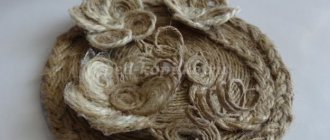
Additional decorative elements
Any crafts made from a bundle of rope and twine can be decorated with cute flowers of your own making. This product will look even more attractive. Flowers made from paper twine are especially good.
To work you will need:
- scissors;
- glue moment;
- plastic film or bag;
- crochet hook;
- wire and beads;
- threads of paper twine;
- stain of different shades.
Before you start work, you need to think about the composition of the decor. You can’t go overboard with flowers; no matter how many of them are made, the thing will look original in any case.
Procedure for making flowers:
- the twine must be cut into pieces of equal length;
- Depending on how many shades the future flower will have, a certain number of threads need to be soaked in stain of different shades. The threads need to be kept in it for a day;
- the next day, use a hook to remove the threads from the stain and place them in a plastic bag until completely dry;
- Twist the prepared threads together into 2 pieces. Next, twist the resulting bundles in a spiral from the middle, constantly gluing them. Thus, a round petal was obtained. You can frame it with the same strand of a different shade;
- the stamens need to be made of wire, one bead should be attached to each section of it; beads can be used for these purposes;
- Then you can start assembling the flower. Take a few stamens and twist them at the base. Apply a drop of glue to the base of the first leaf and secure the bouquet of stamens onto it. Twist the petal around its axis. Next, glue the petals one at a time, similar to the first.
A master class on DIY twine crafts involves the use of various decorative elements. Flowers cut from simple burlap will also look interesting.
Types and properties of twine
The twine is made single-strand or multi-strand. To obtain threads from bast fibers, jute, hemp, linen, paper are twisted, and a combination of them is also used. And for the production of synthetic twine, polypropylene, viscose and nylon threads are used. Synthetic rope has some advantages: it does not absorb moisture, is lightweight, has a long-lasting color and is safe for human health.
Jute twine is very popular among needlewomen. It is made from a plant of the same name. Jute fiber has low elasticity, so the fabric made from it is rough and tough. But nevertheless, it is used for the production of furniture fabric, insulation, burlap, and packaging material. And the most basic application is the manufacture of ropes, ropes and twine. Jute twine has a unique property: it completely decomposes when disposed of without polluting the environment. It is used to create designer jewelry, designer items, and unusual crafts. Jute goes well with.
Methods for painting twine
At home, threads can be dyed using several methods. Each of them is effective in its own way.
The following paints can be used:
- household dyes - construction colors, stains of different colors;
- food - Easter paint for eggs;
- natural - brilliant greens, onion peels, wine.
After each staining with any type of dye, it is necessary to fix the result with a vinegar solution. For this you need 1 tsp. dissolve vinegar essence in 0.5 liters of water. But before you dye the twine, it must be bleached plain white.
Do a little magic
Even if you don’t believe in miracles, you need to treat magic with caution! In fact, who knows, maybe wizards and witches hide so cleverly that they never catch the eye of ordinary people. After all, just in case, every person has some item that he tries to save: for good luck, for happiness, for “let it just be.” These are amulets and amulets, which often do not have much material significance, but are valuable as a memory of something good and happy. You can make a broom-amulet with your own hands if you want. He will become a talisman of love for his home, hard work, and the ability to see beauty. And it can actually become a talisman for your beloved home and everyone at home.
A broom is not a broom!
If you set out to make a broom-amulet with your own hands, you should first make the original item. Moreover, you need to understand one thing: a broom is not a broom. The streets are swept with brooms, and witches fly on them. And a broom keeps the house clean. He must be clean and tidy in order to do his job efficiently. And they say that this is where the brownie lives. And that’s why the broom became a talisman for the home.
What is important to remember when making a broom
A broom, like other hand tools, is made to fit the anthropometric dimensions of the person who will work with it. It should be long enough and not particularly heavy so that it is convenient to work with it.
Also, the wooden holder must be sanded so as not to injure your hands while working.
A broom maybe.
So, there is a task - to make a broom-amulet with your own hands. A master class of such work will definitely begin with creating the basis of the talisman. It can be made from a huge number of materials, because in a talisman it is just a symbol; no one will take revenge on them. To make a broom as the basis of a talisman, you can use:
- sorghum sprigs - buy a real household broom and select neat, strong branches from it;
- straw - it is best to prepare straw yourself, but you can turn to craftsmen who weave pictures, baskets, and so on from straw;
- cattail - this natural material can be found in abundance on the swampy banks of ponds and ditches; it can be harvested at any time of the year, even when it’s wet;
- sponge - gut a new paint brush made from this ancient material;
- bamboo sticks - an exotic material can also be used as a basis for a talisman;
- yarn - ordinary threads, from which craftswomen knit socks and sweaters, can also be used as the basis for a broom.
Twine rug: master class
Jute is a fairly durable material, so rugs are often woven from it with your own hands. Weaving can be done using a hook, frame or other method known to needlewomen. The easiest way to weave a rug with your own hands is to use a hook:
- 6-8 air loops are placed on a thick hook and closed into a ring.
- 1 chain lifting loop is performed and knitting is done in a circle using single crochet stitches with several increments. If the craftswoman is knitting a round rug, then the increases can be chaotic, but if, for example, it is a square rug, then the increases are made in strictly defined places to form the corners.
These rugs are often located near the front door or in the bathroom.
How to tie a broom?
Creative work - create a broom-amulet for the house with your own hands. The beginning is the most time-consuming. The selected material must be cut. The length and thickness of the broom are determined by eye. Usually its length is about 20-30 centimeters, and the diameter of the handle depends mainly on the width of the main part. All twigs, straws, and threads should be cut to a length several centimeters longer than necessary. This is due to the fact that after the handle is knitted, the lower part must be positioned in the shape of a fan, secured and trimmed evenly. The handle is assembled using strong, unbreakable threads or wire. Usually the constrictions are made in three places, spaced evenly. The lower part of the broom is formed by sequentially braiding small bundles of main branches.
They are divided into fairly thin strands and secured with thread or wire. This division can be repeated several times, knitting the strands in a checkerboard pattern. In some cases, for example, when a broom is made from sponge or yarn, it is recommended to coat the material with PVA glue, let it dry almost completely, then form a fan and put it under a press for a day. This is done to secure the shape. But now the broom has acquired the shape of a fan, and it can be trimmed, making the lower edge straight or semicircular, as desired.
Knitting technology
Knitting a broom from sorghum is not particularly difficult, but you must follow a certain technology. The peculiarity of knitting sorghum wreaths with your own hands is that all slings should be without knots or any loops. The twine, after being wrapped around a bunch of stems, is tightly pulled at the opposite ends, and its excess parts are cut off near the very base of the broom.
To knit a sorghum broom, you need to make only seven slings, although you can do 1-2 more or one less. However, if there are fewer than seven bands, the broom may not be very strong. For the convenience of making a broom, the slings must be performed in a certain sequence.
First, a bunch of stems selected for one broom is divided into three equal parts and tied tightly separately from each other at a distance of approximately 25-30 cm from the tops of the panicles, making sure that the tops of the panicles in each of the three bunches are on the same level, and also that in all three bundles the bandage is made at the same distance from the tops, then the broom will be good.
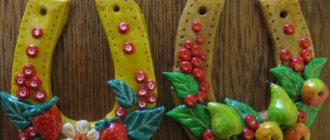
How to decorate?
Often decorative elements are used as talismans. What, for example, is the meaning of the broom amulet? Making an amulet for your home with your own hands and hanging a handmade talisman on the wall is not enough; it is also important to supplement it with significant elements. They can be real, store-bought items, or they can be stylizations created independently from scrap materials. The most convenient way is to sculpt them from a suitable material and paint them. Plasticine will not work, since the amulet whisk often becomes an interior decoration in the kitchen, and it can be hot there, and the plasticine will leak. The easiest way is to sculpt the necessary decor from salt dough without running around shopping for creative materials. The broom handle and its edge can be decorated with patterned braid of a suitable color.
Conclusion
The steam should be light and the broom should be fragrant!
Having steamed to your heart's content in the sauna for the rest of the day, you feel a surge of vigor, health and strength. And if the broom was also knitted with your own hands, with due diligence and accuracy, then the bath procedures will be a real pleasure! The video in this article is ready to share information on these issues, watch it!
Modeling mass
In order to sculpt small figures at home, there are many materials. They make both cold porcelain and clay mixture on their own. But there is the simplest material available - bioceramics. This is the name for a mixture of flour, fine table salt and water. Here is the classic recipe for such a mass:
- 200 grams of flour;
- 200 grams of salt;
- 125 grams of water.
You can improve the recipe a little by adding 100 grams of starch and another 50 grams of water. With this addition, the dough becomes more plastic, and small parts can be made from it. The mass is kneaded to a homogeneous consistency and stored in the refrigerator, wrapped in cling film. Details are molded from it as needed and left to dry in the open air. Finished items are painted with regular paints and covered with clear varnish. You can also involve children in this activity, help them sculpt figures of the appropriate size and shape, teach kids the names of certain objects, telling stories and fairy tales about them. Such a talisman will become a real guardian of the family, because spending time together will forever remain in warm memories.
What is this for?
In witchcraft, and talismans, amulets and amulets somehow belong to the world of magic, each item has its own meaning. How to make a broom-amulet with your own hands so that it brings benefits to your home and everyone at home? Use the right decorative details:
- coins, preferably silver, mean success in business;
- a burlap bag promises wealth;
- a bay leaf foreshadows glory;
- a head of garlic will protect you from evil spirits;
- a loaf or pretzel speaks of hospitality;
- sunflower seeds mean that there will be many children in the house;
- red pepper means a strong masculinity;
- rose hips - feminine beauty and wisdom;
- little shoes symbolize comfort in the home;
- wheat grains or beans mean prosperity and well-being;
- a figurine in the form of a house with a roof and a window will protect the entire house as a whole.
All the elements for creating a broom amulet with your own hands can be molded, although real fruits and grains are more suitable as an amulet. You can also use flowers, pet figurines, ribbons and bows, and stones for decoration. Making a talisman for your home with your own hands, finding out the meaning of each symbol, preparing the necessary elements means helping your home become more beautiful and, if you believe it, giving it protection.
Put together
When the broom is ready and the decorative elements have been selected, they need to be beautifully placed on the base broom. Experienced craftsmen and those who believe in magic do not recommend making a talisman for the home with all possible elements at once. After all, a young family needs children, and those who already have children need stability and success in business. So you should make a broom-amulet with your own hands in accordance with life circumstances. All elements must be secured evenly; their location relative to each other does not matter. The decor can be attached with glue, for example “Titanium”, or with thin wire. If the parts are molded, then the wire can be placed in the body of the figure in advance.
Creation principle
The rules apply not only to the broom of the amulet. In general, during any needlework. Even if you are not careful, you should adhere to the following:
- Sit down to work only in a good mood.
- Do not start work if you are unwell or angry at someone.
- The work must be completed in one go.
- Nothing should distract you. TV and extraneous conversations need to be put off.
- While working, keep good positive thoughts in your head.
- If you are making a talisman for someone, then think about him, imagine the image of the person.
- If the amulet is made for a specific purpose, then visualize it in all details.
- Talk to the amulet. Tell us about the problems. Goals, hopes. This will play the role of a conspiracy.
If you follow all the rules, you will get not just home decor, but a strong amulet that brings profit to your home and protects you from evil spirits. Additional details made with your own hands will give the broom amulet even more strength, and a good mood during needlework will endow the product with magic.
Where to place the broom-amulet?
For the amulet to work, you need to know both how to make a protective broom and the rules for its use. As a decorative element, it is undoubtedly hung inside the home. The best place for its location would be the kitchen - the heart of the house, where everyone at home gathers, delicious food is prepared there to maintain strength and create joy. Inside the house, a broom-amulet, created with your own hands, is hung with the handle up and the main part down. This symbolically serves as a way to remove everything negative from the house; the broom, as it were, sweeps away all the bad things. It is also important to keep the amulet itself tidy, because, according to legend, it is in the broom that the brownie settles, and in order for him to be happy, his home should always be cozy, clean, and beautiful.
Well, creativity always gives joy – through its process of conception and mastery, and also through its result. You should create a broom-amulet with your own hands for two reasons: to decorate your home and give it a cute amulet that keeps you warm and cozy and helps you fulfill your wishes. Good luck!
One of the most common household Slavic amulets is the broom amulet. This seemingly simple household item was endowed with the ability to cleanse the energy environment, maintain prosperity in the house and protect against the attacks of evil in all its various manifestations.
In the days of vacuum cleaners and robotic cleaners, the good old broom is still popular among many housewives. A decorative analogue is found a little less frequently in modern homes, but also finds application. This article will help you understand the difference between a classic and a talismanic broom, and will tell you how to make a talisman and use it so that it fills your home with happiness and joy.
Broom amulet among different nations
A broom for the home was mentioned as a talisman by many ancient peoples. And in some cases, it could even perform the functions of an amulet, attracting certain energies needed by a person. It was with his help that China called for warm, sunny weather during the long rainy season. The Chinese believed that the rains would stop if they hung a homemade broom on the fence near their house.
In European countries, including England, it was believed that a broom could change its positive meaning if used incorrectly. The sign not to sweep or take out trash from the house after sunset appeared precisely on the basis of these beliefs.
However, this amulet was most widespread in Rus'. The Slavs respected the broom, which they used to clean their homes, and also made a special broom-amulet and hung it in certain places.
According to the ideas of our ancestors, the broom served as a resting place for the good spirit that lives in every home - the Brownie. The spirit lived behind the stove, but often rested on a broom, so the housewives monitored the cleanliness of this item and changed it every year, trying to please the protector of the house. After all, if the house is not tidy, the Brownie could get angry and start doing mischief.
How to use a home broom correctly
A home broom, used in a special way, can serve as an alternative to a miniature amulet. This option will be useful for those who have not yet managed to buy a talisman, but already want to put their house in order - to get rid of both ordinary garbage and energy clutter. Of course, it will be better if you have two brooms - a regular one and a protective one.
Using an ordinary broom in accordance with the recommendations given, you can attract prosperity and even find love:
- When buying a broom, the first cleaning should be done with it and only then take up the mop.
- To increase the flow of money into the house and attract coziness, when cleaning, sweep from the threshold and corners to the middle of the room.
- There is a belief that an ordinary broom can make wishes come true. To do this, you need to think about what you want to get the first time you clean with a new broom.
- If you decide to find a betrothed, then know that you don’t have to spend your desire on just that. To attract love, step over the broom nine times and then sweep the floor with it.
It is also important to remember a few rules, violation of which can lead to unpleasant consequences:
- The Slavs believed that if there were several brooms in the house, they would conflict. One of them may be “offended” that the hostess chose the other over him. In order not to cause trouble, there should be only one broom in the house, used for cleaning.
- When moving to a new place, it is recommended to leave the old broom in the previous apartment or throw it away. A broom that has been sweeping up trash for a long time will not have the same power as a new one.
- You cannot lend your home broom to other people - neighbors and friends. Because of this, he will stop sweeping all problems out of the door and may attract bad luck.
The meaning of symbols for a protective broom
On broom amulets sold at souvenir fairs or in magic goods shops, you can almost always notice additional elements. Among them there are houses, bast shoes, and even canvas bags or nuts.
Many people believe that this is just decoration. In fact, amulets are specially decorated with various elements. Each of them has its own meaning. Therefore, whether when purchasing a talisman or when making it, it is important to know the meaning of these components.
Traditionally, the amulet should contain exactly twelve elements. But this rule is not always followed, reducing the number of additional elements or replacing them with others.
You can add to the broom:
- A house made of salt dough or clay. It symbolizes a strong family and helps maintain a pleasant environment in the home.
- Canvas bag. Don't fill it with various fillers like cotton wool - pour grains into it. Thanks to this, there will always be food and drink on your table.
- Grains and legumes. They also mean prosperity. Sometimes they are replaced with coins, but in this case the word “prosperity” will take on a narrower meaning and everything will come down to an increase in income. And happiness is not always in money.
- A clove of garlic. There’s no need to even explain here - everyone who has ever listened to old wives’ tales knows that the fruits of this plant protect against ghouls and other representatives of dark forces. There is an opinion that garlic also helps against energy vampires. In addition, it simply clears the space of negativity.
- Pepper. Symbolizes male strength and helps ensure guaranteed prolongation of the family. It can be replaced with corn, which also symbolizes procreation.
- Rosehip berries. Unlike pepper, a woman needs rosehip - it will help her remain beautiful and desirable.
- Seeds - they help children stay active, healthy and cheerful.
- Bay leaves. Their meaning comes down to what the laurel wreath symbolized in Antiquity - success and glory.
- A bast shoe that conceals the coziness and comfort necessary for every home whose owners want to live happily.
- Pretzel. This pastry is considered a symbol of prosperity and hospitality. It was not for nothing that it was customary for us to treat our guests to tea and various delicacies.
It is important not only what additional elements you add to the broom amulet, but also the material of manufacture. Don't even think about plastic and similar modern materials.
Artificial foundations carry empty energy, which prevents the amulet from fulfilling its purpose. Try to make the components of the amulet from natural raw materials. Salt dough, clay, wood and sponge are ideal for such purposes.
The process of preparing branches, knitting and drying in detail
Well, having learned a little about the variety of raw materials for homemade “massagers,” let’s move directly to the answer to the main question - how to properly make brooms for a bath?
The general time for collecting raw materials, regardless of the chosen type of tree (be it birch, oak, maple, linden, etc.), is when the leaf has already matured. In other words, the season for harvesting branches is from early July to mid-August. Collecting raw materials at this time is completely justified, because the leaves of the trees are already becoming large, but they still have enough essential oil glands.
The general rules for choosing a tree for collecting raw materials boil down to the fact that you need to look for young trees/shrubs with straight flexible branches, at a distance of at least 3-4 kilometers from a residential area.
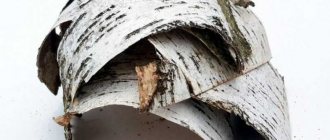
Proper harvesting of birch branches
So, in this article we decided to describe how to correctly collect branches for birch brooms so that they turn out to be of high quality and as useful as possible.
Despite the fact that we will be talking about a specific type of raw material, these collection instructions, in principle, apply to other trees/shrubs:
- Firstly, it is better to break branches for brooms in the first half of the day, immediately after the dew has disappeared.
- Secondly, you need to skillfully select trees. As a rule, these are tall curly and weeping birches, whose branches fall in braids, and the leaves are porous, slightly rough. The branches we need can be characterized as follows: flexible, unbreakable, thin, without knots, 40-50 centimeters long.
Important! Many folk knitters recommend, on the contrary, choosing young birch trees that have never bloomed, explaining this by the fact that they have the most delicate leaves. Of course, we cannot disagree. However, you still need to look at these sheets and even try with your tongue: if the upper side is rough, then you can safely look for another tree. The leaves should be velvety on top.
Leaves are what you need!
- Thirdly, when cutting raw materials, do not use “whips”. Branches for a bath broom must have 2-3 forks, so to speak, for thickness and splendor. It is also desirable that the leaves on them are small or medium.
Attention! To prevent trees from suffering, cut only a few branches from each.
Raw materials for creating bath “massagers”
Knitting brooms
How to make a bath broom correctly - where to start knitting it?
Below is a step-by-step technology for this simple, but requiring special skills and abilities:
- Having prepared a sufficient armful of birch branches, you can start knitting. For one product, enough raw materials are taken so that the handle is no more than 5 centimeters thick. Agree, it will be inconvenient to use a thick and heavy broom.
- The branches are cleared of knots and leaves where the handle will be. As for its length, there are no special rules. You just need to leave the handle long enough to make it comfortable to hold and use the broom.
- When collecting twigs in a broom, the thicker ones are placed in the middle, and thinner ones around them - this way the product will be very durable and can be used 2-3 times.
Knitting brooms is not difficult!
- Then you need to shake and turn over the branches collected in one bunch several times to make sure that the half-finished broom is even, dense, fluffy and beautiful.
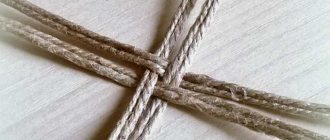
- The knitting technique itself is simple and consists of several steps. We need to fasten the collected branches with strong synthetic twine:
- The first knitting is located closer to the end of the handle of the product and is not tightened very tightly. Then the broom is divided into two equal parts, which are twisted 360º (both!). The clamp will be strong. And if the first knitting is made too tight, then there will not be enough strength to twist the broom, or the branches will simply break.
- For the second knitting, you need to cut a piece of twine as long as possible and tie it above the bottom one as tightly as possible. There is no need to trim the ends of the synthetic twine; they will later serve to connect two brooms into a pair.
Visual knitting technology
- Now all that remains is to carefully trim the ends of the branches to the required length using a sharp ax on the stump. You can move on to drying!
Drying and storing brooms
During drying
First of all, we warn you - you cannot dry them in the sun or use various artificial drying methods. The brooms dry out on their own, the main thing is to properly organize a place for them to do this.
It should be in the shade (for example, a barn, garage, attic, haystack, etc.) with moderate humidity. An increased concentration of moisture can cause mold to appear on the leaves, and then the brooms will have to be thrown away.
It is best when the products take the shape of a fan rather than a panicle. To achieve this result, fresh brooms are laid out on the floor and turned over every day. When they dry (not dry!) you will need to stack them on top of each other, periodically changing places - this way they will gradually flatten.
It is important not to dry them out! After drying, all the leaves on the broom should have a concentrated matte green color, and the aroma of balsam birch oil should emanate from the broom itself. After steaming the product, this pleasant smell will sharply intensify, which will have a beneficial effect on the health of the entire body.
For your information! After drying the products, the second knitting may become loose and will need to be re-tied.
After about a week, the finished brooms can be stacked tightly in a dry, dark and well-ventilated area. And to prevent them from getting dusty, you can wrap them in cellophane or paper, but not tightly, so that there is little air access.
Storage of dried products
A good option for storing bath whisks is in a haystack. In winter, you can also store simply prepared branches in the form of one sheaf, and, as necessary, knit healing “massagers” from them. In wallpaper cases, the leaves are preserved better.
Parking brooms
You also need to know how to steam a broom!
So we learned how to make bath brooms. However, there remains one more important nuance, without which the competent preparation of a “massager” for the steam room cannot be considered complete - this is its preparation directly for use.
The easiest way to steam a broom is as follows: lower it into a bowl of cold water for 3-4 minutes, then into warm water for the same amount of time, and finally into a tub of hot water (not boiling water!). At the same time, it is important to cover the tub with something so that our broom “steams.” But you can tell when to take it out by its delicious aroma!
Advice! Do not throw out the remaining water from steaming - it will be useful for watering hot stones or the walls of the sauna stove, thanks to which the entire steam room will be filled with wonderful natural smells.
How to hang a broom amulet correctly
This amulet, like a horseshoe, should be hung in special places. We have already told you how to hang a horseshoe before. Let's deal with the broom. It was allowed to be mounted above the main entrance - both outside and inside, on the wall in the entryway and even in the kitchen. The Slavs considered it important not only the location of the amulet, but also the method of attaching it.
How to hang a broom amulet so that it protects its residents and gives them positive energy:
- Handle down on the entrance side. In this position, the amulet protects the house from unwanted and envious guests and drives away evil spirits. There is an opinion that this option is suitable only for residents of private houses, because in the entrance of an apartment building the amulet will attract too much attention, which will weaken its impact.
- Handle up on the inside of the front door. This way the broom will sweep away everything bad from the house. The best way would be to combine the first and second methods. This combination is reminiscent of using a horseshoe. One also clung to the outside to ward off evil, and the other inside to retain positive energy in the house.
- In the hallway and kitchen, the broom should be held with the handle facing up. In the kitchen they chose the most honorable place for him, and in the hallway - opposite the front door.
How to make a broom-amulet with your own hands
Making a talisman by hand is not as difficult as it might seem. Brooms are also made from natural materials and finding them is not difficult.
Never use an old broom as a talisman. An outdated broom should be disposed of by throwing it in the trash or leaving it at an intersection. Decorative brooms are more compact in size, so even a new broom will not be suitable for creating them. You will have to make the amulet practically from scratch.
From a grass paint brush
The classic scheme for making a talisman requires a paint brush, washcloth, wire, ribbons and the special elements that we mentioned earlier - grain crops, garlic, a house figurine and other things.
The paint brush will serve as the main brush. It must be natural - the handle is made of wood, and the brush is made of herbs. The washcloth must be placed over the frame and wrapped with wire so that the shape of the object resembles a broom. Then all that remains is to decorate the handle with ribbons and glue it to the bottom of the figure. Don't forget to varnish the amulet so that you can wipe dust on it without worrying about the preservation of its appearance.
From tree branches and herbs
An alternative way to create a talisman is to use tree branches or dried herbs. In this case, you can save money on purchasing materials for the amulet, because all you need to do is go for a walk in the forest.
Try not to break tree branches, but pick up those that are already on the ground. The Slavs often made brooms from birch, endowing this tree with the most positive properties, including the protection of light forces.
You can't do this with herbs, so you'll have to pick them. While collecting herbs, thank them for their help and apologize for interrupting their existence. You can leave some little thing in this place. This way you will show that you made an exchange and did not take without asking what does not belong to you. To create a broom, St. John's wort is suitable - this herb has protective properties, which will only enhance the meaning of the amulet itself.
Having combined birch branches and St. John's wort into a kind of panicle, tie them with a ribbon and decorate them with some kind of protective sign.
What are brooms for sweeping made of nowadays? Cleaning brushes
Brooms will never go away from everyday use due to the fact that there is a certain number of floor coverings that require careful handling. These are laminate, parquet, some types of tiles (for example, vinyl), etc. In no case should they be cleaned using brute force. And a broom comes in handy here.
Nowadays brooms are also made from polymers. They may have an antistatic brush and a long plastic handle. They are convenient to work with, and such brooms are also good at collecting dirt from the floor covering. Synthetic products can be used to clean any surfaces, they do not scratch anything, do not generate dust (to avoid the dusting effect when cleaning with a regular broom, you have to wet it), they allow you to reach hard-to-reach places and sweep them well.
This is what a modern broom looks like
Synthetic brooms are used for cleaning both residential premises and local areas. They are purchased by enterprises for cleaning production areas. Their main advantage is durability compared to conventional brooms and lack of fragility.
Most often, synthetic brooms are called brushes - they just look exactly like brushes, bearing little resemblance to a standard and familiar broom. They are usually made of PVC. Their cost is greatly influenced by the quality of the raw materials, the length of the handle and bristles of the brush itself, strength and manufacturer brand.
Soft synthetic floor brush
By the way, in modern artificial brooms the length of the sweeping part (broom) has become much shorter than in their predecessor - the traditional broom. But the handle has become longer and can have a variety of configurations. These brooms are lightweight and easy to clean/storage; they can be treated and disinfected with various chemical compounds.
Table. Types of brushes.
Rectangular, with long handle
Laminate brush