Almost every person still has CDs, just like videotapes in the distant past, which have become unnecessary. But it’s a shame to throw away such discs (after all, they paid money for it), and they look very beautiful.
So it’s not surprising that folk craftsmen began to make whatever their heart desires from disks. And this article contains the most popular DIY crafts from CDs that anyone can bring to life.
For safety reasons, any operations with CDs (especially cutting into pieces) must be carried out with safety glasses. Sharp edges of cut elements must be trimmed to avoid the risk of cutting yourself.
Lamp
Looking at these beautiful pieces of plastic, it is impossible to take your eyes off the way they shimmer with colors. Therefore, making a lamp is the first thing that comes to mind.
The appearance of the product itself is limited only by your imagination.
In addition to the disks, you will need a working mechanism with a fluorescent lamp, which will hang on the ceiling or stand on the surface.
The incandescent lamp heats up too much and can lead to a lot of unpleasant consequences, ranging from an unpleasant odor to a fire.
You will need soft wire or paper clips as a connecting element. It is advisable that the shiny side be turned towards the light source.
The first step is to drill the required number of holes so that the disks are connected with wire and form a frame. All holes are made using a drill, and the disk itself should lie on a wooden plank. You need to work carefully, as the discs are fragile.
You should not make a chandelier from too many disks.
The finished product is secured using the same wire. Of course, you can cut the discs and shape them into a variety of shapes.
If you want to decorate a chandelier with disks, but have no desire to make crafts, it is enough to place such a bright and eye-catching product directly on the chandelier using super glue designed for fairly high temperatures.
Make four long legs
1. If you manage to find thick boards for legs A, you can skip the step of gluing the blanks. Otherwise, cut out eight planks measuring 19 × 45 * 1143 mm and glue four blanks for the legs-stands from them. When the glue has dried, file one edge of each piece, file the opposite edge, giving the piece a width of 40 mm, and then file it to a square section of 38x38 mm. File the ends of the legs to a final length of 1111mm and rout 3mm radius fillets around the bottom ends.
2. Position the legs A so that the glue lines are directed from front to back (Fig. 1 and 1a ). Place marks on the upper ends of the legs that determine their position (for example, “PP” - front right). Mark the positions of the sockets on each leg (Fig. 1 and 1a).
3. Select the slots by following the steps shown in Fig. 2. For accuracy, equip the drill press with a stop and use a drill with a center point.
Drill holes for the shelf supports in the left rear and right front legs, attaching the template with double-sided tape. To drill holes in the remaining two legs, turn the template over to the other side.
4. Make a simple template that will save time when drilling holes for the shelf supports. Take a piece of hardboard 6x38x813 mm and mark the centers of the holes on it (Fig. 1). Using double-sided tape, attach the template to the rear left leg A, aligning the top and edges. Drilling using the template is shown in Photo A. Drill 12mm deep holes in the leg through the template. Once you've finished with the back left leg, transfer the template to the front right leg. After making holes in this leg, apply double-sided tape to the other side of the template and drill holes in the remaining two legs.
Framework
Frames for mirrors, collages and photos will look great. This is especially true for mirrors that can harmonize with the surface of plastic products.
To make a frame, you need to have:
- Large supply of starting material;
- Cardboard or other frame that can be cut;
- Tools for cutting, gluing, as well as painting and varnishing.
Frame creation process:
- Cut out the frame of the required size (any shape);
- Cut discs randomly;
- Place the cut out pieces on a frame so that the resulting composition is as pleasing to the eye as possible;
- The pieces are glued to the frame;
- If there are gaps between the details of the composition, you can paint them with any color of your choice;
- Cover the entire product with varnish and leave for sufficient time for the entire composition to dry completely;
- Insert a mirror, photograph or illustration into the frame.
It looks unusual, but very beautiful.
Care is required to assemble the case correctly
1. Before assembly, give all parts a final sand with 220-grit sandpaper and soften any sharp edges. Glue the front bottom crossbar E to the bottom H , aligning the top sides of the pieces. The shoulders of the tenons should be flush with the edges of the bottom.
2. Assemble the side panel by gluing two upright legs A , top B and bottom C side rails, and side panel F. To prevent the panel from moving, apply one drop of glue in the middle of the tongue of the crossbars and align the panel between the upright legs. In this design, the panels will always remain in the middle of the frame, but will be able to change their size with seasonal fluctuations in humidity. Make sure the side is flat and free of distortions. In the same way, assemble the second side panel.
3. When the glue has dried, connect the sides using the top and bottom rails, the bottom and the back panel D, E, E/H, G. Insert the back panel into the tongues of the crossbars in the same way as the side panels. To support the rear edge of the bottom, insert shelf supports into the previously drilled holes in the lower rear crossbar C .
4. Using 4.5x13mm countersunk screws, attach the figure-of-eight connectors to the top edges of the top side rails B. Place cover I and, aligning the side overhangs, mark the position of the connectors on its underside. Drill 2.8x12mm pilot holes and remove the cover and connectors.
Flower vases
Flower vases or pots are decorated in a similar way. The whole process is similar to what was involved in the manufacture of the frame.
Considering the fact that the pots have a rounded shape, the pieces from the CDs should be cut quite finely to avoid the risk of tearing off pieces during use.
Making shelves for disks
- We cut out all the design details. After this, we make a slot in the right side wall of the base for a sliding shelf - two cuts are made using a circular plate, and the material between them is selected with a chisel.
- In order for the base to remain stable, the edge of the slot is covered with a wooden insert.
- Let's start gluing the elements. To ensure good adhesion, the parts are fixed using special brackets, under the base of which fiberboard inserts are placed.
- We fix wooden slats around the perimeter of the base for framing.
- A chamfer is made on the front panel A using a circular saw, which will help form a shadow seam between the cover and the frame. The panel is then secured and magnetic latches are installed on it with an indentation of 1.6 cm, taking into account the thickness of the cover.
- We attach guides to the middle shelf, and facing slats to the top shelf.
- The guide shelf must be precisely oriented relative to the pre-made slot, because they are secured with one screw.
- In order to hang the opening lid, special wheels are attached to the top panel. The mounting location must be accurately determined and marked - 2.7 cm from the front edge of the panel and 5.6 cm from the top.
- We attach the corresponding metal plates for magnetic latches to wooden blocks.
- Now we mount the cover and check it in action.
- We connect the elements of the sliding shelf using special flat dowels.
- Then we glue the shelf parts together.
- We open the wooden base of our shelf with varnish using a roller (this will ensure uniform application).
- We will also paint the pull-out shelf: first it must be primed, after drying, treated with sanding paper with 180 grit, and then opened with the chosen varnish in two layers. We chose a light gray color; of course, any combination that suits a specific interior is possible. During the varnishing process, it is necessary to ensure the stability of the sliding shelf, so prepare some kind of stand in advance. To indicate the maximum extension size, a bright sticker should be attached to the shelf.
- To create shadow seams between the shelf and the floor, you can use narrow furniture spacers no more than 3 mm thick.
- We check whether the surfaces are dry (there should be no traces of scratches on the varnish) and replace the cover.
- We glue the pull-out shelf using special clamps and a board. This structure will be removed after connecting to the base.
- We screw the handles to the shelf and enjoy the result.
Evaluate the manufacturing method:
Loading…
Curtains
Such curtains look stylish and catchy. The size of the curtain itself depends on desire, imagination and the amount of consumables.
If there are scratches on the records, they should be removed using technical Vaseline. You need to apply Vaseline to the disc. After a few seconds, the disc is thoroughly wiped. Often such manipulations can remove an external defect.
The process of creating a curtain takes place in several stages:
- It is necessary to determine the size and calculate the required number of media. The diameter of the disk is 12 cm, and therefore it is not difficult to determine how many plates can be arranged in width and height;
- Next, you should arrange the disks in a certain sequence, as they will hang in the future;
- It is advisable to number the disks with a marker. During the installation process, the written numbers can be erased with ordinary alcohol or vodka;
- Using a drill, four holes are made along the edges to thread a paper clip through;
- The entire structure is assembled using ordinary paper clips;
- The resulting curtain is hung using paper clips or curtain hooks.
It is advisable to hang the curtain with the mirror part towards the room; When hit by light, they will immediately attract attention.
Rack for 200 discs
This CD and DVD storage rack will consist of 2 vertical racks with 4 glass and 1 wooden (for the player) shelves. To make a shelving unit for your home with your own hands, we will need the following materials:
- 2 support slats 150cm x 10cm x 1.5cm
- 4 tempered glass shelves 80cm x 20cm x 0.5cm
- 1 wooden shelf blank 9.5cm x 2.5cm
- 4 sets of accessories
- screws and dowels for attaching the rack to the wall
- 2 screws for fixing a wooden shelf 90mm x 5mm
- glue (carpenter's glue, PVA)
When everything you need is ready, you can start assembling the rack.
1. On the support rails, mark the locations of the grooves for the shelves. The distance between the shelves will be 30 cm, and the margin (from the top and bottom) of the support slats will be 15 cm. The grooves are cut with a chisel using preliminary cuts. Their depth should be 5 cm, and their width will correspond to the width of the shelves (0.5 cm - glass, 2 cm - wooden). 2. Cut the edges of the support rails at an angle of 45 degrees (for aesthetic purposes). 3. Mark the locations for the fittings (25cm from the edges of the support rails). 4. Drill holes for the screws with a drill, secure the fittings to the slats. 5. Secure the wooden shelf. To do this, coat the grooves with glue, insert a shelf into them and fasten it with two screws on the reverse side. 6. Mark 4 mounting points on the wall. Depending on the material, either immediately screw in the screws, or (for concrete, brick) use dowels. 7. Secure the rack to the wall with screws. 8. Insert glass shelves. If they stay in the grooves too loosely, you can stick insulating tape to the joints.
This completes the assembly: a spacious and convenient rack for storing CDs and DVDs is at your disposal.
Wall Clock
Wall clocks can be found in any room. There are craftsmen who create watches from unnecessary media.
To implement the idea you will need:
- CD/DVD disk (you can take several disks if desired);
- Glue gun;
- Screwdriver;
- Working clock mechanism;
- Numbers for the dial;
The appearance of the watch is limited solely by your imagination.
Dream watch assembly process:
- The clock mechanism itself is removed from the old watch; do not forget to remove the hands and remember their location on the watch shaft;
- If you use one disk for the craft, then simply attach a previously prepared plate to the back side. If several discs were initially planned, then a composition is created using a glue gun;
- The dial disk is prepared using a protractor;
- We adapt the resulting clock for installation on a surface or for mounting on a wall.
DIY shelves (Option 1, for DVDs)
It all started with my brother bringing home from work a bunch of chipboards of different cuts (former bookcases) that for some reason were thrown away. For about a month this mountain was lying under our feet and getting in the way, and without coming up with anything worthwhile, we decided to simply repurpose the old sagging shelves for DVDs on one wall (Option 1) and make bookshelves on the second (Option 2)Actually, this is what we have, of course this is not everything, the old shelves were also used, but this was not enough, we had to get a few more pieces of chipboard, but for the most part this applies to bookshelves (Option 2). Specifically for this rack, only shelves were made from this pile, since the vertical walls (sidewalls) were made from shelves from an old rack, which is visible in the photos below.
To begin with, in MAX-se I sketched out a fragment of the wall of our room with all the dimensions, and already on it I assembled such a rack, (photo below) the appearance was suggested by the shelves themselves (with stubs you can’t really turn around) so that the rack was not usually angular, I rounded everything protruding corners; in fact, the most time was spent on these corners when assembling it. We decided to make it modular, for ease of assembly in a small room and hanging on the wall, the plus of the modular option is that sections can be removed and thus change the width of the entire rack, but the downside is that there are four 32 mm vertical bulkheads that eat up distance between shelves. 
I think there is no point in giving exact dimensions, since if you assemble, it will not be from scraps, which means you will set the dimensions based on the available material, besides, the dimensions of the free walls are different for everyone, which means you can add or remove shelves or change their height or width, etc.
This is roughly what a rack looks like in the virtual world
This is an old homemade rack, the shelves of which were used to create the sides of new racks
They forgot to film the assembly of the central parts in detail (the process is very drawn out, you remember about the camera when almost everything is assembled), there are only a few frames, but the shelves are elementary and you don’t need instructions or drawings to copy them.
In this photo there is a half-assembled central part, the chipboard was cut with a jigsaw, but then when the file became dull and there was nothing in stock as usual, a hand saw was used, and the corners were only rounded off with a jigsaw. Everything was screwed together using regular self-tapping screws; I didn’t use any Euroscrews. The radius of the corners was measured according to a regular saucer, the only thing I would like to remind you is that after rounding with a jigsaw, it may seem to you that the semicircle is ideal, but this is almost always not the case, all the crookedness will appear as soon as you glue the melamine edge, so it is advisable to go over it with sandpaper wound on a block.
Now, if you glue a PVC edge that has overlaps on the corners of the chipboard (it can hide a torn cut), then you can not be so strict with the radius, since the edge is thick and all minor irregularities are compensated for by it, and such an edge looks much more beautiful, chipboard visually appears thicker. We also wanted to glue one like this, but the price is 30 rubles versus 10 rubles for melamine, so it all comes down to your wallet. And also, it’s better to edge disassembled shelves individually or a removed entire rack, but I gave up on this (there was no edge, but I wanted to hang shelves) then I spent a very long time crawling along the wall with an iron and a soldering iron, because the iron could not fit everywhere, and I had to remove the shelves Damn, there’s a lot of stuff pointed at them.
Since there are a lot of shelves and in order not to constantly grab the ruler, this crap was assembled (photo above, and below) something similar to a jig that sets the distance between the shelves and at the same time shows where to drill into the end of the shelf . To assemble it, I used three pieces of chipboard and two pieces of hardboard; the hardboard is thinner and thus will not interfere with the drill chuck when drilling. If you assemble it (which is not necessary), then you should mark everything thoroughly and maintain angles of 90°.
In the lower photos you can see how it works, with a pencil you need to put a mark on the side wall, where the top of the first shelf will be located (in my case it is 15 cm) and then everything is simple, put on the jig, move it to the right until a mark appears at the left edge of the right tail hardboard, placed a shelf on the inside and drilled exactly between the pieces of hardboard through the sidewall directly into the end of the shelf.
As soon as we have drilled, we immediately countersink, press the shelf firmly and drive in the self-tapping screw, a screwdriver helps a lot here. In general, a ruler is only needed to screw on the first shelf; the remaining shelves are screwed on using a jig that rests on the previous shelf.
We didn’t like this option with countersinking during assembly (apparently the countersink was dull and didn’t drill well) and we first twisted the rack, then put it on its side, unscrewed one row of screws, countersinked, screwed in the screws, etc.
These are sections of the rack already hung on the wall, without side shelves or edges yet. Here you can see another jamb, a discrepancy in the radii at the side walls, I think this is due to the fact that I sawed them in pairs at once, and with a dull file and thick chipboard I had to press hard, as a result, the bend of the file and the crooked cut, I decided to bring it to mind with a file in place when I twist them together.
The hardboard was nailed to the back wall with a stapler and 14 mm staples, having previously aligned the diagonal of the section (so that there was no rhombus)
The racks are hung on a two-meter furniture rail, 1 mm thick, in obi for a bourgeois rail 2 mm they ask for 500 rubles, I had to take a thin one, which is somewhat similar to a loose zinc bucket. I screwed it on with 8 self-tapping screws, placing each pair of screws as close as possible to the side walls of the shelves . Each section is supported by adjustable Camar canopies, since these plastics are usually placed inside the cabinet under the shelf, I decided to play it safe and screwed on top a couple of corners left over from the former shelving. You can also see the self-tapping screw with which the sections are pulled together, there are only two of them, at the top and bottom
The edging process. We deviated a little from the project; the top and bottom rows of shelves were left as wood
Assembling the sidewalls, there are more photos here, but the body movements are almost the same.
We remove the PVC edge (I think you won’t have this option) you will need it to glue it back onto the upper and lower side shelves after sawing them off and rounding them. It can be removed with a chisel without much effort.
We cut the shelves to the required length.
Ready
We mark the shape of the radius, we will have beer cans on the side shelves, so I simply placed the cans on the board in a semicircle, so that there was no gap between the cans (so that not 5.5 cans would fit, but exactly 6), then I simply drew a line along the cans by hand and I cut out a radius along it with a jigsaw. In the photo below, the line is stamped along the finished shelf, which is why it is so smooth
Already sawn shelves, the torn edges left by the jigsaw are clearly visible; to reduce them to a minimum, try to saw them with a fine-tooth file or a metal file, and of course, sand them.
This is the very moment when you remember the clamp that is not there
I didn’t make a clamp, I sanded them one by one.
Actually, that’s where we started, the conductor is in action, the ends of the shelves rest against the sofa.
Disassembled, countersunk, reassembled (you make countersinks immediately during assembly, disassembling and reassembling is a perversion for the elite
This is the process of shooting hardboard onto the shelves. The hardboard can be sawn well with a jigsaw, but when there was none nearby, they simply cut it with a knife and broke it, of course, rags are formed, but the appearance from the back is not so important, with the exception of the outer edge at the sidewalls. First, I nailed the hardboard to the side wall, then I aligned the first shelf with a carpenter's square perpendicular to the side wall and stapled it to the hardboard. Next, I simply rearranged the jig, rested it on the previous shelf and shot the hardboard to the next shelf.
To see where to shoot or hammer nails in the middle of the hardboard, transfer the center of the shelves onto the hardboard using a ruler, rope, thread or a flat piece of something.
The side panel is fully assembled, I glued the white edge only to the plane, since the radii turned out to be curves. The middle shelves look like wood for now, then we covered them with white self-adhesive.
Edging shelves. The excess edge is perfectly cut off with a spatula, and then I remove small burrs with sandpaper. On the outer shelves I glued a PVC edge with Moment glue, which I removed from them with a chisel.
The right side panel is hung, since the shelves are light, the sides are simply screwed to the middle section.
The jars are waiting for their place on the rack.
The left side panel is hung.
The radii were sharpened and sanded, the edge was glued, the edge was literally one meter short, the cans were placed.
I was also surprised by how exactly the cans fit into the central sections, while their width was taken at random.
I glued the edge and covered the middle shelves on the sides with white self-adhesive.
By the way, the wall is concrete and terribly crooked, somewhere in the middle there is a protrusion due to which the lower edge of the rack protrudes, adjustable canopies helped a lot in this regard.
In general, this is all I wanted to tell you about assembling this rack. Of course, if you don’t have a jigsaw or a screwdriver, then there may be more adventures, but if you have both, and in addition a circular saw, a grinder, a router, or a factory nearby, then you can assemble an even better rack without even having to sweating
Write a message to the author Author: Nikolay Golovin — — — — — — — — 03/16/2012
Other site pages
When copying materials from the site, an active backlink to the site is required. Author: Nikolay Golovin / My hosting provider BeGet.ru 04/12/2012
Hot stand
Since the disk is round and small in size, why not use it as a hot stand. To implement your plan you will need:
- Two disks;
- Paper napkins
- Glue
- Stationery knife.
The process itself is insanely simple:
- The prepared discs are smeared with glue and covered with napkins.
- For reliability, the napkins can be varnished.
You can also cover the discs with rolled napkins or paper strands:
Storage of wheels and tires according to GOST
Storage of winter and summer tires must comply with a certain temperature and light conditions. To keep your tires looking like new, you must follow these rules:
- Wheels on rims must not come into contact with copper products;
- Gasoline fumes and ozone are harmful to rubber;
- storage temperature – from -30 to +35 degrees;
- sudden temperature changes are undesirable;
- the rack must be level, without sharp corners, which can cause deformation of the rubber during long-term storage;
- tires up to 205 mm can be stacked, but not higher than two meters;
- large wheels above 215 mm are stored only in a vertical position, arranged in rows;
- direct sunlight has a bad effect on the strength and durability of rubber;
- wheels can be stored outdoors for no longer than a month; in extreme cases, you can build a small shed if there is no space for shelving in the garage;
- cover the wheels on the rack with a piece of tarpaulin or thick film to avoid contact with oil and caustic solvents;
- High humidity in an unheated metal garage has a bad effect on rubber and metal.
Important. Wheels on rims that are stored for a long time should be turned over once every three months to avoid deformation.
If you store tires and rims correctly, then you won’t have to spend money on re-flashing at the beginning of the season.
Napkin holder
There are two ways to make a napkin holder. For the first you will need a disk and a small piece of thick cardboard or plywood; for the second, only one disk is useful. In both the first and second cases, you need scissors and a glue gun.
First way:
- Cut the CD into two equal parts;
- We cut a piece of cardboard or plywood of the required width and length corresponding to the diameter of the disk;
- Using a glue gun, both halves of the cut drive are glued to both sides of the base.
Second way
- Two parallel lines are marked and drawn on the disk at a distance of 1.5 cm from the middle;
- According to the drawn contours, the plate is cut into three pieces;
- The semicircles are brought to the base at an angle of 90 degrees and connected using a glue gun.
Of course, you can design and color the resulting blank in any way you like.
Rack for 50 discs
The simplest option is more of a shelf than a rack as such. Since the boxes for DVD and CD discs differ significantly in dimensions (1.5 cm and 1 cm in width), in this example all sizes will be focused specifically on CD discs.
For the future rack we will need:
- wooden blank (100cm x 40cm x 3cm)
- narrow board (40cm x 5cm x 1cm)
To make a small shelving unit for your home with your own hands, you need:
1. Draw 25 horizontal lines (along the width of the workpiece) at a distance of 3 cm (1 cm under the disk + 2 cm of free space) from each other. 2. Along these lines, cut grooves 1.5 cm deep, into which the disks in the boxes will actually be inserted. 3. Leave a space free of grooves at a distance of 12 cm from the top and bottom. 4. Nail a board at the bottom of the back side so that the rack hangs at an angle and the discs do not fall.
Candlesticks
Since we've already touched on tableware, why not make a creative candlestick that can play with colors from the moment the candle is lit?
Any decorative elements are suitable: rhinestones, beads, stones. Of course, all these elements should be secured to the base itself, which a good second glue will do just fine.
Requirements for equipment racks
Regardless of whether you decide to buy or make a stand for audio equipment with your own hands, it should:
- Promote high sound quality – create favorable acoustic conditions for sound transmission. A vibration-isolated stand improves dynamics by 10–20%, creates tighter and more powerful bass, makes the sound richer and more voluminous, and provides clarity and depth.
- Provide vibration isolation and damping - cut off all resonances or manage vibrations, control them, intelligently respond to vibrations, differentially absorb or reflect them.
- Provide convenient access to all system components.
- Ensure reliable installation and safe use of equipment - withstand heavy weight loads and do not interfere with natural ventilation and cooling.
- Harmoniously complement the system and fit into the interior.
- Use the occupied space rationally.
The equipment rack is not capable of eliminating electronic defects, but it is not required to do so. Its task is to perform the listed functions and contribute to the maximum disclosure of the equipment’s capabilities. Thanks to such stands, clear sound is achieved, creating conditions for watching films and listening to music in the same high quality as in a cinema.
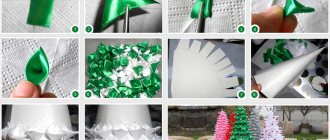
New Year's toys
Moving on from fairly everyday things, one cannot fail to mention the possibility of making New Year's toys. Their surface shimmering with bright colors just begs to be made into a New Year's toy.
Cutting any figure from a disk is not difficult. It is best to decorate the resulting garland with something. For example, draw something or glue a decoration.
You can glue disks pre-cut into small pieces, like fragments, onto New Year's balls.
Such crafts should be treated with varnish - such small fragments can pose a high danger to others if they come off the toy for one reason or another.
With the help of a large number of unnecessary disks and a glue gun, you can always make a Christmas tree that can attract attention no less than a real and decorated Christmas tree.
Standards for storing wheels on rims and tires in the garage
Since tires and tires can withstand sudden changes in temperature, they can be stored at -30 and up to +35 degrees. It is highly recommended not to install shelving or hang hooks near heating appliances. The ideal option is to install racks at a distance of about 1 meter from heating devices and radiators.
How to organize the system correctly?
It is best to make special racks for storing complete wheels and tires. When making such a rack, make sure that its surface is perfectly flat and without any protruding corners.
Also, many car enthusiasts store tires in the garage simply on the floor. This is not the best way, but if you have nowhere to hang a rack in the garage, then the main thing is to put the tires on a flat floor.
It is advisable that the floor in the room be made of concrete, wood or have a good rubber coating. Standard tires up to 205 mm can be stacked on top of each other. Larger tires should be stacked vertically in rows.
The height of the tire stack should not exceed 2 meters.
Tires should not be exposed to direct sunlight or ultraviolet rays. Since their strength will weaken significantly under such influence, and microcracks will appear on the tires. Tires should be rotated every three months. Then they will not succumb to constant stress and deteriorate.
Crafts from disks for children
And since it comes to toys, how can we not make something for our kids. Crafts made from computer disks for children will perfectly attract their attention.
To prevent the child from cutting himself, it is better to use a whole disk when making crafts.
Fish
A classic example of a successful toy is an ordinary fish. The disc is used as a body, and the fins, tail, eyes and mouth can be made from any safe material.
Smeshariki and little animals
These funny characters look like they were made to make your own from CDs. You just need to prepare all the necessary elements and body parts.
If you need to make the character itself the desired color, you can paint the disk itself or, using it as a stencil, cut out the desired shape on a colored sheet of paper. All structural elements can be secured using ordinary glue.
Such a toy will attract the child's attention and give a good mood.
An error-free method for making crossbars
1. Cut out the crossbar dimensions B, C, D, E and save the trim with a cross-section of 18x32 mm for making test tenons.
2. To form tenons at the ends of the crossbars, set up a saw (Fig. 3). Raise the blade above the saw table to a height of 6 mm and cut a test tenon at the end of the trim in two passes. Check how it fits into the socket and change the machine settings if necessary. When the tightness of the test joint is satisfactory, form tenon cheeks at the ends of all crossbars. Without changing the settings, make cuts on the top side of the crossbars B, D. Raise the disk to a height of 12 mm and make the top cutouts on the bottom crossbars C, E , and then the bottom cutouts on all the crossbars. The dimensions of the spikes are shown in Fig. 1a.
3. Install a 6 mm thick groove disc into the saw and lift it above the table to a height of 12 mm. Adjust the longitudinal (parallel) stop to cut out the tongue in the middle of the edge of the crossbars (Fig. 1a). Saw a tongue in the lower edge of the upper crossbars B, D , the upper edge of the lower side crossbars C and the rear crossbar E. There is no need to cut out the tongue in the front crossbars D, E.
Note. If you want to equip the cabinet with internal lighting, drill pilot holes for screws in the front crossbar and make a cutout for the power cord in the back.
4. Mark the center points of the arcs on the lower crossbars C, E (Fig. 1a). Connect these points to the bottom corners of the pieces with a smooth curve (see “Artist's Tip” below). Cut out the arcs with a band saw or jigsaw and sand the sawed edges.
Master's advice
Simple arc marking
To mark smooth lines of arcs on the lower crossbars C, E, you do not need expensive drawing tools. Saw off a thin strip 380 mm long from the edge of the board and compress its ends with a clamp until it bends in an arc connecting all three marked points on the part.
5. Drill holes for the shelf supports on the inside of the lower side rails C (Fig. 4).
6. Mark the centers and make counterbore recesses with guide holes for installing figure-of-eight connectors on the upper edge of the upper side crossbars B (Fig. 4a). Use a drill press, a 20mm Forstner drill bit and a regular 2.8mm twist drill bit.
Scarecrow for the dacha
It would seem that a CD is the most useful item that can decorate a room and attract the attention of others.
But you can use it outside the home as a garden scarecrow. After all, bright glare will easily scare away birds, and therefore these plates can also be adapted for the garden.
It is enough to build a structure on which you can attach the disks so that the glare is visible from all sides. You can secure the CDs themselves with anything: paper clips (you will have to make holes along the edges), fishing line, thread, and so on.
Homemade jewelry box
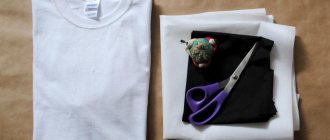
Transfer the pattern to the fabric or immediately draw on it. You need to make 2 such blanks from canvas. Now sew along the markings, making 16 stitches from the outer to the inner edge. Place padding polyester in the resulting pockets. Sew up the top of the disc box.
If you want to make handles, then weave a braid from three strips of fabric.
To make a lid for a box with your own hands, fold two pieces of fabric in a pile, place on a disk, outline with chalk, cut out with a seam allowance of 7 mm on all sides. Cover the disc on top and bottom with these fabrics. If you want the lid to be soft, then cut out two circles of padding polyester and cover the disk first with them and then with fabrics. Sew along the edges with a blind stitch.
Here's how to make a box.
Conclusion
As you can see, many useful devices are made from CDs that will not only delight you every time you start using them, but also bring considerable benefits in everyday life.
In addition, the process of creating all of these crafts will give you and your loved ones a lot of pleasure.
What would you make from disks first?
Vibration protection
The components of the speaker system need not just to be placed on shelves, but to be protected from vibrations. Record players are most sensitive to their influence. All lamp elements are also subject to vibration. Digital and other transistor technology are more resistant to vibration, but vibration can come from disk drives or power transformers. Therefore, racks for acoustic equipment must have the most effective vibration isolation.
Vibrations have an even stronger effect on speakers, especially those installed on shelves. To improve sound quality, floor-standing speakers have a tweeter or mid/high frequency unit, which is made in a separate housing and is mechanically decoupled from the main unit. A similar effect is achieved when installing compact bookshelf speakers on high-quality inert speaker stands. When installing speakers on an unstable shelf, every millimeter of displacement leads to micro-oscillations through the woofers and significant distortion at the HF.
How to decorate a tabletop
To work you will need:
- 20-30 discs (the exact number depends on the size of the table);
- Glue "Moment";
- Construction putty.
Before starting work, the disks need to be cut into small pieces of different sizes.
- It would be good if among them there were both ordinary square fragments and long ones with sharp corners.
- Using glue, place the pieces shiny side up.
- A small number of fragments can be glued with the back side up, so the pattern will be more interesting.
- When the entire surface of the table is laid out, the resulting joints are treated with putty.
The tabletop has received a second life.
Disco ball
The first thing that comes to mind when you see shiny disks is a party ball. To make it, you will need a foam base ball (you can buy a ready-made blank at a craft store or make it yourself from construction foam), hot-melt adhesive (can be replaced with polymer cold glue) and several CDs.
To make crafts from old disks, old media must be divided into parts. This can be done in two ways: break them to form fragments or carefully cut them. The discs are easy to cut with sharp scissors; before cutting, it is better to outline them with a marker. If you decide to make shards, first place the disc in a bag or wrap it in a cloth, then crush the disc with a rolling pin or hammer.
Apply glue to the base ball and glue the disk pieces over the entire surface. Make sure there are no gaps between the shiny parts.
Fridge magnet
A computer disk is a good base for a decorative refrigerator magnet. It can be decorated with photographs, appliqués or some abstract picture. This is not just a stylish decoration, but also a wonderful handmade holiday gift.
Materials and tools:
- CD;
- magnetic strip;
- cut out picture or photograph;
- white acrylic primer;
- stained glass paints;
- polymer clay;
- acrylic paints;
- varnish
Manufacturing technique:
- Make decorative elements from polymer clay. These can be all kinds of flowers, leaves or geometric shapes.
- Dry the clay blanks in the oven at low temperature for 1 hour.
- Paint the decor with the desired colors.
- Coat both sides of the disc with primer.
- Glue the central element of the composition - a photo or picture - to the front side. You need to leave space around the edges to fix the clay decor.
- Trace the outline of the base and photographs with stained glass paint. Leave until completely dry.
- Glue decorative clay parts around the perimeter.
- Glue a magnetic strip on the back side.
- Cover the front part with varnish.
Magnetic tape can be purchased at hardware stores. Alternatively, it is permissible to use the base from old, deteriorated decorative magnets.