Published Oct 11, 2019
Growing a beautiful crystal from copper sulfate, salt or other ingredients at home will require some effort and patience. But it can be a fun activity, especially for schoolchildren.
A crystal can be grown from various substances. As a rule, salts and organic acids are used. You can get them at pharmacies, household chemical stores or specialized outlets. The growing room should have a constant room temperature and average air humidity.
Salt crystals
You can involve children in a simple experiment. All you need is salt and water. There is no need to use additional reagents, so it is a safe process. This is a fascinating activity; every day you can watch how the crystal gradually increases in size.
Preparing for the experiment
Before starting work, decide on the location where the container with the crystal will be located. During growth, do not move or tilt the dishes. It is better to take sea salt, as it does not contain foreign impurities.
Take distilled water or boil it and filter it. You can also use regular table salt for the experiment.
Do not pour the solution into metal containers. Novice researchers are interested in what crystals they can make themselves.
The size of the crystal depends on the duration of the experiment and the volume of the container. The base used is thread, wire, twigs or a piece of salt.
mama-knowet.com
Today, there is a wide range of kits for growing crystals on sale. As a rule, such sets are intended for one experiment and contain one or two products, and they are quite expensive. What I will show you is much more effective, despite the simplicity of execution, it does not require any special devices and reagents, does not limit your imagination and, in addition, is significantly cheaper.
This master class is intended for children over 5-6 years old, as well as for their parents - we will create New Year's decorations for the Christmas tree from “precious stones”. Crystals can be grown from many chemical compounds. Before offering you this master class, I spent a long time selecting substances for “decorations”, looking for affordable materials that were not harmful to health, which would not be difficult to find in retail. I settled on two substances: aluminum-potassium alum, which is sold in pharmacies, and copper sulfate, which can be bought at almost any hardware store.
If you have the opportunity to purchase other salts (chemical reagents), then the range of your products will further expand. I have such substances on hand, so I’ll show you what else can be done.
Don't forget that there is also table salt, which can also be used. To get colored crystals, you can use any food coloring you have.
To make jewelry we will need the following materials:
- copper wire (mine is silk braided, but this is not essential);
- the thread is not particularly fluffy, preferably containing cotton or wool (although acrylic is also suitable);
- instant-setting superglue (cyanapan or any other, I find it more convenient in the form of a gel);
- if you have pliers with long noses, they will help you with your work; if you don’t have them, you can get by.
Let's get to work. We bend the wire and form a template for the future product. We do not connect the ends of the wire so that it is convenient to wrap it with thread.
Using superglue, glue a thread to the edge of the wire and wrap it around the wire. The ball of thread should be taken small so that it easily passes inside the product, then it is more convenient to wind.
The winding should be thick and dense. Whatever was easier to wind, after a couple of centimeters we apply a drop of glue and again glue the thread and so on….
Now you need to connect the loose ends. To do this, we tighten the template and make several turns of thread along the already wrapped initial part. Glue the thread.
We cut the thread as close to the workpiece as possible, otherwise crystals will actively grow on the remaining process. The template is ready.
We make other templates in the same way. These can be flowers, geometric shapes, letters, numbers... whatever you come up with.
It is important to maintain the size of the workpieces - you need to estimate in advance in what container you will grow the crystals and take into account that the workpiece should be of such a size that there is at least 1 cm (and preferably more) left to the walls of the dish. I have beakers, this is just the right size for the heart.
At home, it is convenient to use ordinary jars of 0.5 l, 0.75 or 1 l for growing crystals for large products.
Now let's prepare a solution from which we will grow crystals. I’ll show you how to do this using the example of potassium alum. Solutions of other salts are prepared in a similar way. 1. Pour boiled water at room temperature into a container (it can be a glass jar, glass, etc.) and dissolve the salt crystals in it. The volume of water should be equal to the volume of the container in which we will grow the crystals. Add salt and stir, repeat until the salt stops dissolving and remains at the bottom. This process is lengthy and can take several hours.
2. Add an additional two or three teaspoons of salt to the resulting solution, mix, then heat the contents of the jar to 50-60 degrees in the microwave.
3. Mix well again, achieving complete dissolution. If not all the salt has dissolved, it’s okay. Leave the solution to cool to almost room temperature (up to 30 degrees is possible)
4. Then pour the clarified part of the solution into another container, and leave the crystalline sediment from the bottom of the jar for other experiments.
We take our blanks and soak them in the resulting solution, leave them to drain on a napkin, and then send them to dry on a radiator or in another warm place. This is done so that crystal nuclei form on the threads, which will subsequently serve as crystallization centers.
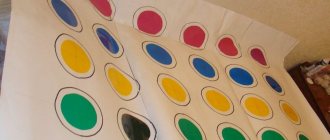
We make triangles out of cardboard (you can take a pencil with edges or sticks, just not round ones, they will scroll and not stick well).
We tie threads to the blanks and wind them onto cardboard - this way you can adjust the depth of immersion by unwinding and winding the thread.
We immerse our workpieces in the solution. I immerse one workpiece in a clean solution of potassium alum. In addition, I take two more containers with the same solution: in the first I add yellow food coloring, and in the second - regular purple ink until a thick purple color is obtained.
This is a solution of copper sulfate. We will “grow” a flower in it.
In addition, since I have access to various chemical reagents, I put in a couple more solutions to check which of them is more suitable for this type of product:
From left to right: table salt with dye (yellow), copper sulfate (blue), cobalt chloride (dark pink), nickel chloride (dark green), a mixture of potassium alum and copper sulfate (blue).
We obtain an orange crescent from a solution of potassium bichromate.
After just a couple of hours, crystals growing on the product are visible in a jar of potassium alum. The rate of their growth will depend on many factors - temperature, concentration and supersaturation of the solution, etc. Crystals can grow from 8-10 hours to 2-3 days. You need to control the completion of the process visually. If few crystals grow, then the product will not be very beautiful; if there are many, they may crumble. A little advice: if your solution sits for a long time, and not enough crystals have grown, you can put the container in the refrigerator; a decrease in temperature will serve as an impetus for new crystal growth.
In a solution of potassium alum, crystals grow quickly and are spectacular; as a rule, there are no problems with this substance. This is the kind of star we get.
We remove the product from the container and cut the thread as close as possible to the surface overgrown with crystals. Let the water drain on a napkin and dry further in the air or on a not very hot radiator.
Crystals grow well in copper sulfate solution. If parallelepipeds grow in potassium alum, then we get crystals with sharp corners.
As you can see, a little more crystals have grown than necessary and the adhesion (attachment strength) of some of them is not high. Therefore, we remove crystals that do not hold well and spoil their shape, and also cut the thread.
We get this beauty.
The flower in copper sulfate also grew beautiful.
In a mixture of potassium alum salts and copper sulfate, crystals grow just as actively, but at the same time there are many poorly attached groups of crystals.
Here, everything unnecessary needs to be removed so that the heart has a neat appearance.
Like this. The heart has a pale blue color.
In a solution of table salt with a yellow dye, crystals grew small, like grains of semolina, and poorly attached. I think the reason for this is the following: I took extra brand salt, special substances are added to it so that the salt does not stick together and caking, which stimulate the growth of small crystals. Yes, plus the added dye, it also crushes the crystals. If you use table salt, you need to use coarse rock salt.
The month turned out to be very bright and beautiful, shiny small crystals. But there is one drawback - the crystals do not hold very firmly, the product must be handled with care.
Crystals grew poorly from pure solutions of cobalt and nickel chlorides, there are several reasons for this, more on them in another master class. Therefore, I repeated the experiment, but as a solution I took a mixture of potassium alum and the above salts, in order to color the products with their help. These are the colored letters we got.
To even out the shape, I removed some of the crystals.
After the products have dried from water, coat them with varnish. You can use any clear varnish. I have this one:
Apply the varnish thickly so that it flows into the cracks between the crystals. The varnish screens the surface of the crystals and prevents the evaporation of moisture from them, then during storage the crystals do not fade or become covered with a whitish film. In addition, the varnish additionally bonds the crystals together and the product becomes more durable.
This is what crystal-coated blanks look like, dried and covered with a layer of varnish.
From a solution of copper sulfate;
From a solution of potassium alum.
From potassium alum with yellow dye.
Made from potassium alum with the addition of violet ink.
From potassium alum with the addition of copper sulfate.
From a solution of potassium alum with the addition of cobalt chloride
From a solution of potassium alum with the addition of nickel chloride.
From a solution of potassium dichromate.
We’ll save the letters for another master class, and use the shaped pieces as Christmas tree decorations.
To do this, attach ribbons to them. I have these:
Our Christmas tree decorations are ready!
Have a nice time and great results!
Growing
Take half a glass of water and pour it into a saucepan. Then the dishes are placed on the fire and brought to a boil. Let's look at what you can grow crystals from at home.
It will take several days to form a craft from table salt. Sea salt forms a crystal in 2 days. If you choose iodized salt, you will have to wait a long time for the results.
It is necessary to prepare a saturated solution. Add salt to warm water until it stops dissolving. We prepare the thread for the warp and tie a small crystal of salt to it.
The rope should not touch the bottom or walls of the container. The second end of the thread is tied to a pencil, which is placed on top of the container. Now we need to watch the growth.
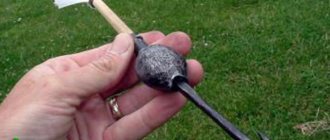
Auguste Verneuil apparatus
Most often, rubies and sapphires are grown using this device.
To grow rubies at home, you can use a device created by the French inventor Auguste Verneuil back in the 19th century. Thanks to this invention, it is possible to grow rubies of different shades (blue, transparent, green, yellow) in 2–3 hours. The device runs on electricity.
The device consists of the following parts:
- a funnel into which salts are placed;
- hole for oxygen penetration;
- burner;
- muffle (chamber for baking products);
- cathetometer;
- shaking device.
For production you will need chromium and aluminum oxides. Manufacturing process:
- Oxide salts are poured into a funnel.
- The device heats up in the burner.
- The salt is melting.
- Ruby crystals form at the bottom of the funnel. Under pressure it sags downwards, adjusting to the size of the stone.
The final cost of the crystal will be higher than the resources expended, so such a business can be considered profitable.
Sugar crystals
Sweet and colorful products will delight children. To get them, just use the instructions for growing crystals at home. For the experiment you need 2 glasses of water, 5 glasses of sugar, wooden skewers, a saucepan, transparent containers, paper.
First of all, prepare the sugar syrup. It will require a quarter glass of water and two tablespoons of sugar. Place this mixture in a saucepan on the fire.
After this, dip the skewers one by one into the syrup and then sprinkle with sugar. The preparations must be thoroughly dried, it is better to leave them until the morning.
Basic inventory
The process of crystal growth is quite long, it can take at least two months. The crystal lattice, the color of the crystal, all of this is influenced by the solution made, the chosen container, and the state of the environment (humidity).
It is worth understanding that the effect of growing a crystal is the same for most formulations, despite solutions from different components.
So, let's select the necessary equipment:
- Dishes. It should not smell, change color or oxidize. A glass or enamel container is ideal. The value depends on the desired type of crystal
- The stirring stick should preferably be made of glass, but wood is also suitable.
- The base element for the solution is sugar, salt or sodium bicarbonate. Depends on the composition of the future crystal
- Filter paper or napkins of excellent quality.
Growing process
Pour 2 cups of water into a saucepan and gradually add 5 cups of sugar. Stir the solution constantly. If the sugar has completely dissolved, remove the syrup from the heat. Leave it for 15 minutes to cool. Cut out circles from paper. They must be larger than the diameter of the containers.
To figure out how to properly grow crystals with your own hands, you need to carefully study the sequence of actions. This will help you get the desired result.
Pour the cooled syrup into glass containers; you can add food coloring to them. Then blanks with paper circles on them are lowered into glasses. The skewers should not touch the bottom or walls. It will take a week to grow sweet crystals.
Note!
- FIFA 22 (PS4)
- Why do you need interior dolls?
- How to choose shoes that don't go out of fashion?
Colored or figured
A unique crystal from ordinary table salt can be made not just white and transparent. It can be painted any color. Absolutely any dye you have on hand is suitable for this. It must be added to water when preparing the solution.
If you want to give your creation a certain shape, you can experiment. For example, take as a basis an object of a certain shape (triangle, ball, cube, etc.). Or you can grow a crystal from salt on strings tied into a snowflake. It should be taken into account that the threads must be elastic and hold their shape well. To prevent the structure from floating, you will need to tie a small weight to the bottom.
In this process, everything is done by the forces of nature and chemical laws. But, if you apply a little imagination, you can adjust the crystallization at your discretion. In any case, you will receive a unique, inimitable piece of decor that can become the highlight of any interior.
Copper sulfate crystal
This experiment requires strict adherence to safety precautions. We will need water, a glass container, and copper sulfate. You need to purchase a homogeneous bright blue powder in the store. Pour 100 g into a jar and add hot water, stirring constantly. We get a saturated solution, filter it and put it in the refrigerator.
The next day, select the largest crystal, fasten it to a thread and place it in a jar with a filtered solution.
The container must be covered with paper to prevent dust from getting in. The growth process lasts several weeks. Afterwards, take out the crystal and cover it with colorless nail polish.