We make a collar and bracers from leather.
A small step-by-step master class on how to make a collar, handcuffs and leggings.
In general, there is nothing particularly complicated, but the skill of working with leather to make these products is still desirable.
So, let's start slowly.
The first is the tool - almost everything that was used is in this photo, with the exception of the sander, but it is below.
All of these tools, as well as many others, can be found on the Leatherworking Tools page.
The second thing we need is the actual skin. Yes, it is leather and it is desirable that it be natural, although now there is leatherette that is not much inferior to leather, but still I work with natural leather) Here it is, leather. The brown one is a saddle cloth from Russian manufactories, thickness 2.3-2.5 mm, bought with a half-skin size of 220 dets., the quality is slightly above average, there are places that are not suitable for anything else except for scraps. The beige leather is a sheepskin made in Italy, 0.8 mm thick with a finishing coating already applied. For the plan, it was necessary to cut the leather into strips; a stap cutter helped me with this, but you can also use a knife, for the collar the width is 33 mm, for the handcuffs 44 mm, strips of 20 mm were used for the belts, and strips of 14 mm for the leash. The width for the collar is made smaller so that it is comfortable for the neck.
After it was all cut, the saddle cloth was made to size, the sheepskin with an allowance along the edges of a couple of mm, this was done to make it more convenient to glue and easier to process the edge in the future, but more on that later. So, when gluing it was so exciting that I simply forgot to capture the process, the fascination of the process lies in the fact that the sheepskin has to be glued in a stretch so that it itself stretches the saddle cloth, otherwise after drying and shaping the sheepskin will wrinkle. I would like to avoid this, but I never fully completed the task, but they didn’t wrinkle too much, but if I glued them on a plane, then I wouldn’t have to continue any further and throw out the unsuccessful workpiece. Well, the rough blanks are ready, and we cut off the allowance that was left on the backing, the role of which is played by the sheepskin. We round the corners and begin preparations for processing the edges, also known as the ends. Yes, we are starting now, and not on the finished product.
Let me say right away that there are so many craftsmen, so many processing methods, and how they process it requires a separate post, or even two. I’ll tell you how I do it, but everyone decides for themselves whether to repeat it or not. So, to process the edge, I use Kezal colorless water-based finishing. It is quite easy to apply, you can wipe it off if you accidentally drip it by, dries quickly and makes the skin rough enough for polishing. The photo showed a sizing agent from Kenda by chance, but I only use it as a finish, since when polishing it ungodly clogs the skin, just like trying to remove paint.
Well, a sizing is applied to our blanks and after 15 minutes we can begin the first phase) We remove the edge of the end with a hammer, this operation can be done before the sizing, but with it the skin is rougher and it’s more convenient for me. I don’t remove the lining with a butt hammer; there is no need for such a strong rounding of the corner.
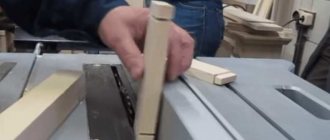
After that, I pick up a small mechanization tool from Proxxon and go through the ends with 180-grit sandpaper (it is possible without mechanization, but then it will take much longer and we should not forget that the movements must be in one direction, otherwise the skin pile may rise and there will be a lot of stupid work), For narrow strips that are not very convenient to press to the surface, I made something like this from plexiglass, which makes it possible to press along the entire length and not bother.
After this, the sizing is applied again and if everything is satisfactory, then you can switch to 250 sandpaper; if not, then repeat the step with 180 sandpaper. On harder leathers, as a rule, it is much easier to make the ends than on soft ones.
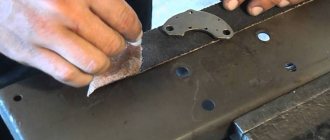
How to make a collar, bracers and leggings, photo No. 8
Now the ends are ready in the rough version, but that’s not all with them) we will do more, but a little later. We take a groove cutter in our hands and make a groove around the perimeter in which the thread will fall, we can do without it, but with it it’s somehow more beautiful or something, but for a beginner it’s not a replaceable tool at all, since the seam still doesn’t turn out smooth and with the same effort tightening the stitch, it is the groove that saves many jobs. So, on my own behalf, I recommend that if you have the choice to take it or not, be sure to take it!
We take a punch in our hands, I have a 4 mm pitch, they were made in our already dear and not everyone’s favorite China, but they serve with dignity and so far they have only failed a couple of times, on very thick leather 7 mm, when taking it out, it rocked and broke a tooth