I have a grinding machine in my workshop. Occasionally I use it to polish some parts. The last purchased ribbon from the set recently broke. I didn’t want to go to the store for new ones, so I decided to make my own from sandpaper. It turned out, by the way, very well, so next I want to tell you about how to glue the grinder tape with your own hands and a little about it itself.
Source pinimg.com
How to choose a grinder belt
So, belts in the budget niche, which are represented by the products of the BAZ Belgorod Abrasive Plant, are quite cheap compared to others, which is logical.
These belts are very “aggressive”; they are designed for grinding hard, hardened steel.
This manufacturer also has ribbons with ceramics.
The disadvantages of these tapes are that they wear out quickly and also begin to heat up over time. On these belts, the metal dust that arose during processing cokes, which is why it begins to tear the grooves of the processed material.
Of course, this happens over time on all tapes, regardless of the manufacturer or the skill of the operator, but on these tapes it happens much faster.
Source ytimg.com
Higher quality abrasive belts are represented by products from ZM and VMS.
These companies even have entire series of belts and other abrasives for grinding machines, which are designed for full processing of the workpiece material, from rough scuffing to polishing.
When choosing an abrasive belt, keep in mind that the shorter the belt, the faster it wears out.
Adviсe
On the Internet, many non-professional machining workers using a grinding machine advise using belts with P24 abrasive grain for primary processing, since this is the largest grain for rough abrading of the material.
This advice is based on the opinion that large grains should, in theory, process the material faster, however, as practice shows, large grains work faster, and a belt with this grain shrinks and wears out faster.
Therefore, use belts with abrasive grain P36 or P40 during initial processing.
And buy a rubber pencil (it removes the remaining dust that cokes on the abrasive belt of the sanding machine), thanks to it your abrasive belt will last 2 times longer.
Source beauty-prof.com
How to glue grinder tape
So, now about the most important thing - how to glue the grinder tape yourself.
If you decide to make an abrasive belt for a grinding machine with your own hands, then you will need:
- Sandpaper with the abrasive grain you need;
- DZ class PVA glue or “Moment” glue (ordinary PVA glue will not work);
- Hammer;
There are two types of gluing abrasive tape for grinders:
- Gluing the tape with an overlap;
- Butt gluing of tape;
Gluing overlapping tape for grinder
Overlapping gluing glues the tape very well; the likelihood that the tape is glued in this way is minimal.
The disadvantage of this gluing method is that at the gluing/joint site it “hits” the material. This drawback also has a logical pattern - the larger the grain of the tape, the less shock is felt on the stack.
To glue sandpaper into a tape using the overlapping method, you need to remove the abrasive at the gluing site.
This can be done either on one of the ends, or on both at once.
If you remove the abrasive from one end of the tape, the tape will end up with solid abrasive grain along the entire length of the working surface, but the beating will be felt more strongly during operation.
If you want to glue the tape end-to-end, then you will not need to remove the abrasive from it, however, the strength and quality of the connection will be inferior to overlapping gluing.
Source delairukami.ru
Before gluing, you must prepare sandpaper with the required grain.
Place markings on it according to which you will cut the tape, and, in fact, cut the tape.
Next, mark the ends of the tape according to the template; the angle of the end of the tape is arbitrary, but should be in the range of 30-45 degrees. Then cut off the excess pieces.
Mark the place where you will remove the abrasive and bend it.
Use a knife to scrape off the abrasive from the bend of the tape.
Next, you need to remove the abrasive from the bent piece. This can also be done in two ways.
The first is using a solvent. It is necessary to apply the solvent to the back side of the tape, then give it a little time to dry and scrape off the abrasive with a regular knife.
The second is with glue. The first step is to coat the abrasive grain of the bent piece with glue.
You should use DZ class PVA wood glue, as regular glue will not work.
Afterwards, you need to glue a piece of abrasive tape with glue applied onto the board or block, and then heat the gluing area with a regular iron.
Carefully tear the tape off the block so that the abrasive grain remains on the block.
The remaining grain is cleaned off the belt with a knife.
Next comes the gluing of the tape itself.
If you have cleaned off the abrasive grain from both ends of the tape, then they are both coated with glue, after which they are applied, pressed and heated with an iron for faster gluing.
If you cleaned the grain only from one end of the tape, then saturate the end without abrasive grain with glue, then place it under the second end of the tape and press it all the same way, and heat it with an iron.
At this stage, you can also use Moment glue; in this case, at the end you will need to tap the joint of the tapes with a hammer for better quality of the gluing seam.
Source delairukami.ru
Butt gluing
For butt gluing, you also need to prepare sandpaper, mark it, cut it, mark the joint, which should be at an angle.
However, after that you need to cut off a piece of special fabric - it can be silk-screen fabric, braid for gluing ribbons, silk, cambric, or even fabric from an old umbrella.
This piece is adjusted to fit the seam of the tape, after which it is impregnated with PVA glue of the DZ or “Moment” class, after which it is glued to the ends of the tape, pressed, heated and, in the case of “Moment” glue, tapped with a hammer.
Do not forget that the tape glued in this way is only supported by this fabric, which can tear and lead to injury.
Therefore, it is necessary to observe safety precautions.
Source delairukami.ru
I recommend the following video, in which the author shows how to properly glue abrasive tape for a grinder with your own hands:
Gluing overlapping belts for a sander at home
The following prompted me to search for information and further experiments.
1. Assortment. In my work, I am used to using 4 types of sandpaper grit: 40, 80, 100 and 150. In the 3 years of using my sander, I have never seen ready-made belts with a grit of 40 and 150. Perhaps they exist in nature.
2. Price. One ready-made belt for a Jet or Zubr garage sanding machine costs a little more than 100 rubles. A square meter of sandpaper costs an average of 250 rubles, from which 10 tapes can be made. A more than fourfold reduction in the cost of consumables is a serious motivator for me.
3. Overhead costs. I brought 40 meters of sandpaper in rolls from the nearest hardware store - I made 100 tapes of 4 types - I forgot about the sanding belt for six months. In my conditions, the closest one is 20 km away. — every day (even a week) you can’t run over!
An additional incentive for me was the fact that everything had to be done from improvised means and materials, without resorting to high technology. In other words, on the knee.
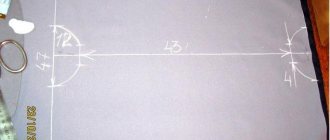
So, we tear off a strip of the required width and 20 centimeters longer from the canvas. We mark on the inside the exact length of our tape +10 mm. for overlap. The length of the tapes is always indicated in the instructions for the equipment. I have it 914 mm. Total 924 mm. We make a bevel. I did it while looking at the standard tape. This is understandable. The angle must correspond to the diameter of the rollers.
An important point is the direction of rotation and, in fact, overlap.
On the reverse side of the entire roll of sandpaper there are arrows indicating the direction of sanding. In my case, it didn't make it into the lens, so I had to draw it myself. It’s easy to remember what’s on top and what’s below: the first “car” in the direction of travel should be on top, the second on the bottom.
— Because the part being sanded should jump off the step, and not rest against it.
Next, we will prepare two strips approximately 20 mm thick, twice as wide as the tape. Turn the tape over to the front side and mark (with soap or chalk) 10 mm at each end. We coat one strip and both marked ends with ordinary Moment glue (you can use 88-m, epoxy, polyurethane or cyanoacrylate “super moment”). This is done in order to free our tape from abrasive.
The reason is simple: the smaller the step at the junction of the sanding belt, the better. Vibration, durability of the belt and grinder, grinding cleanliness, noise and much more depend on this stage. At first, I removed the abrasive with a round file (placing the tape on the rolling pin). But over time I realized that:
a) I lose 1 file per month; b) I feel sorry for the files!
Then I wait 15 minutes for the glue to set. I perk it up with a hair dryer. I put the glue-smeared piece of wood on top of the coated abrasive, put a clean piece of wood underneath and tighten it tightly with clamps!
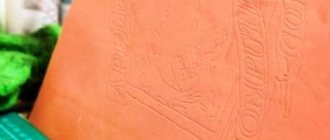
After that, I wait another day (or as long as the glue needs). I sharply tear off the adhesive connection and see something like this:
Next, apply glue again, wait 15 minutes and, without a hairdryer, beat off the joint with a hammer. From the front part - the tip.
From the inside - flat. For beating flat workpieces, I have a plate (like an anvil) made of 10 mm steel.
Of course, each master has his own experience in handling 88 glue. I was taught by Tatyana Mikhalenko (Orlova) - a genius, a brilliant dressmaker and craftswoman who taught me how to work with natural leather. And, by the way, in the instructions for most of these adhesives, it is written that force is more important than its duration.
In a maximum of 24 hours you will receive a working tape for your grinder.
This tape is glued using a similar technology. She has been using the sander for a week, and as you can see in the marked area, there is almost no step.
The “trick” is not mine. Nevertheless, I placed it here for 2 reasons: its importance for all artisans and repeated personal gratitude to its discoverer