home feel cozy, sometimes it’s enough to add
some little thing.
This little thing can be anything - starting from some unusual handmade
and ending with furniture.
Alternatively, you can “dilute” your home decor by using decorative
lamps
.
For inspiration, we have collected for you 14 original
ideas on how to make your own
lamps from wood
-
antique
, classic, modern.
They can be divided into 4 groups:
- suspended (or those mounted on the ceiling
); - desktop;
- wall;
- floor
Before you start making wooden lamps
, you need to decide on the sizes, and also figure out where they will be located and how best to secure them.
For example, to make wooden chandeliers with your own hands
, you must take into account the size of the room and the height of the ceiling.
If you hang a large chandelier in a small room with a low ceiling, it will look too bulky. And a tall person may also have to bend down when passing under it.
To make a lamp or chandelier from wood with your own
You can use a variety of materials with your hands:
- boards, scraps of furniture panels;
- plywood;
- other sheet lumber (chipboard or OSB);
- wooden bars.
Make lamps
You can make
your own lamps or from logs
and
branches
.
In this case, you will get a truly unique and unrepeatable item that only you will have.
If you want to make a chandelier with your own hands from antique wood
, we recommend using noble
wood
- for example, oak or walnut.
Moreover, it is important that the wooden
was dry - otherwise, during operation of the finished product, the material may warp.
In general, do it yourself
Wooden lamps can be made by anyone who knows how to use hand and power tools for woodworking.
Features of the material
Wood is commonly used in furniture, flooring, and small interior elements. But more and more often they began to use it for lamps. All because of environmental friendliness. Wood is a completely natural material that does not emit harmful substances.
Additionally, the psychological aspect is highlighted. It is believed that the more wood there is in the interior of a house, the better its owner will feel, he will be able to relax after work and relax.
Another feature is that you can make a chandelier out of wood with your own hands. From the material you can plan figures of almost any shape. Sometimes special tools may be required to work with wood, and sometimes you can do it with just a standard set.
What kind of wood should I take?
The surest way to find a suitable driftwood for a lamp is to go for a walk in the forest. Most often, branches can be found under old trees. Your task is to find one that has not undergone the process of rotting. It is best to look for snags immediately after a storm, since at this time fallen branches have not yet had time to begin to break down.
In Australia, people are woken up not by roosters, but by parrots (video)
Who is she - the woman who won the heart of Anatoly Kot
It became known how many Russians are ready to give up plastic tableware
Take several options for driftwood at once, and as you work, you can choose the one that suits you best. For example, for this project, my husband decided to take a bird cherry branch. You can later turn the remaining driftwood into decorative lamps.
Pros and cons of wooden lamps
Wood will not harm your health.
Chandeliers made from boards can be found not only on the ceilings of apartments and private houses, but also in restaurants, hotels and other premises. Wood is used to make wall, hanging and ceiling structures. Table lamps and bedside lamps are even made from this natural material. Studying the positive and negative aspects will help you understand why wood is so popular in this area.
Advantages:
Environmental friendliness of raw materials. Wood does not emit harmful substances or unpleasant odors. It also does not cause allergic reactions.
Easy installation. The structure of the tree allows you to fix hooks and other fasteners.
Appearance. Pliable raw materials allow craftsmen to make beautiful lamps for any interior style.
Strength and durability. Under normal operating conditions, wooden chandeliers will last for several decades.
Flaws:
Risk of flammability. Dry, untreated wood is a fire hazard.
Pests may appear. Some types of insects can make a home for themselves in wooden products.
Humidity level requirements. Not all wooden chandeliers are suitable for kitchens or bathrooms, as they can be damaged if exposed to moisture.
All these disadvantages do exist, but they can be eliminated or weakened by treating the wood with special varnishes. They will protect the material from moisture, pests, and fire.
Special coatings improve the properties of wood
Tips for caring for the product
To prevent wooden lamps from deforming or cracking, you need to properly care for them:
- Do not allow excessive temperature or humidity in the room.
- Do not place wooden lamps close to heat sources (radiators, fireplaces). The distance to them should be at least 1 m.
- To wipe off dust, use a dry, soft cloth.
- If contaminants cannot be removed, use an aqueous solution of ammonia (1:6).
- To remove scratches and add shine, mix vegetable oil and lemon juice (1:2) and wipe the wooden surface.
Application in various interiors
The versatility of the material, painting in any color and combination with other materials opens up many design possibilities. Wooden chandeliers are relevant in the following styles:
- Retro . You can make an antique lamp from wood. The original option is the shape of a cart wheel with candle-shaped lamps located around the perimeter. This design is relevant for country houses, hotels, restaurants.
- Country . An interior style in which it is difficult to do without wood. Chandeliers of simple shapes without additional framing are suitable for it.
- Provence . The interior style has simple shapes, but here the structure will additionally need to be painted in light colors. For decoration, you can use small drawings of flowers and leaves.
- Loft. Rough wood and its combinations with metal and glass are popular in this style. Dark colors are mainly used.
Chandelier in loft style. - Eastern . For such a lamp you need solid wood. The main characteristics of the design are strict shapes and lines, decor with oriental motifs.
- High tech . For this style, wood will be only part of the structure; it will have to be combined with metal, frosted glass, and plastic.
Finding a stable position
The next step in creating a driftwood lamp is to find a stable position. This is the most tricky and painstaking work. If your branch is long and thin, then you will need to balance it well so that it can take on a vertical position. It is unlikely that you will be able to do this perfectly on the first try. To balance the branch, use a sanding block. You will need to shape the driftwood so that it can stand upright without assistance. The branch should not swing or deviate in any position. The bottom edge rests entirely on a horizontal surface.
Environmental mission: famous hockey player Vyacheslav Fetisov heads VOOP
“Rose gold” will add zest to your look: fashionable coloring ideas
Funded by the city budget: restoration of the Gothic well at Orlov’s dacha
What you need for work
Depending on the design option, you need to prepare materials and tools in advance.
Tools and accessories
Materials you will need:
- Wood. This can be timber, boards, branches or small planks.
- Fastening elements. The base is usually made of the same wood; chains and hooks can also be used.
- Cartridges and lamps.
- Additional materials. Some designs may require metal, glass, ropes, or other materials.
Rope can decorate a structure.
Tools:
- Sandpaper on a beam. Necessary to polish the surface of the material.
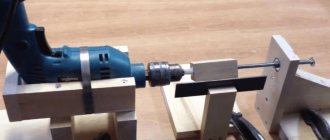
- Drill with pen attachment. Needed to make holes for cartridges.
- Brush. Used for applying paints and varnishes.
- Screwdriver.
- Tools for measuring and marking. Pencils, markers, rulers, tape measures are used.
What lamps to use
LED and fluorescent light bulbs work best. You can also use incandescent or halogen lamps, but during operation they get very hot, so they will be relevant in well-ventilated structures, for example, in a gazebo or on a terrace.
Choosing a wood type
Each type of wood has different properties, so before choosing, you need to know what design the wood lamp will be. Basic materials and their features:
- Pine. It lends itself well to processing, but has internal divisions, where individual circles are separated by resin. Therefore, this wood is not suitable for small parts.
Pine boards are suitable for large parts. - Cedar . Another coniferous species has a high density, so parts of any size are made from it. Cedar has an interesting pink tint and is often used without additional staining.
- Oak _ High strength, but low resistance to splitting. This wood is difficult for beginners to work with.
- Deciduous trees . They have high strength and can be used to process parts of any size and complexity.
Blueprints
One option is to use ready-made drawings. The advantage is that it saves time and that there are examples of finished products.
The second option is your own drawing. This is how you can make your own designed lamp. The diagram must necessarily show the dimensions of the structure, places for light bulbs, and the length of the step between them.
Wall or ceiling painting chandelier
Materials that will be needed for work:
- frame with glass of the same size (one side is 50-60 cm, thickness is 5-8 cm)
- LED Strip Light
- LED wiring
- plug and switch
- drill
- double sided tape
- wooden rods
- paint (acrylic)
Step-by-step instruction
- Remove the glass and backing from the frames, leaving only the frame.
- On the crossbar of the frame, retreat 15 cm from both edges and mark with a pencil.
- Drill 8-10 holes between the notches at equal distances from each other. Marks in the places under the hole will help you avoid unevenness. The holes must have a diameter that matches the diameter of the prepared rods.
- Apply 2 strips of double-sided tape along the edges of the frame. Glue the LED strip onto it.
- Connect the light elements with a cord to an electrical plug, do not forget about the switch.
- Since the back of the frame will be visible behind the decorative branches, it needs to be decorated. The backdrop can be improved by decoupage or covering it with special paints that add an interesting texture to the material.
- Dry all elements thoroughly and check the light range for functionality. Now the picture lamp can be assembled.
- Insert the prepared branches into the drilled holes. If necessary, trim them so that they look harmonious. Connect the frame to the dried, decorated backdrop.
Such a lamp will look harmonious on the ceiling above the dining table or seating area, as well as on the wall. If you place the composition in a frame on the wall, you can make a second similar chandelier for the opposite wall as a design solution.
Original ideas for wooden crafts
Studying interesting ideas will help you figure out what kind of wooden chandelier to make for your home. When choosing, you need to rely not only on the beauty of the product, but also on the complexity of execution and the required materials.
A simple option made of timber
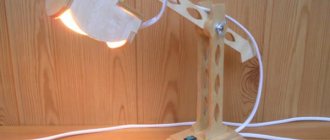
The simplest homemade lamp made of natural wood will be the one with a minimum of details. One beam or board is used as a body, on the surface of which holes are made for 3-4 light bulbs. You can secure it using chains or a pipe; the wires will be neatly hidden in it.
A classic version of a wooden lamp.
Antique chandelier
It can be made in the shape of a wheel, but this is a massive lamp, it will decorate a restaurant well, and it will look beautiful in a house except in a large hall. For rooms, options from a combination of several natural-shaped boards are suitable. Additionally, the structure is equipped with lampshades and decorated with ropes. Chains are used for fastening.
Retro style product.
From tree branches
A good option is to use pendant lamps that twist around a branch. This design has the advantage of being easy to replace; at any time you can throw away the old branch and hang a new one.
Hanging chandelier made from a branch.
Wheel chandelier
A more complex option that will require carpentry tools. The chandelier consists of a central circle, spokes and a wheel rim. Chains are used for fastening. The lamps are installed in the form of imitation candlesticks and can be located either on top of the wheel or below.
Chandelier in the shape of a cart wheel.
From wooden beads
A beautiful option, usually consists of bases and shaping elements. The beads themselves are strung on a thread or vein. You can use either simply polished light beads or additionally color them.
Elements that give shape are required in the design.
From slats
From wooden slats you can make not only a chandelier, but also sconces, nightlights and other lighting fixtures. The work will require many slats of a certain size, which are laid one by one, and the light will pass through the holes.
Rectangular lamp made of slats.
Loft
Branded pendant lamps are perfect for the loft style. They can be placed on a wooden base without any problems. Not only massive timber is suitable here, but also boards of small thickness.
Wooden chandelier with pendant lights.
From LED panel
This lamp has a body made of wood, inside of which LED panels are installed. You can make large suspended structures of this type, but they are only suitable for rooms with high ceilings.
LED lighting can be used for the dining area in the kitchen.
The video contains unusual ideas for wooden lighting equipment for the home.
Lampshade
A lampshade is almost an essential element of any table lamp, floor lamp or pendant lamp. Its task is to hide the lamp and socket from prying eyes, generate soft, diffused light and, if you want, protect against accidental contact with a hot lamp and electrical elements. This is also an interior solution, selected in accordance with the overall design style of the space.
We said “almost an obligatory element” because certain design styles, such as loft or high-tech, often do without a lampshade in their lighting fixtures, leaving the lamp (often of an original shape) open.
You can find many very different lampshades, incl. and such as in the presented photos. A standard lampshade for a table lamp consists of a steel wire frame with a fastening near the socket and a fabric or plastic cover, sometimes a glass cap of an original shape.
When building a table lamp with your own hands, the issue with the lampshade is usually solved in one of four ways:
- use a ready-made lampshade;
- decorate the finished frame from an old lampshade;
- make the frame yourself and then decorate it beautifully;
- do without a lampshade at all.
The second option can be considered the most common, however, the most “hardcore” and “crazy” DIYers do not run away from difficult decisions, but stock up on the necessary tools and materials and rush into battle. When creating a frame, you cannot do without strong steel wire, tools for bending it and electric welding (for thick wire) or serious soldering. You can do without all this by connecting the individual wire elements with careful twisting.
Read also Crafts from toothpicks. Ideas, models, photos
After manufacturing and painting (not necessary, but desirable) the frame of the lampshade, it will have to be decorated in one way or another, whichever you like best and suits the interior. This can be plain or decorated fabric, paper with appliqués (fortunately, LED lamps practically do not heat up), pendants made of beads, original glass and other decor, which are offered in abundance by special stores for needlewomen, both individually and in ready-made sets.
You can use thread weaving and covering with ready-made macrame.
Lampshades made from various types of cardboard boxes, large tin cans, metal sheets twisted into a cone, etc. look somewhat brutal. However, for the loft style and the like, this is a very good design option for lamps!
Step-by-step process for making lamps
In the form of a pallet
The simplest wooden lamp is made from one or two boards. The instructions present a slightly improved version with a shape similar to that of a pallet leg.
Stage-by-stage execution of work:
- Drawing up a diagram and measuring the boards.
- Next you need to cut out two identical boards and 6 small square elements.
- After this, the material must be sanded and holes for the cartridges drilled in it.
- The cartridge is inserted into the structure.
- Everything is held together with screws.
- A wire is attached to the top board, which is connected to the bottom through holes.
- The assembled structure is covered with paints and varnishes.
- Next you need to screw in the fasteners, in this case these are hooks.
- Chains are attached to the hooks, light bulbs are screwed in, and electricity is connected. The lamp is ready for use.
Retro style
A massive antique lamp can be made from pine timber. The design does not include small elements, so pine would be an excellent choice.
Instructions:
- The timber of the required dimensions is cut.
- The wood is sanded.
- The structure is folded, all dimensions are checked, and the entry points of the upper ones are marked on the lower beams.
- According to the previously made markings, cuts are made in the beams.
- Using sharp tools, the product is shaped.
- The elements are folded like a construction set so that the protrusions fit into the grooves. After this, the beams must be covered with paints and varnishes.
- Next you need to make holes for the light bulbs.
- All that remains is to insert the cartridges and connect the electricity. Additionally, metal frames of light bulbs and rope can be used to decorate the structure.
Oriental design
The slatted design will fit perfectly into oriental styles; it takes a little longer to make, because it consists of small parts, but the result will please you.
Instructions:
- On long wooden blocks, segments 22 cm long are marked.
- The next stage is cutting the material along previously marked sections.
- After this, sand each strip separately. Then on their surface the places for the holes are marked, in which the connecting elements in the form of toothpicks will be located.
- Toothpicks need to be moistened in PVA glue, inserted into the holes, and the next two strips installed, but on other sides.
- In this way, the entire body of the lamp is assembled; an additional strip is attached to the top layer, in which the place for the socket is marked.
- Coating wood with stain.
- After varnishing, you need to insert the cartridge and connect the electricity.
- The hanger can be made from a small piece of wood and a rope, which is attached to the top bar.
- As a result, the slats create an original and beautiful lamp.
Ceramic table lamp
Let’s say right away that under the general name “do-it-yourself ceramic table lamp” we have two ways to independently make this useful device from a noble material.
No, you don’t need to knead clay and work on a potter’s wheel - we’ll make do with the beautiful dishes we already have, which for various reasons we don’t mind using to create another beautiful thing. In the first case it will be a ceramic flower vase, in the second - N number of cups, saucers and bowls.
Lamp from a vase
Let's start with the simpler option. It is somewhat similar to the “eco-lamp” discussed above, with the difference that instead of a round one we take a ceramic vase.
In the photo, the vase may not seem very stable, expanding upward. This is not scary if the tube-lampshade holder is positioned strictly vertically. We also measure the length of the tube in advance, taking into account the size and design of the lampshade. If there is also an external thread on the side opposite the cartridge, screw a metal disk to it with two nuts (you can even use a lid for sealing preserves with a hole made in the center) and with this disk insert the tube inside the vase. Now all that remains is to prepare the gypsum mixture and fill the vase cavity with it about 1/3 (no more). Align and fix the lampshade stand vertically as accurately as possible, otherwise in about an hour, when the plaster has completely hardened, it will be impossible to fix anything.
Do you know what else needed to be done? That's right, bring the power cord out! There are two ways to do this. The first, simpler one: bring it out through the top edge of the vase. This compromise option is quite suitable if the lampshade is placed slightly below this very edge, and the wire itself is on the reverse side. Then you don’t even have to run the power cord into the cavity of the tube, just grab it a couple of times with tape or a plastic tie just below the cartridge and a little above the plaster casting.
Method two, if the first is not suitable or causes internal resistance in the soul of a perfectionist. All you need to do is drill two holes: one in the side of the tube, just above the plaster layer, the other in the vase itself from the back (very carefully, at low speeds). Bring the wire out into these holes and then follow the usual pattern - switch, plug...
Lamp from a tea set
It happens that your favorite tea set decreases in quantity over time, proportionally increasing the amount of happiness in your destiny. And then, just for the next anniversary, friends gave you a new set of teaware, making you promise to actively use it, remembering each time the solemn event and the donors themselves. What can you do, I gave my word - keep it.
Read also How to make artificial snow
Let's give old cups and saucers a new life?! Believe me, those who are not in the know will not immediately understand what is going on when looking at the new lamp in your home.
As shown in the picture, we build the pyramid in such a way that the individual elements are tightly connected to each other in a vertical position. In principle, you don’t have to come up with anything new - take a ready-made idea!
To assemble the individual elements into a structure, you will need the same tubular holder for the socket and lampshade. Ideally, it turns out that the thread is cut at both ends of the tube and at least two nuts are available. We think you already understood, even without our explanations, that in the center of every cup, saucer, etc. you need to drill a hole with a diameter equal to the thickness of the tube. You will have to try very hard, since old dishes love to crack from such procedures. But then, assembled in a predetermined order on an iron frame and tightened together (not too tightly!) with nuts on both sides, the table lamp stand will be almost monolithic. You can additionally fix it with hot glue, but so that it is not noticeable from the outside.
If there is no external thread at the bottom of the rack, you will have to firmly fix each element with hot glue to the central tubular rod. And among themselves, although this is not necessary.
We work with electricity
After your decor has acquired its shape, you can tackle the most difficult part, namely, connecting the electricity. Wires sold in hardware stores usually come in three colors: brown, blue and yellow-green. The latter is intended for grounding. However, outlets usually rarely have room for it.
So if you are using a ground cord, you can simply wrap it with electrical tape and leave it. All that remains is to connect the brown and blue wires. The neutral wire should be connected to the screw sheath and the phase should be tied to the center pin in the center of the socket. This is necessary because when screwing and unscrewing the lamp, the hot wire must be connected to the screw shell. If you touch the lamp threads, you may receive an electric shock.
BTS Named World's Best Selling Artists Of 2022 In The Music Industry
Correct geometry: classic dresses of the year that perfectly style your figure
A toy created based on a sketch by a 9-year-old Russian will appear in IKEA stores