Home House and cottage Do it yourself
A newspaper cap is a cute and practical headdress that protects from the sun's rays. The biggest advantage of such a hat is that it can be made in a few minutes anywhere. To do this, you don’t need scissors, glue, or threads—it’s enough to know how to properly roll an ordinary newspaper. It is believed that it is correct to wear a classic cap slightly tilted to one side. Often this does not work out, since it is not always possible to choose the correct size of this headdress. There are no such problems with a paper cap; its main purpose is protection from the sun. In addition, a paper cap can be made very original. It is believed that a classic cap is a small cap, flattened on the left and right. But now a cap can be called an ordinary sun hat from a newspaper. All you have to do is use your imagination and from a sheet of newspaper you will get a cap in the style of a cowboy hat or cap with a visor. After all, modern designers on high fashion catwalks have been experimenting with this model of cap for a long time, why don’t we try to make something special out of the classic version of a military headdress?
So, to make a cap we need a spread of a regular newspaper. Some models of caps use a ruler, pencil and paper clips, but this is not at all necessary. We will be putting together the following cap options:
- Classic cap
- Pioneer cap
- Budenovka pilot's cap
- Square cap
- Cap with visor
- Aviation pilot
- Rain helmet
- Ordinary cap
- Medical cap
- Chef cap
- Nurse cap
- Cap
- African cap
- Square cap
- Cowboy hat
- Cap-Chinese cap
- Elegant cap
- Simple cap
- Santa cap
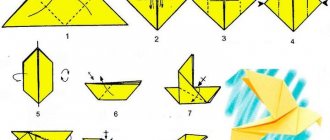
Classic newspaper cap
A classic version of a neat cap, worn slightly to the side.
To make a cap, it is better to take a square from a newspaper with a side equal to the volume of the head plus 1.5-2 cm.
- Fold the newspaper in half.
- We bend each of the resulting rectangles in half to the center.
- Then we fold part of the paper from the edge of the newspaper to the resulting fold line again.
- We bend the upper corners into a triangle into the center of the model. We lift up the bent part of the newspaper from the edge.
- Turn it over to the other side and bend it left and right along the fold lines. The result was a square with folds.
- The bottom edge needs to be folded over the folds, then straightened.
- Decorate as you wish with stickers.
LiveInternetLiveInternet
-Music
-Wall
—Categories
- culture, art (1502)
- video, cinema (164)
- paintings (1253)
- world folk art (3)
- Russian attractions (69)
- theater (5)
- Animals, nature, people (706)
- animals (90)
- seasons (9)
- planet earth, nature (47)
- people (19)
- Baikal (302)
- architecture (28)
- fashion guide (690)
- shoes and everything about them (48)
- dates (147)
- holidays (105)
- for children (160)
- for a diary on LiRu (88)
- frame (41)
- Housing and communal services (54)
- Law (709)
- health (388)
- cosmetics, cosmetology, (21)
- NAMES (727)
- Denis Matsuev (83)
- interesting (890)
- dragoons (145)
- Sagittarius 12 (1)
- history of things (111)
- rituals, customs, signs, myths (236)
- interior, design (160)
- history (480)
- legacy of October (43)
- dolls (52)
- cooking and everything for it (286)
- my library (768)
- articles (93)
- aphorisms, rules of life, quotes (415)
- poems (142)
- music (959)
- video (74)
- Adagio (Albinoni-Gisotto) (23)
- classical music (91)
- mood (493)
- humor (308)
- news sheet (23)
- About Siberia (462)
- Irkutsk region (266)
- Angarsk city (162)
- education (231)
- work (87)
- Russian language (72)
- communication, psychology (98)
- society (454)
- politics (334)
- Liked (46)
- travel (169)
- Cities of Russia (33)
- WORKING WITH A COMPUTER, VIDEO LESSONS (121)
- miscellaneous (177)
- handicrafts (807)
- knitting (100)
- patchwork (142)
- sewing (239)
- gardens, parks (102)
- flowers (81)
- photos (313)
- READ WITH YOUR Squint (about me) (282)
- personal (38)
- test (62)
- economics, finance (140)
Pioneer cap
A cap of a slightly modified shape that can be worn not only on the side, but also in the middle of the head.
- Fold the newspaper spread in half and fold it over to mark the center line.
- We bend the corners of the center line towards the center of the model.
- We bend one layer from the bottom up and up again.
- Turn it over. We bend one side on the side about halfway, then the other too. We bend the bottom edge of the model along the bottom edge of the rim.
- We unfold the cap and bend the small corners from below to the intended line.
- We fold the paper up again, then up again.
- We turn the model over. We first bend the large corner down and then hide it.
Budenovka pilot's cap
A functional cap model that is very convenient for sun protection.
- Fold the newspaper spread in half, then fold it in half on the other side to mark the center fold line.
- We unfold and along this line we bend the corners on one side and the other.
- We bend the rim from below, turn it over to the other side and also bend the rim.
- We bend the corners at the bottom to the opposite side. This results in an isosceles triangle.
- We unfold the model along the side fold line so that the cut shape takes the form of a square.
- We bend the corners from the bottom towards the center of the model. The pilot is ready.
High cap
The first thing that comes to mind when looking at this model is a Halloween witch hat. Although a pointed cap would also be suitable for a wizard. The headdress folds up easily and quickly, in just a few steps.
Step by step description:
- We bend the original square in half from bottom to top.
- Fold the left side along the dotted line.
- Then the right one.
- We bend the protruding bottom flap.
- On top of it is the second one.
- We open the product from the inside and round it into a cone.
Square cap
An unusual version of the cap, which fits tightly to the head and has a visor.
- Fold the newspaper in half and then into a quarter to locate the center line.
- Open it up and make a triangular roof.
- First fold the rectangular strips into 2 halves, then bend them.
- Turn the model over and bend the edges from the sides towards the center of the model.
- Let's fold regular triangles in both corners.
- We bend the triangular roof and tuck it in.
- Open the model and align it to form a square.
- Rotating, bend the corners, open.
- We turn 4 corners. The result is a hat in the shape of a box.
How to decorate
Paper hats made from whatman paper or cardboard are subject to decoration, namely painting. This material does not become covered with waves after contact with water. For this purpose it is better to use gouache or acrylic paints. It is possible to color paper not only after making the headdress, but also before work.
To decorate military caps, they often use a red star made independently from colored paper, which is glued to the product. You can decorate your headdress with a flag. St. George's ribbon is often used to decorate caps on Victory Day.
Themed paper hats are decorated to match the costume. For these purposes, you can use the following additional details:
- sparkles;
- buttons;
- ribbons;
- beads
You can glue an applique in the form of a red cross made of colored paper onto a medical cap. You can also draw it using felt-tip pens, paints or gel pens.
Cap with visor
- Fold the newspaper in half, then fold the other side in half to mark the center fold line.
- We unfold and along this line we bend the corners on one side and the other.
- We bend the rim from below, then turn it over to the other side and crimp the corners of the rim.
- On the left and right we fold the model to the center fold line.
- We fold the strip of paper from the bottom to the middle, bending it in half.
- Then we bend the corners of the rim towards the center of the model and tuck it into the middle.
- We turn the model over. We fold the largest upper corner towards the center of the model and tuck it under the rim.
- We unfold the model, pressing it a little in the center. The cap is almost ready, all that remains is to bend the corners at the top and hide them under the paper.
Stewardess headdress
A distinctive feature of this accessory is its deep fit. In addition, such products are made in blue or light blue. When making a flight attendant's hat from paper, you will need a rectangular piece of paper. Its width should be slightly larger than the length of the future cap. This is due to the fact that the side parts will bend by a quarter.
The following master class will help you do this:
- The rectangular sheet is folded into two equal parts, but always in length.
- The upper edges bend toward the middle by about a third.
- The bottom edge is initially bent in half, and then folded up so that the corners of the resulting model protrude slightly to the sides.
- The future cap is turned over, and both sides are turned up approximately a quarter.
- After this, the element located below is bent twice by approximately a third.
- The top of a classic hat is folded inward.
At this stage, the flight attendant's paper accessory is ready. Additionally, it is recommended to paint it in a suitable color.
Ordinary cap
In order for the product to turn out neat, it is better to make fold lines along special pencil marks.
- First, we outline the fold lines so that the work turns out neat. We fold the rectangular spread of the newspaper along a larger diagonal to mark the fold line, first on one side, then on the other. Then fold the newspaper in half to mark the center fold line.
- Now let's get to work. Fold the newspaper diagonally to form an isosceles triangle.
- Now we fold the corners up along the intended fold line so that we get a square.
- Fold the corners in half again, then in half again to mark the fold line.
- Then we fold the corner along the intended fold line so that the edge sticks out outside the model.
- We do the same on the arc side. The result was a square with the edges of paper sticking out on both sides.
- Now we take the opposite corner and fold one layer to the center of the square, leaving about another 1 cm of layer for the rim.
- We turn up the rim.
- Turn the model over to the other side. Fold it in half corner-to-corner.
- We unfold the model and hide the bottom corner inside the cap.
Materials needed
Before you start work, you need to stock up on the necessary materials. These include:
Directly balloons. Decide whether the arch will be monochromatic or multi-colored, and also select matching colors
It is also important to understand how many balls you will need. Outdoors it is better to make large balls (30 centimeters or more); for indoors, balls measuring from 12 to 25 cm are suitable
News Body massage
Their number will depend on how large the arch you want to make, so it is better to stock up on a fairly large number of balls. It's better to have them in stock than to run to the store for more. On average, 20 large, 30 medium or 45 small balls are needed per meter of garland. Pump. You will have to inflate quite a large number of balloons, so you will hardly have to rely on your own strength. We advise you to purchase a special pump, which can easily be found in holiday supply stores or even in regular construction supermarkets. Fishing line, wire, hose. In general, this is what the garland of balloons will be held on. The material for the base depends on whether the celebration is being held outdoors or indoors. But in any case, it is also worth having such material in reserve.
Medical cap
A round-shaped hat that can be used as an element of a fancy dress costume.
- We cut the newspaper spread into two parts so that we get two identical rectangles. Let's put them together.
- Fold the larger side of the folded together rectangles about 1.5 cm along the edge of the newspaper.
- We do the same on the opposite side. The length of the fold should be approximately equal to the length of the paperclip.
- Now we pull one sheet out of the other, but not all the way. And at the end we fasten them together with paper clips on both sides.
- We roll the model in a circle and insert one sheet into the other from the opposite edge. Secure with paper clips.
Step-by-step instruction
Now that all the materials are available, the tools are prepared, you can begin to put the idea into practice. If you want to get not only a portion of useful theoretical material, but also see with your own eyes how a festive arch is built, then you can watch videos of master classes.
The process of creating an arch will not be difficult even for beginners if all steps are performed without haste according to step-by-step instructions:
- First, an arch frame is created from wire or other prepared materials. The wire bends well, so you can create a variety of shapes. The simplest version of the frame is considered to be a structure consisting of two vertical supports with a rounded top.
- Since the frame will be installed in the place around which guests will move, you need to take care of its stability. The legs are attached to the bottom of the supports. You can use buckets filled with gravel; they will provide maximum stability. Subsequently, the buckets are covered with balls, so the aesthetics of the structure will not be affected.
- All balloons, the number of which corresponds to preliminary calculations, are inflated using a pump.
- They take two balls of the same color and connect them together, using this principle to form numerous pairs of the same color.
- Now take two pairs that differ in color and connect them together so as to get the shape of a four-leaf clover.
- Such groups of balloons are attached to the bottom of the frame by twisting adjacent balloons around a wire or simply tying them to the frame with a thread.
- All other groups of balls are attached to the frame in the same way, placing them above those that were previously attached.
If everything is done correctly, you will get a voluminous and bright arch of balls.
Cap - nurse's hat
A cap model for people with imagination. Can be used as an element of a fancy dress costume.
- Fold the newspaper in half, then straighten it and fold it in half again on the opposite side to mark the fold lines.
- We bend about 1.5 cm along the edge on one side and bend it.
- Fold the model in half to mark the fold line.
- Then we fold the model from the smaller side towards the center to the inflection line. We do the same on the opposite side.
- When folded, it becomes a rectangle. Now we fold one of the corners so that its vertex is outside the model.
- We do the same on the other side.
- Fold the vacated rectangle towards the center. We unfold the model.
Cap-shaped cap
A cap with a visor that covers your head well.
- We fold the corners of the newspaper, smoothing the folds well so that the cap holds tighter.
- We wrap the strip from the bottom twice towards the center. The result is a headband.
- Take the sharp edge at the top and place the corner under the rim.
- Turn the model over and fold the newspaper on the sides to the center fold.
- Fold the strip from the bottom in half towards the center. Then we fold the corners towards the center and hide them under the rim.
- We unfold the cap and tuck the corners at the top under the rim.
Square cap made from newspaper
A cap that completely covers your head from the sun.
- Bend the corner of the newspaper to the opposite side.
- Bend the strip of paper upward at a folded angle.
- We straighten the newspaper.
- We bend the opposite corner in the same way.
- Straighten and turn over the newspaper. We bend the rectangular strip on the opposite side.
- We place the opposite edge on the folded strip so that we get an “envelope”.
- We unfold the newspaper. The fold lines that intersect in the center should be clearly visible.
- Using your finger, bend the center of the intersection of the fold lines upward and fold the sides of the newspaper together in pairs. You will get an isosceles triangle with a free rectangular strip of paper at the bottom.
- Fold the triangle in half so that equal angles overlap each other. When we unfold the triangle, we can see the center of its base.
- We turn equal angles on both sides towards the center of the base slightly with a grip.
- We turn the model over. We fold the strip of paper at the bottom of the model by about 1 cm.
- We bend the sides on the left and right to the center of the model, while the corners from below need to be tucked into one another.
- Bend the top corner of the model to the center.
- Then you need to take a layer of paper at the top angle and unfold the model. The result was a cap with a visor.
Cap - cowboy hat
An original headdress that has a concave brim and looks like a cowboy hat. We will need two complex square sheets of 50 by 50 cm. The larger the squares, the larger the finished product will be.
- Fold the newspaper in half. Then fold it in half again on the other side.
- Unfold the newspaper and use a ruler to mark 4 cm to the left and right of the center fold line.
- We bend the corners so that 4 cm to the left and right of the fold line from the fold line remain free.
- Next, you need to move your hand inside the folded corner of the newspaper and bend it along the bisector.
- Let's do the same on the opposite side.
- Turn the model over and bend the corners along the fold line.
- We turn the model over. Fold the bottom corners of one layer of newspaper toward the center.
- We turn the model over again and bend the corners from the bottom to the center on this side.
- Now we fold the side strip to the center by about 2 cm and bend it again.
- We turn the model over and do the same on the opposite side.
- Let's open the model. The result was a cap.
- We bend the corners on both sides and straighten them.
It is important to press very hard when folding the paper so that the model holds its shape well.
“The honorable title is fighter.” Designing crafts from Budenovka paper. Master Class
Tatyana Petrovskaya
“Respectable title - fighter.” Designing crafts from Budenovka paper. Master Class
1. Strengthen children’s knowledge about the Russian army and the branches of the military.
2. Give an idea of the history of the appearance of the holiday of Defender of the Fatherland Day.
3. Improve the ability to lay paper in different directions, create markings, and apply a standard.
4. Develop children’s fine motor skills and creativity.
Before we start making crafts, we look at illustrations on this topic. Kids actively participate in the conversation and willingly answer questions.
We come to the conclusion that the uniform of military clothing changed over time and in the Red Army there was such a fascinating headdress as the budenovka .
Now let's move on to making our craft . For a very small budenovka, we will need a sheet of greenish A-4 paper . For budenovka , you need to glue 4 such sheets together or paint a newspaper sheet greenish.
1. We bend the corners at the top so that they meet in the middle.
2. Bend the resulting corner down.
3. Having ironed the fold strips, we turn our craft towards us with the reverse side and again bend the corners to the middle.
4. Dividing the remaining strip in half, fold it upward twice.
5. Cut out a star from reddish paper and glue it onto the finished product.
Our budenovka is ready !
Master class on paper crafts “Snowflake” Hello, guests of my page. The pleasant “troubles” for the New Year have begun. I would like to bring to your attention a very ordinary one (in production).
Master class on designing a “Woman’s handbag” from paper “Women’s handbag” - designing from paper. Master Class. Construction is an activity in which children learn to work with paper, cardboard,...
Construction of a “Box” from colored cardboard and paper. Master class Workpieces were prepared for the work. The kids watched a demonstration of step-by-step work and began to do the work independently.
Master class on designing “Father Frost” from paper It turned out that after using metallized paper, there were rolls of ordinary grayish paper left. It was a pity to throw it away and tried it.
Master class for educators “Paper construction” (photo report) In my work on artistic creativity, origami occupies a significant space. This technique opens up the following abilities of the cardboard world: pleasure,...
Master class: paper construction “The city of Koenigsberg in the Gothic building style” (senior speech therapy group) Honored colleagues, I present to your attention a master class: “The city of Koenigsberg in the Gothic building style.” The preparation of the town was.
Paper construction “A bird sat on the window.” Master class Goal: to develop children's creative abilities when working with paper. Tasks: Teach children to work with paper, lay out a circle, rectangle, square.
Master class on paper crafts “New Year's snowflake” For the production of the snowflake the following were used: 1. 5 sheets of A4 format; 2. scissors; 3. glue; 4. thread; 5. a small piece of eraser (for securing.
Master class on manual labor. Designing from paper “Helicopter” Master class on manual labor Making from paper “Helicopter” Goal: development of productive activity. Objectives: 1. Improve.
Master class on crafts from corrugated paper “Owl” To make crafts you need to prepare: 1. A toilet paper roll 2. Corrugated cardboard 3. Black and snow-white paper 4.
Cap - Chinese cap
We make a square sheet of newspaper. Fold the sheet in half and unfold it.
- Then fold it in half on the opposite side.
- Bend the edge of the paper about 2 cm.
- We turn the model over and bend it on both sides to the center bend line.
- Then we bend the corners from the top layer of paper diagonally across the rectangles so that they look beyond the edges of the model.
- Bend a strip of paper from the bottom towards the center.
- We straighten the cap and press down the upper part.
Instructions for creating a balloon arch
Arch made of helium balloons
We divide the entire width of the planned arch evenly by the number of balls. The distance between the balls should be from 15 to 40 cm, if more, reduce the arch or add balls. We tie the balls to a piece of braid or fishing line one after another by a knot, receding the distance measured above between the balls
It is important that it be the same. The braid from the balls themselves, if there is any, can be left or cut off. After all the balls are secured, we attach the free edges of the base to stable floor structures (table, chair, weight, etc.). Due to helium and proper distribution of the balloons, your work takes on the shape of an arch automatically.
Arch of balloons filled with air - from one to four colors
We inflate all the balloons in the quantity calculated according to the formula above. We use a calibrator. We connect the balls into modules - fours. First, 2 balls per double knot - like shoelaces. Then simply twist 2 bundles of 2 balls together
Please note that if your garland consists of 2 colors, then we tie identical balls and twist pairs of different colors. If out of 4, then all the balls in the module must be different colors. We attach the first module - the four - to the fishing line or base. Step by step we add modules, securing them with braid or fishing line, to each other and to the base
Make sure that the pattern (for multi-colored arches) moves in a spiral and is not interrupted. To do this, turn the four to the desired side before fastening.
Reserve time and patience, the balloons may burst or deflate, but they are easily replaceable. Good luck with your experiments and the most beautiful arches.
Elegant cap
- Fold a rectangular newspaper sheet in half lengthwise to mark the center fold line of the larger side.
- Then unfold and fold in half widthwise.
- We fold the corners on both sides towards the center and iron them with our hands.
- We bend the rectangular strip from below towards the center of the model 2 times.
- We turn the model over and do the same on the reverse side.
- Turn the model over and bend the corners to the center bend line.
- We straighten the corners and bend them in the other direction - up along the resulting fold lines.
- When folded, bend them towards the center of the model and tuck the edges under the rim.
Making a balloon arch with your own hands: step-by-step instructions
1) It is necessary to bend the short pipes so that the legs for the arch come out.
After this, you need to tape the already made legs to the racks with tape. If desired, if the arch will not be transported to some other place, the arch on the racks can be secured right there. 2) In order for our frame to become heavier, we need to attach a small number of balls to the legs of the arch. The inside of the balls should be filled with water. It is better to tie them tightly and attach them with tape. The creation of the frame for the arch can be considered complete. Now it's time to decorate.
The box will be needed in order to later compare the sizes of the balloons that will be inflated. This will make it easier to make them neat and even.
We do the main work.
1) You need to inflate five balloons of the same color, their size should be 21 centimeters, and one ball should be different in color and have a size of 15 centimeters.
2) Now we need to connect our balls using braid. This must be done so that the smallest ball is in the middle. Then you will get a beautiful uniform flower of balls.
3) After this, you need to inflate five new balloons again. The color should be the same as the previous balls. Now we don't need the core. It is necessary to attach the balls to each other and attach them to the other side of the already made flower. Thanks to these actions, the flower will become even larger and more magnificent.4) To place a flower on an arch, you just need to pass it through the pipe.
5) Next you need to form new flowers in exactly the same way as described earlier. You can choose colors according to your own taste
It is very important that each flower placed on the arch is as close as possible to another flower, then our design will be more stable. 6) Gaps will appear at the bottom of the rack and they must be filled. To do this, we make flowers with four petals of 21 centimeters each.
Next they need to be attached to the rack
To do this, we make flowers with four petals of 21 centimeters each. Next they need to be attached to the stand.
7) After all the work done, it is important to give the arch a finished look and shape. The flowers should be located on the same plane. The result is a magnificent festive arch of balloons-flowers!
This arch is made using thin rope and helium.
You need to measure the length for the twine, taking into account the segments that will secure the arch. We tie one end with knots to the base, then the rope will not fly away. We fill the balloons with helium and secure them at the end of the rope; it should not be tied yet. Next, you need to wrap the balls with tape. Before creating an arch from the balls, the rope should be wrapped in corrugated paper. This is necessary so that the twine does not spoil the picture, because the balls are inflated with helium, and the individual parts are not attracted tightly to the base. Now that all the balls are secured, you can firmly tie the free end to the second base. Multi-colored structure from balloons This method is much simpler and faster than the first. Balls of two shades are used. They need to be inflated with helium, then they will pull the structure upward, inflate the remaining balloons with regular air, they will balance the helium balloons, making the arch more dense. The method with a rope is intended exclusively for use indoors, since if they are used outdoors, the wind will ruin everything
News How to quietly sew up a hole in clothing: the correct blind seam and other methods
This arch is made using thin rope and helium. You need to measure the length for the twine, taking into account the segments that will secure the arch. We tie one end with knots to the base, then the rope will not fly away. We fill the balloons with helium and secure them at the end of the rope; it should not be tied yet. Next, you need to wrap the balls with tape. Before creating an arch from the balls, the rope should be wrapped in corrugated paper. This is necessary so that the twine does not spoil the picture, because the balls are inflated with helium, and the individual parts are not attracted tightly to the base. Now that all the balls are secured, you can firmly tie the free end to the second base. Multi-colored structure from balloons This method is much simpler and faster than the first. Balls of two shades are used. They need to be inflated with helium, then they will pull the structure upward, inflate the remaining balloons with regular air, they will balance the helium balloons, making the arch more dense. The method with a rope is intended exclusively for use indoors, since if they are used outdoors, the wind will ruin everything.
A selection of videos demonstrating the process of creating an arch:
Simple cap
The easiest way to make a cap from a newspaper in a hurry.
- We make a square from a newspaper sheet and fold it in half.
- We bend the corners of the model, grabbing approximately 1/3 of the length of the side on both sides. 1/3 of the side of the square in the middle remains free.
- Bend a strip of paper at the bottom of the sheet towards the center by about 2 cm.
- Turn the model over and bend the corners to the center by about 3 cm.
- Then we bend a strip of paper from the bottom of the model towards the center along with the folded corners.
Santa cap
A variant of a paper hat for a New Year's masquerade. This hat can be rolled up from newspaper very quickly and will bring real fun to the children.
- Mark the inflection lines. We fold a square sheet of newspaper diagonally.
- Using a ruler and pencil, mark 1/3 of the side of the square. You can roll the paper into a tube and smooth it a little. When we unfold it, two stripes will be visible - the 1/3 marks.
- From the side of the mark, bend the corner of the square diagonally to the mark. We bend the opposite corner towards the center. Fold both corners into an envelope.
- Unfold the paper. An isosceles triangle is visible at the top, indicated by inflection lines. You need to attach each side of the triangle to the base.
- We fold the opposite corner with the top to the base and fold the strip twice from the bottom.
- We fold the opposite corner to the base of the triangle and smooth it.
- From the point where the folds intersect, bend the model so that one of the edges protrudes approximately 1.5 cm from the edge.
- We bend the opposite side in the same way.
- We bend the paper protruding beyond the edges of the model back and straighten it.
Thus, from a simple newspaper that is always at hand, you can make a huge number of interesting caps that will protect you in sunny weather.
What you will need
Before starting production, you should select the necessary tools. The advantage of a paper cap is the minimum time required. This process does not require scissors, glue, or thread. All you need is regular newsprint. To create some models you will additionally need:
- paper clips;
- pencil;
- ruler;
- paints;
- brushes
Before you make a cap, you need to study what, besides newspapers, you can make it from.
- Made from cardboard - the product will be denser.
- Made from colored paper - this option will be interesting for young children.
- From album sheet - usually a children's headdress is made from this material, due to its size.
To make a paper cap with your own hands, you do not need special materials. If you want to paint it, it is recommended to prepare gouache and a wide brush in advance.
Landscape sheet
Newspaper
Colored paper