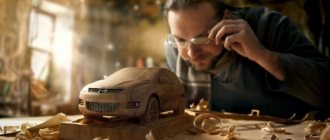
Today, many consumers are interested in making their own furniture. The number of home craftsmen is increasing all the time. Some of them purchase construction blanks from furniture factories, while others prefer to manufacture products according to their own designs. A do-it-yourself children's car bed can be made with all sorts of decorative elements or have a very simple look. It depends on the personal preferences of the child, parent, and financial capabilities.
Types of children's beds
A children's bed must satisfy three basic requirements: durability, safety and attractiveness. If everything is clear with the first two, then the latter leads to ambiguity, especially when it comes to going to the store. On the one hand, there is no point in overpaying for unnecessary decor and design, and on the other hand, it is worth taking into account the fact that children should find it interesting. Always!
A children's bed should not only be comfortable, but also interesting for the child.
Taking this into account, we can consider the main types of children's beds:
- Regular. The most common option is the most practical and equally uninteresting.
- Two-tier. It is attractive because it is possible to sleep on the upper tier.
- Combined. A compromise option between, in fact, a bed and a table, wardrobe, nightstand. Good too.
- Homemade, stylized. For girls, these are butterflies, clouds or fairy-tale animals. For boys, of course, cars: sports cars, trucks, as well as buses and planes. The most interesting solution!
Note! If we talk about making it by hand, then it is the option with a machine that is most often found in modern homes.
Authors' Comments
For a clearer understanding, please read the authors' comments.
Since two people with different education, from different fields of activity and different experience were involved in the development and manufacture of a children's bed, deviations from the project began at the very beginning of the assembly.
1. The metallized edging included in the project was not available for sale; it had to be replaced with laminated chipboard (beech) close to the texture; The same fate befell the reinforced eccentrics (more precisely, they were on sale, but in wholesale quantities) - they had to be replaced with regular ones (this change is reflected in the design documentation).
2. It was proposed to fasten the beam for fastening the lath holders not from the inside with 14 screws each, but from the outside with only 5; At the same time, cover the countersunk holes (in which the screw heads are buried) with epoxylin.
The proposal is justified - the total twisting length in the second case is slightly less than the total length of the first option, but in this case the beam is attracted to the sidewall with great force and there is no need to glue the beam and the sidewall and, therefore, to prepare the surface of the sidewall for gluing.
3. Points not reflected in the documentation:
- install dowels with glue,
- fix the lath holders with a furniture bracket of 11-12 mm (quite enough - a longer bracket and, accordingly, a larger diameter can split the lath holder),
- The design documentation states, however, I repeat - the batten should not stand up in the batten holders by surprise, it should be able to move within 5 mm.
4. For a person familiar with the oracle sticker, this operation will not cause difficulties.
- the surface must be smooth and clean,
- the sticker must be guided through the water - this makes it easier to smooth the film and expel air bubbles,
- the film with the applied pattern is very unstable to mechanical influences (I do not rule out that printing on other, more resistant media is also possible), so a transparent oracal was glued on top of it (the so-called “cold lamination”); Notes specifically on this point - the sticker should also be placed on water; It is advisable to use boiled water without impurities (we had some streaks under the oracle, the nature of which we could not determine),
- As a squeegee, use a fairly hard (and clean, free of foreign inclusions) felt; using a rubber squeegee can cause streaks and scratches in the drawing.
5. The profile was glued with Titan glue along the untreated (in the sense of unedged) end; I’m almost sure that this glue is far from the best material, but... “I made it from what I had...” (there was nothing else at hand and accessible...). The very presence of this profile is explained by the need to protect the edges of the films (patterned and transparent) from scuffing, which could ultimately lead to their (the films) peeling. During the work on this item, the following considerations arose:
- It would probably be more correct to first glue the 0.4 mm PVC edge, then apply the design, and only then sculpt the profile - this way the adhesion of homogeneous materials would certainly be higher.
- It would probably be more technologically advanced to apply the design using ultraviolet printing (however, the resistance of such a design to mechanical influences is unknown, and the cost of the issue is unknown...).
- the feasibility of using a T-shaped mortise profile is, in my opinion, questionable; I'm not sure if this is a better solution.
That's how all the comments are.
PS: The designer does not want to give away full-color and full-size drawings suitable for printing (tiff, 300dpi) for “just like that.” So either use jpg, or draw it yourself, or something else (for example, buy it).
How to make a baby bed in the shape of a car with your own hands
You need to start with an idea. You should not take models with complex shapes and an abundance of small details as a basis. The contours of the future bed should be as simple as possible, with smooth contours, without sharp transitions and sharp corners. It is necessary to exclude options with volumetric surfaces, especially those with curvature along all three axes - this is impossible to make at home.
The model should not be too complex to implement.
As an optimal option, they most often settle on the idea of styling them as sports cars. Firstly, boys love racing and everything connected with it, and secondly, sports cars have laconic lines and have a good balance between attractive appearance and functionality. For example, the spoiler can be turned into a shelf, and the hood into a drawer for clothes.
DIY children's beds for boys: schematic diagram
Finding a suitable design is not difficult these days. Moreover, on the Internet you can find completely finished drawings, with assembly and cutting diagrams. Here, the main thing is not to miss an important point - the size and dimensions of the bed will be determined by the mattress. Therefore, you should proceed from what is available or, if you plan to do everything “from scratch,” you can rely on the standard children’s size: 140x70cm.
There are many drawings of children's bed cars on the Internet.
The next step should be the preparation of drawings. Ideally, it is desirable to have at least basic skills in working in CAD and CAM systems, but you can make drawings manually. This is really important, since the depth of drawing and the accuracy of the dimensions will determine what kind of children's bed in the form of a car you make yourself will turn out to be. Therefore, it is necessary to think through everything thoroughly, down to the smallest details.
If desired, you can draw the diagram yourself according to individual parameters.
Tools and materials
To make a bed, you should divide the required tools into two categories (this will make it easier to understand what else you will need):
- The usual: hacksaw, screwdrivers, wrenches, breadboard and carving knives, a set of hex keys (for confirmations), sandpaper, markers, brushes and brushes.
- Special: jigsaw, grinder, grinder, hair dryer, level, spray bottle (airbrush).
You will need tools for woodworking.
It is assumed that a do-it-yourself car bed for a boy will be made only from wood. Plastic or metal should be used more for decoration. In general, the best option might be:
- Chipboard (chipboard). It is characterized by low cost, ease of processing and a wide range. Afraid of mechanical damage and moisture.
- Laminated chipboard (LDSP). The same chipboard, but with a so-called laminate - a coating that gives it color, texture and pattern. Less susceptible to harmful factors.
- Fiberboard (not to be confused with fiberboard - MDF from the English. Medium-Density Fiberboard). Durable, well processed. The structure is closest to ordinary wood.
Manufacturing
The ease and simplicity of manufacturing directly depends on the thoughtfulness of the concept and the accuracy of the drawings. Of course, a fair share of success depends on the “curvature” of the hands, however, the desire to surprise your child or the desire to bring everything to the end at all costs will help here too.
The speed of production depends on your skill and desire.
Cutting blanks
For simple parts, an ordinary hacksaw is enough, but since you can’t make a car bed with your own hands without interesting decor, the biggest difficulty will be the sides.
Firstly, it is difficult to make such a drawing without special equipment on a 1:1 scale: you can try the coordinate grid method or print the outline in parts on a printer, and draw them directly on the surface of the sheet.
The hardest part is sawing out the sides.
Secondly, curved lines are labor-intensive to manufacture and process, and also require the ability to work with a jigsaw.
If there is such an opportunity, the best option would be to cut the sidewalls at a company that provides such services - the result of a milling machine cannot be compared with sawing by hand.
It is better to cut the sidewalls using the services of the company.
Important! When making sidewalls from a sheet with laminate, you should select the appropriate operating mode and type of jigsaw blade so that when cutting you get smooth edges without chips.
DIY bed for a boy: frame
When designing bedroom furniture, two frame options are usually considered:
- Frame. The frame is the main strength element, as it bears the entire load. In this case, the sidewalls can be made from a thin sheet of chipboard, no more than 16-18mm thick. It is advisable to take thicker timber: usually a section of 50x70 is sufficient.
- Carrier. Here the sidewalls themselves will play the role of strength elements and support the entire load - they are made of chipboard or MDF, with a thickness of 18 to 22mm. In this case, it is necessary to consider additional fastenings of the sidewalls to each other if the panels are not solid, but have cutouts.
Assembly
Assembly is recommended to be carried out in two stages. The first, rough or trial, is carried out after the manufacture of all the frame parts and is intended for adjusting the connections, as well as correcting flaws in the design - since it is impossible to make a children's bed in the form of a car with your own hands the first time without errors.
The second stage is considered finishing or final. It is already being produced at the final stage. Usually by this time all the parts have a finished look: painted and decorated accordingly. As a rule, the “last” assembly takes place on site, directly in the nursery.
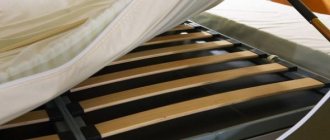
Laying the mattress
The mattress must be placed on a ready-assembled bed. However, you should take care of the type of substrate in advance. It also comes in two versions:
- Lamellar or on slats. In this case, the “bottom” of the bed is a series of slats of a fixed width, fixed at a certain interval.
- Solid. A mattress base is simply a piece of sheet metal (usually chipboard), either solid or with a number of holes to improve ventilation.
The mattress is laid when the bed is ready.
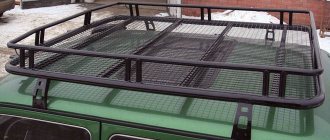
Final touches
After installation, the bed can be further decorated with overhead elements, for example, by installing wheels on the sides or attaching a spoiler at the headboard, which will simultaneously serve as a shelf for small items.
Also, if you have the necessary skills, you can organize lighting around the perimeter of the bottom using an LED cord. In addition, LED spotlights will come in handy to imitate headlights, otherwise what kind of car is this - a do-it-yourself bed for a boy!
You can organize lighting in the form of headlights.
Decoration
In order for the boy to be satisfied with the assembled “car”, it is beautifully decorated. Decorative elements are made from the same material as the main product. They can be decorated with multi-colored self-adhesive film. Some parts can be painted with rich, durable acrylic paints using a spray gun or a spray can. And sometimes a simple brush comes to the aid of a master. Volumetric car beds are most often painted in rich red or blue and decorated with white stripes.
The wheels can be cut out of chipboards and painted black, and inexpensive plastic caps can be used to decorate the center.
The wheels do not need to be painted or decorated separately, but can be painted on the side parts. You can also paint the car bed in assembled form.
The car bed is decorated with emblems, inscriptions, moldings or stickers. The sides are decorated with decorative overlays, which are screwed with self-tapping screws 80 mm long. The lower edge of the lining is located at a distance of 41 mm from the floor level.
In place of the headlights, holes are cut out for low-voltage LED spotlights. In this case, the “car” will have luminous headlights. The final appearance of the design depends on the imagination of the craftsman.
Installing a children's bed: what you need to know?
Even at the planning stage, you should consider not only the design features, but also how such a bed will fit into the interior of the nursery. If repairs are not expected in the foreseeable future, you will have to develop a machine design that best suits the style of the room.
In addition, the children's bed must be stable in itself. Do not allow a child to be injured as a result of it tipping over or moving out of place. It is also not advisable for the furniture to be in direct sunlight most of the day - this can damage the paintwork.
You should carefully consider the place where the product will stand.
Materials and tools
The choice of materials is quite large. But when purchasing, you need to pay attention to the class of the product: fiberboards are only allowed in classes E1 and E0.
- Wooden beam 50*70 mm, treated with antiseptic. When purchasing, it can be cut to size.
- Sheets of chipboard, MDF, plywood or furniture board made of wood - pine, for example. 1-2 sheets are usually enough for a baby crib.
- Confirmats and a hex key for them. As a rule, it comes included or is at least offered upon purchase.
- Drill bit for furniture screed – you should consult the seller or a familiar carpenter about the size.
- Rollers if you plan to move the crib.
- Fasteners – wood screws and 12 cm nails.
The tools required are a jigsaw or a wood saw to cut the material, a screwdriver and an electric drill. You will also need a pencil, ruler, tape measure, brushes or spray paint for painting and sandpaper for sanding.
Do-it-yourself car bed for a boy: care rules
In general, caring for a handmade bed is not much different from caring for the same one, but bought in a store:
- Do not allow the humidity level in the room to exceed.
- Regular dusting and wet cleaning.
- The bed should not be placed near heating radiators.
- Don't forget to change your bed linen.
Caring for a homemade car bed is the same as caring for a regular bed.
As you can see, making a children’s bed yourself is a completely feasible task. Of course, a lot depends on both the idea and the possibilities (including material ones). However, if you really want to, then a sudden idea of how to make a car bed with your own hands can find a completely real embodiment. Moreover, if it gives the child joy and healthy sleep.
Manufacturing technology and work procedure
- At the first stage, the frame is assembled - in the form of a frame or box, with partitions or crossbars. The frame elements are fastened with self-tapping screws or nails. The holes for them are drilled with a drill - if hammered, the timber may burst.
- The sides and back are cut from the selected material. It is recommended to cut the second sidewall not according to the template, but according to the first blank, in order to achieve complete symmetry. The parts are sanded with sandpaper and edged. There should be no sharp edges or protrusions.
- It is recommended to carry out the first rough assembly in order to identify and eliminate possible shortcomings. If no inconsistencies are found, the bed is disassembled and designed according to the project: painted, pasted over, and so on.
- If the sidewalls act as a frame in the model, the scheme will be the same: preliminary assembly, then dismantling and painting. The timber under the mattress is fixed to the bed frame part before the first assembly.
- After drying, the bed is assembled a second time. The parts are fixed to the frame with self-tapping screws, and with confirmatories to each other. After installation, the screw heads are painted in the desired color. Rollers can be attached to the lower part of the frame, if provided.
- The last stage is decorative finishing: installation of overhead wheels, installation of lighting under the car, sticker of moldings. The slatted bottom is also laid last.
Do-it-yourself children's bed-car in the form of a “betomobile” (video):
Design ideas for a children's car bed - 50 photos
Authors' Comments
For a clearer understanding, please read the authors' comments.
Since two people with different education, from different fields of activity and different experience were involved in the development and manufacture of a children's bed, deviations from the project began at the very beginning of the assembly.
1. The metallized edging included in the project was not available for sale; it had to be replaced with laminated chipboard (beech) close to the texture; The same fate befell the reinforced eccentrics (more precisely, they were on sale, but in wholesale quantities) - they had to be replaced with regular ones (this change is reflected in the design documentation).
2. It was proposed to fasten the beam for fastening the lath holders not from the inside with 14 screws each, but from the outside with only 5; At the same time, cover the countersunk holes (in which the screw heads are buried) with epoxylin.
The proposal is justified - the total twisting length in the second case is slightly less than the total length of the first option, but in this case the beam is attracted to the sidewall with great force and there is no need to glue the beam and the sidewall and, therefore, to prepare the surface of the sidewall for gluing.
3. Points not reflected in the documentation:
- install dowels with glue,
- fix the lath holders with a furniture bracket of 11-12 mm (quite enough - a longer bracket and, accordingly, a larger diameter can split the lath holder),
- The design documentation states, however, I repeat - the batten should not stand up in the batten holders by surprise, it should be able to move within 5 mm.
4. For a person familiar with the oracle sticker, this operation will not cause difficulties.
- the surface must be smooth and clean,
- the sticker must be guided through the water - this makes it easier to smooth the film and expel air bubbles,
- the film with the applied pattern is very unstable to mechanical influences (I do not rule out that printing on other, more resistant media is also possible), so a transparent oracal was glued on top of it (the so-called “cold lamination”); Notes specifically on this point - the sticker should also be placed on water; It is advisable to use boiled water without impurities (we had some streaks under the oracle, the nature of which we could not determine),
- As a squeegee, use a fairly hard (and clean, free of foreign inclusions) felt; using a rubber squeegee can cause streaks and scratches in the drawing.
5. The profile was glued with Titan glue along the untreated (in the sense of unedged) end; I’m almost sure that this glue is far from the best material, but... “I made it from what I had...” (there was nothing else at hand and accessible...). The very presence of this profile is explained by the need to protect the edges of the films (patterned and transparent) from scuffing, which could ultimately lead to their (the films) peeling. During the work on this item, the following considerations arose:
- It would probably be more correct to first glue the 0.4 mm PVC edge, then apply the design, and only then sculpt the profile - this way the adhesion of homogeneous materials would certainly be higher.
- It would probably be more technologically advanced to apply the design using ultraviolet printing (however, the resistance of such a design to mechanical influences is unknown, and the cost of the issue is unknown...).
- the feasibility of using a T-shaped mortise profile is, in my opinion, questionable; I'm not sure if this is a better solution.
That's how all the comments are.
PS: The designer does not want to give away full-color and full-size drawings suitable for printing (tiff, 300dpi) for “just like that.” So either use jpg, or draw it yourself, or something else (for example, buy it).
RESPONSIBILITY
RESEARCH °Ð»ÑÑиков, ÑодиÑели ÑÑÐ °ÑаÑÑÑÑ Ñак пÑеобѰзиÑÑ ÐºÐ¾Ð¼Ð½Ð°ÑÑ, ÑÑÐ¾Ð±Ñ ÑебÑÐ½ÐºÑ Ð± Ñло инÑеÑеÑно Ñам пÑоводиÑÑ Ð²ÑµÐ¼Ñ. RESULTS ARE RESPONSIBLE. RESULTS the вовÑÐµÐ¼Ñ Ñна. RESULTS °Ð»Ñное меÑÑо, Ñо лÑÑÑе вÑего пÑедÑÑмоÑÑеÑÑ Ð´Ð¾ ASSURANCE °Ð½ÑÑво длÑÑебенка лÑбого возÑаÑÑа. 0.95 м до 1.2 м, в Ð´Ð»Ð¸Ð½Ñ Ð¶Ðµ деÑÑкР°Ñ кÑоваÑÑ-маÑина должна бÑÑÑ Ð½Ðµ менÑÑе Ð¿Ð¾Ð»Ñ ÑоÑа меÑÑов, а Ð¼Ð¾Ð¶ÐµÑ Ð´Ð¾ÑÑигаÑÑ Ð´Ð°Ð ¶Ðµ 2.4 меÑÑа. RESULTS RESULTS. RESEARCH ROOM ÑÑа, и пÑи ÑÑом не иÑпÑÑÑваÑÑ Ð´Ð¸ÑкомÑоÑÑа.
RESULTS ROOM µÐ½Ð¸Ñ . RESPONSIBILITY ½Ð¸Ð¼Ð°ÑÑÐ¾Ñ 1.5до 1.9мввÑÑоÑÑ. RESULTS ½ÐºÑ на веÑÑнем ÑÑаже не пÑиÑлоÑÑ Ð½Ð°Ð³Ð¸Ð± RESULTS.
ROOM
RESULTS RESULTS - RESULTS. RESULTS RESULTS, но и как ноÑники. OPEN ROOM, RESULTS . RESULTS RESULTS . RESULTS ±Ð½Ð¾ÑÑÑ Ð¿Ð¾ÐºÑпаÑÑ ÐµÑÑ Ð¸ комод. RESULTS ROOM ¼, ккоÑоÑÐ¾Ð¼Ñ Ð ±ÑдÑÑ ÐºÑеп¸ÑÑÑÑбокÑеÑÑÐºÐ°Ñ Ð³ÑÑÑа, ÐºÐ°Ð½Ð°Ñ Ð¸Ð»Ð¸ даР¶Ðµ бÑÑÑÑÑÑ.
RESEARCH °Ð»ÑÑиков, ÑледÑÐµÑ Ñакж ROOM ROOM ROOM RESULTS ÐÐ ¸Ð³ Ðена. RESEARCH sir ¾
Design Features
Children's beds are subject to much more stress than adults, despite the obvious difference in weight. The child is constantly and actively moving, and the bed, both regular and play, is constantly used not only for sleeping, but also for jumping, tumbling, climbing, playing hide and seek, and so on.
Bed in the shape of a car (photo)
Frame
It is performed in two main modifications. The choice depends on desire, experience working with wood and the upcoming load - the weight of the main user.
Do-it-yourself car bed (photo)
Side panels
They serve as the main design detail, giving the bed the contours of a car.
Sidewalls are cut from plywood, chipboard, MDF or wood, depending on the features of the model and financial capabilities. At the first stage, a project is developed. A specific model or an abstract image of a car is used as a sample, but even with the most basic calculations, there should be a drawing in front of your eyes with parameters, rounding angles and color. A template is made from the sketch and then cut out of the material.
The same is done for the headboard and footboard. The options are different: it is possible to install simple flat panels, where the resemblance to a car is achieved by the image of headlights, but you can develop a design that more accurately imitates a bumper.
There are two ways to make a machine bed with your own hands.
In both cases, the workpieces are cut out with a jigsaw, cleaned, and the edge is processed with a milling cutter. The edge must be sealed with thermal tape or plastic edge.
Details and additions
The most obvious car accessories are the steering wheel and wheels. In the vast majority of cases, both in models of manufacturers and in-house production, they are absent. In principle, a steering wheel is not provided: it would have to be installed at the foot and the backrest should be made too high. They prefer to paint or stick on wheels.
Drawing with dimensions
To make a bed yourself, you need to make a drawing. It is on its basis that you will create furniture parts and assemble the structure. In this drawing, it is necessary to indicate not only the design with the dimensions of the bed, but also the presence of the dimensions of the drawers, as well as other elements.
Once you have decided what the crib will look like, you can look for a ready-made drawing on the Internet . If necessary, it can be adjusted according to your wishes.
If you know how to draw and count, you can make a diagram of the future product yourself.
If you do not know how to draw and calculate the dimensions of furniture, it is better to contact a specialized company . Here they will not only draw you an ideal diagram of a bed - a typewriter, but will also detail the product on modern machines. After this, you only need to assemble the bed in the correct sequence.
Important : a drawing of the bed is needed from different angles. It should show the bed from all sides.
The bed-machine will consist of the following elements:
- sides (they act as a body);
- a drawer for small items (located on the side of the bed);
- hood (you can place several toy boxes in it);
- slatted bottom.
What's wrong?
RESULTS й или знакомÑÑ Ð¸Ð» UR оваÑи-маÑÐ¸Ð½Ñ Ñвоими ÑÑками, ÑеÑÑежи лÑÑÑе Ñо SOS °Ð½Ð¸ÑÑ. ROOM RESULTS Ð¾Ð¼Ð¾Ð±Ð¸Ð»Ñ Ð¸ изголовÑе. ROOM, ROOM ROOM, ROOM ¶Ð½Ð¾ обойÑиÑÑ Ð¸ одной ÑаÑÑÑÑÑ, но маѸна Ñогда "Return" ASSESSMENT. RESULTS димое, но еÑли много ÑнÑÑзиазма, Ñо поп RESULTS ºÐ»Ð°. OPTIONAL CONDITIONS колеÑами и SMALL. RESULTS ÑÑÑ Ð½Ð¸Ð¶Ðµ оÑÑаÐ"ÑнÑÑ, ÑÑÑÐ¾Ð±Ñ Ð² Ð½ÐµÑ Ð±ÑÐ" о Ñдобно забиÑаÑÑÑÑ. RESULTS ASSOCIATED.
How to close the podium
Once the installation of the podium and bed frames has been completed, it is possible to begin closing the frame and covering the upper elements. For finishing, sheet material is used that has high strength, for example, OSB boards or plywood.
The cost of a finished plywood structure will be less, however, OSB boards have a more uniform structure, without knots, chips and cavities.
In accordance with the drawing, the necessary pieces of the slab are cut out and screwed to the frame with self-tapping screws. It is recommended to leave a distance of 2-3 mm to prevent possible surface deformation.
If a completely enclosed podium is being installed, then you don’t have to cover the internal structure. For structures that are open on at least one side, the inside is sheathed.
If the podium is planned with drawers, then they are installed inside the frame before the podium is closed. How to make and install drawers will be discussed below. It is recommended to treat the wooden frame and cladding with protective agents against fungus and mold.