Meaning and purpose
High-voltage transformers (HV) belong to voltage converters and are used to convert high-voltage voltage into low-voltage voltage, which is used to supply power to various equipment. The principle of their operation differs little from a power transformer.
A special feature is the difference in the number of turns in the primary and secondary windings: in a step-down transformer there are more of them, in a step-up transformer there are fewer.
All devices can be classified by:
- purpose – general and special;
- type of installation - internal or external;
- errors;
- number of windings (2, 3, 4);
- number of phases (one, three).
Special ones are installed in radios, televisions, communication devices, and household appliances. Almost all of them are low-power (several kVA), designed for a frequency of 50 Hz, and are installed exclusively inside. The number of windings depends on the type of equipment on which they are installed. The insulation is treated with epoxy resin.
Removing the transformer
Extraction
For a homemade welding device, a transformer is used, which has an average power of 750 W. Using such a device, it is possible to connect metal sheets up to one millimeter thick. This electromagnetic device is a booster device. To provide power to the magnetron, it is capable of generating a voltage of 4000 V.
A powerful electronic device (magnetron), which absolutely every microwave oven has, requires high voltage for normal operation. Therefore, the transformer, which is connected to the magnetron, has fewer turns on the first winding. There are more turns on the secondary winding, a voltage equal to 2000 V is created here. But then the voltage doubles, thanks to the use of a specially designed doubler. Therefore, measuring voltage does not make any sense.
Remove the transformer from the microwave oven with care and precision. Do not use a hammer or any other heavy objects. First you need to unscrew the base of this kitchen appliance, after which you need to remove all the fasteners. After this, the transformer is carefully removed from the place where it is installed. From the “insides” of an ultra-high-frequency oven (microwave), you will need a magnetic circuit and a primary winding. The primary winding has a thick wire and fewer turns.
The secondary winding is not needed, so it is dismantled. This procedure can be carried out using a hammer or chisel. You must act extremely carefully, otherwise you may damage the primary winding. If during this procedure it is discovered that there are shunts in the transformer that limit the current, they should be removed.
If the magnetic core is not a glued structure, but a welded one, then the removal of the secondary winding must be done using a carpentry tool (chisel).
Using a chisel
An ordinary hacksaw can be a substitute for a chisel. If the winding is tightly packed into the magnetic wire window, then you should cut the wires and then remove it by drilling it out. During work, care must be taken, otherwise the magnetic circuit can be deformed.
After dismantling is completed, it is necessary to wind a new secondary winding. For this process, a wire with a diameter of one centimeter is useful. If there is no wire with this diameter, then you need to purchase it. You should not worry about the fact that the wire must be multi-core; you can use a bundle consisting of individual conductors. The main thing is that there is a suitable diameter. Upon completion of the installation of the secondary winding, the updated transformer will be able to produce a current strength that will be equal to 1 kA.
If you need to make a welding device with more power, then using one electromagnetic device is unlikely to be enough. You will have to use two devices.
Electrical specifications
To correctly make a model yourself, a number of parameters are determined:
- Output power: P2 = U2*I2, which is obtained by multiplying the output parameters. If there are several secondary coils, they are summed.
- The efficiency does not exceed 80%, so the primary: P1 = P2/0.8 = 1.25*P2.
- The area of the central part is calculated based on P1. For steel, this value is: S = P1^0.5 - calculate the root of the primary power value. For tin, baked wire, roofing iron, S is taken three times more: S = 3*P1^0.5.
- Turns of the first coil: w1 = 50/S.
- Second: w2 = w1*U2.
The w value is increased by 5-10%, because Some voltage is lost due to resistance.
Magnetron replacement
Repair of a broken magnetron is not carried out even in specially equipped workshops, so you will have to purchase a new part. Before removing the magnetron from the microwave oven, you should mark the connector contacts to avoid confusion in their connection when installing a new part. If the leads are connected incorrectly, the magnetron simply will not function.
In fact, you can replace the magnetron with a new one yourself. To do this, it is enough to be able to use a screwdriver and be able to ring diodes. Therefore, narrowly focused knowledge and skills are not required. If you cannot find a specific magnetron model for a specific microwave, you should use the most suitable analogue.
The magnetron device itself is the same for all manufacturers, but their design may vary, so it is important to pay attention to the fit of the analogue to the waveguide, which should be tight. If the thermal paste on the thermal fuse is dried out, it should be replaced with fresh one when replacing the magnetron
What material is the magnetic circuit made of?
If you need a low-power converter, a rod or armored magnetic circuit is suitable. In the first version, the rods are located vertically. In the second case, the rods have a rectangular cross-section and are located horizontally. This design is more complex and therefore less common.
In step-up, W-shaped ferrite magnetic cores are often installed; the difficulty in the design lies in the need to select the exact size of the rod. If a spare part from another equipment is used for assembly, the thickness of the plate package is determined based on the power. The plates are inserted into the coil and tightened with nuts and studs.
Where can I get a powerful transformer? What can you pull out of? | Topic author: Egor
We need transformers from 400W and above, but where can we find such treasures? Old TVs, tape recorders? My uncle pulled out an armored trans with a power of 600-650W, quite heavy, from an old Soviet TV set. Can you tell me where they are? I saw a non-working Ruby in my neighbor’s garage in the village, what’s interesting about that? Transformers for business.
Dmitry in old Soviet tube color TVs - 380 watts. .Ruslan, you can peel off all the secondary and wind your own. .
It's easier to go to flea markets..
Pavel there were no such TVs... your uncle is fucking!
Vladislav Old color tube TV, transformer charger for a car, microwave oven, linear transformers for wired radio broadcasting.
Grigory If “Rubin” has a switching power supply, you won’t find anything for yourself in it. Go to the markets, they often sell old things. You're sure to find something.
Ilya In old COLOR tube TVs there were 250-270W, maximum 315W.
Alexey Microwaves. But keep in mind that there transformers operate above their rated power, in core saturation mode.
Valery From old color tube TVs you can make any transformers from 250 W to 5 KW. All that remains is to strip off all the windings from the iron, put the iron in the necessary bags, of course you will need more than one such trans, make a new frame and rewind the windings according to calculations. Even a welding transformer can be built from 4 such transformers.
Igor Industrial have different capacities. In factories you need to take an interest
Wire diameter
The parameter is determined by the strength and current density, on average 2 A/mm2.
- On the 1st winding: I = P1 / U1.
- Without insulating material: d = 0.8*I^0.5 – the root is calculated from the current indicator.
- Cross section: s = 0.8*d^2 – squared.
If there is no product with the resulting diameter, you can take several thinner ones and connect them in parallel so that the total cross-section is larger than the calculated one.
For a thick wire in the last formula, the coefficient can be 0.65-0.7. To avoid calculating it, you can use the table:
Next, the area with insulating material is determined: s' = 0.8d^2 - but here the characteristic is taken from the table, with insulation.
To obtain the area of the core window, sum up all the area readings obtained and multiply the indicator by 2 or 3.
Widest scope of application
The simplicity of assembly and high efficiency of transformers became the reason for their inclusion in the composition:
- Power supplies;
- TVs;
- Microwave ovens;
- Radio stations;
- Welding machines;
- Communication equipment;
- All kinds of automation
- Control and measuring equipment.
How to wind?
The core is covered with tape 5 times, the wire is placed in the groove, and winding-1 is wound. Both ends should be brought out to one side and insulated with Teflon tape or cambric. To fix the last turn, you can use regular thread, so it will not unwind.
4-5 circles of tape are laid on top of this, the rod is placed in the body of a syringe 3 cm long. It is also wrapped with tape twice and a secondary winding is performed, the width is one and a half centimeters. Each layer is insulated with tape or double fluoroplastic tape. The ends are brought out on different sides, three conclusions are made from one, and one from the second.
All this is again insulated with adhesive tape in five layers, flexible wires for output are soldered to it, and insulated again.
If a break occurs somewhere, the place is cleaned, twisted, soldered, isolated. Therefore, you can use the old wire, as long as it is properly soldered. To increase electrical strength, each layer of winding is impregnated with acrylic varnish or epoxy.
The turns are placed as close to each other as possible, parallel to the core if possible.
Procedure for safe inspection
When starting an independent test, you need to stock up on a multimeter (in extreme cases, a two-pole indicator with a built-in power source), screwdrivers with various tips, an ohmmeter, and pliers.
The general scheme of safe work looks like this:
- disconnect the device from the power supply;
- unscrew the screws and remove the casing;
- discharge the capacitor;
- carefully remove the terminals from the transformer;
- check its windings: if the parameters are normal, replace them and look for other reasons;
- when a break or short circuit is found in them, the device is replaced;
- The oven is assembled and its functionality is checked.
If, after removing the transformer, traces of insulation melting are visible on its windings, and a strong burning smell emanates from it, then it is no longer suitable for use, and there is no point in checking it. In this case, only replacing the device
.
Before you begin examining the transforming device, you must make sure that it is receiving power. To do this, you should use a multimeter to check the presence (after turning on the device into the network and starting the heating program) at the connection points of the primary winding of an alternating voltage with a value of 220 V
This work must be performed with extreme caution to avoid electric shock.
The presence of a high-voltage capacitor capable of storing an electrical charge leads to the need to discharge it before carrying out testing work
. This is done by simply connecting its contacts to each other (with a screwdriver, pliers) or to the housing when the voltage is turned off.
Assembly
Epoxy resin is an essential component of the structure. It eliminates air bubbles, which will lead to breakdowns and leaks in the future. Therefore, take care of the frame and vacuum installation. For the latter you need:
- sealant;
- plasticine;
- syringe;
- jar with a rubberized screw-on lid;
- silicone hose;
- check valve (can be found at a pet store).
A hole is created in the lid, a hose is inserted, and the area is isolated with sealant and plasticine on both sides. The air is pumped out with a syringe before the lid is pressed in.
The resin is heated and a hardener is added. An ordinary paper frame will also work; a cylinder of the same diameter is attached to it using hot-melt adhesive. It takes 24 hours for complete hardening, after which the frame is removed.
To avoid mistakes, it is checked for the integrity of the magnetic circuit, the presence of breaks in the wires, and the integrity of the insulation. To do this, you will need a multimeter; set it to MOhm mode and measure the resistance between the windings, both them and the housing. Next, the experiment is repeated in operating condition, the current and transformation ratio are checked. Another option is to ring the terminals.
After this you can start using it.
Trial
To check the performance of U-shaped or toroidal transformers at home, you can use a conventional multimeter. To do this, switch the measuring device to the ringing mode and check the integrity of each of the windings. Then check the insulation between each winding and the magnetic core and the resistance between both windings. This is the simplest set of tests, which will give a general idea of the serviceability of a home-made unit.
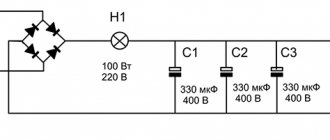
To check the absence of short-circuited turns, a lamp is used that is connected in series to the primary winding.
In addition, electric machines are tested in idle and short circuit conditions. Such checks show how well the converter is assembled, but it is not necessary to perform them at home.
Windings for increasing voltage
The reel is placed on a block of wood. It should already have a hole for the winding rod. The further sequence of actions is as follows.
- A couple of layers of varnished fabric are wound onto the reel.
- The tip of the wire is fixed on the cheek, after which the handle begins to rotate.
- The laying of the coils must be monitored and, if necessary, compacted.
- At the end of the primary winding, the wire is cut and fixed on the cheek.
- The working terminals of the windings are wrapped with electrical tape or covered with heat-shrinkable tubing.
You can't do without chargers
To perform this operation, as already noted, chargers operating from a 220 V network are used. There are a lot of such devices on the automotive market, they may have various useful additional functions.
However, they all do the same job - convert alternating voltage 220 V into direct voltage - 13.8-14.4 V.
In some models, the charging current is manually adjusted, but there are also models with fully automatic operation.
Read on the topic: How to choose a charger.
Of all the disadvantages of purchased chargers, one can note their high cost, and the more sophisticated the device, the higher the price.
But many people have a large number of electrical appliances at hand, the components of which may well be suitable for creating a homemade charger.
Yes, a homemade device will not look as presentable as a purchased one, but its task is to charge the battery, and not to “show off” on the shelf.
One of the most important conditions when creating a charger is at least basic knowledge of electrical engineering and radio electronics, as well as the ability to hold a soldering iron in your hands and be able to use it correctly.
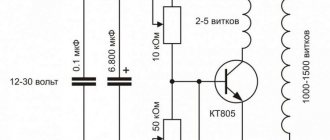
Next, we will consider several battery charger circuits that can be created from old electrical appliances or electronic components.
Memory from the ATX power supply (for prepared ones)
A charger made from a computer power supply has a more complex circuit.
For the manufacture of the device, units with a power of at least 200 Watts of the AT or ATX models, which are controlled by a TL494 or KA7500 controller, are suitable. It is important that the power supply is fully operational. The ST-230WHF model from old PCs performed well.
A fragment of the circuit diagram of such a charger is presented below, and we will work on it.
In addition to the power supply, you will also need a potentiometer-regulator, a 27 kOhm trim resistor, two 5 W resistors (5WR2J) and a resistance of 0.2 Ohm or one C5-16MV.
The initial stage of work comes down to disconnecting everything unnecessary, which are the “-5 V”, “+5 V”, “-12 V” and “+12 V” wires.
The resistor indicated in the diagram as R1 (it supplies a voltage of +5 V to pin 1 of the TL494 controller) must be unsoldered, and a prepared 27 kOhm trimmer resistor must be soldered in its place. The +12 V bus must be connected to the upper terminal of this resistor.
Pin 16 of the controller should be disconnected from the common wire, and you also need to cut the connections of pins 14 and 15.
You need to install a potentiometer-regulator in the rear wall of the power supply housing (R10 in the diagram). It must be installed on an insulating plate so that it does not touch the block body.
The wiring for connecting to the network, as well as the wires for connecting the battery, should also be routed through this wall.
To ensure ease of adjustment of the device, from the existing two 5 W resistors on a separate board, you need to make a block of resistors connected in parallel, which will provide an output of 10 W with a resistance of 0.1 Ohm.
Next, the manufactured board is installed in the case and all pins are connected according to the diagram.
Then you should check the correct connection of all terminals and the functionality of the device.
The final work before completing the assembly is to calibrate the device.
To do this, the potentiometer knob should be set to the middle position. After this, the open circuit voltage should be set on the trimmer resistor at 13.8-14.2 V.
If everything is done correctly, then when the battery starts charging, a voltage of 12.4 V with a current of 5.5 A will be supplied to it.
As the battery charges, the voltage will increase to the value set on the trim resistor. As soon as the voltage reaches this value, the current will begin to decrease.
If all operating parameters converge and the device operates normally, all that remains is to close the housing to prevent damage to the internal elements.
This device from the ATX unit is very convenient, because when the battery is fully charged, it will automatically switch to voltage stabilization mode. That is, recharging the battery is completely excluded.
For convenience of work, the device can be additionally equipped with a voltmeter and ammeter.