A children's matinee at school or kindergarten is not only a joyful, but also a slightly trembling event. In addition, parents have a new problem - where to buy a New Year's costume or how to make it from scrap material. Mom and dad need to make every effort and imagination to make the result truly beautiful. It is the bee costume that causes a lot of difficulties for many parents. But we offer you several options for making a bee costume, among which you will definitely find something interesting for yourself.
What is needed to create wings? What can an insect body be made from? What can serve as antennae for a bee. This is what we want to talk about next.
Action plan
Skirts:
- Drawing patterns.
- Transferring patterns to fabrics.
- Sewing skirts.
- Connecting skirts with the top of the dress.
- Sewing a hidden zipper.
Top dress:
- Drawing patterns.
- Transferring patterns to fabrics.
- Preparing the details of the top of the dress.
- Sewing the top of the dress.
Wings:
- Making wing shapes from wire.
- Covering the wire frame with tulle.
- Gluing the straps.
- Gluing chamomile.
Headband with mustache:
- Gluing chenille wire to the existing rim.
- Gluing pompoms to antennae.
- Decorating the headband with braid.
How to make wings?
To make your own bee wings, you will need:
First, you need to make blanks for future wings from wire. There should be 4 of them: 2 small and 2 large. To do this, fold the wire into a shape resembling a drop and secure the ends so that it does not unfold. Next, tie the small ones at the bottom of the large wings with a thick thread. Having made the blank, it’s time to start tightening the wings. To tighten them, take the prepared tights and pull them over the wings, one at a time on each one. Then tie it in the same place where you tied the 2 wings with thread.
Now you need to connect 2 pairs of wings. This can be done using the same wire, simply winding it between two blanks. And hide all the knots so that they are not visible.
Since the wings should be on the back, they need to be attached there somehow. To do this, you can take a strong black ribbon and, cutting off 2 pieces, tie it to each of the wings. To prevent the ends of the ribbons from fraying, lightly scorch them with a lighter.
In order to put wings on a child, you can use any of the techniques. For example, just tie them on your chest. Or tie it to your shoulders. Or tie the ribbons with a cross. Do what is most comfortable for the baby.
Also, for variety and greater similarity, you can sew rhinestones or beads onto the wings of the bee costume. Wings painted with paints will also look interesting. This process can be done with your child, which will add even more value to the costume.
Step-by-step instruction
Preparing the details of the dress top
You need to make pattern templates and transfer them to the fabric.
Dress top pattern
Notes:
- Patterns are given for four dress sizes without seam allowances.
- The number of front and lining parts is indicated.
Sewing process
Stage 1:
- Make pattern templates of the desired size on paper.
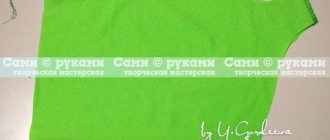
- Iron all fabrics.
- Place the yellow satin on a flat surface with the wrong side up, lay out the templates, trace the details of the top of the dress, taking into account the allowances.
- Cut out the details.
- Perform the same actions with the yellow lining fabric.
- Fold the satin and lining pieces in pairs with the right sides facing inward.
- Pin, baste and stitch the front and two back pieces along the side seams.
- Sew two stripes of black satin onto the front of the dress.
- Place all the pieces face down on a flat surface, pin, baste and stitch together the front and two back pieces along the side seams.
- Baste and single stitch along the neckline and armholes of the top of the dress.
- Turn the top of the dress right side up.
- Connect the shoulder seams of the top of the dress.
- Finish the neckline and armholes with bias tape.
Stage 2:
- Prepare yellow satin for an underskirt with a width of 300 centimeters and a height equal to the height of the skirt plus seam allowances of 2 centimeters.
- Fold the bottom and apply a single stitch.
- On the top edge, sew a single stitch with the maximum length of a sewing machine seam for subsequent assembly of the top of the skirt.
- Carry out similar operations with yellow tulle according to the size of the satin petticoat.
- Prepare a piece of black tulle 300 centimeters wide and 5-6 centimeters tall shorter than the height of the first tulle skirt.
- Prepare a piece of yellow tulle of the same width, 5-6 centimeters shorter than the height of the black tulle piece.
- Apply black and gold trim to the bottom of all skirts.
- On the upper edges of all skirts, sew a single stitch with a maximum spacing for assembly.
- Assemble all tulle skirts, achieving uniform folds.
- Baste the tulle skirts along the top edges together and apply a single stitch.
Stage 3:
- Baste and stitch the bottom of the front of the dress top, the top of the satin petticoat and the top of the tulle skirts.
- Undercut the shoulder seams of the back halves of the top of the dress one centimeter at a time.
- Baste one half of the hidden zipper to the left back half of the dress top.
- Mark the belt line on the zipper.
- Baste the second half of the hidden zipper to the right back half of the top of the dress, checking the location of the belt line mark.
- Sew a hidden zipper to the back halves of the dress top and to the side edges of the skirts along the entire length of the zipper, stitching from top to bottom on both halves of the zipper.
- Sew the side edges of all skirts separately.
- Fold the lining of the dress top, closing the purl seam of the connection between the dress top and the skirts, and sew a spot hand stitch.
- Try on the finished dress.
- Apply sequin braid to the black stripes on the front of the dress using a heat gun.
Overlock rating
The best overlockers for home and production according to customer reviews
Rating
More details
Sewing machine rating
The best sewing machines from budget to computerized
Rating
More details
Stage 4:
- Take a single-core copper or aluminum wire insulated 3 meters long, bend the outline of the wings, and secure the ends of the wire with masking tape.
- Wrap the wire frame with masking tape and crimp the tape with your fingers along the entire contour.
- Prepare a piece of yellow tulle according to the size of the wings.
- Glue the material to the wire frame, cut the fabric along the contour, leaving allowances of 1 centimeter around the perimeter.
- Glue the fabric allowances to the frame.
- Glue gold bias tape along the outline of the wings.
- Prepare two strips of yellow satin measuring 6 x 40 centimeters, fold them in half with the wrong side out, baste and stitch along the long edges.
- Turn the strips onto your face and insert a 25-centimeter long elastic band inside each strip.
- Having stretched the elastic band, sew it to the stripes in the center.
- Glue the finished straps to the wings with a heat gun.
- Make a fabric daisy with yellow satin petals.
- Glue the daisy to the outside of the wings, covering the junction of the wire frame and straps.
- Try on the wings.
Stage 5:
- Take a ready-made headband and glue the braid with sequins on the outside using a heat gun.
- Glue two pieces of chenille wire to the hoop using a heat gun.
- Glue pompoms made of woolen thread to the wire.
- Try on and test the finished bee costume in action.
Bee antennae
A mandatory attribute of a bee costume must be antennae. Making them is not difficult at all. To do this you need to prepare:
First you need to make two small pompoms on any base, the technique and result will be the same. So, as an example, we will tell you how to make pompoms using a regular fork. The yarn needs to be wrapped around the sharp part of the fork and secured so that the wound part does not unravel. Then cut a small piece of yarn and tie the skein in the middle with a fork. You will get something like a bow. You need to tie it very tightly. Next, remove the “bow” from the fork and use nail scissors to carefully begin cutting the loops along the edges. Having fluffed the pompom on all sides, you should roll it a little in your hands so that it finally takes the desired shape. Make 2 of these pompoms.
Then attach the wire to the hairband on both sides. Wrap the braid around it in a circle and secure it. Once completed, secure the pompoms to the tops of the wire. The antennae for the bee costume are ready!
Other costumes
Maleficent costume
Making an outfit at home using improvised materials
Instructions
More details
Raven costume
Master class on making a raven and crow costume from a mask, cape and feathers
Instructions
More details
gold fish
Children's goldfish costume for the New Year. Step-by-step master class on making
Instructions
More details
Wolf costume
Costume for a child or adult made of faux fur. We sew in a few hours
Instructions
More details
Harry Potter
New Year's Harry Potter costume for a boy. We sew and knit in a few evenings
Instructions
More details
Kolobok
A cheerful kolobok costume for a matinee. Even a novice master can handle it
Instructions
More details
Carlson
Carlson's costume for a children's party. Step-by-step sewing instructions
Instructions
More details
Bat costume
Three outfit options for Halloween and New Year
Instructions
More details
Wizard's Outfit
New Year's costume for a boy: cape, cap and wand. We do it in a couple of evenings
Instructions
More details
Spider costume
A spider with moving or removable legs. Two unusual ideas for making
Instructions
More details
Pig costume
We sew costumes for Piglet, Peppa Pig and Piggy with our own hands. Step-by-step instructions for variations
Instructions
More details
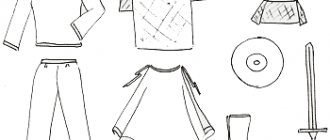
Beetle costume
New Year's costume for a boy: jacket, pants, wings, hat and butterfly on the chest. Even a sewing novice can handle it
Instructions
More details
Where to begin?
First of all, it should be understood that it is not at all necessary to start sewing almost any suit, as they say, from scratch. It’s entirely possible to use ready-made clothes that you won’t mind, and add some thematic elements to them.
The bee costume is exactly that. Therefore, first of all, you need to get a plain black or yellow dress out of the closet. The style and material are completely unimportant. The main thing is that the child feels free and comfortable in it.
Next, you will need satin ribbons of the opposite shade - black or yellow, depending on the color of the dress. They should be sewn horizontally. The stripes may not run along the entire length, but only in the upper part of the outfit. You can also use a skirt and embroider only it.
Images
The bee costume is most often made for girls, limited to a striped yellow and black skirt, blouse and wings. However, the bee outfit is considered universal because it is suitable for boys, newborn children, and adults.
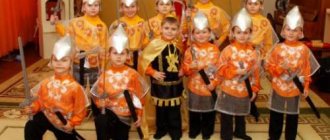
Bee Union
A New Year's bee costume is always gorgeous, but the effect is enhanced if there are friends, loved ones or family members nearby dressed in similar outfits. This unites children and adults, creating feelings of mutual friendship, love and mutual assistance in everyone.
Bee girls
New Year's outfits for girls dressed as bees are very diverse. These can be suits specially made for the holiday, or they can be combinations of individual elements with everyday clothing.
Boy's costume
Such outfits are rare, but they are no less interesting.
Bee Girl
A well-chosen yellow coat or jacket with a hood, complemented by individual decorative elements, a little makeup on the face - all these are attributes of a touching bee costume that is suitable for girls and teenagers.
Bee Costume Ideas
To make these costumes, it took imagination, a sense of taste, and the ability to work with fabrics and yarn.
Decorative elements
In addition to the main costume, you can try to decorate it with some accessories. For example, make a bright flower brooch that will complement the look of a bee costume for a girl.
For a decorative flower, prepare:
- colored felt sheets;
- sequins or beads;
- glue gun;
- pin;
- scissors.
Making such a flower is very, very simple. All you need is to cut out the core from a dark sheet of felt, as well as light or yellow petals. And carefully use a glue gun to glue the petals to the circle. Then use thread or glue to decorate the core with shiny sequins or beads. Glue the flower to a special pin and decorate the bee costume with it. Exactly the same flowers can be glued to strong elastic bands and, having made 2 braids, decorate your hair with them.
Required materials and tools
The material for this craft can be found in every home; you don’t need to buy anything separately. If something is missing, then the acquisition will not affect the family budget at all. For production you will need:
- Small plastic bottles. The optimal volume is 0.33, but more can be used.
- Plastic transparent cup. A bottle can also be used.
- Scissors and stationery knife.
- Glue.
- Black electrical tape.
- Acrylic paints.
- Any wire that is not too thick.
- Marker.
Important! It is best to use acrylic-based paints, since watercolor paints will wash off in outdoor conditions, while oil paints adhere less well to the surface.