It often happens that a plastic part or its fastening bursts, comes off, and so on. I don’t really want to buy a new part because of some small fasteners. All that remains is repair by soldering and subsequent strengthening with soda and superglue. But first things first.
It may be that the part simply cracks: here you can immediately proceed to soldering. But it happens that the plastic is deformed, then before soldering it is necessary to return it to its original position, and this can be done with a hair dryer. After that, we take a soldering station (in fact, this is an ordinary soldering iron with a thin tip, the temperature of which can be adjusted, making sure that this or that plastic does not burn, but melts).
Carefully solder in depth, applying stitch by stitch, and solder 5-10 mm more than there is a crack. It may simply be that the crack is internal and is not visible on the surface. So we solder each crack, and in the end we get a similar web of seams.
We do the same on the back side of the part.
After this has been done, the seams need to be processed, made flush with the main surface, and the entire surface as a whole must be prepared, if, of course, this is required, but the most important thing is the seam. And we do this with ordinary sandpaper, about 100 grit.
Is that all? But no, now comes the fun part!
We need ordinary baking soda and any superglue.
On the soldered seam between the ties there is a space that needs to be filled in order to give the whole thing final rigidity and complete confidence in the reliability of the soldering.
Take superglue and apply a thin layer of it to the seam. Make sure that each seam cavity is filled. Let it sit like this for about 10 minutes.
- After that, apply another layer of superglue and sprinkle soda on top of it all!
- If required, for painting, for example, the seam can also be treated with sandpaper.
The baking soda reacts with the superglue, after which it all crystallizes and you get a stone seam! All the space between the ties is filled and rigidly fastened, the seam is super strong, when you try it yourself, you will understand everything)
The fork shield was soldered in the same way. I didn’t process the seam, it just doesn’t make sense.
I hope that this method of repairing plastic will be useful to someone)
Source: https://PitBikeClub.ru/news/blog/paika-plastika-bez-armirovki-2083.htm
Renault Megane Cheshire cat › Logbook › Repairing the front bumper with a hot stapler
Hi all.
I want to tell you about my repair of the front bumper. I'll start from afar. On December 1st I got into a small accident. At the first snowball, he didn’t have time to slow down in front of the car and drove into his rear bumper. As a result, he has scratches on the rear bumper; my bumper was cracked quite well, but it was held together by fasteners. For the first time, I tightened the bumper with zip ties so that it would stay tighter and would not fall off on bumps on the road. I monitored the disassembly, I wanted to find a bumper in the exact color because... I don’t want to take the bumper for painting, because I don’t know how it will be painted. I had a negative experience in the past.
There were different thoughts, and solder it with a regular soldering iron with a mesh, drill holes and tie it together with blue ties, sort of JDM style.
And somehow the user Ukrop373 gave me the idea of buying a hot stapler and staples for it and sealing the seams with staples. Then why didn’t I plunge into this idea? But then on February 23, the wife says: “What do you want?” “I thought, why not.”
In general, I ordered a stapler from Aliexpress. Link to order. I ordered from Russia, from a Russian warehouse, it arrived quickly, 8 days. But there is one thing that I didn’t like. The product is sent by IML delivery service. The order was sent, IML gave me a track number, and I used it to track the movement at first. And one day the movement froze at the “Delivery by courier” position. Of course, I thought that the courier would arrive soon. But he didn't arrive for 4 days. I couldn’t stand it, I’m writing to IML, asking where the order is. to which their answer was that the goods were transferred to Russian Post, and they gave the track number to Russian Post. Delivery service! handed over to Russian Post! wonderful, huh. That is, here is a little thing that you should pay attention to if you order. Okay, in the end everything came, everything is fine. I'm waiting for it to warm up.
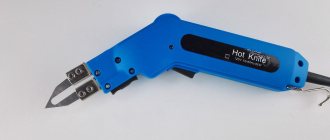
Hot stapler for restoration of plastic bumpers and headlights
A crack in the bumper or a broken headlight is a common problem that most car owners are familiar with.
The price of a complete replacement of a part does not always suit the car enthusiast. Now there is an alternative - quick and reliable restoration of the damaged area, which the Hot Stapler will help to perform. The Hot Stapler uses special stainless steel staples to connect damaged edges, similar to a similar household tool. But in this case, the fixing elements are also heated to the melting temperature of the plastic, due to which they are easily immersed in the bumper material, pulling together the damaged edges. It is very easy to master the principles of using such a device; the corresponding video and article will help you with this.
DIY soldering iron for plastic
Authorization on the site
How to make a homemade soldering iron for plastic from an ordinary one with your own hands.
Hello to all DIY lovers!
Today I want to show you one of the options for making a homemade soldering iron for plastic. Those who have scooters quite often encounter a problem when the plastic covering breaks. And not only scooters, but also car trim, bumpers, various plastic fasteners, and so on, and so that all this can be soldered together efficiently, you can make this device.
Making a soldering iron for plastic
First of all, these soldering irons need to be slightly modified. We remove the handles, cut off the wires (I will replace them with better ones), then use a sander to grind down the wooden handles so that they can be fastened together. I used electrical tape, but you can also glue it together.
Now you can replace the wires; I don’t really like thin Chinese ones, so I completely replaced them with thicker ones. (I took them from an old tape recorder)
We bring out two wires from each soldering iron and connect them into one to the plug. Of course, you can not do this and leave two forks, but it seems to me that it will be more rational.
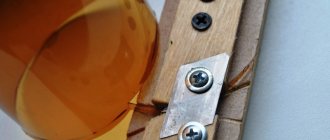
Now comes the most painstaking task. You need to remove both tips from the soldering irons, turn them over and drill holes about 2 cm deep in the flat side. Select the diameter of the holes individually according to the size of the staples.
After that, we put the stings in place and make a bracket. For the test, I made it from a regular paper clip; steel wire will also work. Types of staples can be viewed on the Internet.
Secrets of soldering auto plastic
Many motorcyclists and motorists have to deal with the fact that the plastic parts of their vehicles (most often bumpers) receive some damage and lose their former appearance.
But instead of buying a new spare part, you can restore the old one yourself by soldering. Soldering plastic is not that difficult.
Necessary tool
In this case, the following soldering tools can be used:
- an ordinary 100-watt soldering iron;
- hair dryer (also called a heat gun);
- Soldering Station.
The capabilities and operating principle of a conventional soldering iron are familiar to almost every home craftsman. Such a soldering apparatus may have a straight or curved tip.
The hot-melt gun solders plastic by supplying heated air. The heating temperature ranges from +80 to +600 ℃, it can be continuously adjusted.
As a rule, models of soldering guns are equipped with a large number of attachments that make this tool as convenient and efficient as possible.
The nozzles help direct the air to the desired area and create the required angle of inclination. High-quality hair dryers for soldering plastic have a power of at least 1600 watts.
The soldering station combines a regular soldering iron and a hot-melt gun for plastic. Such a unit is capable of solving many problems. Temperature adjustment and a huge number of attachments allow you to carefully solder plastic, as well as other materials.
Types of plastics
In order to successfully repair a car element, it is worth determining in advance what kind of plastic it is made of. All plastics can be divided into hard and soft. In particular, fiberglass plastics that do not have any markings are considered soft.
Hard types of plastics can have different markings, for example, ABS, GF30, PAG6. The markings are visible if you look from the back of the vehicle part. Polypropylene (PP marking) is considered the most durable.
Quite often, vehicle owners require soldering of ABS plastic, since it is from this material that the bumpers of cars of many well-known brands are made.
Use of a soldering iron
Let's assume that the plastic bumper of a car is seriously damaged and needs to be repaired by soldering. How to do it?
To make it easier to solder the structure, it must be removed from the car. It also doesn’t hurt to look at the labeling in advance. Most likely, the part will be made of ABS plastic.
Then you should clean the surface of the bumper from dirt, remove paint and varnish residues. Additionally, the entire plastic part must be degreased. Next, you need to connect all the fragments of the bumper together.
For such a connection, it is important to use clamps or staples. But this must be done carefully so that they do not penetrate through the car plastic.
Soldering plastic with a standard soldering iron should begin from the inside of the car bumper . To do this, one of its edges is securely fixed, and special plastic electrodes are laid along the future seam (although the name “electrodes” in this case is very arbitrary).
At the next stage, a soldering iron for soldering plastic melts the electrode material, and it fills all the recesses of the crack. This operation must be repeated as many times as stitches need to be made, that is, it all depends on the initial number of defects and damage.
Now you need to wait for the molten mass (characteristic bubbles appear on it) to cool a little - this will take about five minutes. Then you need to smooth out the seams on the plastic.
In principle, any blunt object can be used for this procedure. In hard-to-reach places, the surface can be smoothed and leveled with gloved hands. Complete hardening of the seams will occur in a few hours. At this point, the soldering of the auto plastic can be considered complete.
Using a hair dryer
Soldering automotive plastic is done a little differently if a heat gun (hair dryer) is used. Here you will need special welding rods (essentially, this is solder for soldering plastic).
You can purchase them in specialized stores or even make them yourself. The main thing is that they are similar to the material being welded. One of the ends of the rod is sharpened and then inserted into the corresponding hole in the nozzle of the heat gun.
The hair dryer should be moved slowly along the crack being repaired; the filler rod should be inclined towards the workpiece at an angle of approximately 45°. If a plastic part has shattered into separate pieces, then soldering it with a hairdryer is carried out in two passes.
First, the pieces or fragments are fastened together with short stitches (seams). And only after this the final reliable soldering is made. When the material has cooled, the surface of the part is puttied and sanded, preparing for painting.
To repair the plastic of a motorcycle, all kinds of elements of its external design, you can use soldering using approximately the same technology as in the case of repairing a car bumper. Moreover, motorcycle panels are usually made of the same ABS plastic.
Reinforcing mesh
Also, home craftsmen can use in their work such a device as a reinforcing mesh for soldering hard plastic.
Plastic soldering iron test
Next, insert the bracket into the soldering iron tips, wait until everything warms up well and you can solder.
After the plastic has hardened, you can bite off the excess with nippers or a drill and clean everything thoroughly. The test piece of plastic was thin, so it didn’t go deep; in thicker plastic, the bracket can be deepened further and then virtually nothing will be visible.
Characteristics
- Power supply – electrical network 220 V;
- Power consumption – 100 W;
- Fixation means – bracket;
- Bracket length – 16 mm;
- Bracket width – 19 mm;
- The cross-section of the staple is 0.8 mm;
- Bracket material – stainless steel;
- The thickness of the plastic with which work can be done is 1.5-7 mm;
- Device weight – 3000 g;
- Warranty – 30 days.
You can contact us for more detailed information in any way convenient for you, which are listed here.
Video on making a soldering iron for plastic
I also recommend watching a video on making a homemade soldering iron for plastic:
So I got this useful tool for soldering plastic. I would be very grateful if you could somehow finalize or improve this homemade product with your advice!
Thank you all very much for your attention and see you new homemade products!
Source