Handmade educational cube faces
I'll show you the faces of the cube. Each face actually represents a small task, a small game, one might say. I'll start with something simple...
1 side
development cube -
apple
:
You can take the worm out and put it back:
2nd face
developmental cube –
snail and butterfly
:
There are three different balls sewn inside the snail's shell that you can roll around there.
The butterfly is voluminous, rustling, knitted separately and fastened to the edge with a button:
3rd side
development cube –
fly agaric
and
flowers
:
Fleece grass, knitted flowers are fastened with buttons, the zipper on the mushroom is unfastened - there is a ladybug hiding inside:
4th face
development cube -
door
:
All the doors rustle, the fasteners are different everywhere. Various animals are hiding behind the doors - thermal decals:
5 face
development cube - “
finger walker
”. I slightly “paraphrased” the well-known finger exerciser (according to early development sites).
I will write the words of the wandering itself: through the snow, through the forest, through the sand, over hummocks, into a hole in a clearing, across a river, along planks... and they found a treasure!
And now what the elements are made of, in order.
The white bag is made of fleece with a rustling bag. Knitted square with long loops, yellow bag with beads. A bag with sewn buttons, a knitted square with a real knitted hole. Bag with sewn knitted berries, blue ribbon. Caps for felt-tip pens, corduroy pocket:
You can touch all this with your fingers, pick, feel... And the berries can be untied and put in a hole:
6th face
developmental cube -
buttons
on satin
ribbons
: airplane, animals, cars, boat.
All items can be moved along the ribbons and hidden
. An airplane - behind a cloud, cars - into a tunnel, a boat - behind the mountains, animals - behind the trees:
DIY knitted educational cube for girls - master class for mothers
Soft, bright, with numerous interesting elements, producing rustling and ringing sounds.
A knitted educational cube is a toy that teaches a baby to explore the world, improves motor skills and helps to acquire skills necessary in everyday life. Such toys are not cheap, but after spending a little time, you can make a personalized cube for a girl with your own hands. A desired gift from a loving mother will easily conquer the baby and become her favorite toy. And if there is an older child in the family, then you can do creativity together.
- Preparation of materials and tools
- Instructions for making and decorating
Preparation of materials and tools
This master class provides instructions on how to create a knitted educational toy for a girl. If you have a boy or you like sewing more than knitting, watch the lesson on a cube using the biscornu technique. Taking decorating ideas from there, you will also get a toy for a guy with a knitted base.
To make a developing cube with your own hands, you will need the following materials and tools:
- children's cotton yarn, approximately 55 g for the base of the figure;
- children's yarn of different colors, about 50 g, for decorative elements;
- foam rubber in the shape of a cube with an edge length of 9.5-10 cm;
- rattles (hollow plastic beads with a bell inside) – 2 pcs.;
- flat plastic tweeter – 1 pc.;
- a plastic transparent lid from a jar of sour cream or yogurt;
- various beads, beads, elements for scrapbooking;
- nylon and twill ribbons of different colors, cotton lace;
- yellow felt, hard;
- transparent glue “moment”;
- scissors;
- Crochet hook;
- ruler;
- doll eyes with moving pupils, 5 mm in diameter – 1 pair, 2 mm in diameter – 1 pair;
- silver stopper, for cord, 1 pc.;
- red cord 20 cm long, 1 pc.;
- gypsy and bead needles.
Instructions for making and decorating
The optimal length of the edges of the cube is 10 cm . A toy of this size will not be bulky or heavy, which is extremely important since it is intended for a child aged 5 months and older.
First, you need to knit six identical blanks in the form of squares with a side of 10 cm. For them you need to take cotton yarn. If you don't know how to knit, just take suitable fabrics ! This will be the basis of a developmental cube for your baby. Then start decorating each side.
The purpose of the toy is to develop fine motor skills and expand the child's tactile experience. This will not be difficult to achieve, using, for example, materials of different properties and structure.
So, a felt sun with rays from different ribbons, cords, elastic threads, and a piece of cocktail straw will fully solve the problem. The rays can be made even more interesting if you attach a tied ring, a voluminous bead or a button of an original shape to them. Then the child will be truly interested in both looking at the sun and touching its elements.
An important skill for any girl is the ability to lace and tie bows. It is recommended to devote one side entirely to this task. Lacing can be decorated using delicate cotton lace, a thin cord for loops and an elegant organza ribbon. Decorative bows made from satin ribbons will help add a cute girlish touch to the cube.
It is important that all elements are securely sewn on , because otherwise the child will easily and quickly tear them off or even want to taste them.
Try to make a very interesting rattling element for a children's educational cube with your own hands, using a transparent lid or body from some packaging. Place colorful beads, shells, scrapbooking items, and other small items inside. They will make noise, rolling from place to place.
To make the decor look brighter, make a contrasting felt backing inside the lid. The cover itself should be sewn onto the surface using a gypsy needle using an overcast stitch.
Another sound effect can be easily achieved using a plastic squeaker sewn under a decorative applique, for example, an owl. Around it, place improvised stars made of large beads, as well as a smiling moon with eyes.
For the squeaker to work, you just need to press your finger on the owl’s abdomen. The child's fingers will practice strength when pressing, and will also become familiar with the texture of a knitted applique.
It is more convenient to carry the development cube in your hands if you make a neat knitted handle. It can be decorated with lace, and the junction with the cube part can be decorated with buttons.
On the same side of the cube for a girl, embroider the name of the owner, emphasizing that the toy is her personal, personalized, made in a single copy.
Here you can sew on a couple of interesting beads and buttons that look harmonious against the overall background of the product.
Another side should be reserved for the “magic bag”. This element will teach the girl to use the stopper placed on the cord. Having acquired this skill, she will be able to open the bag on her own and find out what is in it. Inside, place a knitted rattle bead, knitted and simple plastic rings, and a knitted curl. Everything should be bright, interesting, and attention-grabbing.
Having formed all the sides of the cube, connect them together. It is recommended to further decorate each corner by sewing on various beads, plastic rings and other little things. They will complete the image of an educational toy and make it bright and positive.
Place a foam cube inside the mold. It must be inserted into the workpiece before attaching the last side.
A self-made development cube should be washed exclusively by hand, very carefully, at a temperature not exceeding 30 degrees, and dried on a towel. When hung, the knitted fabric may become deformed, which will spoil the appearance of the product.
Homemade toys are safe, and the love invested during the work makes them a kind of amulets. Learn to knit amigurumi and sew Tilda, so that your child will be surrounded by your care. Perhaps the process of making educational and other toys will captivate you and you will even start making money from handicrafts, turning your new hobby into additional income. Calculate how much the craft will cost you and compare prices on sale!
A master class on making a developmental cube for a baby was prepared by Zabava Rodionova. Especially for the online magazine “Women’s Hobbies”.
Assembling a development cube
I put foam
. I only had foam rubber 1 and 2 cm thick, so I had to sew it in layers. This is a difficult matter, I pricked all my fingers.
First I sewed 2 halves. I cut a hole in the center of each half and put a bell
, I sewed the halves:
I cut a hole in the top edge for a hole.
:
When assembling, I sewed 5 edges on a machine, and sewed the top edge using a machine only on one edge. Then she turned it all out, straightened it out, and inserted a foam cube.
I sewed the top edge by hand: first I fastened it with needles, and then sewed it with a hidden seam.
And this is how my son plays with a development cube:
In general, what he likes most is to pull out and throw out the worm, look behind the doors and put the berries in the hole.
the original of this master class on making educational toys with your own hands on the author’s website.
Educational cube
Author:
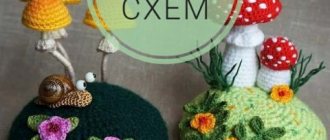
We knit a developing cube with a loophole for balls, a ladybug and a mirror flower
I’ll say right away that the process of creating this toy is not the fastest or easiest. But the result will definitely please your baby. And adults will also be happy to try out all the gaming capabilities of this versatile cube. How many times have I noticed - you make toys for children, but the adults themselves don’t let them out of their hands - it relieves stress 
So let's get started. First, let's prepare the necessary materials. Be sure to take into account the age of the baby, since small children put toys in their mouths. Therefore, we give preference to natural cotton, juniper beads and hypoallergenic children's plastic. The cube is based on foam rubber, which also does not contain substances that cause allergies, it does not accumulate dust and does not mold.
These are the materials we need:
- Foam cube with a side of 7 cm.
- Cotton threads of different colors and thicknesses (I used “Children’s Cotton” for the cube faces and “Cocco” for the developing elements).
- Crochet hooks, scissors and needle.
- Rattlers for toys (in the shape of a ball and a flat cylinder).
- Plastic buttons.
- Juniper beads.
- Holofiber filler.
- Velcro.
- Plastic mirror.
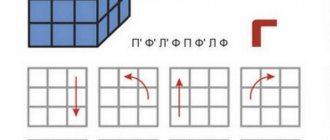
1. First, we need to make a through hole in the cube itself. The size of the balls that will have to fit through there is 1-3 cm in diameter. Therefore, the hole itself will be 4 cm in diameter.
To cut holes on exactly two opposite sides, you need to determine the center of the face of the cube. To do this, draw with a pencil along a ruler from the corners of the side of the cube. There is a center. Now we measure several equidistant points from it and draw a circle. We do the same on the other side of the cube.
Now comes the fun part. We'll cut it out. To be honest, this is very difficult to do. Foam rubber varies in hardness. The tougher it is, the easier it is to cut it. My cube is quite soft, so to make the hole fairly even, I need to make it hard.
Let’s do it this way: first you need to wet the cube (I just put it under running cold water).
And then, after squeezing it a little, put it in the freezer. And leave it there for a while (this will depend on the power of the freezer). My cube froze in about 2 hours.
Now the hole can be cut with an ordinary thin kitchen knife, making sure that the cut “hole” runs exactly in the center of the cube. All this must be done quickly enough so that the ice does not have time to melt during the process.
Now you need to let the cube melt and dry.
And we will finally start knitting.
2. We will knit 4 straight edges of the cube. To do this, you need to make a chain of air loops with a length equal to the side of the cube (I got 19 chain stitches).
Next we knit st. b/n in the 3rd loop of the chain from the hook and then in each vp. 1 tbsp. b/n. (17 art. b/n).
Turn the knitting, make 1 ch. lifting and knitting 1 tbsp. b/n in Art. b/n of the previous row.
We knit 19 rows in total. We pull out the last loop, cut off the thread, and hide the ends with a needle inside the knitting.
3 more sides of the cube are knitted in the same way.
3. Now we will tie the mink .
You need to make a chain of air loops equal to the circumference of the hole in the cube. Let's remember school mathematics. Circumference=2PiR. The radius of the hole is 2 cm. Accordingly, the length of the chain will be 2 * 3.14 * 2 = 12.56 cm. It can be a little less.
Close the chain into a ring and then knit in the round (I usually knit in a spiral without connecting posts).
The length of the tube should be equal to the length of the side of the cube, that is, we have 7 cm.
Now you will need to knit the outer side with the hole. We turn the cylinder with the inside facing us, insert a blue thread and then knit in a circle with concave stitches. b/n, that is, we insert the hook behind the wall of the column of the previous row.
Forming a square. In the next row we make 1 ch. lifting, and in the same column 2 tbsp. b/n. Next we knit 1 tbsp. b/n in each column of the previous row (7 times). Then 3 tbsp. b/n in the column of the previous row. And so on until the end of the row. We should have 4 corners.
Next we knit according to this pattern.
We knit as many rows, making 2 increases at the corners, so that the resulting square covers the side of the cube. In our case, there were 6 rows in total.
We do the same on the back side of the cylinder.
This is what the figure should look like.
We thread the resulting part into the hole, straighten it and align it at the corners.
4. It's time for the balls . We will not touch the juniper ball: it itself is very tactile to the touch. I only had my husband widen the inner hole with a drill in advance so that the rope could easily be threaded into it.
But we will tie the plastic rattle ball with cotton threads.
The principle here is simple, like tying a bead. Chain of 10 v.p. close it in a ring and knit 12 tbsp inside the ring. b/n. Next, we knit in a circle until the diameter is slightly larger than our ball, evenly adding 6 tbsp in each row. b/n.
We get the following knitting sequence:
1st row: inside the ring 12 tbsp. b/n.
2nd row: *1 tbsp. b/n, 2 tbsp. b/n. in senior biological sciences previous row *, repeat from * to * 6 times = 18 tbsp. b/n.
3rd row: *2 tbsp. b/n, 2 tbsp. b/n. in senior biological sciences previous row *, repeat from * to * 6 times = 24 tbsp. b/n. 4th row: *3 tbsp. b/n, 2 tbsp. b/n. . in senior biological sciences previous row *, repeat from * to * 6 times = 30 tbsp. b/n.
Rows 5-11: knit in the round without increasing st.b.n.
12 row: *3 tbsp. b/n, skip 1 tbsp. b/n, art. b/n *, repeat from * to * 6 times = 24 tbsp. b/n. Row 13: *2 tbsp. b/n, skip 1 tbsp. b/n, art. b/n *, repeat from * to * 6 times = 18 tbsp. b/n. Row 14: *1 tbsp. b/n, skip 1 tbsp. b/n, art. b/n *, repeat from * to * 6 times = 12 tbsp. b/n.
We pull out the thread and hide it inside the ball.
To prevent our balls from rolling away and getting lost, we string them on a string. You can simply knit a single crochet chain using thick threads. And I decided to knit a caterpillar string.
It is knitted as follows:
You need to knit 2 vp, in 1 vp. tie st. b/n.
Turn the knitting clockwise and insert the hook into 2 threads, which are located on the left, knit st. b/n and turn the knitting again. We tie the lace to the desired length. And put it aside for now.
5. It’s time for the next educational element: a rattle toy ladybug sitting on a flower.
First we knit the body.
We knit a semicircle slightly larger than a rattle.
It is knitted in exactly the same way as the green ball, only the number of stitches in the circle will be 36.
Next, we knit several rows without increments.
Then we knit the lower part - a circle equal in number of loops to the upper part.
We knit the head of a ladybug:
1st row: 6 tbsp. b/n in an amigurumi ring.
2nd row: in each st. b/n. previous row 2 tbsp. b/n = 12 tbsp. b/n.
We knit rows 3-5 straight.
Row 6: every 2 sts. b/n we knit together = 6 tbsp. b/n.
We embroider the eyes with white thread.
We knit spots in the amount of 6 pieces - 6 tbsp. b/n into the amigurumi ring, leaving the ends of the threads longer so that they can be used to sew on the spots.
Sew the head to the body.
Using the same thread we embroider the middle of the wings. Sew on the spots.
We sew Velcro to the bottom with white thread.
We knit a chain of 36 chain stitches and sew it to the ladybug’s body from the inside.
Now we put a little holofiber inside the body and begin to connect the two halves of the toy with connecting posts.
As soon as they are connected halfway, we put a rattle inside and add a little filler around the edges.
We tie it to the end. In the place where the head is, we sew the parts together with a needle.
We knit a flower for the smallest bug.
From a yellow melange thread we knit a circle with a diameter slightly larger than our ladybug. I ended up with a circle of 54 stitches. b/n. This will be the center of the flower.
Knitting petals:
8 ch, skip 5 sts. previous row, connecting column in the 6th art. previous row, etc. to end. We got 9 arches.
We knit 1 tbsp into each arch. b/n, 1 pst s/n, 5 s/n, 1 pst s/n, 1 tbsp. b/n, connecting column into the connecting column of the previous row. The result is a flower with 9 petals.
But I wanted to make the flower a little more voluminous, so I added 1 more row as follows: 1 tbsp. b/n in Art. b/n of the previous row, 1 pst s/n in pst s/n, 2 pst s/n in 1 s/n of the previous row, 1 pst s/n in pst s/n, 1 tbsp. b/n in Art. b/n, connecting column into the connecting column of the previous row. And so on 8 more times.
Sew the flower along the outer edge of the center to the green edge of the cube. Sew the second part of the Velcro into the middle.
We try on our ladybug - it fits great! Sew a rope in the corner of the green side.
A little tip! To ensure that the strings on the toys hold tightly and do not come off, I sew them from the inside out with double knots: we make a knot, pull the thread through the knitting, strengthen it with a second knot, and cut off the thread.
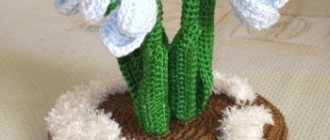
6. It’s time to make a seven-flowered mirror flower .
We knit a chain from v.p. slightly smaller than the circumference of our mirror (you can again recall the formula from school mathematics).
We connect into a ring and knit a circle with an even addition of 7 b/n columns in each row. The resulting circle should be slightly smaller than the side of the cube.
Next, we knit small petals in a circle: * skip 2 columns of the previous row, 5 tbsp. s/n in 1 st.b/n, skip 2 columns of the previous row, connecting st. in Art. b/n.* Repeat 14 more times.
Sew buttons to the flower.
Remove the protective film from the mirror.
We sew the flower on top of the mirror in a small circle (stepping 5-7 mm from the edge) and along the outer one at the base of the green petals.
Using a needle, we tighten the edges above the mirror with a thread so that it does not fly out.
7. The last element of our cube remains - a handle with juniper beads (which can possibly be used as a rodent).
We take pink melange threads, knit in a circle with an increase of 6 loops in each row, so that the width of the handle is slightly larger than the diameter of the bead, which is 14 mm. I knitted a circle of 18 sts. b/n.
We knit straight without increments to the desired length of the handle. We need a handle 12.5 cm long.
We stuff the resulting “sausage” with beads.
And we tie it to the end, making the same number of decreases as we made increases.
The result is a striped handle. We do not cut off the ends of the threads; we will use them to sew the handle to the cube.
8. Now let's get to the fun part: assembling our original cube.
We connect the individual sides of the cube with single crochets (I usually tie them with white thread - this way we clearly demarcate the individual sides and developing elements, and the white color goes well with other colors).
On the corners of the cube I knit 2 tbsp. b/n. And so all 6 edges are gradually connected.
The cube is connected, all that remains is to attach the missing elements.
We pull the cord with the balls through the hole and sew both ends on the orange side. We try to do this carefully so that the balls can also be pulled through the stitching area.
And lastly, we sew a striped handle to the top (in our case dark pink) edge of the cube. We sew it firmly, passing the needle several times (including through the foam cube), fasten it, and hide the ends of the threads inside.
Hooray! Our developing cube is ready!
The balls can be easily pushed into the loophole with your fingers, or you can simply pull them out by the string.
To my joyful surprise, it turned out that the ladybug also crawls into the hole (although initially I did not set such a goal). So now she can live not only on the flower, but also hide in the house of balls.
And at this time the balls can serve as a second handle; you can also hold the cube by them. You can simply admire it in the mirror, and use the multi-colored petal buttons to learn the colors of the rainbow.
Thank you very much for your attention!
I will be glad to answer all questions and comments. After all, this is my first master class!
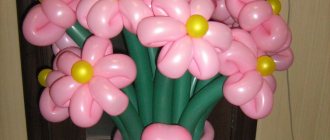
Matryoshka (Maria Komkova)
source: https://komkofa.blogspot.ru/2013/01/blog-post_22.html
I sewed a development cube to order.
Edge length 16 cm.
There is foam inside.
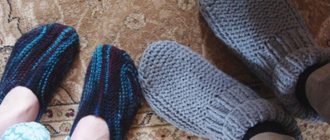
I named this girl Fenka (there’s a book about a girl who ate nails, haven’t you read it?) Fenka’s arms and legs are constricted.
Goldfish. Her tail and fins rustle, beads move on a waxed cord, and pearl beads in the net can also be moved with your finger.
There are four doors here. The first one has a button, the rest are smaller and smaller in size, opening in different directions, on each side there is an animal, and at the end there is a button - a frog.
Three cat buttons of different colors are also sewn on for learning the colors accordingly.
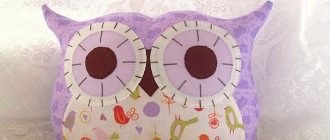
House with a bell. The window has a button, there is a mouse behind the window.
Here, behind a zipper, a cow on an elastic band is hiding in a recess; a butterfly on a cord is hiding in the flowers (you can hide it and take it out).
The gate is Velcro, behind them is a suede machine. Wooden bead on a cord.
In this master class we will crochet the educational toy “Cube”.
Thanks to her, the child will know what animals eat. And playing with Velcro develops fine motor skills. Such a developmental cube can become your baby’s favorite toy, because it will be made with love by your own hands.
To knit a developmental cube we will need:
- yarn of different colors;
- hook;
- foam;
- padding polyester;
- hot glue;
- needle;
- Velcro.
First you need to knit the squares that will make up the cube. We cast on 21 VP and knit 20 rows of sc. In total you need to knit 6 squares.
We also cut the foam rubber into squares according to the size of the knitted ones. You can stuff the toy with padding polyester, but foam squares will be smoother. Sew the RLS squares into a cube.
The base of the toy is ready, now let's move on to the animals. We knit a cat. 1st row: 6 sc in a loop. 2nd row: in each loop of the previous row we will knit 2 sc. 3rd row: 1 RLS, then increase. Let's repeat everything from the very beginning in a row. 4th row: 2 sc, then increase and repeat everything again along the row. 5th row: 3 RLS and increase. We will repeat everything again in a row. 6th row: we knit ears in it. 1 sc, 1 hdc, 1 dc in 1 stitch and make a picot from 2 ch. In the next loop we knit a dc, make 2 ch and here we knit 1 dc. Next we knit 6 dc and the second eye in the same way. We embroider the muzzle.
We knit a bunny. We knit the head like a cat's. And let's move on to the ears. We collect 7 VP. And, starting from the 3rd loop, we knit a DC to the end of the chain. In the next loop of the base we knit 1 sc. Next 5 SS and repeat the eyelet. We embroider the muzzle.
We knit a bear. We knit the head like a cat's. And let's move on to the ears. We knit in a loop 1 sc, 1 hdc and 3 dc, 1 hdc. In the next stitch 1 sc. Next 6 SS and the second eye are similar. We embroider the muzzle.
We knit a dog. We knit the head like a cat's. We knit the ears like this 8 VP, then along the chain 1 SS, 1 RLS, 1 HDC, 1 SSN and finish with SS2H. Sew on the ears and embroider the muzzle.
We knit a mouse. 1st row: gray yarn in a sliding loop 18 dc. And connect the columns. 2nd row: 5 RLS. 3rd row: turn around and knit 5 more sc. 4th row: decrease, 1 sc, decrease. Row 3: decrease all stitches and make 1 ch. We knit an ear for a mouse. 1st row: 7 hdc in a slip loop with white yarn and tie a sc in a gray yarn. Sew on the ear and embroider the muzzle. We knit a tail from 15 VP.
We knit a hedgehog. Row 1: 12 dc in a slip stitch. 2nd row: increase in each column. 3rd row: 6 RLS. Next we will repeat 7 times - 1 sc, pico from 3 VP, 2 sc. We knit the muzzle with brown yarn. 1st row: attach the thread to 3-1 loops from the needle (from picot). We knit 2 VP and 5 hdc. 2nd row: 2 VP, decrease, 1 hdc and decrease. 3rd row: 2 VP and 3 hdc together. We embroider the muzzle.
Let's move on to knitting vegetables and fruits. We knit a carrot. 1st row: 6 sc in the loop. 2nd row: 6 RLS. Row 3: 1 sc and increase. Along this row we continue to alternate increments. 4-7 rows: in a circle. 8th row: 1 RLS and then you need to decrease. In this row we will continue to alternate decreases. We stuff it with padding polyester and sew the RLS with green yarn. We knit 2 ponytails (greens) from 6 VP and SS along the chain.
We knit a fish for a cat. 1st row: 6 sc in a loop. 2nd row: 6 RLS. 3rd row: increase every 2nd stitch of this row. 4th row: 9 RLS. 5th row: 2 RLS and here we further increase. We will repeat this alternation in a row. Row 6: 12 RLS. Row 7: stuff with padding polyester and knit 2 stitches together. Sew the RLS hole. 8th row: we knit a tail from 4 VP and along the chain 1 sc, 1 hdc, 1 sc and ss into the base. Let's repeat it again.
We knit a dog bone. 1st row: 8 VP in the ring. 2-7 rows: 8 RLS. We sew the RLS hole and stuff it with padding polyester. We also sew the bone on the other side. And now we will make a bone at both ends of 2 lush columns from 4 unknitted sc. There are many loops on the hook, we knit them and make 2 VPs. And then 1 SS in the base.
We knit raspberries for a bear. We start with raspberry yarn. 1st row: 6 sc in a loop. 2nd row: 6 RLS. 3rd row: 1 RLS and then we will add. And now let's repeat everything again along the entire row. 4th row: 9 RLS. 5th row: 2 RLS and then add. In this way we knit this entire row. Row 6: 12 RLS. We stuff it with padding polyester. 7th row: 1 sc and then knit a decrease. At the end of the row there will be 6 loops. Let's pull it off. We knit arches from 3 VP and 1 SS on top at the base of the berry. In total we will knit 3 arches and sew their lower part to the berry.
We knit an apple for a hedgehog. 1st row: 6 sc in a loop. 2nd row: in this row we will knit 2 sc in each of the loops. 3rd row: first knit 1 sc in a loop, then in the next 2 sc. 4-6 rows: 18 RLS. Row 7: decrease, then 1 sc. We stuff it with padding polyester. Row 8: We knit 2 sc together. And we tighten it. Attach brown yarn to the top of the apple and perform 4 ch, knitting SS along these loops. This is a twig. We attach green yarn to the base of the apple branch and knit a leaf from 4 VP. And along these VPs we knit 2 RLS and 1 SS.
All that remains is to knit the cheese for the mouse. 1st row: 6 sc in a loop. 2nd row: 6 RLS. 3rd row: 1 sc in a loop, then 2 sc in a loop along the row. 4th row: 9 RLS. 5th row: 2 sc, then 2 sc in the loop. Row 6: 12 RLS. 7th row: 1 RLS, then we will make 2 RLS in the loop. We knit a row like this and sew a sc.
Sew the animal faces onto the cube.
And using hot glue we glue Velcro on each side of the cube and on the vegetables and fruits.
The crocheted educational toy “Cube” is ready!