AMC (AChM Airsoft Mine)
Before starting to describe the AMC manufacturing technology, I feel it is my duty to mention the following. This ammunition was developed by me exclusively for airsoft gaming purposes and is intended only for a symbolic imitation of an explosion by means of a small clap. "AMC" in its original design has neither high-explosive, nor blasting, nor fragmentation effects. Therefore, I cannot take responsibility for if “AMS” is used by someone to create a real explosive device. Just as the designer of a kitchen knife is not responsible for those who use kitchen knives to cause bodily harm. And just like the manufacturer of air guns is not responsible for those who use air guns for hooliganism. I will only urge those who will repeat my design to remember that “airsoft” is still just a game, and therefore it is worth taking care of the ears of your opponents, using the weakest possible firecrackers as explosive charges. So, "AMC". Pressure action anti-personnel mine. Its design is quite simple, and the materials are accessible to everyone. The estimated cost of one “mine” fluctuates somewhere around 15 rubles at 2009 prices, and the time required to manufacture one copy takes about half an hour. The weight of the device is negligible, and the size is 65 mm in diameter and approximately 53 mm in height. The “mine” is triggered easily and even by the gentlest pressure. It is not equipped with elements of non-removal and self-destruction. It is easily neutralized and quite safe. Not afraid of rain. Here she is, my beauty:
To complete the design, we will need: – A half-liter beer can (not pictured - I think everyone knows what it is) – A cheap 1.5V AA battery – A low-voltage flashlight light bulb (for example – 2.5V 0.75A ) – A piece of flexible wire – Two shiny metal pushpins – Two self-tapping screws (2.5 by 16 mm and 3.5 by 12 mm) – A small firecracker with a quick-burning fire cord – A strip of shiny metal (8 by 35 mm) – Beading bead 10 by 10 mm – PVC insulating tape – Candle (not pictured)
Let's get started. First of all, we will make an “electric igniter”, for which we clamp the light bulb with pliers (you can over the rug of your favorite neighbors) and gently press its cylinder in order to expose the tungsten wire.
Next, we clean the positive end of the battery with a file (if you can’t just tin it) (this one is simply more convenient) and solder a light bulb to it at an angle of 90 degrees relative to the longitudinal axis of the battery. Moreover, the light bulb must be soldered so that its antennae point to the sides relative to the same axis.
After that, we prepare two wires approximately 40-45 mm long, strip their ends by 5-8 mm, tin and solder one wire to the negative pole of the battery. Afterwards, cover the “minus” with a piece of electrical tape.
Then, we take the glazing bead and saw off a piece 30-35 mm long from it, slightly finishing it with a file for decency. We tape this part to the battery with electrical tape, just securely fixing the electrical tape that covers the “minus”.
And after that, we install our “explosive charge” using the same electrical tape. (By the way, such a firecracker that has a short and quickly burning wick can be obtained from a large firecracker that makes three pops.) We thread the tip of the fire cord through the eyelet of the legs and the tungsten spiral of the light bulb, so that the spiral is tightly pressed against the wick ( you already understand the whole principle, right?).
Next, solder the second wire to the side of the light bulb base. Why not solder it at the same time as what comes from the minus? The fact is that if you do this earlier, the second wire may interfere with you from winding the glazing bead and the “charge”.
Remembering how many times a sapper can make mistakes, we continue to work. The next step is to solder the negative wire to one of the pushpins from below and stick the button into the bead, as shown below (to be safe, it’s a good idea to scrub the front of the button with an eraser).
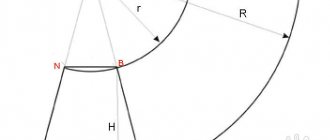
Now we prepare a metal contact plate measuring approximately 8 by 35 mm. We bend it in such a way as shown below and make a small hole large enough for the pushpin leg. Please note that the corners of the short end of the plate are slightly bent - this is necessary so that it can rotate relatively freely around its axis without clinging to the electrical tape. Next, by applying the plate to its future location, we make sure that its shape allows it to hang over the contact button by two, three, or four millimeters.
Now we solder the wire coming from the light bulb to the plate. And after that, completing the design of the “mine” base, carefully (how many times can a sapper make a mistake?..) we fix the plate with a button on the bead at an angle of 90 degrees relative to the battery.
The basis of our “aemeska” is ready. Now all that remains is to make the body of the “mine”. This is a simple and quick task. Take a beer can and use scissors to cut out the following two parts from it (about the same height):
Then we take the part from the bottom, drill a hole in the middle of it, drill a hole in the middle of the wound bead for the self-tapping screw and, again, carefully, install the charge with the detonator.
Now we make three cuts in the body of the other part of the “mine” body and slightly bend the edge outward so that the top cover fits onto the base more easily.
The next step is to drill a hole in the lid (approximately where it is in the photo). Next, we saw off another piece of glazing bead (25 mm long) and use a self-tapping screw to install it inside the lid.
Then, we put the cover on the base and look through the drainage hole to make sure that the bead hangs quite accurately over the contact button (damn, it’s my fault - you can’t see it in the photo. But the bead hangs, honestly!).
Having made sure that the vertical bead is ready to press on the contact plate, we draw a mark on the body of the “mine” that will correspond to the “combat cocking” position.
The last step, for reliability, is to seal the cracks and screws using a candle.
All! Now, in order to move the “mine” into the firing position, you need to open its cover, turn the contact plate counterclockwise 90 degrees and carefully return the cover to its place, guided by the mark on the body. Neutralization is carried out in reverse order. Although it is better and more respectable to act like a real sapper - destroy it by blasting it. A video about the AMC tests can be found just below on the same page. When detonated, no impact is felt on the foot, only a fairly loud bang is heard, even in the forest. An honest player doesn’t need anything more (where is it customary for us to put half a store of balls in for not knowing? -_^). It is best to produce “AMS” using a conveyor belt - for example, first make 10 cases, then prepare 10 light bulbs, then 20 glazing beads, and so on... Of course, the question may arise - why not a liter beer can, because in this case the target sensor was obtained would it be more? This is no coincidence - the fact is that then the AMC would be too large to carry in your pocket. And there is no particular point in a large size. After all, our idea is not a real murder of the enemy, but just a designation of an explosion. In other words, “AMS” can be the basis for traps, which themselves will be large target sensors. For example, you can put it under a piece of plywood and cover it with soil, under a springy tree that blocks the path... there are many options. So, the main thing is not to be a bully, ladies and gentlemen, and I’ll try to invent something else!
Test video download link
Alexander Cherny Musician
Design and decor for a false fireplace
When decorating stationary structures, it is better to adhere to the general style of the room. Neutral tones are more suitable for attached options. Otherwise, their advantage in mobility is lost. For example, the design that you created for the living room will not fit into the bedroom or hallway.
It is important to study decor ideas at the sketch development stage. In construction stores you can purchase many ready-made elements: baguettes and moldings made of polyurethane, stucco moldings made of plaster, etc. But in order for them to look organic, you need to calculate their dimensions in advance at the sketch stage.
A win-win option for decorating a hearth is a combination of mirrors and fire. The inner surface of the firebox is made mirror-like. To simulate a flame, use candles or electric lighting. Reflections of flames enhance realism and make the interior warmer and more comfortable.
We looked at the most popular options for how to make a decorative fireplace with your own hands. All you have to do is choose the appropriate model and assemble it in your apartment.
How to make the simplest kite using origami technique
Who said kites have to be big? If you are working with a large group of children, it will be difficult to make such a toy for everyone. But creating a compact (but still functional!) model will take much less time, and the result will not disappoint.
Materials:
- Paper squares 10x10 cm;
- Glue stick;
- Small strips of colored paper;
- Threads.
Stages:
First, we fold the base of the kite. To do this, bend the square of paper diagonally and bend its edge to the middle.
We make multi-colored tails for snakes from strips of colored paper.
We make a small hole in the top of each toy and thread a thread through it.
Ready. The kids had a lot of fun with their flying toys on their next walk!
Finishing
The finishing coat gives the fireplace a finished look. Before learning how to make fireplaces, it is advisable to immediately decide on the end result. There are several additional methods that may be useful:
- Plaster coating.
- Painting – what material to choose was described earlier.
- Facing can be done using artificial or even real stone.
Many people begin to experiment with the appearance by cutting off some parts of the brick. This not only destroys the integrity of the structure, but also defeats the purpose of the effort.
The best ways to make Pop It from paper with templates
You can make a Pop it anti-stress out of paper at home in the form of a geometric figure. It’s a little more difficult, but no less interesting, to make a Pop It pineapple, in the form of a kitten, unicorn, avacado, carrot, cabbage.
Pop It templates, which will be needed in all these cases, are made in the following way:
- you need a compass or stencil ruler;
- a sheet of colored paper;
- 2 sheets of thick cardboard or 4 thin ones;
- circles are drawn on paper and on cardboard, but smaller in diameter;
- the same amount of both is needed;
- a sheet of paper is made glossy by gluing tape on both sides;
- circles are cut out;
- They will be needed later, so you can act without being particularly careful;
- Circles are also cut out of cardboard, but you need to act carefully - next you will need the actual cardboard sheet with round slots.
Paper circles should be cut along a radius, from the edge to the center of each. The cardboard stencil is made in two copies, but first you need to choose what Pop it will be.
Square
In the form of a geometric figure, a homemade popit made of paper and cardboard can easily be obtained in the shape of a square.
Important: you don’t need to decide for a long time how much paper and cardboard you need, since they are produced in A4 and A5 formats with a standard length and width.
Sheet A4, A5 can be turned into a square with absolutely equal sides in no time:
- you need to position it in front of you so that the base and top are formed by the smallest of the sides;
- the upper corner is bent, the sheet is folded diagonally - the second upper corner from a right angle of 90 degrees should become an acute angle of 45 degrees;
- the remaining single part at the bottom of the double triangle must be cut off;
- straighten the triangle, use the resulting square to make circles and a square base.
Thanks to its square shape, the toy can be hidden without problems in a desk drawer, folder, or briefcase. To make a toy from the blank, you should:
- bend the circles into a cone;
- seal with tape on both sides;
- cut each along the edge to make a fringe of small squares;
- they must be carefully bent;
- insert the top of the navel into the hole in the square base;
- Glue the fringe with tape on the inside.
The square pit is filled with bubbles. The cardboard parts are glued together. You can use colored cardboard, and if you chose regular cardboard, color it with a marker, draw a pattern, and glue an additional piece of colored paper.
Pineapple shaped
An anti-stress toy pineapple drink made from paper, made with your own hands, can be used to decorate a shelf in the kitchen if it is completely sealed with tape. If it gets dirty, you can wipe it off without damaging the cardboard.
The algorithm of actions is the same as in the case of a square toy, but the cardboard base should be oval. Additionally, you need to draw leaves-needles. Cut them out of colored paper in two copies and staple them together. During assembly, the leaves need to be placed between cardboard templates and glued.
In the form of a kitten
To make a Popit in the shape of a kitten from paper and tape, you need to follow these steps step by step:
- draw a circle - the face of a cat;
- draw ears on top;
- divide the circle into four equal parts with a horizontal and vertical line intersecting in the center;
- draw, focusing on the horizontal line of the kitten’s eye;
- Below the vertical line is the nose, cheeks and mustache.
A template is drawn from the sketch. All parts are cut out and glued together according to the same pattern as in the case of a square Pop it.
Unicorn
A mythical character, the unicorn can inspire with fabulous colors. You will get an original toy in lilac, blue, pink, or any other color. A unicorn is drawn like this:
- a question mark is depicted on the sheet;
- the head and neck are drawn using two ovals, which are then connected by a smooth contour;
- on the sketch you need to draw the eye, mane, bridle4
- determine the location of the glossy roundels.
All that remains is to transfer the silhouette onto paper or cardboard.
Important: when decorating a toy, it’s easy to forget about the beautiful horn on its forehead, but thanks to this attribute, the Unicorn is unlike any horse, real or fairy tale.
Avocado
Avocados have a rich green skin. Light green flesh and one brown seed. Pop It will turn out spectacular. The shape of the fruit is egg-shaped and it is easy to draw a sketch in 5 minutes. The oval is narrowed at the top and widens at the bottom. Another 10 minutes will be spent cutting out the base and circles, gluing, and painting the anti-stress avacado toy.
Carrot
The showy leaves and orange color make carrots a popular vegetable. It's also easy to draw a sketch, make a template, and make a sensory toy with your own hands.
Cactus
A character from Westerns, a flower on a windowsill, a cactus can be depicted as one oval or several ovals on one leg, growing in a pot or in the desert. You can make bubbles from ordinary colored paper and glue in the form of a hat, nose, eyes, lips or thorns.
Chainsaw wood splitter
The easiest way to use a bladeless saw as a wood splitter is to install a special attachment. They are sold for certain models and pair with the device without problems.
To work with such an attachment, you do not need a table or any device for holding logs. You can simply hold them with your foot. The process of working with the nozzle is shown in the video.
If this option does not suit you, you can make a homemade machine.
To do this, a chainsaw in the usual configuration is installed on a prepared wooden frame.
Secure the entire device and canvas.
A rigid frame made of PVC pipes and metal allows you to hold the product in place, despite strong vibration during operation.
However, you should understand that this is more of a device for sawing timber, boards, logs to length than for splitting them into logs, which is clearly visible in the final part of the video.
How to hold a harp while playing
It is necessary to press the kubyz tightly to the teeth, and leave a gap between them for the tongue of the instrument. Holding the khomus between your teeth makes it easier to control the sound. The lips should not be pressed closely to the instrument. You need to hold it with your less active hand, with your elbow down. It is recommended to hold the jew's harp on the bent areas of the index and thumb, pointing the tongue in the direction opposite to the hand.
The jew's harp must be pressed to the teeth while playing.
Over time, the performer finds the optimal way for him to hold the kubyz. It is important to find the most comfortable position, but it takes practice to get used to the instrument. It is better to master several performance options to learn different melodies.
Child's intellectual development
By independently folding the simplest origami, the child performs a lot of exercises at the same time: trains accuracy by cutting out patterns from paper; develops finger motor skills, trying to make the most beautiful paper crafts; forms imagery and vividness of thinking, trying to understand how to make the desired craft. Therefore, patiently teach your child how to fold origami, tell him about the limitless creative possibilities of ancient oriental art and the use of alternative materials at hand (products made from napkins, figurines made from thick textiles, etc.).
The welcoming pages of our website will show you how to develop your paper creativity, providing both yourself and your children with decent leisure time. The “Origami” section is equipped with a lot of illustrations and a detailed description of each of the schemes. You will immediately figure out how to make this or that figure out of paper or how to make origami for a gift without prior preparation. And if you don’t have time or, for example, don’t want to spend a lot of time learning basic folding techniques, here you can always print ready-made templates for cutting. All that remains is to fold the figure along the folds, trim here and there, and glue here and there. And now you have your first origami craft in your hands. Let's get down to business?
Let's start the step-by-step assembly
We take the handle and insert our bent wire into it. Like this:
We place a piezoelectric element in the hole and glue it
Then we thread the contacts into the holes of the bottle and glue them
The first part of the mini gun is ready. The most important thing is that in the bottle, when you press the piezoelectric element, a spark jumps between the contacts. If there is no spark, then they are located far from each other. You can adjust the gap with a regular knob.
Now the second part of the crossbow. We make a hole in the cork with a stationery knife and round it with a file so that the edges are even. Take a corkscrew from the syringe and cut off the top of the head
After this, insert the syringe into the cork, seal it, and screw the cork onto the bottle. The gun is ready.
Imitation of fire for a false fireplace
If you approach your work with passion, even a decorative hearth will look realistic. But the key difference is the absence of fire. The easiest way to bring the look closer to the real thing is to put a few logs of firewood in the firebox. There are more realistic options:
- Built-in bio-fireplace. It works on the principle of an alcohol burner. After ignition, a real flame appears in front of you. Alcohol produces virtually no smoke or odor, making it great for indoor use. To integrate into the portal, you need to choose models that are closed on all sides. They prevent fire.
- Digital photo frame. Gadgets with support for GIF animation and background sound imitate the movement of flames and the characteristic crackling of coals. But large format frames are expensive, and standard seven-inch screens are only suitable for mini-fireplaces.
- LED Strip Light. Bright orange or red lighting is installed in the podium or along the lower contour of the combustion niche. An improvised fire comes to life if you place a transparent container filled with water and glass balls inside. Light is refracted in glass beads. The water sways at the slightest vibration and creates the effect of movement.
Photo: Instagram @camin36
Photo: Instagram @kamin_astrakhan
Photo: Instagram @allyanovadesign
Photo: Instagram @draftburo
Photo: Instagram @ ideiipodelkidliadachi
When to use a mini-greenhouse for seedlings on a windowsill
They begin to sow in mini-greenhouses already in January–February. Tomatoes and peppers are sown from February to March. If you have a greenhouse, you can sow earlier. If we plant immediately in open ground, then sow later. The timing of sowing depends on your region and conditions.
Photo: The timing of sowing in greenhouses depends on the region of residence.
Making a cannon
Follow these instructions:
- Make a hole in the lid of the jar with a diameter equal to the diameter of your tube.
- Make two small holes in the side of the jar itself.
- Insert the wire from the piezoelectric element into one of the holes.
- Insert a piece of wire into the second hole and connect it to the end of the wire from the piezoelectric element.
- Insert the tube and wrap everything tightly with tape.
- Fill the combustion chamber with any highly flammable substance.
- Insert what you will shoot into the tube and press the piezo element button.
As you can see, there is nothing complicated in the assembly process, and such simple entertainment will help pass the time at home or at work, as well as amuse those around you or your own son.
A mini-gun (also known as a crossbow) has long been a favorite weapon for children to play “war games” and not only, and adults will not refuse to shoot, remembering their childhood.
And so - we make crossbows with our own hands at home.
Preliminary preparation
The components and tools for making the device can be found in the kitchen; the only thing you have to purchase is potassium nitrate. Fertilizer is offered in stores for gardeners and gardeners; there will be no problems with the purchase.
To make a smoke fume you will need:
50 gr. potassium nitrate; 10 gr. sodium bicarbonate; 50 gr. sugar (allowed to replace with powdered sugar); 55-65 gr
dye (available from hardware stores); a small diameter cardboard tube (suitable for toilet paper), a matchbox; pencil; stewpan (saucepan); a little tape; cotton swabs; fuse (carefully remove from the fireworks, soak a regular cord with saltpeter, use hunting matches).
To mix the composition, use a wooden stick or spoon.
Electric fireplaces: description, characteristics, device
Basically, the operating principle of electric fireplaces is similar to that of air heaters, fan heaters, and convection-type devices. Often products have the same heating elements. The difference is that in this case the decorative role for the design of the room and options for user comfort are not secondary. A real hearth is imitated: a portal, fire, logs, smoldering coals. Moisturizing, aromatization, and audio accompaniment may be provided.
It is necessary to distinguish between an electric fireplace with and without a heating function, only for decoration; strictly speaking, it is more appropriate to apply the term “false fireplaces” to such models.
Reputable brands in the electric fireplace segment: Dimplex, Twin-Star Inter, Electrolux, Royal Flame, Danville, Zanussi, Alex Bauman, domestic Glenrich.
Electric fireplace design
Elements and composition of the electric fireplace design:
- hearth with firebox - a “heart” with a heating element producing and transmitting heat in the form of a heating element (incandescent filament in a protective tube) or a ceramic-based coil. The firebox has a decorative and protective design: casing, grates, tempered glass. There are also reflectors, reflectors - radiating surfaces for the accumulation and distribution of heat flows. As a rule, they are supplemented with a fan that provides convection;
- portal - a niche for a fireplace. In compact mobile devices, its role is played by the casing, frame, and housing. Externally, the portal can imitate stone, brickwork, have forged metal gratings, and quartz glass screens. Dimensional designs can completely replicate the appearance of conventional fireplaces, have an imitation of a chimney, countertops;
- control system: thermostat, remote control, flame brightness adjustment and similar settings;
- system for simulating fire: LCD monitors, fabric with a fan or a steam generator with lighting, decorative logs, coals, stones.