Making enamel mini buckets
Dear craftswomen! I suggest you make these tiny enamel buckets. I did it according to Elena Nikitina’s MK. Here is MK - https:///post340829642/
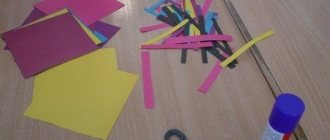
We will need any cardboard, white and other colors of paint, wire, wooden beads, glue, a napkin with a small pattern, a compass and a simple pencil.
So let's get started. Using a compass, we draw a circle with a radius of 11 cm. Inside it, from the same point, we draw a second circle with a radius of 8 cm. It is not necessary to draw full circles - a semicircle is enough. Next, in the inner circle we draw a chord 7.5 cm long. From the center through the extreme points of the chord we draw two lines until they touch the outer circle. So as shown in the picture
The part circled with a red felt-tip pen will be our future bucket. We also cut out two arches, as shown in the picture.
We cut out our blanks.
To ensure that there are no kinks on the cardboard when folding the bucket, we roll it over our blank with a felt-tip pen. Our workpiece will curl up a little and when gluing it will be even.
We glue our workpiece.
Then we need to make the bottom. We take a piece of cardboard, thickly coat the bottom edge of our bucket with glue, and also apply glue to the cardboard in the place where we will glue the bucket. Press it down and let it dry thoroughly.
Then carefully cut along the contour.
Then we glue our arms against each other, having first made holes with an awl or a needle. Then we glue either twine or any knitting threads (not fleecy ones) to the top and bottom of the bucket. I glued two rows of threads, but you can do it in one row.
This is how it should work out for us.
Next, prime with white acrylic paint in 2-3 layers. Let it dry.
Then we paint with any other colors. We paint black paint along the edge of the bucket, as well as at the bottom and along the arms. We also use black paint to imitate chips. Use brown paint to imitate a little rust. Like this.
Then we cut out small motifs, such as flowers, and glue them onto our buckets.
And finally, pens. Take a piece of wire measuring 7.5 cm. My advice: take a regular colored paper clip instead of regular wire, bend it and straighten it. Insert a wooden bead (handle) and secure with glue.
Insert into the arms and bend the ends with pliers.
Our enamel mini buckets are ready! Use for decoration or “gift” to dolls.
1How to build a bucket for a snowman costume - cutting out the parts
You can, of course, take a ready-made plastic bucket and wrap it in foil or papier-mâché, but it’s much more interesting to build a paper structure. In addition, a paper bucket is much more comfortable to wear than its plastic counterpart.
- The first step is to measure the circumference of the head on which the bucket will be placed.
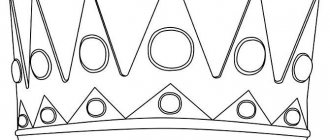
- Next, build a pattern-drawing of a bucket. The finished image is a slightly curved trapezoid (since in its finished form the bucket has the shape of a truncated cone).
- Construct an isosceles trapezoid ANBK, in which the smaller base (NB) is set to approximately 10-12 cm, and the larger one (AK) is calculated as: BK (external contour) / 3.14. The height of the trapezoid is the height of the finished bucket. Set 18-20 cm. Define VC as OG (Head circumference) + 3-6 cm (free fit of the finished structure).
- Extend the sides of the resulting figure until they intersect. Designate the intersection point as P - this will be the center of your drawing.
- Having installed the compass at point P, draw 2 arcs. The radius of the first will be the segment PN (or PB), the radius of the second will be the segment PA (or PK).
- Take a thread (or measuring tape). The length of the thread is equal to the value of VC (calculated earlier). Lay out the thread along the outer arc. Mark the place where the thread ended with a T. S.
- Connect point S to point P. Designate the point of intersection of the segment SP in the internal arc as L.
- When the drawing is ready, it's time to cut out the bucket. Cut out a curved trapezoid, the vertices of which are points A, N, S, P, and the bases are a fragment of the small and large arc.
- Now draw and cut out the bottom of the bucket. You need to draw a circle with radius NB:2.
Pictures from plastic caps
You need to wash and dry well, and degrease the plastic cover. Next, you should draw a sketch of the design on paper and place the lid on it with the outer side.
Along the line of the sketch, carefully filling it in, spread a thin layer of plasticine. Using a thin marker on the outside of the lid, you need to trace the contours of the picture, and then glue the side of the lid to the cardboard. You can make a hole in the top of the lid, insert a rope and hang the image. If you open it with varnish, it will not be afraid of water. The application is ready.
Garbage bin platform design
In order to create a good edge for attaching the drawer hardware to the platform (apron), you will need three pieces of wood - one in front and one on each side. My husband cut these bars in advance with the same dimensions of 2.5x7.5 mm.
He cut the piece for the front of the apron exactly according to the width of the piece of plywood for the platform, and the side parts of the apron were cut carefully to the size of the two side pieces of plywood (minus 1.5 cm).
Instead of our “Ku-ka-re-ku!”: Australians wake up to the hubbub of parrots (video)
“Believe and know your worth”: Anna Khilkevich about real men
Young people in Russia are thinking about giving up plastic tableware
Then I needed to glue these three pieces of wood onto the plywood.
My husband had to work hard to ensure that the sides were parallel. After all, if the box is not parallel, it will not slide smoothly. While the glue was drying, I had to use clamps to keep the whole structure in place.
Applications
Working on a postcard develops fine motor skills in children. Making applications is not only interesting for them, but also useful. Working with a child means making him happy by playing together; children love to do something together with their parents.
The appliqué design made from colored paper is presented as follows:
- Prepare a sheet of cardboard, colored or white paper, pencils and a marker in advance.
- You can draw all the details on colored or white paper by hand, without using templates.
- Use a marker to trace the lines of the parts so that it is convenient for your child to cut them out.
- Carefully cut out all the details.
- Glue them onto a sheet of cardboard, assembling a snowman, arranging the Christmas trees, moon and snowflakes in the correct order.
Thus, applications can be made from paper and even felt. Often cotton pads are used.
Video master class
It is recommended to watch the video, which explains in detail how to make your own snowman applique.
Necessary materials and tools
To create such a drawer, we had to work hard to find on the Internet a suitable volumetric tank with flaps along the rim, which would not only fit inside our cabinet, but would also leave enough space around it.
In addition, we found it useful:
- a drawer from another cabinet that was about 5cm shorter than the depth of the cabinet (and 10cm shorter on each side);
- wooden blocks for fastening on the inside of the cabinet walls;
- plywood;
- jigsaw;
- drill;
- flat screws;
- wood glue;
- level;
- roulette;
- two simple pencils;
- sandpaper;
- furniture varnish.
Easter baskets from mayonnaise bucket
For production you will need the following materials:
- Plastic bucket for mayonnaise.
- Solvent.
- Super glue or hot glue.
- A piece of white thick fabric.
- White lace fabric for decoration.
- Wooden clothespins of the same size.
- Scissors.
- Threads.
- Twine rope.
Such crafts for the garden from mayonnaise buckets on a bright holiday will be especially interesting for children if treats are hidden in them.
The bucket needs to be removed from the sales sticker and wiped with solvent. Divide the clothespins into two parts and glue the flat side to the bucket. They should fit snugly against each other. Sew a bag from thick white fabric to the inner size of the bucket. To do this, cut a circle slightly larger than the size of the bottom of the bucket, and a strip the size of its wall. We sewed the two together. Sew lace to the top of the bag. Wrap the handle of the bucket tightly with twine. And tie it around the bucket with clothespins and tie it with a bow.
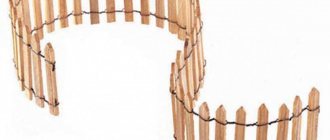
Garden crafts made from mayonnaise buckets will be a wonderful and unique decoration. This inventive and creative activity will appeal to both children and adults. And now, before getting rid of the empty container, you need to think about whether it might turn into, for example, a border of mayonnaise buckets. You can make a lot of great garden decorations this way.
Making a drawer
To cut out the platform that would accommodate the trash can, my husband carefully measured the exact width between the pieces of wood installed inside the cabinet.
He then subtracted 1.5 cm from this distance and cut the plywood to this width. He cut the other two identical pieces of plywood to a depth that matched the intended length of the drawer.
Three easy ways to turn ordinary construction buckets into beautiful planters
Now, when the time for garden planting is approaching in the yard, having a large number of flowerpots and flower boxes is most important. And very usefully, ideas for creating them from any containers available in the house appear. For example, from old buckets or construction plastic containers left over after renovation.
We will now be happy to tell you three options for making them.
For it we will need:
- wide lace ribbon;
- alcohol and cotton wool, scissors;
- PVA glue, instant glue;
- acrylic varnish, colorless;
- long nail, pliers;
- paint bucket;
- brushes, foam sponge;
- acrylic paints – black, gold, white.
First, remove the handle, then make drainage holes in the bottom of the bucket using a hot nail and pliers.
Degrease the surface with alcohol.
Cut the lace to a length equal to the circumference of the bucket. Cover them with PVA glue and glue them exactly in the center.
From the remaining lace we cut out individual fragments in the form of leaves or flowers, which we place on both sides of the braid at the same distance from each other.
Paint everything with black paint. Leave to dry for some time.
Then the guipure elements are lightly painted over with white. Using a sponge moistened with golden color, we barely blot the entire surface. We fix the result with acrylic varnish. After drying, fill it with soil and plant the seedlings.
Cement waste container
To make a stable and durable concrete waste bin you will need:
- Sand.
- Cement.
- Copper sulfate.
- Wood saw.
- Plastic bag.
- Scotch.
- Nails with a hammer.
First, formwork is made from available wooden objects. Sizes are chosen arbitrarily. It's easier to knock together the outer cube shape. The edges are covered with tape to eliminate gaps.
Prepare a solution from a mixture of river sand, cement and water in proportions - 3: 1: ½, respectively. Add half a glass of copper sulfate to the mixing bucket to prevent the formation of mold and the growth of bacteria in the pores of the concrete.
Cement is poured into a 10 cm layer at the bottom of the mold. Next, you need to insert a box, barrel or other smaller container inside, having previously wrapped it in a plastic bag or film. The resulting empty space is filled with cement, and the structure is left for a week until completely cured.
When the solution becomes strong, the formwork is dismantled and the inner container is removed. The result is a concrete container for garbage, which still needs to be processed before use. Irregularities and sharp corners are ground off with a grinder, and the internal surfaces are covered with bitumen or tar to prevent rotting. The outside of the container can be painted or decorated with stones and cement.
Volumetric paper snowmen
To decorate the Christmas tree, you can make a three-dimensional snowman out of paper. There are several options. For children, it is better to choose one that is simple in technique and does not take much time, so that they do not lose interest in the work.
How to make a three-dimensional paper snowman is presented with step-by-step instructions:
- Prepare sheets of white paper, compasses, scissors, pencil, glue, thread, felt-tip pens.
- On a piece of paper, draw two circles of different sizes, the small one is placed above the large one. Make this snowman silhouette in two copies.
- Make 16 parts of the lower circle (circles inscribed in the lower part of the body).
- Fold the rope in half and glue it to the top circle so that the ends extend beyond the bottom of the snowman. These will be his legs. Their ends can be decorated with beads.
- The top part is folded in half, the threads should come out of the loops beyond the top of the snowman. This is a DIY pendant.
- 8 circles need to be folded in half and glued to each other to form a hemisphere that is glued to one half of the silhouette. Do the same with the remaining circles.
- Using felt-tip pens, add eyes, nose, smile and cheeks to the snowman. Draw a paper bucket for the snowman, cut it out and stick it on his head. Also, draw and cut out a scarf for your neck from paper (you can take a piece of fabric or knit a scarf from yarn), you can design it individually - perhaps yours will turn out more beautiful.
A beautiful decoration for the Christmas tree is ready. You can make several copies in different colors.
Video master class
If you have any questions about making three-dimensional crafts, we recommend watching the video master class.
Preparing to install box hardware
First, my husband removed the shelf from inside the closet. It was fastened tightly, so he had to saw it in half and use a hammer to knock it out of place, and then rip it out of there. He then used sandpaper to sand down the damaged areas.
An animal drawn by a 9-year-old boy from Russia will appear in IKEA stores
Will harmony reign or will diseases be attracted? Various signs about seashells
Experts: salt may help fight multiple sclerosis
After the shelves were removed, he measured the height of the trash can and added another five centimeters to this figure. He marked this point on the inside of the side wall of the cabinet on both sides.
My husband used a level to draw a straight line on the inside wall of the cabinet. He needed this line as a guide to place two pieces of wood to hold the drawer hardware. In the project he used bars 2.5x7.5 cm thick. We bought them, and after taking the necessary measurements, we cut one block into pieces of the required length in advance.
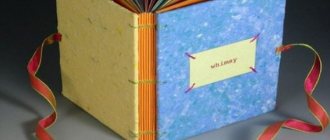
Postcards with surprises
It’s very easy to make unusual cards with surprises from plastic caps.
Make a base for a postcard from thick, strong cardboard. To do this, fold the cardboard into a book. The card itself should be wider than the plastic cover. For a round lid, you need to cut off the edge that covers the bucket, keeping only the flat strip. This strip is needed to attach the lid to the card. In the front part of the cardboard blank, cut a round hole 2 millimeters larger than the diameter of the lid. On the back of the card, mark a place that will be visible through the cover. Glue the cover itself to the hole in the front of the card.
Cut a piece of corrugated cardboard into thin strips. Make their width less than the height of the mayonnaise lid. On the back wall of the postcard, in the place marked in advance, lay out a random labyrinth from strips of corrugated cardboard and glue it. When the glue is completely dry, put any round thing in the maze and glue both halves of the postcard together.
Such products from plastic lids can be made with various fillings. You can pour colored chips inside the lid, which will look like sand. You can glue a photo or drawing to the back wall, make an applique or paint it with paints.
Securing wooden blocks to cabinet walls
The husband secured the resulting wooden blocks to the cabinet walls with four screws with sharp ends. The good thing about point screws is that they are sharp enough to drive into wood without having to drill holes first.
First, we made sure that the screws were smaller than the width of the cabinet walls. We don't really want their ends to come out on the other side. On each side, the husband aligned the bars so that their upper part coincided with the previously drawn line, and secured them along this line with adhesive tape. He then secured each block with four screws at the marked points.
Vyacheslav Fetisov headed the central council of VOOP
“Rose gold” will add zest to your look: fashionable coloring ideas
“Hands froze”: Russian woman played in a landfill at -30 for the sake of clean ecology
How to make an unusual cardboard trash can with a lid opening mechanism
Good day to all, dear friends! In today's article I would like to show you a very interesting idea about homemade crafts. Namely, in this article we will look at how to make a trash can with an opening mechanism when pressed. Children may like this homemade product as it will be executed in a cartoonish and unusual style. The homemade product will consist of as simple parts as possible. When making this homemade product, no difficulties should arise, as the design will be very simple and primitive, and therefore anyone who liked this idea, even a child, can repeat it. This trash can can be placed in your workplace, for example in a garage or workshop, and it can also be placed in a child’s room. Well, okay, enough of the long prefaces, let's go! And so, for this homemade product we will need: From the tools we will also need:
Types of waste bins
Based on the material of manufacture, there are metal, wooden, plastic and concrete containers for collecting solid waste.
What you can use to make your own trash can:
- wooden boards;
- cement mortar;
- plastic bottles;
- old water barrel;
- metal sheets.
For waste of natural origin - cleaning, food scraps, paper, weeds, plastic cannot be used, since during the decomposition of organic residues such waste becomes very hot. Bins made of any material are suitable for packaging, bottles and other garbage.
Installing the drawer in its place in the closet
After my husband installed the drawer piece in the middle of the sides of the platform, he drilled a vertical hole so that if he positioned the drawer incorrectly, the hardware would at least be able to move up or down easily when he slid the platform into place.
Once the drawers were secured to the cabinet walls and trash can platform, my husband was ready to slide the platform into place and use the fixed bin for its intended purpose. But it was not there! It turned out that the wood he had glued to the backsplash platform had moved before the glue had dried, preventing the structure from being perfectly parallel. So he pulled the platform out again, removed the bracket from the drawer, and sanded the edges until they were parallel. Then he put everything in place, after which we began to actively use this invention.
After using this trash can for a few days, we decided to attach the cabinet door to the front of the platform so that when we opened the door, the trash can would slide out on its own. But this will be a completely different thing, also made with your own hands!
Found a violation? Report content