- Vyacheslav Panov January 2, 2019
- HandicraftsHomemade products for childrentools
We independently convert an old sewing machine into a jigsaw.
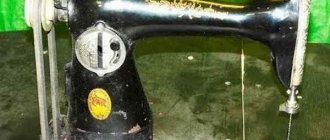
There are many videos on the Internet about using old sewing machines in a new way. To do this, we leave in the body only the crank, the vertical rod for attaching the needle, and the flywheel with a groove for the belt drive. An electric drive for manual sewing machines is used to rotate the flywheel. (A lyrical digression off topic: I purchased the drive about 30 years ago to make an electric spinning wheel according to the drawings from the magazine “Young Technician”. Wool from a white sheep was spun on the spinning wheel and a winter sweater was knitted. The spinning wheel itself was happily played by someone I knew, i.e. e. disappeared). The foot pedal for speed control and the electric motor are pictured below.
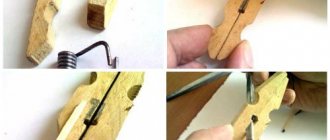
A review of net rollers recommends the use of leaf springs with the force application point in the center of the long spring, or a block of coil springs with precise fixation of the bottom edge of the file. A long leaf spring significantly increases the overall dimensions of the device. The coil spring unit is difficult to make at home. The chosen scheme is a short spring fixed at one end.
A piece of an old metal meter was perfect for this. The spring stiffness can be adjusted by setting the number (stack) of springs and moving the clamp along the spring. The use of a short spring complicates the attachment of the file, because the free end of the spring describes a curved line, and accordingly the lower end of the file will also not move strictly vertically.
The existing round hole in the spring is bored out with a file to make a rectangular hole according to the size of the file mounting unit. The result was a unit swinging along the long axis of the spring. Fixing the unit from below with a piece of rod. Fastening the file with a screw. When changing the file, the unit does not fall out because The saw blade clamp screw does not allow it from above and the axis of rotation from below does not allow it to move at a small angle.
Making the attachment point for the upper end of the file is not difficult and is clear from the photo.
The next feature of using sewing machines for making jigsaws is the small stroke of the working rod - approximately 25 mm. For reference: the working part of purchased files is approximately 85 mm with a total length of files of 120 mm. This shortcoming can be eliminated. To do this, the body of the machine is installed through a gasket (I have a thickness of 45 mm - three plates of furniture chipboard) Under the working rod there are three gaskets of 15 mm each. As the working part of the file wears out, one gasket is removed, and so on.
When using homemade files (notching saw teeth on piano wire with a diameter of 1 mm over a length of about 30 mm), it is not necessary to remove the gaskets. Since the machine is quite old and worn out, i.e. It rumbles and to eliminate noise, rubber shock absorbers are attached to the base posts. The first work was made of good quality 3mm plywood.
The works are small in size. Machine length 22 cm. Puzzles approximately 8 cm.
Author of the article “Do-it-yourself jigsaw from a sewing machine” Vyacheslav Panov
Source: samodelka.info
DIY stationary jigsaw from a sewing machine
One of the most convenient stationary machines for figure cutting, it has a very simple design. Craftsmen make such devices from a wide variety of materials and tools. One of the most suitable bases for making a tabletop jigsaw machine is a regular sewing machine. At the same time, the device does not have to be new or have an electric motor. We will tell you in more detail about the principle of operation and the manufacture of a stationary jigsaw later in the article.
Disadvantages of a manual jigsaw
A manual jigsaw is designed to form even cuts. In this case, as the rollers, rod, and pusher wear out, the saw may wobble, deviate from a straight line, and change the angle of attack. Regardless of the quality of the tool components, the following features are always present:
- When the saw becomes dull, deviation from a straight line is observed when cutting material of uneven density (for example, low-quality chipboard). The saw is capable of leaving the cutting line when it encounters a knot in the wood.
- When trying to make a curved radius cut, you can observe the following picture: the upper cutting line, which the worker follows, follows an exact trajectory, the lower one deviates, goes to the side, the radius becomes larger. The higher the wear of the tool and the lower the sharpness of the saw, the more pronounced this phenomenon is.
- Some materials cannot be worked using a pick-up or bottom feed of the saw. The carpenter is required to move the tool forward extremely evenly, which is impossible to do very accurately; as a result, the saw beats along the entry and exit path.
It is even more difficult to work with thin saws designed for curved cuts. Without practice, it is very difficult to achieve a good result, especially on thick slabs or wood materials. Let's look at how you can make a carpenter's job easier and the result better.
The working principle of a jigsaw machine
Before you start studying the manual for assembling your own stationary cutting machine, you should delve into its structure and a little about the history of its origin.
The first electric jigsaw machine was born in 1946, when engineer Albert Kaufmann had the idea to replace the sewing machine needle with a thin file. For its time, the invention was very original and received well-deserved public attention. She was engaged in the production and sale of jigsaw machines until she was purchased in 1954. Today, the patents for the invention have long expired and a wide variety of companies have begun to manufacture jigsaws.
Modern stationary jigsaws are functional devices assembled from precise and reliable parts. At first glance, the models on sale may seem incredibly complicated to manufacture, but they are based on the same old principle of operation, albeit with a more optimized mechanism. By assembling a jigsaw from a sewing machine, we are essentially returning to the origins of this invention, partially complementing it with modern technologies.
The design itself, which tensions and drives the saw blade, is quite simple and consists of a special frame and a crank mechanism. The movable frame consists of upper and lower arms of equal length, attached to the rack. A file is installed on the front side of the frame, and on the opposite side there is a spring that performs tension. The crank mechanism connected to the motor causes the saw to move up and down. A more visual and detailed embodiment of the above process can be seen in the following drawing.
How does an electric jigsaw work?
Although the device of a jigsaw is not particularly complicated, its mechanism has certain features that require familiarization. To understand how to make a jigsaw, you first need to understand what causes the saw blade to make reciprocating movements. For the clearest understanding of the principle of operation of the device, we will present the main components that make up the mechanism of the instrument and describe their interaction with each other.
The basis of any electric jigsaw is the following components: an electric motor, a gearbox and a rod with a saw blade clamp. Secondary, but no less important elements include the start button, support roller, cooling fan and sole. As additional functionality, many models have a pendulum stroke, a dust collector, lighting and a laser guide. We will not touch upon the operating principle of the latter, and will move on to a description of the interaction of the main elements of the mechanism. The high-frequency movements of the jigsaw saw blade originate from an electric motor, started by pressing a button or directly from the network. Rotation is transmitted along the shaft to a special “gearbox” mechanism with an eccentric, which interacts with the rod, forming a reciprocating movement. The mount installed at the end of the rod holds the saw that makes the cut. To minimize the load on the rod with the gearbox, the rear edge of the saw blade rests against the support roller. In this way, all components of the device are involved to perform the main task of sawing all kinds of materials.Jigsaw from a sewing machine
The beauty of making a stationary jigsaw from a sewing machine is to minimize precision work. A reliable crank assembly is already connected to a needle mount, which can be easily converted into a file. In fact, in order to requalify the device, it is necessary to install a tension mechanism on the opposite side of the saw blade being installed. We will tell and show you in detail about how to make a jigsaw from a sewing machine.
The above components are not intended to be completely accurate and are provided as a guide only. The dimensions of the required parts should be selected based on your capabilities, based on the examples in the video below.
By instruments:
- Drill (with a set of metal drills)
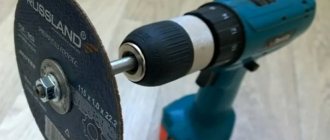
- Grinder (with metal disc)
- Pliers
- Screwdriver
At the first stage of assembly, it is recommended to remove all unnecessary elements from the sewing machine, leaving only the crank mechanism and the needle holder connected to it. To set the tension of the file, it is necessary to remove the shuttle device located under the needle. If a motor is built into the housing, it should be left in case it will be used as the main drive. If the power of the standard one is not enough for you, you can remove it and connect a third-party electric drive.
If you use thin files for sawing, up to #2, a standard hole in the top mount will be enough. For wider canvases, it will be necessary to drill a hole of a larger diameter.
The lower mount can be made from a regular bolt. To do this, you will need a drill, a 3-4 mm metal drill, and a tap for cutting threads for this diameter. The resulting design should look like this:
There are 2 types of installation of a sewing machine: above the table and under the table. In the version we are considering, the apparatus is located on top, when the tension mechanism comes from below. The author of the product abandoned the spring tension method in favor of a metal plate cut from a hacksaw blade. A hole drilled in the center of the plate serves as the attachment point for the saw blade. The strip of steel itself is installed in improvised grooves made from corners.
At this stage, the assembly of a homemade jigsaw from a sewing machine is considered complete. The device is capable of easily cutting wooden workpieces up to 20 mm thick. With a more advanced tension system, a good spring, and the presence of a powerful motor, it can easily take higher values. The detailed assembly process, with comments from the author, is presented in the video below.
Basic steps
The first thing to do is remove the flywheel to which the belt is attached.
After this, on the other side you will need to remove the front cover covering the needle bar. Next, the presser foot rod is removed, after which all parts under the needle plate are removed. Including shuttle travel.
If the car is old and you intend to paint it, you need to immediately remove all the old paint. Afterwards you will need to sand the surface.
A friend moved to America. Americans don't know how to defend their opinions like we do.
Smileys need to be quarantined with 2 squares: I figured out how to do it
Dasha read aloud a message from her father's phone, and her mother filed for divorce
It is advisable to treat the entire body in this way.
The next step is to remove the needle bar. In its place you will need to install a longer rod from the presser foot. The bottom bracket will need to be cut, otherwise it will not be possible to secure the saw blade.
As a result, there will be one hole left at the end of the rod, which will be used to secure the blade with a screw.
Since there is no hole in the presser bar to connect to the crank mechanism, it will need to be drilled. The screw will be screwed in there.
After completing the described steps, you will need to make a guide for the file. It will support the canvas in the desired position.
The guide is installed on the sole of the machine. To make it, 3 bearings will be enough. Two of them are needed to hold the file from the sides. The third blocks the movement of the canvas towards the edge.
For the holiday table I always prepare the Kyiv cake without baking: I spend half an hour
6 zodiac signs that can charm anyone with just one word
The caveman from the movies is the complete opposite in real life, he is simply handsome
The base of the guide must be bent from the strip on which the rods machined to the inner diameter of the bearings are fixed.
Under the sole of the machine there are eyelets that were previously used to attach mechanisms. The strip must be shaped so that it can be secured in these eyes.
Remaking the place where the needle is attached to the file
Not everyone and not always has the need to carry out only figured cuts. Much more often, a jigsaw is used to produce controlled cuts in straight and round shapes. In such cases, a thin file will be too slow, but a standard jigsaw blade will cope with the task quite quickly. And everything would be fine, but such a saw will not fit into a standard needle holder. This means that you need to reactivate the logical hemisphere and “pump up” your homemade jigsaw from a sewing machine. By the way, this is quite simple to do.
As an example, let's take a product from the following author, although this problem was also solved at the end of the previous manual. The answer lies in the stitching of the seat to tighten the needle. For this purpose, a grinder with a metal disc is used. The shank of the file itself also needs to be sharpened so that it fits into the hole in the fastener element with the bolt. Detailed examples are shown in the photo above, below, and also in the video.
Coloring
The next stage of changing the machine was applying paint. For better effect I used an aerosol.
For coloring, I used blue paint. I wanted something bright, rich, interesting, and if I didn’t like it later, I could always repaint it.
Next up is the work of the tabletop. Initially it was supposed to use the one that came with the machine. But I didn’t like it either in color or shape. And it didn’t go well with the base. So I decided to do everything the way I see it.
Correct geometry: classic dresses of the year that perfectly style your figure
“Rose gold” will add zest to your look: fashionable coloring ideas
BTS Named World's Best Selling Artists Of 2022 In The Music Industry
Original homemade products from a sewing machine
- 1. What can you make from an old sewing machine?
- 2. DIY jigsaw from a sewing machine
Many people still have old sewing machines left over from their grandmothers sitting idle in their homes to this day. Of course, it would be a pity to throw away such an antique, but there is nowhere to use it. Today, when progress has stepped far forward, the old Zingers are gathering dust idle, no matter what they have to do with modern sewing machines.
However, do not despair, because even from an old sewing machine you can make original homemade products and crafts for the home that will last for many more decades. On the Internet you can find many ideas for using sewing machines with a working upper mechanism, and even without it.
Labor and cost
Processing the beds takes the most time. You may be required to work hard for several hours. Everything will depend on their initial condition.
It took me about two hours to clean the surface of oil, old paint, degrease again and apply a new layer. If the cast iron is heavily rusted, it may take much longer.
Assembling the tabletop and securing it will take about an hour. You will have to wait the longest for the decorative impregnation to dry; this usually takes up to twelve hours.
A bottle of solvent will cost about 100 rubles per 500 ml. Paint – 600 rubles and more, depending on the manufacturer. Tabletop from 300 rubles. The total cost will not exceed 1500 rubles.
DIY jigsaw from a sewing machine
If you have an old sewing machine on hand in fully working order, then it can easily be used to make a homemade jigsaw, and even a small sharpener. The essence of converting a sewing machine into a jigsaw is to install a fabric holder instead of a needle.
In this case, the design of the sewing machine itself is of no small importance. So, if an old sewing machine with a foot mechanism is being converted into a jigsaw, then there is no need to install a small 40 W motor. Otherwise, you will have to install an electric motor on the sewing machine, since the quality of cutting workpieces largely depends on the required force and uniformity of saw movement.
In this case, the motor is installed on the tabletop, near the stand of the sewing machine, as close as possible to the flywheel. Since a belt will be used to transmit torque, a pulley should be installed on the electric motor shaft, after which it will need to be connected via a belt to the pulley of the sewing machine. Thus, you can convert a manual sewing machine to operate from an electric motor.
Now you will have to tinker a little with installing the adapter for installing the jigsaw file. As a rule, the socket into which the sewing machine needle is fixed is too small to install a jigsaw blade, so it will have to be drilled out a little and deepened at the same time. In general, a lot here depends on a particular device of the sewing machine.
If using the method described above to install a jigsaw saw on a sewing machine does not work, then there is another suitable option. For these purposes, you need to use a nut with a hole in the end into which the bolt can be screwed.
It is the bolt that will hold the blade of the electric jigsaw. To drill a hole in the end of the bolt, you will have to use a drill of a suitable diameter, and to cut threads, a tool such as a tap.
Source: zen.yandex.ru
Assembling a table jigsaw
The construction of a homemade jigsaw begins with assembling the body, which can be made of plywood, chipboard or metal. The simplest model of this tool can do without a housing, but in this case strong vibrations occur, which can significantly affect the ease of use. In this case, two holes are made in the jigsaw - one for attaching the crank to the tool, the second for movably fixing the jigsaw itself to the table. After starting the engine, the jigsaw begins to produce reciprocating movements that facilitate sawing of the material.
Such a spring will provide the necessary tension on the jigsaw saw.
A more sophisticated model includes two separate strips with wing nuts installed at the ends. At the opposite end, the planks are pulled together by a strong spring, ensuring constant tension on the saw. Such a device operates from a separate motor or, for example, from a drill.
There is a vertical bar running inside the case, which is fixedly attached to its bottom or one of the walls. Two holes are made in it, the distance between which should be 2-3 cm less than the length of a standard file. Bolts or pins are inserted into the holes, onto which strips are placed that hold the file.
The engine is built into the housing and is attached to the bottom bar by means of a disk with a connecting rod mechanism. A table with a hole for a file acts as a cover for the case.
The main disadvantage of a jigsaw with a separate motor lies in its most intricate part - the crank mechanism. The file with it makes not only vertical, but also oblique movements, which cannot but affect the cutting accuracy. If you need to get a precise tool, then it is better to replace the motor with an inexpensive factory-made manual jigsaw. It is attached under the surface of the body and a file is passed through the table, clamping it with one end in the jigsaw and the other in the upper bar of the structure. This design ensures sufficient cutting accuracy, bringing this parameter closer to factory models.
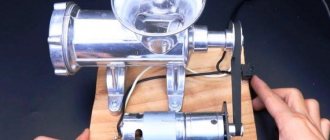
Metal cutting machine
If the machine has a working mechanism, it can serve as the basis for the machine. If it has a manual drive, then it is better to use an electric motor; if it has a foot drive, it will not be needed. Next, you need to remove the mechanisms of the sewing machine, assemble the cutting unit, install a device for securing parts and supply electricity to the machine.
Attention! Before the first start-up, check all installation details and follow safety precautions.
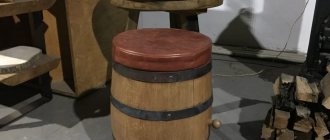
For a kitchen or summer veranda, a stylish piece of furniture made from the base of an old typewriter and a tabletop made of wood or glass is suitable. You can use not one, but two frames, then the table will be larger and more stable, which are better placed closer to the edges.
A cast iron bed from a sewing machine can be used as a base for a barbecue. On top you need to make a brazier from a metal sheet, which will be placed on the structure of the sewing machine. Thus, you get a good grill that will decorate any garden or summer cottage and will last for many years.
Important! To prevent the metal from corroding, it is recommended to coat it with paint that is resistant to heat from fire.
Disadvantages of a manual jigsaw
A manual jigsaw is designed to form even cuts. In this case, as the rollers, rod, and pusher wear out, the saw may wobble, deviate from a straight line, and change the angle of attack. Regardless of the quality of the tool components, the following features are always present:
- When the saw becomes dull, deviation from a straight line is observed when cutting material of uneven density (for example, low-quality chipboard). The saw is capable of leaving the cutting line when it encounters a knot in the wood.
- When trying to make a curved radius cut, you can observe the following picture: the upper cutting line, which the worker follows, follows an exact trajectory, the lower one deviates, goes to the side, the radius becomes larger. The higher the wear of the tool and the lower the sharpness of the saw, the more pronounced this phenomenon is.
- Some materials cannot be worked using a pick-up or bottom feed of the saw. The carpenter is required to move the tool forward extremely evenly, which is impossible to do very accurately; as a result, the saw beats along the entry and exit path.
It is even more difficult to work with thin saws designed for curved cuts. Without practice, it is very difficult to achieve a good result, especially on thick slabs or wood materials. Let's look at how you can make a carpenter's job easier and the result better.
Homemade jigsaw from a sewing machine
The idea of making a jigsaw came to me many years ago, but I brought it to life much later - when someone came into my hands with a discarded faulty sewing machine made in Podolsk, I took only the main shaft and the “needle bar” assembly, and dismantled the rest of the parts. Cut it off and the front part of the platform, leaving only the thrust bearing under the pillar of the L-shaped body. I sanded down all the ridges on the bottom surface. I drilled holes in the corners of the thrust bearing and through them I attached the inverted machine to the table top of the cabinet from below. By the way, I also used a cabinet from an old foot-operated sewing machine. True, finding such a cabinet is perhaps more difficult than the machine itself. But it is not difficult to make it from a 20 mm thick chipboard. On top of the lid I covered it with a steel sheet 1.5 mm thick (can also be made of duralumin).
A pulley with a diameter of 80 mm for a V-belt drive was installed on the protruding end of the main shaft (you can take it from an old foot sewing machine, you just need to bore it for a V-belt). A similar pulley, but with a larger diameter (100 mm), was installed on the electric motor shaft. The electric motor is single-phase (220 B) with a power of 180 W and a speed of 1350 per minute, together with a pulley, used from an old washing machine.
Making a manual jigsaw using simple technology
Before making a jigsaw, you should prepare inexpensive and accessible materials. Let's present them in the form of a list:
- sheet plywood - 12 mm;
- sheet plywood - 5 mm;
- sheet steel - 2 mm;
- set of bolts and nuts;
- drill (manual or electric);
- chisel;
- sanding paper;
- files.
After this, you should thicken the handle using a thinner plywood sheet (5 mm). This thickening is glued evenly on both sides of the handle, which ensures its comfortable position in the hand during subsequent work with a jigsaw. At the same time, the bracket and handle must be carefully processed using sandpaper and files of different classes.
The steel plate must be cut out using a chisel and the clamping jaws must be cleaned using a file. Next, you will need a drill to make slits in the jaws. Having taken this step, we begin to cut out notches on them with a sharp chisel. The left clamping jaw must be modified in such a way that a threaded hole is made for the bolt. We attach the jaws to the bracket, and then screw in the bolts on the left clamp, securely securing it with a nut.