Unfortunately, with new changes in technology, paper books are becoming redundant for younger generations. Now we see people with wireless headphones listening to literary works through smart devices. But on the other hand, we respect paper publications because trees were cut down to produce them. With this in mind, I decided to try and repurpose one of my unwanted old books into something useful with my own hands. The result is a luxurious jewelry box. I want to share this interesting instruction.
How to decorate?
There are quite a few ways to decorate a box, and here, again, you need to focus on your capabilities. Simply painting will significantly improve the appearance of the glued base for the box. To do this, you need to perform several steps.
- Tape the folds, joints and gluing seams with masking tape.
- Apply primer to all external sides. For smooth cardboard you only need one layer. If there are irregularities, the primer will have to be applied several times after the previous layer has completely dried.
- The dried primer should be sanded with sandpaper, and you can begin painting. A more uniform layer is obtained from a spray can, but you can use a regular brush.
In addition to plain coloring, various techniques are used, including painting. An alternative method is to cover it with fabric or paper. On paper or fabric, you need to make a pattern with allowances - it will look like a drawing of a box. If you take fabric, it is better to apply glue both to it and to the base. After gluing, the canvas should be smoothed well to expel air.
Another way of decorating is decoupage, this way you can decorate a painted or glued box.
Select a suitable image from a decoupage card, napkin or any printed publication. You can use the entire picture of a suitable size or cut out the desired part
For multi-layer napkins, the top layer is separated. The image is applied in the desired place and carefully covered with glue, while avoiding folds, tears and bubbles. After drying, the surface can be modified - some details can be drawn more carefully, and the surrounding background can be filled in. Finally, a layer of varnish is applied.
To learn how to make a cardboard box, see the following video.
Add decorations to the surface of the box
This is the most interesting and at the same time dirty part of the work. You can add anything to the book to decorate it. Here is a list of a few items I used:
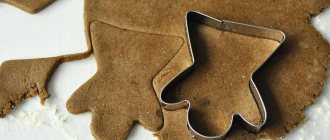
- metal stencils;
- broken earrings;
- torn necklace;
- decorative carnations and pushpins;
- craft keychains;
- book corners;
- old keys to lockers and drawers.
All decorations are glued to the book cover using permanent glue for small items and a hot glue gun for large items. When adding decorations, you can layer some elements on top of each other to give the box a 3D effect.
To make the book look more like a jewelry box, I added some small feet. This accessory is sold in craft stores. To attach the legs to the book, I used a hot glue gun with black glue sticks. The cover and center frame were made using ready-made silicone molds and were filled with epoxy glue.
The mentor asked the students: “What is the only thing that belongs to each of us?”
A healthy dessert that is no worse than cakes: baked apples with pumpkin
When you want something new for dessert, there’s nothing better than Earthquake. Recipe with photo
Once all the embellishments have been added, you can paint the entire piece. For this project I used black and silver acrylic paints. You can add any color depending on your decorating style. A great way to dry paint quickly is to use a hair dryer.
Perform texture application
For mixed-material pieces, it is recommended to add texture to the surface first. Using stencils is a great way to do this. Place the stencils on the book and add a layer of texture glue using a spatula.
The woman with whom Anatoly Kot hid for several years
Who to call mom: Semyon Treskunov about relationships with his stepmother and natural mother
It is recommended to drink lemongrass tea in the morning to help your head work better.
This step does not need to be performed in any particular way. Adding a few different stencils will give a great effect either way.
Step-by-step manufacturing instructions
Having everything you need to make boxes, you can get to work. Since there are quite a few modifications of such caskets, you can consider several models of varying degrees of complexity.
The most common option is a rectangular box. The first step is drawing up a diagram. The appearance depends on its accuracy. Usually boxes are made with a hinged lid. In this case, you can get by with one large drawing. It is cut along the contour, bent along the dotted lines and glued at the joints.
If the cover is overhead, the parts for the upper and lower parts are drawn out and made separately. Such schemes are quite common, and the sizes in them can be changed, but the proportions must remain the same. The lid should be a little wider, otherwise it simply won’t fit on top.
Another common option is a heart box. It’s quite simple to do, the main thing is to act extremely carefully. Let's look at the progress of the work.
- First you need to cut out two identical parts - the bottom and the lid. To do this, you can draw a symmetrical heart, or outline an object of a suitable shape.
- Then you should cut out a cardboard strip, the width of which will be equal to the height of the box plus an increase for gluing (it needs to be cut in the form of a wide fringe or triangles). The length of the ribbon is equal to the edge of the heart or slightly less if there is an indentation from the edge. You can take a long tape and cut it in the right place after trying it on or during the gluing process.
- The jagged part of the sidewall needs to be bent, and you can start gluing. The teeth can be slightly shifted - this will allow you to place the side part in the desired position. You can glue one half first and then the other, but then you will have to work on the joints.
- Then you should wait until it dries completely, and you can start gluing the lid. Once the entire structure has dried well, you can decorate it to your liking.
Book boxes are of particular interest. Of course, it can be made from a book edition of a suitable size. However, this method is by no means the simplest, and it would be a shame to spoil a real book. Therefore, it is better to make it from cardboard.
- First you need to make the cover (bottom and lid). It will require very thick cardboard. You can use several layers of regular or thick corrugated. A printed image is pasted onto the blank and the back side is decorated.
- After the parts have been glued and dried, you should take on the middle part. The pages can be drawn on the sides, the sheets can be glued together tightly or in the form of an accordion. To prevent the book from looking too new, the pages are aged artificially.
Popular articles Floor screed
How to make a box from a book
A jewelry box is every girl’s weakness. I really want it to be unique and inimitable. If you are fond of needlework, then it will not be difficult for you to make a box with your own hands from a book for your bracelets, earrings and other things.
To create a box you need a book, an unnecessary one, a stationery knife, gold-colored crepe paper, colored paper for decoration, cardboard, PVA glue, a brush.
Take any book with a hard cover.
Mark the inside outlines along which you will cut. It is better to step back at least a centimeter from the edge.
Cut out the middle. To easily cut the middle, change the blade on the knife as often as possible. It is better to move the knife more often with light pressure. Cut the corners well. It is better to remove paper that has already been cut. You can turn the sheets with windows over for convenience.
Once you've cut through all the sheets, you need to glue them together so they don't fall apart. Take a brush and PVA glue. Apply glue to the spines of the closed sheets. Brush all the leaves well with a brush.
Do the same for the nutria window. Place the book under the press for at least three hours. If after drying some sheets do not stick together, repeat the procedure with glue.
When the book is dry, take gold crepe paper and cover it on all sides, as well as inside. It is better to apply glue to the surface of the book and spread it evenly with a brush.
Handle the paper carefully, as when it comes into contact with the glue, it becomes soft and is easy to tear. After pasting, the book can be placed under a press until completely dry.
Now you can decorate the box. Inside, place a gold ribbon around the perimeter of the window.
Make roses on the outside using the quilling technique. Take two sheets of orange and yellow paper, “neon” sheets look very good. Cut out two circles with a diameter of 4cm and four circles with a diameter of 3cm. Place the orange and yellow circles together. Cut the circle in a spiral.
Now screw the circle onto the awl starting from the outer diameter. Glue the ends of the paper with glue. Glue the roses to the corners of the box.
Add to them leaves made from loose spirals in the shape of a “drop”.
Make an S-shaped spiral from the same green paper. Visually divide the strip into three parts. Twist two-thirds of the strip onto an awl and unravel. Wind the remaining one-third part onto an awl in the other direction from the first curl. Glue them near the roses.
The middle of the box looks empty. You can glue a mirror there if you have a suitable shape and size. Or you can do this: cut a rectangle out of cardboard. Round its corners.
Cover it with cream crepe paper. Glue it in the middle of the lid.
Make eight loose spirals from strips of paper the same color as the roses. Give them the shape of an “eye”.
Glue onto cardboard. Decorate the composition with S-shaped spirals.
Having made such a box with your own hands, you will get a lot of pleasure from using it. You can do something similar for your friend. And if you have a daughter, make a box for her little things together. Create for your own pleasure.
- Masha Ageeva
- Create masterpieces with your own hands for family and friends with the Home Decor website
Peculiarities
Many people consider boxes to be trinkets that simply take up space. They're actually quite functional.
- They are often used to decorate the interior. Moreover, if the style requires a large number of small details, you simply cannot do without boxes. In order for such decorations to be appropriate, you need to carefully consider their design.
- They help to maintain order and properly organize the storage of various things. The practicality of such a container is determined by its strength, size and shape.
- The fruits of your labor can be safely used as a gift. Moreover, such a gift will appeal to both a very young girl and a fairly adult woman. Moreover, the box, depending on its design and purpose, can be presented to a man. Sometimes people accumulate a lot of little things that simply need to be placed in suitable boxes.
Beginners who are faced with making boxes for the first time should pay attention to cardboard. It is no coincidence that this material is popular
Among the advantages of cardboard are:
- environmental friendliness;
- ease of processing;
- low cost;
- availability.
Step 11: Adding Felt and Paper Inside
This step isn't really necessary, but I wanted to enhance the look a little.
Steps:
- First I took thick paper. I used slightly thicker paper, which really feels more like thin cardboard.
- I then bent it around the wood until I was happy with how it sat there and all the wood was hidden. As I said, this is not necessary, especially if the wood looks good enough.
- I then cut a piece of felt for the bottom of the compartment.
- Finally, I glued everything in place and left it to dry.
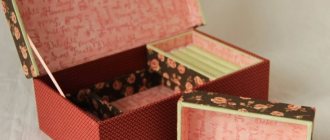
How to make a box from a book with your own hands - master class with step-by-step photos
Do you feel bad about throwing away old books? give them a second life by making a beautiful and useful box. A book box is a great gift, wonderful decoration and great pleasure if you make it yourself.
You can use any unwanted book with a hard cover as a basis. The depth of the decorative box depends on the thickness of the novel or textbook.
Inside such a storage room it is convenient to keep documents, memorable photographs, payment receipts, and if you make soft partitions, you will get an ideal place for storing jewelry.
Preparing materials and tools for work
Before you make a book box with your own hands, prepare all the necessary materials and tools. For this master class you will need:
- unnecessary book;
- glue "Moment";
- PVA glue;
- paper;
- felt;
- scissors;
- golden paint;
- collet cutter;
- a set of spare blades;
- ruler;
- pen;
- brooch.
It is advisable to choose a thick book and a small format. For external and internal decoration you will need multi-colored felt. An old brooch with a broken fastener or any other suitable decoration will serve as the main decorative element. You can also add a long, large bead and a thin, thick hair elastic to the set so that you can later make a clasp for the box by sewing them on by hand.
Stages of work and step-by-step photos
Cut a plain sheet of white paper in half and place it under the bottom and top covers.
This is a precaution necessary to prevent the pages from sticking prematurely to the covers. Glue the outside of all the sheets of the book with PVA glue, liberally lubricating the edge of the book and smoothing it with a brush, you can make several layers of glue
Popular articles The Legend of a River
For clarity, the photo shows a layer that has not yet been touched by the brush.
Using a ruler, draw a rectangle in the middle. This will be the recess inside the box. The outer edges should not be made too narrow; the paper will tear when cutting.
Cut a hole along the drawn rectangle inside all pages. The work is painstaking and there will be an unexpected amount of garbage, even if the book is small.
This is the most labor-intensive and time-consuming process of all the stages, requiring patience. The corners are especially “capricious”. Additional blades will come in handy, which you need to stock up on in advance. They quickly become dull on paper.
Sometimes it is recommended to cut out the pages first and then glue them together.
- From felt, measure and cut four rectangles for gluing the inner edges of the recess, glue with “Moment” or any other viscous transparent glue.
- From felt of a different color, cut out a large rectangle for the book cover.
- Glue to the entire plane of both covers and binding, wrapping the felt around the book.
Make cuts in the corners, fold them inside and glue the edges to the inside of the covers. On the binding, wrap the ends inward, after applying glue to them. Place under the press for a while and let the glue dry.
Glue the felt to the inside of the covers, and decorate the recess with a frame also made of felt. Glue the monolith of sheets to the back cover, thus creating the bottom of the box.
Paint the edges of the pages with golden paint, mixing it with glue. This can be old eye shadow in a suitable tone. In the same way, decorate corners and other places where a thick cut of felt is visible.
- Attach the brooch to the cover.
We can stop here. Or you can look for more interesting jewelry. Usually, during the work process, new ideas appear and additional materials for decoration are found. Therefore, you should always leave room for imagination and not be limited by the recommended set of materials and tools.
If you like making beautiful, useful things with your own hands, check out our other master classes. You might like a small kanzashi box, a cute box decorated using the scrapbooking technique, or a pink jewelry box.
This master class on a box from a book with her own hands was prepared by Olga Pakhomova especially for the online magazine “Women’s Hobbies”.
Preparatory work
For the manufacturing process you will need an old unnecessary hardcover book, thick sheets of paper, a stationery knife and a set of blades, scissors, masking tape, and a metal ruler. It is also necessary to prepare polyvinyl acetate glue (PVA), reliable, quickly hardening glue, best of all “Moment”, alcohol (shellac) and craquelure varnish, paints - acrylic and oil, pencil and brushes for using the above products.
Additional materials for decoration - ordinary sheets of paper, decorative elements, broken earrings or brooches, ribbons and ribbons, pieces of multi-colored felt are suitable for this; you may need thin hair bands if you want to make a clasp.
We assemble a box from a book with our own hands in a master class
What materials and tools will be needed for the work:
- Hardcover book.
- A stationery knife (preferably with replaceable blades) and a metal ruler.
- Scissors.
- Pencil and paints (acrylic).
- PVA glue and stationery glue.
- 2 sheets of thick paper.
- Brushes for glue and varnish.
- Varnish for coating the finished work.
- Decor and design elements. One of the options is water-based crackle varnish and shellac varnish (alcohol), Pebeo Fantasy paints, paper for the cover. Other decoration options will be discussed in detail below. To rub the crackle, use a dry brush and oil paint.
Let's start making the base of the box.
At the beginning of our master class we need to mark the future box. We open the book, turning over the flyleaf and the first sheet. For convenience, we secure it with a clip along with the cover.
On the next page, using a ruler and pencil, draw a “window” that we will cut out. Usually they retreat from the edges by 1.5 -2 cm
Please note that the cut of the pages is also smooth.
Applying a ruler, we begin to carefully cut through the sheets with a knife. Don't rush and cut through a lot of pages. The ideal option would be to cut 3-4 sheets at a time. You need to cut especially carefully in the corners, but here you can slightly go beyond the intended lines. We turn the cut sheets over and secure them with a clamp. If the blade becomes dull, you must change it, otherwise the work will be sloppy.
We gradually cut through all the pages to the binding. Now you can start gluing. Place a piece of paper underneath the binding. We apply PVA glue along the edges outside and inside, without gluing the leaves separately. It is better to work with a hard brush. Then we press the wall of the future box with our fingers and remove the excess glue. Place the second piece of paper on top and put everything under the press for about 12 hours.
The top piece of paper will need to be removed, but the bottom one can be left and then glued to the cover.
Now you need to glue the sides of the box with paper from the inside. We cut out the set aside endpaper and title page in the same way as the pages and glue them. Press again for about 2 hours. We got the base of the box as in the photo:
Cover the cover with masking tape. Then we paint the sides with acrylic paint on the outside and inside, going slightly beyond the edge onto the cover. A mixture of black and brown paint is used here. Paint in 2-3 layers, drying each time.
Then we use alcohol shellac varnish, applying it in 2 or 3 layers.
After this we apply crackle varnish. It is needed for the cracking effect. We take into account that the direction of the cracks will depend on the direction of the brush. You can apply it with a roller, then the cracks will be smaller and more chaotic. The crackle will take 5-6 hours to dry. After cracks appear, they need to be covered with oil paint of a contrasting color or pastel.
Let's start working with paints. They need to be applied with a stick and a napkin. Mix the paint, pour it from one of the edges and wipe the stick with a napkin. Mix paint of a different color in the same way and pour it on the other side. Apply another color with a stick. Having lifted the box, we tilt it slightly so that the paint spreads and mixes a little. Dry it by placing the box on a flat surface. The design can be left as is or slightly adjusted during the drying process by tilting or adding additional colors. This can be done only until a film forms on the surface (no later than 4 hours). Everything will finally dry only after 2-3 days.
After this, we coat the product with fixing varnish in 2 layers. Now you can do the final finishing. You don't have to touch the cover, then it will look almost like an ordinary book. The inside can be covered with scrap paper, supplemented with splashes of watercolor paint and beautiful braid if desired.
To completely get rid of the smells of varnish and paint, it is better to keep the box open for a while.
Popular articles Bottle decor “Golden Sunflowers”
From a candy box
Let's look at one way to magically transform an unnecessary item into an original item! We will need:
Macrame: diagrams, interesting projects and detailed descriptions of making crafts
Coffee topiary: step-by-step master class on how to make a small decorative tree from coffee beans
- candy box;
- multi-colored and plain paper;
- glue, acrylic paint and scissors.
- First, we cover the entire base around the perimeter with paper, leaving a margin around the edges. To neatly decorate the lid and bottom, the first thing you need to do is glue the side parts, trim the corners and bend them inward. You should take extra paper.
- We decorate the inside of the product with plain paper.
- Afterwards you need to let the box dry.
In every home there are things that can be given a second life! Don't rush to throw them away! The process of turning an ordinary unnecessary box into an original designer item instantly lifts your spirits and motivates you to new creative discoveries.
A little effort, imagination and free time will lead you to the desired result! A handmade gift always wins!
We are exploring other options for decorating the box and basic ideas
Relief decor made of paper.
For this decor you will need simple office paper, which you need to crumple by hand. Cover the cover of the book with PVA glue and apply straightened crumpled paper. We bend the edges of the sheet, cutting them off. We glue the book on all sides, including the spine. Let's go to the inside and do the same.
We tint the paper using a sponge with paint. Lightly touch the paper with a sponge so that only the folds are painted. Now you can complement the composition with any decor of your choice: ribbons, flowers, beads, etc.
We decorate the box with felt.
We cut the felt into 4 rectangles, suitable in size for gluing the inner edges of the box, and glue it with transparent instant glue.
We cut out a large rectangle for the cover from felt of a different color. Glue it around the book.
We make cuts in the corners and wrap them inside. We also wrap the edges on the binding and glue it. Place everything under a press and dry.
We cover the inside of the cover with felt and decorate the recess with a felt frame.
On the side of the cut pages we paint with gold paint with the addition of glue. We decorate the corners and sections of felt with the same composition. We decorate the cover with a brooch. Now you can leave it as is, or add artificial flowers, butterflies, ribbons, etc. to the decor.
Decor
We cut the disks into pieces small enough to stick them on the box. Let it dry and sand the seams with sandpaper. For a more neat design, grind down the corners and wipe until shiny. Such a box will suit even the most glamorous girl.
You will need:
- shoe box;
- cardboard or plastic partitions;
- scissors;
- paper for decoration;
- glue moment.
There are quite a lot of videos on the Internet on how to make a box. For convenience, first apply glue to the partitions and cover with paper. Let it dry and at this time work on the interior decor of the box.
We recommend reading:
- How to make scrapbooking with your own hands - ideas for beginners, choosing materials and tools with your own hands (110 photos)
- Do-it-yourself refrigerator magnet: the best ideas, options and ways to make a magnet (115 photos)
- How to sew a bedspread with your own hands - how to properly sew a beautiful and stylish bedspread (135 photos)
Be careful when choosing paper for the bottom, as a dark color will make your box infinitely deep. A light shade will help it visually become lighter than a feather.
After making sure that all parts of the box are dry, you can assemble it. Secure the partitions with glue for reliability and you can begin to form the external image. You can make this box part of your interior if you glue on a beautiful design.
From a shoe box
One of the simplest and most affordable options is a shoe box.
For work, prepare:
- shoe box;
- glue and scissors;
- thick cardboard;
- fabric or paper for decoration
The base is already there, so you can safely move on to the decor. The box is quite large, so there is plenty of room to roam around. The inside of the box can be decorated with soft fabric (for example, fleece), and the outside can be covered with colored paper or decoupage can be used.
You can go further and add rhinestones, sequins or glitter. There are a lot of options. Below are photos of jewelry boxes of this type.
The inside can be divided into sections using strips of thick cardboard covered with beautiful paper. This product is convenient to use for storing jewelry, cosmetics, threads and needles, creative materials and other small items.
The process of making a book box with your own hands
Work on the original box takes place in several stages:
- We mark on page No. 3, leaving the previous sheet for connection with the lid.
- We cut out the unnecessary block of pages according to the markup, right down to the cover. As a result, you should have a blank box with sides at least 2 cm wide.
- We generously coat the inside of the future box with glue, gluing the pages to the back cover and to each other, glue a white sheet on top, put the blank under the press and leave it for a day.
- After drying, the inside of the box can be covered with fabric using hot glue or paper using ordinary PVA.
- The cover can be decorated by covering it with colored paper or fabric. If you plan to paint in several colors, then use paper tape so that the pattern does not mix.
- The top of the product can be painted with acrylic paint and covered with three layers of alcohol and then craquelure varnish for a vintage effect.
- The final touch is to apply the decor and secure the fittings. It is best to glue metal corners using “Moment”; locks should be screwed or glued, depending on the mechanism.
A book box lined with fabric or leather looks beautiful. To do this, you will have to use hot glue, otherwise the adhesion of the fabric and paper will not be strong enough.
You can cover the box with fabric.
Decoration methods
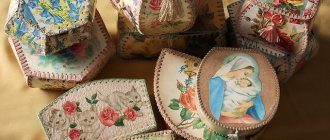
To decorate a gift item, you can use various options, for example, decoupage techniques, pasting with fabric, decoration with beads, beads, ribbons, lace.
Boxes decorated with lace look beautiful.
Decoupage style boxes are decorated with craquelure, vintage pictures, lace, and half beads. The products have a touch of antiquity and are well suited for storing women's jewelry, handicrafts, various memorabilia or photographs.
A compact box for money or documents can be covered with leather or painted with dark paint. Don't forget to coat the surface with varnish to make the product look finished.
Important! When choosing decor, it is important to ensure that the selected elements combine well with each other, otherwise a holistic design will not work. For example, romantic lace is unlikely to be combined with black leather, and thin fabric with metallic elements. Choose decor that rhymes with each other to make the product beautiful and aesthetically pleasing.
All decorative elements must be combined with each other.
An unusual box from a book will be a good gift or will add variety to your usual interior, and everything you need to make it will definitely be found in your home. Try creating such an accessory with your own hands to please your loved ones.
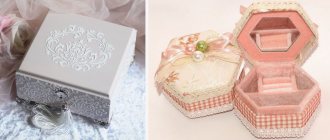
Types and forms
A small beautiful box made from a book is an original thing that can be used to store small items - jewelry, hair ornaments, souvenirs, accessories for needlework, but also for money. The decorative container can be additionally equipped with a hiding place, in which memorabilia are usually placed.
Receipts, documents, photographs are stored in large souvenir books; if you make 2-3 compartments using soft partitions, it will be convenient to place jewelry in them. Compact deep boxes are suitable for threads, buttons, storage of beads, beads and other accessories.
Externally, a super gift involves various forms of the product and types of its decor:
- it could be a large book-box for jewelry;
- a book-safe equipped with a small lock;
- a variant of a miniature but voluminous folio casket;
- a book in the shape of a chest, glued together from two or three books of different formats with drawers, is the most difficult product to make on your own.
You can decorate a masterpiece with paper, felt, all kinds of decorations - artificial flowers, beads, ribbons, papier-mâché figures and ready-made souvenirs.
The most interesting option for decorating any boxes is decoupage. This technique involves processing techniques such as patination, stenciling, gilding, and decorating with fabric and paper. In principle, a variety of materials and techniques can be used to decorate a prepared box. However, such work requires certain skills, and for those who first decided to make a souvenir item with their own hands, it is better to use simple technology.
Box in the shape of a doll sofa
Instructions for making a box in the form of a doll sofa:
- cut out the parts in the form of a parallelepiped approximately 7 by 15 cm;
- make an identical element 2-2.5 cm high;
- in a larger box, leave an open hole at the top, fill it with filler and compact it well;
- assembly: place the smaller closed element on the end (this will be the back), and need to be glued from the back to the soft seat;
- form upholstery with beautiful fabric. Completely cover doll furniture and measure to make a cover;
- cut a piece of fabric and sew it, the seam should be at the bottom;
- For better fastening at the bottom of the cardboard, you can make small holes through which you can pass ties or staple the fabric.
What is needed to make a box
To make an unusual box you will need:
- thick hardcover book;
- colored and white sheets of paper and cardboard;
- felt, velvet or velor for gluing the inner surface;
- scissors and a sharp stationery knife;
- paper tape;
- long school ruler;
- PVA glue and “Moment”;
- craquelure and alcohol varnish for decoupage;
- acrylic paints;
- pencil, brushes;
- fasteners, corners and additional fittings as desired.
Note! For the external design of the product, you can use beads, glass beads, decoupage napkins, half beads, or you can sheathe the surface of the box with eco-leather, fabric, lace, as your imagination tells you.
Find a suitable book and cut it
For this project you will need a thick hardcover book. Editions with a glossy surface are not suitable because paint and glue do not stick to it very well.
You will need to highlight the area you want to cut out first. Using a ruler as a guide is a good idea because the pages shift slightly when opened.
You will also need to leave enough paper on all sides to maintain the correct shape of the jewelry box. Using a sharp craft knife, begin cutting through the pages according to the markings you made. I was originally going to leave the first few pages, but then I thought they would get damaged over time, so I cut them off.
The head doctor of Kommunarka named the most difficult thing in the situation with Covid - separation from relatives
Young people in Russia are thinking about giving up plastic tableware
Water with honey on an empty stomach: starting the day with the right drinks