Over the years, I've built a whole shelf of book safes. To make the book a more secure hiding place, I decided to incorporate a lock into it. And not a simple lock, but a secret one, so that it would not be clear that it was built into the book. Thus, if someone were looking for a secret book, then upon a quick inspection he would not have any suspicions. And if you have a large library, then you can easily hide the book among other books.
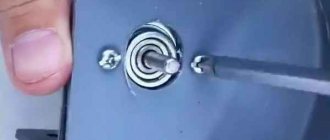
The lock is an electromagnetic solenoid with a small reed switch that opens when a magnet is applied to the reed switch. This way, you can place the lock mechanism and switch inside the book, hiding the necessary parts from prying eyes.
But there is a slight danger in this type of lock: if the battery runs out, it will take a lot of time to open the lock, and you may have to destroy the safe book too.
The project is simple enough that anyone who knows the basics of woodworking and soldering can easily make a book like this.
Safe book as a gift
Who among us has not had to rack our brains for an original gift? An excellent option for a business gift or birthday present would be a piggy bank safe. A small storage unit will find a place in any interior - a living room, a home office or a manager's office, since its design can be anything, and the untrained eye will not be able to distinguish an ordinary book on a shelf from a safe book.
A safe book is a universal gift for both a stranger and your own boss. There are several categories for such a hiding place - from a simple plastic souvenir to a completely serious safe with keys. There are many options regarding the cover. For a gift to a colleague whom you do not know closely, a cover in the form of a world map or encyclopedia is suitable. There are covers stylized as Soviet publications from Dostoevsky and Tolstoy to children's fairy tales, or the ever-living "Capital" by Karl Marx for lovers of humor. For women, covers in the form of culinary recipes or women's novels are suitable. If your friend collects coins or stamps, his joy will know no bounds at the sight of such a gift. Well, a safe made from a book, made by yourself, is practically a gift for any occasion, because it can be decorated in any style.
Gun storage rules
Proper storage of weapons is due to the protection of loved ones and the possible theft of valuable property. There are a total of 9 rules for storing firearms:
- Keep the gun in a safe in your own home.
- Weapons must be kept safely (unloaded, disassembled, cleaned, with the safety on).
- Store cartridges in a separate container.
- Capsules and gunpowder must be stored separately.
- Devices that create high temperatures should not be located near ammunition.
- The location and method of storage must be checked and approved by the police.
- Keys cannot be trusted to anyone.
- If you have a large number of guns, installing an alarm system is mandatory.
- If you receive (find) a “left” weapon that is not registered in your name, you must hand it over to the police.
The thoroughness and correctness of fulfillment of all requirements is checked by employees of the internal affairs bodies. They check whether the gun is licensed, how the gun is placed, and whether it is present during inspection.
Violation of the requirements will result in administrative (and possibly criminal) liability.
The easiest way to get a safe is to buy it. At the same time, pay attention to 2 indicators: fire resistance and burglary resistance.
Most often they purchase repositories of European brands (Germany, Israel, Italy). But you can also find safes made in China.
However, a gun cabinet is an expensive proposition. To save money, some people prefer to build a safe themselves. Below is what is required for this.
Expert opinion
Strebizh Viktor Fedorovich, leading construction foreman
To understand how to make a safe with your own hands, you need to have a general understanding of the designs of safes, what materials they are made of, and much more. If you want to clarify something, please contact me!
Do-it-yourself safe: requirements, sizing and drawing
- Resistant to adverse environmental factors (despite the fact that the safe is located in the house).
- Comply with all requirements and installation rules specified in the articles of the law.
- Have a castle.
- Have sufficient capacity - in the case of weapons, at least 30 cm in width per unit.
How to treat the surface → Room decoration → How to choose the right paint → Surface treatment technologies → Leveling and finishing the walls → Selecting and applying a primer → Removal from the surface → Stretch ceilings and technologies → Reviews and testimonials
Stages of work
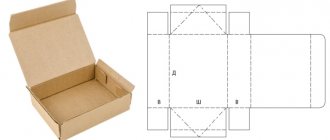
Now it’s time to figure out the stages of work. First, on the very first page of the book, you need to draw a rectangle.
Sedykh named the reason why she did not come to the funeral of her ex-husband
Myasnikov warned Russians about the outbreak of a dangerous disease due to the Covid epidemic
A hole marker simplifies the work of gardeners: how to make it from plywood and corks
After this, you need to cut it out with a stationery knife. The sharper the tool, the easier the work will be. It is also necessary to carefully observe safety precautions. Do not keep your fingers in close proximity to the cutting edge.
Now you need to cut out each page along the resulting contour. You need to work until you reach the desired depth of the box.
The above manipulations take a lot of time. However, in any case, some of the edges will remain uneven. You need to carefully clean each side of the recess. There should be no protrusions or tubercles.
Now you should carefully tape the box with tape. The outer part of the book does not need to be secured with adhesive tape. However, the inside needs to be glued very carefully.
If desired, flat magnets can be attached to the book binding. Some other magnets can be placed on the pages. This will reduce the risk that the box will unexpectedly open on its own.
: Finishing touches
Before you close the cover and the lock latches, do some magnet tests to make sure the lock works. The last thing you want to see is that you closed the cover and the lock latched but did not open for some reason. In this case, you will most likely have to rip the book safe to open it again.
If everything works, close the cover and click the lock. Place a magnet where the reed switch is located and you will hear the lock open. If no sound is heard, lightly press the cover - perhaps the lock tongue is under slight pressure.
I decided to solder a small loop to the magnet so I could hang it somewhere nearby. You can make a locket magnet or something similar so that you always have a magnet handy.
I also recommend changing the battery every 12 months, just to be on the safe side.
: wall alignment
No matter how well the knife is sharpened, the edges of many pages will be cut unevenly, and there will also be a lot of rags hanging down. Therefore, the walls of the resulting opening should be further trimmed with a blade.
: Making a wooden frame inside the compartment
To make the compartment stronger and give the lock something to grab onto, we need to make a wooden frame in our compartment.
Steps:
- 1. Measure and cut 4 pieces of wood to fit into the secret compartment. I cut out the sides and then the top and bottom. You may find that the secret compartment is not rectangular. Don't worry about this, as the wooden sides will be glued to the walls of the hidden compartment and you won't have any problems with it.
- 2. The piece of wood I used was too tall and I had to remove some of its thickness. For this I used a sander.
- 3. Cut another piece of wood, it should be about the same size as the top/bottom piece. It will be needed to secure the lock.
- 4. I rounded the edges to give it a more finished look.
- 5. Before you secure this piece of wood in place, you need to screw a lock onto it.
Mini-safe – which one to choose?
Based on price and purpose, there are three categories of mini-safes:
- A plastic mini-safe is a plastic box covered with leather or a substitute. The door in this design is retractable, like a book it does not open, although a lock with a key is included. At the most affordable price, this gift can be given to a friend as a surprise with humor. You can put sweets or a souvenir in the middle.
- A book-safe made of wood is the most common option. The external design is multivariate, and the quality is significantly higher than its plastic counterparts. There are models in the form of a box with a combination lock or with a key. All wooden safes are opened like a regular book by turning over the cover. The combination lock is usually three-digit; more complex combinations are found in custom-made safes. The box is used to store documents, photos and other important things. If the mini-book has a combination lock, then the cover itself serves as the main door. In models with a rotary key, the cover only masks the main lock (there is a metal door underneath it). For wooden models, the cover can be made of satin or silk, leather or leatherette. There are three types of such safes in size – small (17 cm), standard (22 cm) and large (30 cm).
- It’s worth talking about metal caches separately. They are equipped with a combination lock and cardboard covers. In terms of price, these are the most expensive models, although wooden ones are more realistic in appearance. Metal mini-safes are stored in a desk drawer or on a shelf away, since this is already quite a serious storage facility, not intended for prying eyes.
Of course, you shouldn’t count on such hiding places as a super-reliable means for family valuables, but for a gift for important little things it’s quite acceptable.
If you are giving money for an anniversary or a wedding, then a mini-safe is an excellent replacement for an envelope. The books are spacious enough, and you can store not only money there, but also, for example, jewelry - another gift idea for your loved one.
You can see such book-safes with a key in the video. For those who like to give gifts made with their own hands, master class “Safe from an old book.” Making a hidden book is quite possible for any home craftsman. The main thing here is not clever technical techniques and complex design, but accuracy and precision in execution, fitting and finishing of parts. This is what will make your hiding place invisible (or very effective and original) - as you wish. First, you need to pick up an unnecessary book, but not from a second-hand bookstore, but one that is similar in design to your home library.
How to make a cache from a book
Cache device
The first step is choosing a book. The book should be quite thick, with a hard cover and, of course, not be a valuable publication for you. If you don’t want to decorate the cover, the more boring and uninteresting the book, the better, as it will attract less attention. Of course, this is a humorous gift, but feeling like a secret agent can be fun for serious people too. So, it’s probably a shame to spoil books from your home library, so you can look for an old and unnecessary book in the attic or in a thrift store. Paper yellowed over time gives books a special charm, which in our case is an additional advantage.
You've decided on the book, and you can get to work. First, dilute the PVA glue with a small amount of water. To do this, take a small bowl and mix glue and water in it in a ratio of 1/2 or 1/3, so the glue becomes more liquid and the book pages are better saturated with it.
Using a brush dipped in glue, coat the back cover of the book from the inside and apply the last sheet to it. To ensure that the sheets lie flat and there are no folds or air bubbles, it makes sense to run a ruler over the entire surface of the page.
Glue the remaining pages in the same way. It is enough to apply glue only around the perimeter, stepping back from the edge by 2-3 cm on each side. It’s worth leaving a few blank sheets at the beginning of the book; they will cover our hiding place.
Depending on the thickness of the book and the availability of free time, this boring activity can last for a couple of evenings, but it does not require much effort and is easily compatible with watching movies or chatting.
When all the necessary pages are coated with glue, cover it with an unnecessary magazine so as not to spoil the cover, and put something heavy on top. Under the press the book will stick together more tightly. You can leave the book for several hours, but better all night.
On a dried book, make markings using a ruler and pencil, draw straight lines, leaving a distance of 2-3 cm from the edges
Take a stationery knife and begin to carefully cut through the pages along the outline. Take your time; for convenience, you can cut under a ruler, so there is less chance that the edges will come out narrowed on the inside.
Initially, you can cut out the middle and then glue the edges, but then there is a chance that the book will turn out sloppy, since the pages move a little during the gluing process.
When you have cut out all the excess, grease the edges of the cuts with adhesive solution, so they will smooth out a little.
Take the last un-glued page and make a cut on it, using a stationery knife lengthwise, retreating 5-7 centimeters from the outer edge, and then diagonally from the cut to the beginning of the border of our hiding place. Fold this page inward so that it covers the cut edges of the sheets.
If you wanted to make a real hiding place, then you can stop at this stage, but if the book is still going to be used as packaging for a gift, then you need to give it a more presentable appearance.