In tradition, the icon is made by hand on a wooden board covered with gesso, using paints made from natural pigments. In general, in ancient times only natural materials (there were no artificial ones) were used to make icons. The process of making an icon could take months, from making the board to applying the varnish.
Currently, some components for making icons are already used ready-made. For example, the use of transfer gold leaf (glued to a piece of paper) simplifies the process of gilding an icon. Also today, ready-made paints and varnishes can be used to make handwritten icons.
However, with the development of technology, not only ready-made components for making icons appeared. Icons made of different materials appeared.
Here are just the main ones today.
Bead embroidery icons: instructions
The most popular type of work is Matrona of Moscow. Usually the circuit is sold with a full set of everything necessary. The master embroiders the scarf, clothing and background. The saint's face remains unchanged.
The scheme is quite simple; the outline already contains marks that even a child can understand. By the way, joint activities with children have a good effect on their cultural education.
Additionally, a medium complexity scheme is provided. To embroider an image yourself, you need to do:
- Prepare the edges of the fabric where the image will be embroidered - treat it with regular PVA glue.
- Print an image on a canvas - many people simply draw based on a template taken from the Internet.
- Choose the method by which the work will be embroidered.
By the way, it is faster and easier to embroider with a monastery stitch (reminiscent of a half-cross). Bead embroidery of icons must be discussed in advance with the priest.
Process:
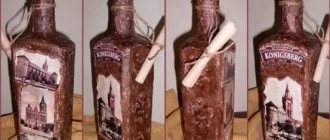
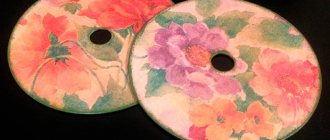
1. Select an image to apply to the tree. We edit it in any illustrator, increase the contrast for printing. Flip the image horizontally to create a mirror image. Print the picture on good glossy paper.
Photo: AiF/Lyudmila Maksimova
Important : flip horizontally, print on glossy photo paper.
2. Select the surface of the desired format. You can cut the wood yourself, in which case, do not forget to “sand” the board to protect it from unevenness.
Photo: AiF/Lyudmila Maksimova
3. Apply a thin layer of PVA glue evenly onto the board and spread it with a brush.
Photo: AiF/Lyudmila Maksimova
4. Attach the printed drawing to the board. Smooth it with a cloth.
5. Squeeze out the air. A spatula or other hard object is suitable for this. In the absence of a spatula, we use a flat wooden comb.
Photo: AiF/Lyudmila Maksimova
Important: if you squeeze out the air poorly, the image will not stick to the board.
We put a weight on the board. After ten hours we remove and begin the last stage of work.
Photo: AiF/Lyudmila Maksimova
6. Tear off the glued pattern. If a layer of paper remains on the board, carefully peel it away from the image with your finger; you may have to moisten the surface with a slightly (!) dampened rag.
Let's look at the result. The image was not completely reflected on the surface; we probably did not squeeze out the air well enough. But, nevertheless, the decoupage was a success, the result was an ancient icon.
Photo: AiF/Lyudmila Maksimova
Of course, in this way you can make not only an icon, but also any other picture.
By the way, in the Middle Ages, icons were decorated in the Orthodox Church using decoupage. In icon painting, this technique is called applique on a wooden base: images cut out of wood, leather, fabric, paper were glued or attached to the icon. In Russia, such decoupage began to be used from the 17th century, when Western artists transferred this technique to the masters of the Armory Chamber.
A Song of Ice and Fire. Decorating the house for the New Year with your own hands Read more
Technique step by step
For those who are just starting to embroider with beads, there are step-by-step instructions:
- First, the thread is threaded into the needle.
- Next, a small bead is strung on it.
- When the needle penetrates the wrong side, a tie is made. Afterwards, the needle returns back at a distance of 1 mm.
Next, the beads are strung again and the steps are repeated. In practice, there is nothing complicated here. The main thing is to maintain the distance between stitches. If they are the same, and the edges of the beads are directed in one direction, the icon will turn out very beautiful.
Ready-made kits will help make the job easier for a beginner. Usually they already have a detailed diagram, instructions and material.
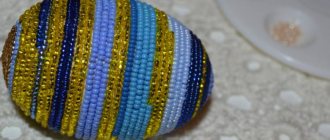
Embroidery
There are two types: embroidering a design on fabric with threads and beads.
Bead embroidery. There is an assumption that the beads originate from the Arabic language and in translation mean fake beads.
Bead embroidery as an art arose a long time ago. Thus, the first mentions of beads in Rus' date back to the 9th century. In the 18th century, beads became an integral part of folk craftsmanship. Russian craftswomen could create masterpieces that often surprised foreign guests.
Beads were also known in Europe. According to some historical data, until the 17th century, beads were produced only in the Venetian Republic and the technology of its production was kept strictly secret. A little later, the Czechs destroyed this monopoly by inventing a new technology for the production of beads, the basis of which was wood ash. The quality and beauty of Czech beads is still known today.
Embroidering icons with beads is a rather labor-intensive and time-consuming process that requires great skill and patience.
Currently, ready-made kits for embroidering icons with beads are sold in Russia, mainly manufactured in the Czech Republic and Ukraine. The set is a fabric base with a printed pattern on it, onto which, depending on the pattern (symbol), beads of the corresponding color are sewn.
Patterns: photos, how to embroider correctly
The second most popular model for embroidery is the icon of St. George the Victorious. Bright colors predominate here, which are quite easy to get confused. To prevent this from happening, it is recommended to study the presented diagrams and photos of finished works.
By the way, in average complexity there are fewer elements that do not need firmware. Before proceeding with a more complex method, it is recommended to study all the nuances.
What else was placed on the shelf for images?
Home iconostasis of those times were also intended for storing holy water and prosphora. The household hid the Gospel and memorial books (special books in which the names of all the deceased and living Orthodox Christians of this family were kept) behind the god. Particularly skilled needlewomen created doves (as a symbol of the Holy Spirit) from scrap materials and hung them from the iconostasis. In the red corner it was obligatory to have lamps and candles, which were lit during home services.
A similar small temple was in every Orthodox home until the 1917 revolution. After the Bolsheviks came to power, people continued to pray, but they did it in secret. Therefore, from the richly decorated home iconostases, only a few images remained, which people carefully hid from prying eyes, fearing persecution. The modern red corner is somewhat different from the one created by our ancestors, since many of the traditions of its creation have simply been forgotten.
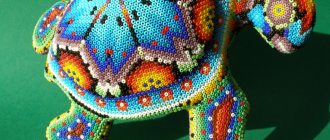
Other ideas
Once the master has understood the basic nuances of beading, you can begin more complex projects. By the way, they will be discussed below. Now it’s worth considering a few points for those who see a commercial nature in this art:
- You can sell finished products, but only if they belong to the canonical types and are made of the proper quality.
- Before placing a work on the market or on the Internet, it is advisable to discuss it with a priest.
It is not necessary to wear a scarf or pray before embroidering. The main thing is that the master believes in what he is doing while working. Icons of God with beads are made only when you are feeling well.
Thread.
Wood carving. Such icons are made from different types of trees. A three-dimensional design is cut out on a wooden board. The top of the icon is varnished. Previously, wood carving was only possible by hand - the master hand-carved every element and detail of the icon.
Also, carved icons can be made from various other materials, most often of natural origin, for example: granite, precious and semi-precious stones.
Currently, mechanical and automated devices are used in carving processes for various steel materials. For example, some production lines allow you to create a three-dimensional model in electronic form, and then simply, as a result of an automated carving process, obtain a finished result. It's more like volumetric printing only.
Is it possible to consecrate products?
By the way, there is quite a lot of controversy on this matter. The only correct solution is to take the diagram or drawing to the priest and clarify whether the sketch corresponds to Christian canons.
After receiving the blessing, you can start working on embroidery. After finishing, you must come to the church to consecrate the work.
general information
The main difference between church embroidery and secular embroidery is that a person busy with work receives not only aesthetic pleasure, but also strives to more fully reveal the inner meaning of the image.
Read also: Mold on the ground in seedlings
The generally accepted method of embroidery has long been considered face stitching, which is close in artistic expression to the skill of an icon painter. Working on an icon is a titanic work, primarily spiritual. Therefore, this embroidery method requires not only the advice of a priest, but also his blessing.
Today, it is customary to embroider icons with beads in three versions:
1. The first involves placing a paper icon on fabric and sewing only the frame and vestments.
2. Working according to the second option, the craftswoman embroiders the vestment with beads, and the face using the facial sewing method.
3. Third method: you need to embroider with a cross, according to a counting pattern. It is important to remember that in this case the work will not be considered canonical.
Is it possible to give
The issue of religious gifts is quite complex. If the icon is given to believing relatives or friends, then of course it will bring benefit and peace to their home. The main thing is that while working, the master does not allow bad thoughts, does not use bad words, or does anything that could fill his work with negativity.
Before selling or donating, you must obtain permission from the priest. If the painting complies with all the canons and rules, a blessing will be received.
Tags
which you needed with your hands you must definitely with your own hands you need with your own hands from your own hands with your own hands from your own hands. with your own hands with handicrafts sold with your own hands with your own hands with your own hands to make famous for your craftsmen icons with your own hands and an icon with your own hands and an icon with your own hands and an icon with your own hands makes with your own hands.
simplecraftsphotosstepbystepgluecomplexideasnowreadstheiroptions
Photo of icons with beads
Stripping plywood
We clean our plywood with sandpaper. As you already know, “Medium-grained” and “Fine-grained” sandpaper is used for cleaning plywood when sawing. You've probably seen sandpaper in hardware stores, and that's what we'll need. In your work you will need “Coarse-grained”, “Medium-grained” and “Fine-grained” sandpaper. Each of them has its own property, but a completely different coating, by which it is classified. “Coarse-grained” sandpaper is used for processing rough plywood, i.e. which has many defects, chips, and cracks. “Medium-grained” sandpaper is used for processing plywood after “Coarse” sandpaper and has a slight coating. “Fine-grained” or otherwise “Nulevka”. This sandpaper serves as the final process for stripping plywood. It gives the plywood smoothness, and therefore the plywood will be pleasant to the touch. Sand the prepared plywood in stages, starting with medium-grain sandpaper and ending with fine sandpaper. Sanding should be done along the layers, not across. A well-polished surface should be flat, completely smooth, glossy in the light and silky to the touch. How best to prepare plywood for sawing and which sandpaper is best to choose Read here. After stripping, check the plywood for burrs and small irregularities. If there are no visible defects, then you can proceed to the process of translating the drawing.
Making the corner red
You can decorate your home iconostasis with fresh flowers and willow branches after the Twelfth Feast - the Entry of the Lord into Jerusalem. And on the day of the Descent of the Holy Spirit, shelves with images are framed with birch branches, as a symbol of the grace of the power of God.
You can also install reproductions of images on the shelf for icons. They must first be consecrated and then added to the home iconostasis. Embroider an icon case (frame) for them with beads, and then they will look harmonious with other icons.
Substrate design
This is a kind of lining for the icon. It is cut out of thick cardboard or wood fiber tiles. The size is slightly larger than the finished icon (by the size of the frame groove). That is, the substrate must fit tightly into the grooves of the frame. On the back side of the substrate, sheets of foam rubber (5 mm) of different sizes are glued in two layers. The smaller sheet is glued first, directly onto the backing. A second larger one is glued on top. But both of them are smaller in size than the backing sheet itself. The frame is ordered according to the size of the finished embroidery, and the backing is cut out according to the size of the grooves of the frame.
Additional images
In addition to these main icons, on the home iconostasis you need to put images of saints after whom your family members are named. It is also advisable to purchase an icon of the healer Panteleimon - a healer of mental and physical illnesses. The choice of other images depends entirely on the needs of the household. For example, you can purchase an image of Peter and Fevronia, to whom they pray for family well-being. In front of the icon of Sergius of Radonezh they ask for help in their studies and good endeavors. Unmarried women can pray before the image of Xenia of St. Petersburg, who, by the will of God, became a helper to people in matters of marriage.
Recently, in many homes, one of the central icons has become the image of the blessed old lady Matrona of Moscow. Even after her earthly death, she helps in everything those who come to her at the Intercession Church or to her grave at the Danilovskoye Cemetery, or simply turn to Matrona in home prayers. Many people have already received healing and help from her. It was not for nothing that she said: “Come to me and tell me everything as if you were alive.” By this, Matrona meant that her earthly death does not mean a spiritual death: after all, she is still with us.