Both adults and small children wear hats with ears. In today's article we have collected a lot of different models of hats with ears. We hope that you will find something interesting among them.
Can you crochet? Publish your work on kru4ok.ru
Hats with ears can be of any shape:
- summer hats
- hats like cats and other cartoon characters
- women's hats with long ear flaps
- children's hats with ears for little ones with ties
- caps with ears
- openwork Panama hats with ears and so on.
Crochet hats are most often crocheted from the top of the head, and are based on a circle. The circle can be knitted with single crochets, double crochets, and essentially any fancy pattern. But for warm hats, you should choose a tight knit.
How to tie ears?
If the ears are located on the top of the head, then they are most often knitted separately and then sewn onto the finished model. But sometimes ears are knitted together with a hat (this method is used when knitting summer hats and panama hats).
For hats with earflaps, the ears are at the bottom and are knitted last. These ears are decorated with flowers, pompoms and other accessories.
Animal hats with ears
There are many different models of hats that imitate animals, which is why they are called animal hats: panda, cat, mouse, tiger, crocodile, any animal can be modeled on children's and adult hats. In our selection we will present many different options.
Koto - hats
These patterns are easily recognizable; they are always knitted with ears on the top of the head, and they make eyes and mustaches on children's hats.
It is possible to knit absolutely any model with your own hands, the main thing is to be able to read patterns and knit the simplest single crochet or double crochet stitches. There isn't much difference.
And if you want to knit a hat for the winter, then be sure to buy thick woolen threads, and we recommend lining it for children.
Master class on knitting a children's hat with cat ears
A crochet baby hat with ears can be crocheted in a few evenings.
To knit a colored hat you will need 2 types of yarn:
- 100 g of cashmere or wool with acrylic, a little yarn of a lighter color of the same tone.
- Hooks No. 4, 7, 8.
- Tape measure.
Video demonstrating how to create a crocheted hat with cat ears:
To knit a hat with ears for the winter, you need to add density: increase the number of threads to three. Knitting for a hat in a column will be embossed and dense. The head circumference should be chosen as average for children: 50 cm.
Bottom of the hat
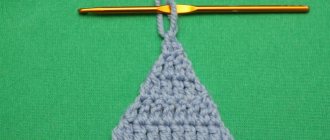
First you need to knit the base of the hat - its bottom, for this you need to use a 7 mm crochet hook to cast on 3 air loops:
- After which, connect the first with the third, obtaining a vicious circle.
- Then, in the second row, you need to knit 9 stitches without throwing loops.
- The 3rd row is knitted in 18 stitches, on which 2 yarn overs are made: the size of the bottom increases.
- A strong base is ready. Now you can reduce the knitting density. To do this you will need an 8 mm hook.
- The fourth row is knitted without any additions.
- In the 5th row, increase 1 yarn over every 3 loops.
- The sixth row is knitted without double crochets.
- In the seventh row you need to add 1 yarn over every 4 loops.
Afterwards you need to indicate the size of the required bottom. To do this, measure the circumference of the head, divide it by 3.14 and subtract 2 cm. You will get the diameter of the bottom.
Knitting hats
Upon reaching the required diameter, you just need to knit the selected height of the hat - 18 cm with a decrease in each row. Decrease the first 2-3 rows by 3 loops, the next 2 rows by 2 loops. As soon as the transition is visible, you can continue knitting with a stitch without decreasing to the required height of the hat.
The final 3 rows need to be tied behind the back wall and the hat is ready. Now we need to do the ears.
Increases and decreases for ears
To knit the ears you will need to knit 4 parts. The ears will be double. The outer eye is crocheted with 8 mm stitches.
The knitting pattern is as follows:
- 1st row: 1 loop.
- 2nd row: 2 loops.
- 3rd and 4th row: 4 loops each (uniform increase on 2 sides).
- 5th and 6th row: 6 loops each.
- 7-8 row: 8 loops each.
The inner eyelet is crocheted from light threads 4 mm in 2 threads. It turns out denser and smaller in size.
The scheme is like this:
- 1st row: 1 loop.
- 2nd row: 2 loops.
- 3rd and 4th row: 4 loops each (uniform increase on 2 sides).
- 5th and 6th row: 6 loops each.
- Rows 7-10: 8 stitches each.
After which, both ears are tied around and crocheted to each other with a dark thread. The ears are ready. Can be sewn to a hat. First you need to outline the desired location of the ears; it should be symmetrical to each other.
Simple garter stitch hat
Even a novice needlewoman can knit such a cute and simple baby hat:
This is a classic version of the simplest pattern, when the fabric of a hat for girls is made in garter stitch. We will knit the smallest size for a newborn girl whose head circumference is 35cm. We cast on sixty-five loops on knitting needles number 4.5. Next, we knit LP in all rows of the fabric to create a relief called “Garter Stitch”.
Having knitted seven cm of fabric, you need to start decreasing the number of loops for the crown so that the hat is rounded. In the first R decrease after the LP, we knit a rapport consisting of two P together, six LP, and repeat it until the end of the row. We consider this P to be the front one, and we will perform all the purl ones as LP. In the third R after the LP we knit a rapport two together and five LPs. In subsequent rows in repeats, it is necessary to reduce the number of facial loops by one:
Having knitted up to the eleventh P, there remains only one LP after two together, and seventeen P on the knitting needles. In the last P, all Ps are executed two at a time. At the end of the work, the thread must be tightened and sewn on the wrong side of the fabric.
Master class on knitting a children's hat with cat ears
A crochet baby hat with ears can be crocheted in a few evenings.
To knit a colored hat you will need 2 types of yarn:
- 100 g of cashmere or wool with acrylic, a little yarn of a lighter color of the same tone.
- Hooks No. 4, 7, 8.
- Tape measure.
Video demonstrating how to create a crocheted hat with cat ears:
To knit a hat with ears for the winter, you need to add density: increase the number of threads to three. Knitting for a hat in a column will be embossed and dense. The head circumference should be chosen as average for children: 50 cm.
Bottom of the hat
First you need to knit the base of the hat - its bottom, for this you need to use a 7 mm crochet hook to cast on 3 air loops:
- After which, connect the first with the third, obtaining a vicious circle.
- Then, in the second row, you need to knit 9 stitches without throwing loops.
- The 3rd row is knitted in 18 stitches, on which 2 yarn overs are made: the size of the bottom increases.
- A strong base is ready. Now you can reduce the knitting density. To do this you will need an 8 mm hook.
- The fourth row is knitted without any additions.
- In the 5th row, increase 1 yarn over every 3 loops.
- The sixth row is knitted without double crochets.
- In the seventh row you need to add 1 yarn over every 4 loops.
Afterwards you need to indicate the size of the required bottom. To do this, measure the circumference of the head, divide it by 3.14 and subtract 2 cm. You will get the diameter of the bottom.
Knitting hats
Upon reaching the required diameter, you just need to knit the selected height of the hat - 18 cm with a decrease in each row. Decrease the first 2-3 rows by 3 loops, the next 2 rows by 2 loops. As soon as the transition is visible, you can continue knitting with a stitch without decreasing to the required height of the hat.
The final 3 rows need to be tied behind the back wall and the hat is ready. Now we need to do the ears.
Increases and decreases for ears
To knit the ears you will need to knit 4 parts. The ears will be double. The outer eye is crocheted with 8 mm stitches.
The knitting pattern is as follows:
- 1st row: 1 loop.
- 2nd row: 2 loops.
- 3rd and 4th row: 4 loops each (uniform increase on 2 sides).
- 5th and 6th row: 6 loops each.
- 7-8 row: 8 loops each.
The inner eyelet is crocheted from light threads 4 mm in 2 threads. It turns out denser and smaller in size.
The scheme is like this:
- 1st row: 1 loop.
- 2nd row: 2 loops.
- 3rd and 4th row: 4 loops each (uniform increase on 2 sides).
- 5th and 6th row: 6 loops each.
- Rows 7-10: 8 stitches each.
After which, both ears are tied around and crocheted to each other with a dark thread. The ears are ready. Can be sewn to a hat. First you need to outline the desired location of the ears; it should be symmetrical to each other.
What to rely on when choosing a scheme
When a caring mother wants to start knitting hats for children from 0 to 3 years old with descriptions and patterns, her eyes run wide from the number of knitting patterns and she cannot choose the most suitable one.
To choose the right one, you need to consider the following points:
- The difficulty of knitting a hat for children from 0 to 3 years old is that it is desirable that the model come with a description and diagrams. When you select a scheme, you must understand exactly whether you can handle it.
- Model. Of course, every mother wants her child to wear fashionable things. That is why, before you start knitting a headdress for a child, see if such hats are currently worn, and whether your daughter or son will look stylish if they wear this thing.
- Season. Of course, always first of all think about what time of year you want to knit a gift for your baby or for your baby. Naturally, there is no point in knitting a warm hat for the summer or making a light cap for the winter.
- Child's age. When you are looking for a way to knit a hat for children from 0 to 3 years old with a description and patterns, never forget to look at what age this or that item is intended for. You can also include the size of your baby or toddler in this paragraph.
- Time spent. If you decide in the fall to knit a headdress for your child for the summer, then there is no need to rush and think about the amount of work.
But if you want to knit a hat in May before June, then you will have to think carefully about whether you can handle such a volume of work.
Interesting! How to knit beautiful booties for newborns
Of course, these tips are mainly needed for those who have just started knitting and do not quite understand what they need to do and what they want to knit for their child.
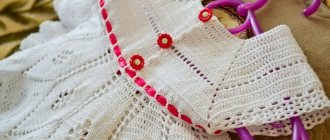
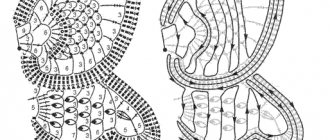
WOMEN'S HAT WITH CROCHET EARS
Saturday, February 03, 2022 23:45 + to quote book
Women's hat with crochet ears.
This cute hat with ears is crocheted with a simple single crochet pattern.
The bright colors of the colored tints on the cap are obtained by knitting from sectionally dyed yarn.
Head circumference 56(58) cm.
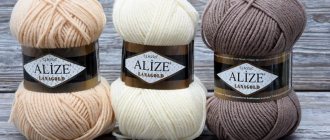
To knit a hat you will need: - 150 gr. yarn (100% merino wool, 100m/50g) section dyed, - hook No. 3.5, - beads for decoration.
Knit the main pattern of the hat in st. b/n in circular rows in a spiral, inserting the hook behind both half-loops of the previous row.
To add, do 2 tbsp. b/n from one loop.
Crochet hat description:
Crochet 2 chain stitches. and from the 1st, knit 5 tbsp.
Continue knitting the 2nd row in a spiral, while making additions from each loop = 12 tbsp.
Next, knit circular rows of double stitches, adding 6 stitches evenly in each row.
When the diameter of the circle is 17 (17.5) cm, then continue knitting rows without adding to a height of another 12 cm.
Knit the last row of stitches behind the front half-loop, finish row 3 with joint st.
Then turn the work and knit in the opposite direction for a 6 cm lapel with the main pattern.
Tie the edge with a crawfish step. Fold down the flap.
Divide the bottom edge of the hat into 4 parts: 19 (20) cm – front part, 10 cm side parts for ears and 17 (16) cm back part.
To knit the right ear, place the work with the right side facing you and knit the 1st row of sc, inserting the hook behind the free loops of the last bend row.
Having knitted the eyelet section, turn the work, make 1 chain stitch. rise and knit the 2nd row of stitches back.
So knit 5 cm, then start decreasing at the end of each row until there are 8 stitches left.
Knit the left ear like the right one.
Tie the bottom edge of the cap in a crawfish step.
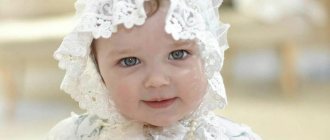
How to knit a baptismal cap
You will need:
Alpaca yarn from Drops (100% alpaca 167m/50g) or Children's Hit from Pekhorka (100% acrylic 163m/50g) depending on what time of year you need a baptismal headdress. Choose between wool, synthetic or cotton. Knitting needles number 3. Density 27p. = 10cm
Description of work:
We cast on the knitting needles 77p. Let's start knitting an openwork pattern:
Next, repeat rows 25 and 26 of the pattern until there are 10 cm from the beginning of the cap. The last one should be close.
Forming the top of the baptismal cap
1st row: * 8 knit, 2 knit. together * - 8 times, 1 knit. 2 and all even: 1 knit., then purl all stitches, 1st knit. 3 and 7th row: knit 5 row: * 7 knit, 2 knit. at the same time * - eight once, 1 knit. 9 p.: * 6 knit., 2 knit. together * - 8 times, 1 knit. 11 p.: * 5 knit., 2 knit. at the same time * - eight times, 1 knit.
So we decrease 8 stitches every other row until there are 17 stitches on the knitting needles. Then repeat 1p, and then knit 2 knits at a time. We tighten the remaining loops with a working thread and fasten them tightly.
Bottom bar of the cap. From the bottom of the cap we cast on 56 stitches. and make 2 knit stitches. Tie the ties, or use a satin ribbon, and sew them on.
Choosing the right crochet hook
A crocheted baby hat with ears will be made perfectly if you take into account the rules for selecting yarn and knitting tools: they must match the size and thickness. When choosing a hook, you should know that its pointedness should not interfere with knitting, and also be safe for the needlewoman.
It should be remembered that an extremely rounded hook will interfere with the work, since it penetrates the product very difficultly. Beginners are recommended to choose a hook without a plastic handle. It should fit tightly to your fingers and be felt by your hand.
There are several types of hooks, which differ in the material they are made of and have a number of advantages:
| Hook quality | Advantages | Flaws |
| Platsmassovye | Cheap, easy to use. | May bend too much when knitting. |
| Wooden | Lightweight, inexpensive. | They electrify the yarn, quickly lose the smoothness of the surface and catch the yarn. |
| Aluminum | Lightweight, inexpensive, do not electrify the yarn. | May stain light-colored yarn and hands. They bend quickly and can break. |
| Steel | Comfortable, light, durable. | They have no flaws and are very durable. |
| Bone | Designed for knitting from thick threads. | Expensive, fragile. |
| Combined | Made from metal and plastic or wood. | When purchasing, you should pay attention to ensure that the connection of the parts is strong. |
When choosing a hook, you should take into account that its diameter should match the thickness of the thread. The diameter of the hooks varies from 0.5 mm to 6 mm in increments of 0.5 mm. Accordingly, for a thin hook you should choose a thin thread. This hat will look very elegant and beautiful.
Basically, when knitting hats, hooks from 3 to 5 mm are used.
Knowing the following rules will help you avoid mistakes when selecting a hook for a thread:
- When purchasing threads, you need to pay attention to the packaging: sometimes the manufacturer indicates the appropriate hook number.
- You can select threads for a hook without knowing the parameters of one of the materials, knowing that the thickness of the hook should be twice the thickness of the thread.
- When knitting, the crochet grip of the thread must go completely.
To calculate, you need to use a special table:
| Hook | Thread meter | Hank weight |
| № 1 | 550 m | 100 g |
| № 2 | 400-500 m | |
| № 3 | 300-400 m | |
| № 4 | 200-300 m | |
| № 5 | 100-200 m | |
| № 6 | 100 m or more |
General recommendations
For babies aged 0 to 3 months, whose bodies are just beginning to adapt to the environment, a hat is necessary not only on the street, but also at home. When starting to create your baby's first things, you need to take into account some features and important details.
Yarn selection
The yarn used for knitting for babies is selected very carefully. The threads should be as soft and gentle as possible. In summer, preference is given to cotton and bamboo fibers, and in winter - acrylic. In any case, the thread should be smooth, without irregularities, not prickly, and pleasant to the touch.
The choice of color is rather a matter of taste. A girl doesn’t have to knit a pink hat, and a boy doesn’t have to knit a blue one. Delicate pastel shades and bright saturated colors are suitable for kids of both sexes. In addition, sometimes ultrasound results are not accurate. Then a headdress in a neutral color - yellow, green, white, red - will come in very handy.
From several skeins you can knit not only a hat, but also a whole set of clothes for your baby
Set of tools
Any children's hat is created using ordinary tools and materials. For work you will need:
- thin (approximately 350m/100g) yarn with a hypoallergenic composition;
- knitting needles No. 2.5;
- tape measure;
- scissors.
In some cases, you can add a crochet hook here. It is usually used to tie or finish the edge to give it strength.
Taking measurements
To make a baby hat, you only need to measure the circumference of the head. Usually this measurement, even for large newborn babies, does not exceed 36 cm.
When measuring, the measuring tape should pass just above the eyebrow line
If we knit a cap for a newborn with knitting needles in advance, when the baby has not yet been born, you can use the size chart. It specifies the parameters for making hats by age. It will also come in handy when knitting a cap for a child to grow a little.
The dimensions indicated correspond to the head circumference
Selection of knitting methods
Models with simple patterns, without unnecessary embossed and voluminous details, are most suitable for sensitive children's skin. When deciding how to knit a baby cap, you should give preference to smooth patterns and simple elastic bands.
Loop calculation
To correctly determine the number of stitches to cast on, it is recommended to knit a piece of fabric approximately 10x10cm. By attaching a measuring tape to it, you can understand how many loops in width and height there will be in 1 cm of the product. After this, it is easy to calculate the number of stitches in the cast-on row.
Knitting a test sample will prevent you from making mistakes
Hat with ears for a girl or boy without elastic band
In the photo you see a hat with ears like a cat, it is knitted with double crochets from Jeans yarn.
The patch is knitted separately and sewn onto the hat.
Take: exhaust gas measurements (head volume), depth or height.
You will need: jeans or any other thread, a hook, scissors, a needle for sewing on patches, knit a train patch or any one that suits you, a little grass for the edging.
Step-by-step instruction:
- Cast on a number of stitches equal to the OG and knit in the round without increasing or decreasing with an even fabric.
- Having tied the desired depth, tie the edge, picking up one and the other side with connecting posts.
- Then, trying it on the child, sew the place where the ears will be, feeling with your fingers.
- If you additionally decorate it with an applique or train patch, it can look like in the photo.
- For a more organic edging, the edge is tied with grass threads.
It's up to you to wear such a hat with or without a lapel.
Measurements and preparation
To knit a hat with a toe, you need to correctly calculate the dimensions of the finished product. So where do you start?
- Measure the head circumference: place the measuring tape so that it passes just above the eyebrow arches, above the tips of the ears to the most protruding part of the back of the head.
- Calculate the height of the product. First, imagine exactly how the hat should fit on the child, and then measure the distance from the middle of the forehead to the point on the back of the head where the back of the helmet ends. This measurement needs to be divided in half: the resulting value will be the height of the finished product.
Scheme of taking measurements
Tip: when starting work, you need to take into account the properties of the yarn. For example, thread containing acrylic tends to stretch when washed. Therefore, if you are planning to knit a warm sports cap, it is better to reduce the circumference by 2-3 cm.
Then you need to knit a sample to calculate how many loops there are per centimeter of the product. Once you've done your calculations, you can experiment with needle size, yarn, and pattern.
Hat with ears
Description of the hat for OG 50. The description is practically no different from the previous hats, the only difference is in the description of the knitting of the bottom, that is, the crown.
- yarn – a little more than a skein of Trinity “Snowdrop”,
- 100% cotton, hook number 4
1st row - 6 sc in an amigurumi ring (6). 2-4 rows - knit in a circle with 6 increases in each row (24). 5th row - start knitting the ears, do it like this: in addition to the increases in the bottom. select 2 points according sides (for me this is the 5th loop from the beginning of the row and the 5th loop to the end of the row) and knit 3 sc at these points.
6-12 rows - we knit with uniform increases - 6 sc in each row, plus 3 sc on the sides for the ears, while the loops in which we knit 3 sc for the ears should be located strictly under each other in each row.13- 14 rows - we knit without increases in the ears, but with increases in the bottom (6 sc in each row).
Rows 15-16 - we start decreasing in the ears, we do it like this: we make one out of 3 loops, we knit the bottom without increases. Row 17 - we continue the decreases in the ears, plus we knit 6 equal increases in the bottom. Rows 18-19 - we continue the decreases in the ears , we knit the bottom without any increases.
Row 20 - we continue the decreases in the ears, plus we knit 6 equal increases in the bottom. Rows 21-22 - we continue the decreases in the ears (these are the last rows of the ears), we knit the bottom without increases. Rows 23-31 - we continue to knit the crown sc.
And who will say that this is not a cat - just sad
Another funny model. In essence, it is knitted according to the same pattern, but the yarn is quite soft and the ears droop. What a sad cat! A style for any age from girls to older women. Very warm, double, with acrylic lining. Let's look at a knitting pattern for a women's cat-style hat on knitting needles.
You will need:
— grass yarn Gjestal Orkide (50gr/100met); - acrylic yarn (50g/133mt) - knitting needles No. 4
Read description here