Low ambient temperature significantly reduces labor productivity and living comfort. Therefore, heating domestic and industrial premises performs an important function that requires significant financial costs for the purchase of special equipment. To save money on heating appliances, you can assemble a heater yourself. Which is especially important for those rooms and locations where there is no need to care about its aesthetic appearance and design.
Assembly of the structure
Assembling the radiators together is not difficult, but you should first purchase new intersection gaskets or use instead an asbestos cord impregnated with graphite powder, previously diluted in drying oil.
Since the temperature inside the boiler can exceed +600 degrees, it is worth taking care of the gaskets in advance. The tightness of the entire structure depends on their quality and strength.
The radiator assembly sequence is as follows:
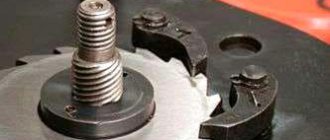
Nipples equipped with right and left threads are screwed into each section. Asbestos cords are wound around them.
Sections are connected in pairs by alternately tightening the nipples
It is important to make the same number of turns with the key so as not to cause distortion. All sections of the cast iron radiator are connected in the same way. The return and supply pipes should be connected diagonally, closing unused holes with plugs. There should be a right-hand thread on one side of the riser and a left-hand thread on the other
If this does not work out, then you need to screw on the nipple, and on it a coupling with a drive
On one side of the riser there should be a right-hand thread, and on the other, a left-hand thread. If this does not work out, then you need to screw on the nipple and the coupling with the drive on it.
How to make a USB fan
But the most convenient and simple fan is an old cooler, which can also be used. For example, put it on a table, and it will cool, but not the processor or video card, but a person.
The advantages of this design are obvious: the cooler is very reliable, because it is its job to constantly turn the impeller and cool something. And it’s easy to get coolers. It is enough to either find an old computer, or order a new fan or buy it in a store.
The cooler design is simple. This is a ready-made fan in a plastic case. There are two wires coming from it (usually red and black).
Regular computer cooler
Making a USB fan takes just a few minutes:
- The wires on the cooler are stripped 1-2 centimeters.
- Take a regular USB cable, at the end of which you also need to get rid of the insulation. The standard USB cable has four wires inside. Of these, you should choose black and red. Cut off the rest so as not to get in the way, and clean up the necessary ones.
- Connect the red wire of the cord to the red one on the cooler. Black - with black. Carefully insulate areas without winding. Ready.
- All that remains is to think about the holding device. Here the already familiar wire, which can take any shape, can come in handy. Even a cardboard box will do just fine for the fan housing, but if you spend a little more effort and time, you can even build a real designer object.
Design approach to fan design
It is very convenient when the fan turns on when the computer starts. In addition, modern units have several USB outputs. It turns out that such a device will not interfere.
Another point is that sometimes you want to turn on the fan regardless of the computer’s operation (especially since a device with a cooler turns out to be quite powerful, good and useful). Then you can use adapters. For example, today they make chargers for phones that easily turn into a USB cable when the connector with the plug is disconnected. Similar equipment can be used for a fan, making it universal: operating from the network and from the USB port of any computer. Another advantage of this design is the simplest electrical circuit. A cooler-based fan can even do without extra buttons: just a wire and a plug.
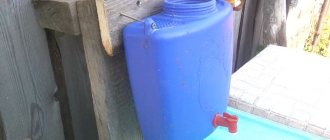
Heater made of battery and heating element
When it comes to deciding how to heat a room: electricity or solid/liquid fuel, consumers are confused by both options because of their high cost. Therefore, many are interested in the question of how to make a heater from a cast iron battery so that it is cheap and does not require special care.
Craftsmen have long been using the advantages provided by installing a heating element. Its main merit is that, with proper connection, it can easily heat small rooms, for example, a greenhouse, garage, workshop or chicken coop, without additional heat sources.
A cast iron battery with a heating element is, in fact, an effective way to autonomously heat a small room or use it as an additional heat source in an apartment in a city heating network.
A heating element is a metal cylinder with a spiral installed inside. The walls of the tube do not come into contact with the spiral due to insulation with a special filler. Installed in a heating device, such a homemade heater made of a cast iron battery has the following advantages:
- This is a reliable design, completely safe for human life.
- This device has high efficiency.
- They are simple and durable to use.
- Heating elements are almost invisible, as they are installed directly into the heating system.
- Since they are equipped with a thermostat, they help save energy resources.
- The amount of electricity it consumes is significantly lower than that of conventional electric heaters, boilers or underfloor heating systems.
- To make such a heater from a cast iron battery with your own hands, you do not need any permits. The heating element is simply mounted into the heating network pipe.
Even a person far from electrical work can install and connect the heating element. As a rule, they are sold complete with parts for installation and protection, control devices and elements for connecting to the electrical network. The heating element is simply screwed into the radiator socket and plugged into the outlet.
It should be remembered that the heating element must be installed in a horizontal position. You can turn on the device for heating the room when there is coolant in the system.
To control safety, the heating elements are equipped with double overheating protection. Control sensors are located both inside the device and outside.
Modern heating elements for connecting to cast iron radiators are equipped with two operating modes, which allows them to be used as the main source of heating, and then they are turned on at full power, or as an emergency or periodic one. In the latter case, it is beneficial to use such technology, for example, in dachas where people do not live permanently, but care must be taken to ensure that pipes and radiators do not freeze.
To make efficient heating from cast iron radiators with your own hands, you need to choose a heating element of suitable power. To do this, a calculation is made taking into account the required heating of the coolant and its quantity in the battery.
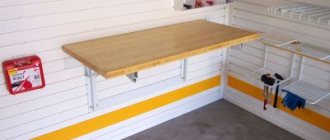
Directional heat gun
Our own heat gun has enough power to easily heat a garage, utility room or office in the house
For assembly you will need:
- a piece of plywood 16 mm thick;
- fan (duct);
- temperature and speed controllers;
- PBEC heating element (2.2 kW);
- fasteners (clamp, bracket, studs, nuts, washers);
- wheels.
We cut out a rectangle of approximately 47 cm x 67 cm from plywood, sand the rough edges and corners.
The plywood base was not chosen in vain: it is light, flat, and most importantly, it does not conduct electric current, which is important in the event of force majeure circumstances
We connect two central parts with a coupling - the fan and the heating element. We fix the resulting structure on a plywood base using a bracket and a plumbing clamp.
We select fasteners in such a way that they firmly fix the elements of the device and do not cause them harm. For example, self-tapping screws are perfect - they do not destroy plywood
Self-tapping screws (16 mm) are suitable for fastening. We install a temperature sensor (for example, TG-K 330), which is necessary to control the temperature, next to it there are two more devices - for adjusting the speed and temperature.
When connecting the parts of the fan heater to each other, do not forget about the safety of the device: the connection points of wires and cables must be insulated
Pulsar 3.6 is suitable as a thermal regulator. After installing all the necessary devices and parts, we connect them according to the diagram.
Device control circuits can be found in specialized literature, instructions for devices such as an electric fan, or on specialized websites
For ease of use, we screw wheels to the plywood base.
Small rollers screwed on the bottom side make the homemade fan heater more convenient to move around the room, especially if it is heavy.
Well, that’s all - the homemade heat gun is ready.
Try to place the device parts in such a way that, if necessary, it is easy to disassemble each of them and replace failed elements
Like any homemade fan heater, this device has disadvantages. For example, when the device is stopped, the voltage on the heating element remains, and this is quite dangerous, since overheating occurs and an emergency situation is possible. The situation can be corrected by installing a relay to timely turn off the power supply to the temperature controller. Another disadvantage is inadequate heating of the room, but this is a disadvantage of almost all stationary fan heaters.
Types of heaters
A home craftsman who wants to acquire a homemade “hot water bottle” can choose from several options:
Oil
It is a container equipped with a tubular electric heater (TEH) and filled with oil.
The main element of the heating element is a spiral made of nichrome or other material with high electrical resistance, which begins to heat up when an electric current is passed through it. The spiral is placed in a copper tube filled with sand.
The oil removes heat from the heating element, distributes it over the surface of the body and, in addition, serves as a heat accumulator (after a power outage, the device continues to heat the surrounding air for some time).
Steam-drip
In its design, a vapor-drip heater is very similar to an oil heater, only water vapor is used as a medium that distributes heat. It is formed from a small amount of water, which is poured into the body.
This solution provides two significant advantages:
- When freezing, the vapor-drip heater will not burst, since water occupies only a small part of its volume.
- Steam is an extremely capacious heat accumulator. More precisely, not so much steam as the evaporation process: it is during the transition from liquid to gaseous state that water accumulates a large amount of thermal energy, which is returned when steam condenses on the walls of the heater.
Having transferred heat to the body of the device, the condensed steam in the form of water flows to the lower part, where the heating element is installed. The power of the heating element and the volume of water are selected in such a way that rupture of the heater by steam pressure is excluded.
Due to the fact that the device body is hermetically sealed, its internal walls do not rust due to high humidity.
Candlestick
A candle flame is known to emit not only light, but also some heat.
Only it usually evaporates to the ceiling in the form of convective air currents and is “smeared” over the entire area of the room.
Why not place a heat trap above the candle? We will tell you what it is in the next section.
Infrared (IR)
Any substance with a temperature different from absolute zero emits “thermal” electromagnetic waves, which are called infrared.
The intensity of this radiation is directly dependent on the temperature of the substance. Water and oil radiators also emit IR waves, but in very small quantities because their surface is relatively cold.
To turn a metal object into an IR emitter, it is enough to heat it to a red glow temperature. If you use special materials, for example, graphite, then quite noticeable “heat” waves can be achieved at relatively low temperatures.
Knowledge of these subtleties will help us make our own IR heater, which will give us heat directly, that is, without the participation of air as an intermediary.
Other types
Since electricity is not available everywhere, structures running on gas or solid fuel have the right to life. The latter include potbelly stoves.
Choosing an installation location
The correct choice of installation location is the key to success in the enterprise of creating a water fan heater. First of all, you need to figure out how the temperature will be distributed throughout the room. The flow of hot air should not be cut off due to the architectural features of the room.
You should choose an installation location from which the heated air will be distributed as far as possible. It is worth understanding that the fan needs to be taken somewhere to create air flow, so you cannot install the future device close to the wall.
DIY assembly
So, all the starting materials have been prepared. In addition to them, you will need some plumbing tools and equipment, which will not be difficult to find. For example, if you don’t have your own, you can borrow a welding machine from your neighbor in the garage (you still don’t plan to assemble and test the product in your apartment, do you?).
Homemade heater diagram
Do-it-yourself assembly will be carried out mainly locally; you just need to pay attention to the following individual points:
- for better oil circulation, heating elements are placed in the lower part and on the sides; they should not come into contact with each other or with the body;
- if the shape and volume of the body do not sufficiently provide natural convection of liquid, you should resort to equipping the structure with a pump and electric drive;
- for emergency drainage of oil and pressure relief, it is recommended to provide appropriate openings with valves;
- the housing must be grounded;
- Before use, it is recommended to thoroughly test the device for functionality.
As you can see, constructing an oil heater yourself is not so difficult. If you take the utmost care in designing and manufacturing, it will respond to you with all its warmth in inclement weather. If assembling the device seems too complicated, you can always choose an oil radiator in the store.
What components and materials are needed to assemble a fan heater?
Before making a fan heater, you should definitely carefully study the design of such devices and consider what they consist of.
The device consists of three main elements:
- Frame. As a rule, its shape resembles a fragment of a duct air duct. Housings are made from heat-resistant dielectric, that is, pipes with a round cross-section.
- Fan. Direct or synchronous current is used in such devices. AC power of 220 W is supplied from the network or from a power supply.
- A heating element. It is a spiral that is placed in a pipe and is powered by AC voltage. A household charge is quite enough to heat a small room, garage or workshop with such a device in winter.
In order to make a fan heater with your own hands, you will need the following tools, parts and materials:
- Asbestos-cement or asbestos pipe 50-60 cm long with a cross-section of 150 mm and a wall thickness of 10 mm. You will also need an old door handle to transport the device.
- Nichrome wire with a diameter of 0.5 mm and a length of 6 m. If you increase the diameter of the wire, then, accordingly, the heating power will increase.
- Two wooden blocks, a bench vice. A handle made by hand from a steel rod for winding a spiral with a hole or slot in it for threading the ends of the wire.
- Heat-resistant micanite insulation film 2 m long and 0.5 m wide.
- An ordinary 220 W axial fan or from a computer cooler with a voltage of 12 W. The ribs of the body flange should have a size of 6 to 12 cm.
- Pliers, hacksaw, soldering iron, wire cutters, citric acid, rosin, regular tin-lead solder POS 60 or POS 40.
- Twin-core wire with a cross-section of 0.5 mm, length 5 m. Ceramic heat-resistant adapter pads - 3 pcs. Switch and plug designed for household current. Fasteners.
- Ready diode assembly, capacitance, capacitor.
Size calculation
Making your own pipe heating device is not very difficult. But there is one important point here - to correctly calculate the dimensions of the device. After all, such an indicator as heat transfer will depend on them.
Required indicators
The calculation is not easy, because it requires some criteria for the premises itself. For example: glazing area, number of entrance doors, what windows are installed, whether the floor, walls and ceiling are thermally insulated.
It’s difficult to take all this into account, so there is a simpler option that takes into account only two indicators:
- area of the room.
- ceiling height.
How can this help when assembling a homemade heating device? To do this, you will have to make a comparison with the usual MS-140-500 brand. The heat output of one section is 160 W, volume is 1.45 liters. What does this give us?
You can determine exactly how many sections will be needed if you use a cast iron device. The total volume of coolant that will fit in one battery is determined from the number of sections. And knowing this number, you can approximately determine the volume of the pipe radiator.
The thing is that the thermal conductivity of steel is 54 W/m*K, and that of cast iron is 46 W/m*K. That is, a small downward error will not have any effect on the quality of heat transfer.
Calculation example
Conventionally, we will assume that an eight-section cast-iron heating device corresponds to the above-described ratio. Its volume is 8x1.45=11.6 liters.
Now we can calculate the length of a pipe with a diameter of 100 mm, which we will use to assemble a homemade battery. The standard cross-sectional area of the pipes is 708.5 mm². We divide the volume by the cross-section, we get the length (we convert liters to mm³): 116000:708.5= 1640 mm. Or 1.64 m.
A slight deviation in both directions will not greatly affect the heat transfer. Therefore, you can choose either 1.6 or 1.7 m.
Electric spiral heater
A small homemade garage heater can be made in almost a couple of hours.
To do this you will need the following materials and tools:
- fireproof (fireclay) brick – 2 pcs.;
- nichrome spiral – 1.2-1.5 m;
- steel or aluminum corner 35x35 or 40x40 mm - 1.5 m;
- small grinder with discs: for stone and cutting for metal;
- drill with drills: for metal – Ø 3 mm, pobedit – Ø 6-8 mm;
- narrow chisel with hammer;
- rivets with a key.
The device to be manufactured will be an insulating base made of two bricks with a spiral recessed into them, located on a frame made of angle steel.
Homemade electric heater based on a nichrome spiral
A square of 250x250 mm (the length of a brick) is drawn on a sheet of paper, in which a spiral layout is arranged - a labyrinth of strips 1 cm wide, directed from the edges of the square to the center.
Bricks that are selected with good geometry and without chips are cleaned, washed, dried and placed on a flat surface next to each other to form a square. The outline of the labyrinth drawn on the sheet is transferred to this square.
An example of marking a furrow for a spiral
Using a grinder with a stone disc (a dry cutter), a furrow is formed on the bricks. Along the boundaries of the groove, even cuts are made to a depth of 1 cm, and then the core between them is selected using the side edge of the same disk - this way the bottom of the groove is smooth.
Using a grinder to make straight sections of a groove for a spiral
If you cut out the middle between the cuts with a chisel, then there is a risk of splitting the brick; moreover, if the outcome is successful, you will still have to level the bottom of the furrow with a grinder.
By forming straight sections of the groove on the bricks with a disk, at turns there is no need to go beyond the boundaries of the contour in order to create the required depth of the groove - this is carefully done with a small chisel, which can be made from an M10 tap or a Ø10 mm drill.
Finishing the corner sections of the furrow with a chisel
After the groove is formed, a spiral is placed into it.
Important! In order to be able to place containers on the heater to heat the contents, the spiral placed in the furrow must be 3-5 mm below the plane of the bricks.
In the grooves at the beginning of the “labyrinth,” two through holes with a diameter of 6-8 mm are made using a drill with a Pobedit tip for subsequent connection of the ends of the spiral to the power cable.
Places for making holes in the brick for bringing the spiral down
Then they begin to make a tripod from angle steel for installing bricks into it.
Using a grinder with a cutting disc for metal, cut a corner to size - 4 elements for the frame and 4 support legs. Corner pieces can be connected in two ways:
- electric welding, having previously cut the ends of the fragments for the frame at an angle of 45 o;
- using blind rivets, drilling holes in elements placed on top of each other.
Assembled metal stand for brick insulator
The thickness of the brick is 5.5-6.5 cm, so at both ends of the spiral we straighten several turns to even sections approximately 10 cm long. The straightened ends of the spiral are passed down through the holes in the brick and connected to the ends of the power cable.
Connecting the spiral to the electrical cable after exiting down through the holes in the brick
The heater is installed in the working position, the spiral is distributed in the groove until it is evenly tensioned along its entire length.
Perform a test connection of the device to the network. Electrical wiring and automatic line shutdown must be designed for a power of at least 3 kW.
After the device enters operating mode, its spiral should not be bright red, but brown-crimson in color.
If the coil is overheated, it is necessary to reduce the current, which is done by adding a 20-40 A diode to the circuit.
Diagram of parallel connection of two heat-reducing diodes and normal color of the spiral in operating mode
The electricity consumption of such a homemade heater cannot be called economical, but it is quite acceptable for short-term activations - minor car repairs in the garage, for a small greenhouse as an emergency means of heating, heating food, etc.
Using radiators
Selection by heat transfer
So that the radiators cope with their task, i.e. provided a comfortable microclimate, we need to purchase a sufficient number of such devices for one room.
And here you can’t do without calculations, instructions for which are given below:
The number of heating points must correspond to the volume of the room
- Power consumption depends on how much volume needs to be heated. Therefore, we need to multiply the area of the room by its height (in meters). So, for a room with an area of 25 m2 with 3 m ceilings, the required value will be 75 m3.
- Next, we multiply the volume by the standard value of 41 W/m3. This value determines the heat consumption per cubic meter of living space for central Russia. In our case, the total volume of heat will be equal to 75 * 41 = 3075 W.
For cast iron models, heat transfer is calculated per section
System installation
Installing heating radiators with your own hands is a rather complicated process, but this task is still feasible for most craftsmen.
We begin the description of the algorithms with instructions for installing electrical models:
Electric radiator under the window sill
As a rule, stationary electric heaters are mounted on the wall. In this case, for connection, either a socket located in the immediate vicinity of the device or hidden wiring for a permanent connection is used.
- In order for heat flows to be distributed evenly in the room, the battery must be positioned according to certain rules. It is extremely important to maintain the size of the gaps: from the floor - about 100 mm, from the window sill - 80 - 100 mm, from the wall to the back surface of the battery - 30 - 60 mm.
- If the radiator is completely covered by a window sill board, then it is advisable to make holes in it for the release of warm air, covered with plastic grilles. Otherwise, the bottom of the window glass will constantly accumulate condensation as the coldest area in the room.
- The installation of an electric radiator itself is not difficult. All we need to do is install the mounting brackets on the wall and hang the battery on them.
Water heating systems
With water heating it is much more difficult:
First you need to select a connection scheme. This determines how efficiently heat redistribution will take place. Possible schemes are presented in the images in our article, so during installation you must keep this information in mind.
Connection diagrams and heat losses during their implementation
- Secondly, we need to lay heating pipes. As a rule, steel or polymer products with good heat resistance are used for this purpose.
- After this, we install the radiator itself on wall or floor brackets. The heaviest batteries are made of cast iron, so the most powerful fasteners are used to secure them.
- Finally, you need to connect the radiator to the pipes. Most often, threaded connections are used here, which must be as reliable and tight as possible.
Connection fittings
After completing the installation work, it is worth testing the system
If you have not done this, then it is important to follow the announcements about the beginning of the heating season: only the first launch of a test portion of the coolant will finally demonstrate how high-quality the installation was
Work on connecting fan heaters
So, we lay two cable lines for the fan heater control circuit. We take into account the sufficient length of the cable ends to make connections conveniently.
In each room where the fan heater is installed, you need to install a remote temperature sensor.
The sensor must be installed in a place where it will not fall under the direct flow of air heated by the fan heater. In this case, it will respond to the temperature of the air in the room, and not the flow of heated air.
The connection diagram for temperature sensors is not complicated. All sensors are connected in series into one circuit.
The electric motor speed control circuit is connected, unlike temperature sensors, in parallel. This makes it possible to control the speed of all fans through the command controller.
The power supply to the fan heaters themselves, as well as to the controller, is supplied directly to each device separately.
So, I think there is no point in describing how to lay an electrical cable, so I’ll go straight to connecting the devices.
The used fan heater models (Veher EC-30) have a type of motor (electronically commutated fans with Green Tech technology), which allows you to adjust the speed without using transformers. In addition, they are much more economical. Let me explain so that there are no questions about why this or that equipment is not used.
Since there were differences in the connection diagram specified in the instructions and in fact, it was decided to first assemble a test circuit, connecting one fan heater and a command controller.
As you can see in the photo above, the cable for connecting the power supply to the fan heater has a slightly larger number of wires than shown in the diagram in the instructions. Fortunately, the colors of the wires still corresponded to the instructions.
We connect to the black and blue wires, two wires from a 220 V power supply. If there is a ground line, then connect the two-color wire to it.
We connect the wire to the blue and yellow wires, the fan heater control circuit, as shown in the photo below.
Now you need to connect the necessary wires to the controller
To do this, you need to carefully (using a flat screwdriver, for example), pry the latches of the controller case and carefully, slowly open the cover
You need to open it carefully so as not to damage the cable connecting the control buttons to the board. We connect the wires as indicated in the instructions for connecting the command controller
We connect power, a remote temperature sensor (not necessary for one fan heater, since the controller has its own built-in), control circuit to the appropriate terminals
We connect the wires as indicated in the instructions for connecting the command controller. We connect power, a remote temperature sensor (not necessarily for one fan heater, since the controller has its own built-in), and a control circuit to the appropriate terminals.
Above, in the photo, you can see how the remote temperature sensor is connected.
We connect the fan heater and controller to the network.
And, it’s done! The controller displays the parameters, the fan heater starts and starts supplying air.
All that remains to be done now is, according to the already proven scheme, to connect, instead of the temporary hut, the wiring of the control circuit and remote sensors throughout the premises. Carefully securing the wires, we connect them to the controller, which we first fix on the wall, in a convenient place we selected earlier.
It is best to connect the automation at the last stage. When the heating system has already been assembled, tested and checked for functionality. So, we immediately adjust the necessary parameters of the controller, and we are sure that water (coolant) will not get into the automation.
In our case this was the case. The only thing I swapped the description of the boiler piping with the connection of the fan heaters.
As you understand, the final material on this topic will be a description of the piping of a long-burning solid fuel boiler.
All the best, see you in new material. Vladimir Voinarovsky was with you.
The fan heater can be used as additional electric heating for home and garden. If your system cannot cope or the central heating in the apartment has not yet been turned on, such heaters can come to the rescue. But what should you do if after summer the fan heater does not turn on or blows but does not heat? In this case, you can try to repair it yourself, which is actually not very difficult. Next, we will provide the most common causes of breakdowns and DIY repair methods.
Advantages and disadvantages of oil heaters
Among electric heating devices, oil ones are the only ones that are called electric radiators. Oil heating has many advantages:
- does not dry out the air;
- radiators transfer heat mainly through thermal radiation;
- has a safe design;
- the surface almost never heats up above 50-60 oC;
- easy installation and management.
All this is true, but there are also disadvantages. The main thing is a fairly large inertia. Oil, which serves to transfer heat, has a high heat capacity. And until it warms up, the air will not begin to warm up. But this same property allows you to smooth out temperature differences when turning on/off.
The biggest problem is high inertia and low efficiency: too many heat transfer stages
The second disadvantage is that the safety and durability of the work depends on the quality of workmanship. An incorrectly designed structure can simply burst when heated, the seams are poorly sealed, and oil will leak. Therefore, buying cheap but unknown brands is a risky business.
Safety precautions
Making a heater is not difficult. It is much more difficult to save a building from fire when using homemade devices. Compliance with fire safety regulations is an integral part of any work with thermal heaters.
You should always remember:
- Do not use faulty electrical appliances.
- Such devices should not be left unattended or alone with small children.
- Caring parents always try to make sure that dangerous parts of heaters are inaccessible to children.
- If a fire occurs, immediately turn off the power supply to the device and then extinguish it. Immediately call the Ministry of Emergency Situations.
As a safety precaution, wise parents always teach their children how to properly handle thermal heaters and explain what they can and cannot do and why. By following fire safety rules and using only proven and reliable heaters, those living in the house will enjoy warmth and comfort for many years.
Algorithm for making a heater yourself;
Long gone are the days when the only way to heat a private home was a wood stove. Modern technologies and materials make it possible to choose a heating method from a variety of existing ones, but experts unanimously say that in the future, electric heating of a private home will be a priority. Everyone knows that mineral reserves are far from endless and the time will come when we will have to completely abandon gas and switch to a cleaner energy source - electricity.
Electric heating systems have a lot of undeniable advantages, and often it may simply be the only heating method available.
It is very important to think through the electric heating project at the stage of building a house, since in the future, installing equipment in a ready-made room may lead to the need for remodeling, and, as a result, to additional costs. Accurate thermal calculations must be made taking into account SNiP standards. Failure to comply with these requirements will result in increased energy costs.
Criteria for selecting the required materials
Since a homemade device is assembled from units that have already been used, first of all it is necessary to assess the condition of the pipes
Particular attention will need to be paid to their walls. Their thickness should be several millimeters
If corrosion occurs, it is undesirable to use such pipes or be sure to eliminate all defects before use. All rust will need to be thoroughly removed from the metal with a brush, and then covered with an anti-corrosion compound so that the problem does not arise in the future during operation.
For production, pipes with a diameter of approximately 12 cm are usually used. Sheet metal of the appropriate size is used to plug the ends.
To make bypass channels and fittings, you will need to use pipes of a smaller diameter, which can eventually be connected to the heating system. The threads on the fittings are pre-cut, for this reason the appropriate equipment is required - a “drill” (for creating external threads) and a tap (for cutting internal threads).
A DIY oil radiator can be made portable. In this case, small pipes will be used, and oil will be used as the coolant. Heating elements are used instead of heating elements. The choice of this component depends on the area of the room that needs to be heated. Home craftsmen often install an additional thermostat on such a device, which periodically turns the heating element on and off.
For good fastening to the wall, you will also need strong hooks that can support the weight of the resulting unit. To create a more aesthetic appearance, they can be purchased in the store. But if you don’t want to spend additional money, then strong reinforcement bars that need to be fixed in the wall are also suitable. It is advisable to first paint the hooks in the same color that was used to paint the heating device - this way the fittings will become invisible.
How the device works
A water fan heater consists of a housing in which a heat exchanger and a fan are installed.
The fan, thanks to its blades, creates an air flow that, going around the heat exchanger with circulating hot water, heats up and, accordingly, increases the temperature in the room. The main advantage of this device is low power consumption, with fairly high efficiency, ease of maintenance and the absence of parts, except for the fan, that can break. The highest fire safety makes the water fan heater an indispensable heating device for use in areas of increased explosion and fire hazard, and in places where it is not economically feasible to install other heating systems, for example, at a service station, gas station or car wash.
Making your own infrared heater
Modern IR emitters for heating homes are reliable, practical and have good efficiency. Such devices emit infrared radiation, which, without interacting with air, contributes to the rapid heating of various surfaces in the room. Thus, they effectively convert electricity into thermal energy.
The most affordable option for home assembly is an economical film heater, the basis of which is a heating film.
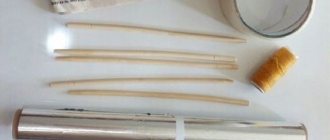
To work, you will need to prepare the following materials and tools:
- two identical pieces of glass,
- aluminum foil,
- sealant,
- paraffin candle,
- epoxy resin glue,
- electrical cord with plug,
- candle holder,
- soot cleaning sticks,
- sponge for cleaning glass surfaces.
The infrared heater is assembled with your own hands according to the following scheme:
- The glass is thoroughly cleaned of dirt and degreased.
- A conductive base for the heater is assembled. Using a candle, soot is applied to the back side of the glass blanks, acting as a kind of current conductor. Before starting the procedure, the workpieces are slightly cooled.
- Along the perimeter of the workpieces, the surface is cleared of soot using chopsticks to obtain an even edge 0.5 cm wide.
- Strips of width equal to the area of the conductive glass base are cut out of foil. They will be used as conductive electrodes.
- One workpiece is placed on a flat surface with the smoked side up, and a thin layer of glue is applied around the perimeter. Foil strips are applied to the glued surface with a slight shift beyond the edges of the workpiece.
- It is covered with a second piece on top and, accordingly, the smoked side down is pressed to set the glue. All joints are carefully treated with sealant.
- Checking the power of the finished structure. If the power indicator does not exceed 100 W per 1 sq. m of room, then the heater is connected to the network using a conductive wire and plug.
A multimeter measures the resistance of the heater's conductive base. To calculate power, use a simple formula: N = U×U/R, where
N – power, U – mains voltage (220 volts), R – resistance.
For example, R – 20 Ohm, then N = 220×220/20. The result is 2420 W. This power is enough to heat a room of 25 square meters. m.
Purpose and types of electric heaters
The purpose of household appliances is clear from the name - heating residential and other utility premises using electricity. Equipment of this type is used to organize general and local heating of various buildings and structures. The operating principle is the same for all types of heaters - the conversion of electrical energy into thermal energy with an efficiency (efficiency) of about 98-99%.
Local heating is the directed heating of part of a room in a certain area. Example: a car service technician is working in an inspection ditch located in a large hangar. Raising the temperature to 20°C in the entire building is uneconomical; to create normal conditions for the worker, it is enough to install an electric heater in the pit.
Infrared heating is used at service stations to dry cars
All heaters are divided into 2 groups according to the method of heat transfer:
- Convection. They give off heat directly to the air in the room, causing the appearance of convective currents. The colder and heavier air mass displaces the heated light air upward, causing circular circulation from the ceiling to the floor and back.
- Infrared. Thermal energy is transferred to surrounding surfaces through infrared radiation. The air is heated last, receiving heat from objects.
Due to their design features, most heaters are mixed - they give off heat in a convective and radiant way, but in different ratios. Devices that transmit 70-80% of energy by radiation are considered infrared, the rest are convection heaters.
Direct heating of air by a household appliance causes convective circulation in the room
Infrared heating devices
The group of infrared heaters includes the following household electrical appliances:
- with a tubular heating element made in the form of a lamp;
- ceramic panels;
- quartz;
- long-wave wall and ceiling;
- micathermic.
Each type implements radiant heat release in one way or another - through a hot nichrome thread, a carbon element, metal plates or artificial stone panels. In micathermic heaters, manufacturers use mica and oxides of various metals, which significantly increases the cost of the design.
An infrared heater transfers heat to the surfaces of objects
A generally recognized novelty that has recently joined the range of electric heaters is infrared film of different widths. Generates radiant heat using thin carbon elements applied to a polymer base. It is used for floor, wall and ceiling heating.
In carbon film, carbon heating elements are applied to a flexible polymer base
Convection heaters
For air heating of premises, the following types of household appliances are used:
- wall and floor convectors;
- portable fan heaters;
- oil radiators;
- modular heaters - so-called electric batteries.
The fan heater has a simple design, small size and weight
The first two varieties are purely convective heaters, releasing approximately 80% of the heat directly to the air. The principle of heat exchange is simple: a heating element made of chromium-nickel wire is blown by an air flow created by a fan impeller or due to natural circulation.
The surface of oil radiators and electric batteries heats up considerably (sometimes up to 60 °C), so a significant portion of the heat is transferred into the room by radiation - up to 40%. The rest of the energy is taken up by the air washing the numerous heat exchange fins of the unit.
Externally, electric batteries are similar to water heating devices, only they are heated by an electric heating element
Video: types of electric heaters
Homemade heaters: pros and cons
As a rule, heat generators made by hand are copies of devices produced industrially. These copies, with rare exceptions, are inferior to the originals in many respects, but due to certain circumstances, the consumer often chooses a home-made unit.
“Pros” of using homemade devices:
- relatively low cost (when made with your own hands and using improvised means);
- the ability to assemble a unit of the required dimensions and manufacture a housing with the desired strength characteristics, up to vandal-proof design.
The main argument against it is the uncertain degree of safety of homemade heating devices during operation, which is fraught with unpredictable negative consequences not only for the owner of the unit, but also for others.
This argument is due to many factors, and its validity is confirmed annually by numerous fires caused by homemade air heaters used in violation of the Decree of the Government of the Russian Federation. “On the fire safety regime” No. 390 of April 25, 2012 (as amended on November 18, 2017)
Excerpt from the Resolution on the fire safety regime in R.F. banning the use of homemade heaters
As for the secondary arguments “against”, they are as follows:
- lack of legitimate manufacturer guarantees;
- uncertainty of some characteristics of homemade devices;
- low aesthetics and degree of automation of handicraft units.
If familiarization with these arguments still does not prompt you to purchase a factory-made heater in a store, let’s consider how to make a heater yourself so that the likelihood of an accident when using it is as small as possible.
Pros and cons of heating your home with electricity
Electric heating of a private house has the following advantages:
Simplicity and ease of installation
Self-installation does not require expensive tools or special knowledge. All equipment is small in size and can be installed quickly and at minimal cost.
All devices are easily transported and moved to different rooms. A separate boiler room and chimney are also not required.
Safety
Electrical systems do not produce carbon monoxide, and combustion products are completely absent. No harmful emissions are released even if the system breaks down or is disassembled.
Low initial costs
There is no need to prepare project documentation with the invitation of special services. No permits are needed.
Reliability and quietness
Electric heating does not require regular maintenance by specialists. All installations operate absolutely silently, since the system does not have a fan or circulation pump.
Easy to use
There are no elements in the system that could quickly fail. There is no need to constantly monitor sensors and fuel levels.
System control unit.
High level of efficiency
Allows you to quickly heat a private home even in the most severe frosts. Electric heating is always equipped with a special system that makes it possible to regulate the temperature in each individual room, which can significantly save financial costs during the heating season.
Selection of materials
As is clear from the above, to obtain a homemade heater you will need to get the following components somewhere:
- frame;
- oil;
- heating element;
- mobile stand;
- control and automation devices.
As a housing, you can borrow an old radiator from a central heating system, sheet or sectional. A car, or any similar product, the design of which will allow fluid to circulate inside naturally or artificially (using an electric motor), is also quite suitable. You can also make a closed loop from steel pipes with your own hands.
The main thing is not to forget that an indispensable condition for the normal functioning of the system will be to ensure the tightness of the housing. If the liquid begins to leak, then it is unlikely that such a homemade device will bring more benefit than it will cause trouble.
As for the oil, firstly, its quantity should be based on the calculation
85% of the body volume. The rest of the cavity is filled with air. This 15% area is maintained so that during operation the oil does not crush the housing due to thermal expansion.
Secondly, the quality characteristics of the liquid must satisfy at least two criteria: purity and heat resistance. Dirt and impurities will shorten the life of the heating element by causing scale to settle on it. A decent temperature of the heating element indicates that you should select technical oil of the appropriate brand. A suitable option would be, for example, a transformer.
The number and characteristics of heating elements are selected depending on the required power of the heater (and taking into account the overall dimensions of the housing). Conventionally, we can assume that to create a comfortable atmosphere in a room with normal ceiling heights, you need
1 kW per 10 sq. m. For rooms with high ceilings, poorly insulated, located in cold areas, etc., several times more powerful products are needed.
Of course, the capabilities of the power supply network in the place where you plan to use the hand-made device must also be taken into account.
In terms of durability, it is also important to consider possible combinations of metals of the heating element and the body. For example, it is not recommended to use heaters with a magnesium anode
combine aluminum and regular steel (not stainless steel) with copper.
Installing a heating element into the heater body
Since the structure, in all likelihood, will have an impressive mass, a mobile platform on wheels, if one is planned to be included in a home-made device, must withstand the load placed on it. It can be made, for example, from rolled steel - angles, channels, etc. materials.
Switches or a rheostat are selected in accordance with the total power load of the device.
A bimetal plate (taken, for example, from an old iron) should be used as a thermostat. When choosing a setting for it with optimal temperature characteristics, you need to proceed not only from considerations of energy savings, but also from the fact that excessive heating can cause the pressure inside the case to increase to too high a level.
To better guarantee safety, an additional thermal fuse can be provided. Or a similar switch that triggers at a certain pressure.
Idea N4: Heater with a spiral
The classic version of a spiral-type heater involves connecting heating coils to the network. Heat-resistant dielectrics were used as the basis for installing the spiral in such models. But these are quite simple options, so in this article we will look at the principle of manufacturing a device whose characteristics are not inferior to a gas heater. It uses the same principle as a heat gun, but with less heat output.
To make it, you will need a heating coil, an electric fan, a metal pipe or box for the housing, a dielectric heat-resistant frame, and a power cord. The heater manufacturing process includes the following steps:
- Cut the asbestos cement pipe to the required length (in this example it will be used to make the supporting frame).
Rice. 17: Cut the pipe to the required length - Drill several holes in the pipe from different sides so that you can insert a nichrome spiral into them.
- Insert a spiral into the holes, in this example they are made in the form of a lattice, but this is not important, it is important that the heating elements have a different angle of inclination. Rice. 18: position of the spiral in the pipe
If you are assembling several pieces of spiral, connect them together on the outside of the pipe.
- Place a fan on one side of the pipe to force air flow. The direction of the blades should ensure the movement of air towards the spirals stretched in the pipe. The distance from the fan to the heating element must ensure safe operation so that the blades do not melt. For additional cooling, the fan and asbestos pipe can be separated in the housing.
Rice. 19: separation of fan and pipe with heater - Insulate the electrical connections both from the fan to the power cord and from the nichrome spiral. To insulate the spiral joints, you can use micanite tape, which is wound directly onto the asbestos surface.
- Place the finished heater in the most suitable housing. In this example, to protect against accidental contact with the spiral, an additional grill is installed in front of the pipe.
It should be noted that the fan power should not be too high so that the coils have time to warm up. In practice, you should achieve a blowing effect, and the heating performance can be adjusted by the length of the spiral. It is also advisable to coat the inside of the asbestos pipe with heat-resistant varnish to prevent asbestos particles from entering the air. It would be a good idea to ground the heater body to a ground loop.
Serial connection of light bulbs
Very easy. Simply connect two light bulbs of the same wattage in series and the voltage across each will be cut in half.
They will of course shine dimmer.
How will the power consumption of such a combination of light sources change? Measurements can be taken with a multimeter.
Let, for example, at a constant voltage of 240V, for two 100-watt light bulbs the current is 290mA.
Based on the formula for calculating power, we find that:
P=I*U=0.29A*240V=69.6W
As you can see, consumption has dropped. But at the same time, the heat dissipated per watt of power has increased.
The old Soviet reflector is in use!
A homemade infrared heater can be made from an old Soviet-made reflector. In addition to this, you will need:
- Nichrome thread;
- Steel rod;
- Fireproof dielectric (ceramic plate is suitable).
To make an IR fireplace from these things, follow the instructions:
- Remove dirt from the reflector;
- Check the plug, cord and terminals to turn on the coil (they must be intact);
- Measure the length of the spiral that is wound around the reflex cone;
- Cut a steel rod the same length as the spiral;
- Wind a nichrome thread onto the rod so that there are 5 turns for every centimeter;
- Carefully remove the rod from the nichrome winding;
- Place the spiral on a plate (another dielectric) so that the turns do not touch each other;
- Connect the ends of the nichrome spiral to the mains;
- Now the heated spiral will easily fit into the grooves of the cone from the reflector;
- Connect the ends of the spiral to the contacts.
The nichrome filament glows better than the spiral that was in the device before our manipulations. As a result, we get a powerful emitter, the energy of which is reflected from the walls of the reflector and hits opposing bodies, which begin to absorb heat.