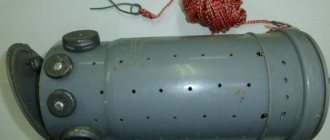
Fishing with a roller (aka fool, tug, tug, ball, twitch) is a fairly effective method for use on the current during winter fishing. It is especially effective to fish with a pull in the current, where using other gear can be very problematic or not so practical.
With the help of skating on the river, you can catch bream, roach and other white fish, while the technique of catching this type of fishing is relatively simple and is suitable even for beginners.
Do-it-yourself catchy spinning tackle “Shnyryalka”
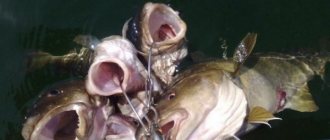
There is a category of fisherman who, on principle, do not want to fish with “standard” purchased bait. They find such fishing a boring activity and they are looking for more and more new approaches. For example, one fisherman once came up with the idea to create a unique tackle from several nuts and pen paste. To my surprise, the tackle turned out to be not only original, but also quite catchy compared to such freshwater favorites as pike and perch.
As for the name, the tackle received it due to its properties; during wiring, it “sneaks” through the expanses of water, attracting the attention of a predator.
Materials and tools: — ballpoint pen paste (preferably empty); - petal (can be cut from a piece of aluminum); — two tees (with factory rings); - a piece of wire; - two nuts; - wire cutters and pliers.
Step one. Creating the “backbone”
First you need to take the paste from the ballpoint pen and free it from the paste. To do this, remove the tip from the paste and blow out the contents. If there is another suitable tube, that would be great too. Now you need to insert the wire into the paste and bend it as the author showed in the photo.
Step three. Installation of hooks and petal
Now you need to make ears at the ends of the wire to attach the hooks. It is best to use round nose pliers for these purposes. The hooks are attached using rings. As for the petal, it is installed on the rear hook also using a ring. That's all, the tackle is ready.
If you want to improve the bait, you can use a variety of materials for these purposes. For example, to make the bait more voluminous, you can attach tinsel to it.
As for wiring, the author recommends using the same approach as for jig fishing. That is, these are small impulse jerks that will force the tackle to dart around in the expanses of water.
Source
About the size of pellets
In addition to the question of how to make a fraction, beginners are interested in what the magnitude of the charge may depend on. First of all, the size of the pellet is affected by the diameter of the hole through which molten lead flows. In addition, the heating intensity is of great importance.
For example, if a master wants to make large shots, but does not plan to widen the hole in the frying pan, then he just needs to reduce the heat a little. As a result, the lead will flow out more slowly, which will result in a larger shot.
Making a bombard with your own hands
Fishing for many people is not just a hobby, but a desired and long-awaited pastime, a way to take a break from everyday work and hide from the bustle of the city. Naturally, without a spinning rod or fishing rod, as well as a whole range of auxiliary devices and elements, fishing will simply be impossible.
One such device can be called a bombard. This is the name given to a special type of float or sbirulino, which has a certain mass, making it possible to cast the tackle much further than when using a classic float. Usually it is installed on a spinning rod, which allows you to turn it into a unique type of gear with which fishing is possible anywhere. Let's try to figure out how to make such a fishing device at home with your own hands.
What is donka
Bottom tackle is simply called donka and is a fishing line with a hook and sinker attached to it, obviously heavier than required for ordinary float or Bolognese fishing. The essence of fishing is to deliver the bait to a certain place on the bottom of the reservoir, where fish are potentially located, and wait for a bite.
Most fish that live in reservoirs look for food at the bottom, so you can catch almost all representatives of the ichthyofauna with a donk. It’s quite easy to assemble a catchy donkey yourself, but truly catchy options will require additional effort and knowledge of technology on how to properly make the preferred option for fishing with a bottom rod for the chosen fishing location.
The simplest version of equipment for fishing, which was used in the last century, is a certain amount of fishing line wound on a reel, a large load and several leashes with large hooks. The use of large hooks for bottom fishing is explained by the fact that it is initially aimed at catching large specimens.
At first glance, everything is very simple, so assembling the donk with your own hands is quite easy. You can buy already assembled versions of the bait in fishing stores, but installing bottom gear yourself is a process that will bring pleasure to a real fishing enthusiast and will allow you to take into account all the subtleties and nuances in accordance with the intended type of fish and the characteristics of the reservoir where you will be fishing.
Before you start collecting bottom tackle, you should know what the most common bait consists of:
The simplest do-it-yourself bait is a basic tackle that is easy to use and the most successful when fishing in the right place.
Over the time that the donka has been known to mankind, it has undergone some changes in design, which resulted in various variations of the traditional zakidushka.
Manufacturing
Let's consider various options for creating bombards for catching asp or any other fish.
The simplest floating, slowly sinking model is made from a large float. There is nothing difficult here at all. You simply need to increase its mass, which can be done using ordinary lead shot.
If you decide to make the item in question from foam plastic, then you will need to use a knife, as well as sandpaper to give it the desired look and shape. After this, paint that has water-repellent properties should be applied to the workpiece, and a hole should be made inside such a foam bombard. There you will need to insert a tube with good rigidity, and attach a lead bead with a hole on top. It will add heaviness to the structure. After this, the components should be attached to each other with glue, and a thread of fishing line should be inserted into the tube.
A small bombard is made from a syringe. In general, everything is very simple here: you just need to make a hole for the fishing line and everything will be ready. All you need to do is adjust the appearance of the device. The syringe will become a float due to the cavity, which will fill with water.
Now let's look at how to make the analogue, which is more difficult to create, correctly. With this solution, the body will be created from granular foaming polystyrene. The mold will consist of 150 grams of epoxy, and its body will be made of a piece of pipe with a diameter of 3.6 centimeters, made of metal and pre-cut lengthwise.
In addition, to fasten a pair of these elements you will need to have clamps on hand.
The easiest way
This method is suitable for those who do not want to bother with making a special design for casting. You can limit yourself to a few bricks or metal supports, a tin can and a container of water. Making fractions this way is quite simple. A small amount of lead is poured into the jar. Then it needs to be placed over the fire. A steel mesh is placed on the bricks, and a can is placed on top of it. It can also be hung using wire. The master decides what to do based on his capabilities. A small hole is made at the very edge of the jar through which the lead will pour out. The container with water is covered with flannel.
Equipment for a homemade bombard
Making a homemade bombard is only part of the process, because all that remains is to equip the spinning rod with it, after which you can actually start fishing. This process is, in principle, simple and consists of several simple steps. Its algorithm will be as follows:
At this point, the equipment for the homemade bombard will be completed, after which you can go to the reservoir. As you can see, even a novice fisherman can carry out the above steps.
Types of tyrants
Tackle with this name is fishing equipment, which consists of a fishing line, cord or nylon core about 50 m long, wound on a reel. More reliable is the tyrant who is mounted on a 1 meter long rod with guide rings and a spinning reel. A leader equipped with a weight and a set of hooks is attached to the main line; it is called a stake. With the help of a simple device, you can catch several trophies at once in one cast. Use it both at a specific place and on the go. The primary purpose of the tyrant was to catch sea predatory fish, but it is also practiced for the peaceful inhabitants of the reservoir.
Common differences between the options for this equipment are:
- length of undergrowth and leashes attached to them;
- sizes of hooks and their number;
- color of the bait used;
- weight and shape of the sinker;
- methods of attaching feathers.
Based on these components, there are two most commonly used types: “noticeable” tyrants and “playing” ones. The first feathers on the hooks are much larger and have shorter undergrowth. Such models perform well on bright autumn days, when the water is much darker than in the warm season. The second ones have smaller feathers and a long undergrowth. They serve well in clear water in spring and summer at dawn and before sunset, as well as in moments of complete calm.
Do-it-yourself fishing drach
Are you bored with a fishing rod on the lake? Doesn't bite? Let's fix it! Today we will make our own tackle that will not let you get bored on the pond. Tackle that you can take with you anywhere. Fishing, hiking, and even to the Bolshoi Theater. If you are not a fisherman at all and go on a weekend hike with your other half, you can always surprise and delight her with a delicious fish soup made from spontaneously caught fish in the very first forest pond. Unless, of course, your other half gets around to reading this publication first.
- a piece of wire 20-30 cm. In my case, it is copper. Yours contains any soft wire.
- pliers. Everyone has them. If they don’t exist, we take them from a neighbor.
- ball pen. In my case. In yours - door, women's, etc.
- two foam balls.
That's all we need. Now calculate the costs, taking into account the fact that the ballpoint pen, nails and pliers will not be damaged during the manufacture of the equipment.
This gear has dozens of names, but in order not to get confused, let’s call it a non-lost one .
We pick up a piece of wire with a diameter of 1 mm and hand it over to a non-ferrous metal collection point, and with the money raised...
No, wait! This is a slightly different story. Using pliers, twist a small eyelet at the end of the wire, wrapping it around a nail. We bite off the extra piece of wire and bend it so that the sharp tip does not stick out.
2.
We step back from our loop about 30 mm by eye and twist another eye at the other end of the wire.
This time we do not cut anything, but carry out the process of disassembling the ballpoint pen in order to separate the rod from its body. Then we insert the free end of the wire into the body of the ballpoint pen and begin to twist the turns.
When the required number of turns is ready, remove the wire from the body of the ballpoint pen and set it aside.
We wrap the free end of the wire around the already twisted ear and bite off the excess. Did it turn out ugly? Dont be upset! Beauty is not needed here and it will not affect catchability in any way. Moreover, the fish will not see it. Now you can see with your own eyes the size of our gear. It will even fit into a matchbox.
3.
Next we will need two small fish hooks and a piece of fishing line. In my case, it is a thin braid.
We tie the hooks to the fishing line. The fishing line goes to our wire ears. Take your time and tie the knots well. Be sure to wet each knot with water or saliva before tightening. This is done so that the turns do not heat up and fray the line when tightened.
4.
Now we have two leashes 4 cm long, tied on both sides of our tackle. We tie our main fishing line to any of the ears.
When fishing, we put a foam ball on each hook.
5.
Our equipment is assembled.
Now let’s immerse it in a container of water to make sure that our hooks float up thanks to the foam balls.
How it works?
1. The tackle is stuffed with porridge or bread, kneaded tightly and thrown into the pond. There is no need to insert hooks into the porridge.
Homemade tackle straight from the Soviet Union - 3 fishing homemade products from the USSR
These homemade products for fishing were invented in the distant USSR by our fathers and grandfathers.
At that time there was not an abundance of all kinds of fishing gear. Therefore, every fisherman was wise, inventing and making his own gear. Some of them became the very best and were used for their intended purpose more and more often.
And envious of the successful bite and catch, others adopted and prepared their own gear. This is how various popular fishing crafts came into being.
3 homemade products for fishing straight from the USSR
Today I want to introduce you to 5 of these necessary fishing devices.
Homemade interesting and simple self-cutter for donkey
In order not to miss a bite and remain with the catch when catching fish on the bottom, you should make such a self-hooking device. Moreover, it is made right on the shore in a matter of minutes.
Go! We take a piece of wire and make a ring at the top of the device, stepping back from the edge 5-6 cm, and then a diamond square at the bottom (see photo). At the very top is a hook that clings to the topmost ring on the fishing rod.
We thread an elastic band into the ring of the device and place it behind the ragulka on which the fishing rod is located. There is a bite, the hook is triggered and the fish is on the hook.
Makushatnik for catching carp and crucian carp
Again, nothing complicated - many already know about such fishing gear and successfully catch crucian carp and crucian carp with it. It is also popularly called “nipple”.
You need to melt a piece of lead from lead and drill a couple of holes in it. One more hole is needed in the top of the head. Through them we collect all the makushatnik gear.
Grandfather's homemade spinner from a spoon
Another homemade fishing product is a spoon made from an ordinary tablespoon. We saw off the handle, leaving only the “bread” or “scoop” - as you like.
We drill holes at both ends. We install one winding ring in each hole. And then we attach a tee or double hook to one, and a leash to the other.
This old-fashioned spinner still works. However, all the homemade products I presented are also used by many fishermen while fishing today.
So don’t throw them aside - maybe right now they will become the very first for you - use them to your health!
How to make a muzzle for catching fish
Fishing devices have been used for a long time. In ancient times, people were more interested in the catch and simplicity of design, rather than the fishing process itself, so traps were more in demand. Now fishing has become a hobby, but the demand for passive methods of catching fish remains. One of the most effective devices is the muzzle (muzzle, muzzle, venter, kubar, wick, top). A person may need it for various reasons. You can find a ready-made version in stores, but it will be more economical to make it yourself. Below we will describe how to make a muzzle for catching fish at home.
Description of the device
The top for catching fish is a simple design, often made in the form of a cylinder, into which necks tapering inwards are inserted on one or more sides. A weighting agent is placed in the body, which pulls the trap to the bottom, as well as a bait that attracts fish. Once inside, she will no longer be able to find a way out. All varieties of kubar work on this principle. To choose the right type, you can look at approximate drawings on the Internet, like these:
Different muzzle schemes
Tools and materials
Before you start making a kubar with your own hands, you need to decide what it will be made of.
Usually they use improvised materials that can be found everywhere:
The remaining devices depend on the selected venter option. For example, if you make it from a bottle, then in order to make holes in it you will need a soldering iron, and when working with wire you need wire cutters or pliers. You also need a prepared workplace where the face will be made.
Using a frying pan
For those who are interested in how to make fractions, we can recommend another method of casting using improvised means. Judging by the reviews, the end result is pretty good pellets of the fifth number. How to make a shotgun with your own hands? What will you need for this? Before casting shot, the home craftsman needs to prepare an old unnecessary frying pan, basin or other similar container, a magnet, tap water and lead from a cable or battery. Before you begin, a hole is drilled at the bottom of the frying pan, at the very edge. Its diameter should be 0.7 mm. Next, you need to insert a temporary plug into this hole.
You can use a nail or steel wire of the appropriate diameter. Only after completing these steps do they begin directly casting lead.
Manufacturing process
As mentioned, there are many options for top design. It all depends on the qualities required of the device. Some people want to do it quickly and simply, others need compactness and light weight, while others only care about reliability. Therefore, below we will discuss several types of muzzles for fishing and step-by-step instructions for their manufacture.
Plastic bottle trap
This option is the least expensive. All you need is a plastic bottle, fishing line and a device that can be used to make small neat holes through which water will pass (soldering iron or drill). The holes are needed to prevent an air pocket from forming inside the structure. For this type of muzzle you need a bottle with a volume of at least five liters. First, the neck is cut off. A narrow hole is cut to increase the maximum size of fish caught. The resulting part is inserted back into the bottle with the narrow half inward and secured with glue. A fishing line is attached to the resulting structure and the device is ready. All that remains is to put the weight and bait inside, and you can start fishing.
Photo of the finished top from the bottle
This type of trap is not compact or reliable, but is easy to reproduce. If you want to try catching with a homemade trap, then you can take a closer look at this option.
Frame muzzle made of wire and mesh
This option is no longer so easy to implement, but it has increased strength and the ability to choose the dimensions yourself. To make such a muzzle you will need a durable garden plastic mesh, nylon rope and steel wire.
A frame of metal rings connected to each other is created from wire using pliers to form a neck shape. All elements are held together using the same pliers. When the main frame is ready, it is covered with plastic mesh. It is secured to the structure with a rope. After this, two pieces of fishing line are tied to the trap. One is shorter (a load will be tied to it), the other is longer (to tie the top to the shore). After all these steps, the device is ready for use.
Frame top
You can learn more about how to make a top of this type, and also make sure it works in this video:
Full metal muzzle
In order not to think that some passing muskrat will bite through the net and get to the catch, you can make the top entirely of metal. Of course, there can be no talk of compactness or light weight, but this method is the most reliable compared to others. To make such a trap you will need galvanized mesh and wire. The principle of creation is the same as that of the frame top. First, rings are made, which are connected by longitudinal rods. After this, the entire structure is covered with a metal mesh.
Since the entire device is made of metal, there is no need to attach additional weight; all that remains is to tie a longer piece of fishing line to it and go after the catch.
Versha from the network
If you need the trap to take up little space, you can use a ready-made rope net to wrap it around. Otherwise, the design is very similar to the previous two. First, a frame is made from any hard and flexible material, only this time the rings are not connected to each other by longitudinal rods. This is necessary so that the top can fold comfortably. After the base is assembled, it is covered with a net. The net is attached to the frame using rope or wire. You need to carefully check all attachment points, otherwise the trap may fail at the wrong moment. Just like in the version with a plastic mesh, here you also need to tie two pieces of fishing line
Alternative way
It may be that a home craftsman does not have the opportunity to make a shotgun with his own hands. In this case, he will have to use dry reeds. It is desirable that its thickness corresponds to the thickness of the required pellets. The reed itself is carefully cut in half. First, the lead is melted in a container. Next, they fill the halves of the reeds. After cooling, the pellets are cut from the resulting lead strip. How to make fractions if there is no reed at hand? In this case, we can recommend cutting several grooves in the wooden surface with a knife. The master decides what depth they will have based on the size of the shot he wants to get. Pieces of lead, as in the first case, are first melted, and then the metal is poured into these grooves. You should get lead wire from which the shot will be cut.
Fishing tackle durilka
The many names of winter donkey do not affect its structure, which depends only on the fishing conditions, and especially the current. Differences may lie in the method of attaching the leash or the length of release of the hook with the nozzle.
The weight of the weight is between 6-8 g. It is made in the shape of a ball or olive. The leash must be secured below the weight through a swivel. Some fishermen, for a ten-meter height, tie a leash above the sinker, and instead of a hook use a phosphorescent jig.
Advantages and disadvantages of hair rigs when fishing for carp
Hair rigging on carp is in some way a necessary measure. Almost all carp reservoirs are often visited by fishing enthusiasts, which means that the fish living there are often already familiar with all sorts of equipment options and are extremely careful.
Carp, especially large ones, are initially cautious fish, and in such reservoirs with severe “pressure” - doubly so. This behavior of the carp forced us to come up with new ways of presenting bait, and this method became a hair rig, the main advantage of which is the low visibility of the hook.
What are hair accessories?
The main difference between the hair rig and all other methods of attaching the nozzle to the hook is that the hook remains free from a sufficiently voluminous nozzle, prying and the tip of the hook with this attachment does not cover anything, as a result of which the hook performs its task as efficiently as possible.
The bait also receives advantages - the shine of the sting protruding from it does not alarm the fish, and when trying to swallow the bait, the carp does not feel the tip and may not immediately suspect something is wrong, which also makes hooking more effective.
Actually, the hair in this rig is a thin cord or fishing line that attaches the bait to the hook. You can attach any bait to such a hair, although in professional fishing only boilies are used (floating, sinking, combinations thereof, and half boilies are also often used to give the bait an unusual appearance), but amateur fishermen also use it for other baits - corn, peas, and everything else that is at hand.
The mechanism of operation of such equipment as a hair rig is quite simple - the fish first detects a bait larger than the hook and tries to swallow it. The carp does not feel the hook, since it is covered by the bait, but when it feels the leash, it tries to get rid of the suspicious food. When you try to spit out the bait, hooking usually occurs, which is facilitated by the weight of the sinker - self-hooking tackle.
Choosing hooks for rigging
Fishing technique with winter tackle
The weight must be lowered to the bottom and tapped on the surface, then oscillations are performed with a nod. Next, a pull is made to the length of the fishing rod and hand. At this moment the bite most often occurs. If this does not happen, the weight is again released with the flow, and oscillatory movements are made along the way. The tackle can also be installed motionless - it will work due to the current, but maximum effectiveness is achieved according to the scheme described above.
After 2-3 unsuccessful pulls, the line is released from the reel, which allows the weight to go forward several meters downstream. Then the procedure is repeated. The length of the care can be up to 50 meters, but more often this figure is within 10-20 m. It is important to choose the correct weight of the weighting element, which will allow it to roll along the bottom.
Fishing with a baitfish involves using the usual bloodworm as bait. In spring, you can use a worm for large fish.
Additional recommendations concern holes - they are drilled diagonally, towards the flow. The tilt allows you to reduce the friction of the fishing line on the edge of the hole, which in severe frost becomes sharp like a blade.
The described technique is used in winter for catching white-eye, crucian carp, bream and many other fish. It is only necessary to make small adjustments to the preferences of certain underwater inhabitants.
Types of tyrants
Tackle with this name is fishing equipment, which consists of a fishing line, cord or nylon core about 50 m long, wound on a reel. More reliable is the tyrant who is mounted on a 1 meter long rod with guide rings and a spinning reel. A leader equipped with a weight and a set of hooks is attached to the main line; it is called a stake. With the help of a simple device, you can catch several trophies at once in one cast. Use it both at a specific place and on the go. The primary purpose of the tyrant was to catch sea predatory fish, but it is also practiced for the peaceful inhabitants of the reservoir.
Common differences between the options for this equipment are:
- length of undergrowth and leashes attached to them;
- sizes of hooks and their number;
- color of the bait used;
- weight and shape of the sinker;
- methods of attaching feathers.
Based on these components, there are two most commonly used types: “noticeable” tyrants and “playing” ones. The first feathers on the hooks are much larger and have shorter undergrowth. Such models perform well on bright autumn days, when the water is much darker than in the warm season. The second ones have smaller feathers and a long undergrowth. They serve well in clear water in spring and summer at dawn and before sunset, as well as in moments of complete calm.