Furniture
0
13 792
Share
Despite the fact that furniture plywood is an environmentally friendly and wear-resistant material, it is quite difficult to find a finished kitchen made from it. But what prevents you from assembling the headset yourself? We prepare a kitchen project, make drawings of plywood furniture, pick up the tools and start manufacturing. Such an environment will be pleasant at the price and will last a long time - about 20 years. And you don’t have to adjust your headset to the standard sizes of manufacturers. A kitchen made of plywood with your own hands is not made quickly, but every centimeter of it turns out to be as functional as possible.
You can make furniture from plywood sheets yourself
- Which plywood to choose for the kitchen
- Kitchen measurements and design project
- Preparation of materials and accessories: plywood sheets and more
- Tool preparation
- Preparing parts
- Making a headset: assembling the frame and beyond
- DIY tabletop
- Making a dining table
- Summing up
Which plywood to choose for the kitchen
Plywood is glued together sheets of veneer, of which there is always an odd number. Wear resistance and strength are achieved by placing the fibers of each sheet in different directions relative to each other. Usually birch or coniferous wood is used, while the inner part can be coniferous (GOST 3916.2-96), and the top made of birch veneer. Hardwood plywood (GOST 3916.1-96) is considered to be of higher quality and costs more.
Material classification
There are several parameters by which the material is classified:
- Brand - determines moisture resistance and scope of application. Main types of FC, FSF, FKM, FOF, FBA
- Grade - determined by the appearance of each surface. The letter E denotes the highest quality, then there is a decrease from grade I to grade IV. The grade is determined separately for the face and the back - 1/1, 2/2, ¼ and other combinations
- Surface treatment - unsanded plywood is marked with the letters NSH. If there is one sanded side - Ш1, if both sides have a polished surface - Ш2
- Formaldehyde content - the letter E with an index in the range 1-3 indicates the environmental friendliness of the material
Plywood for the kitchen must be free of formaldehyde.
To make a kitchen set from plywood with your own hands, choose sheets with average moisture resistance and no formaldehyde.
More about brands and sizes
Let us give a brief description of the main brands of plywood so that you can immediately see which of them is suitable for making furniture and which is not:
- FC - adhesive composition based on urea resins, average moisture resistance, used for interior work or furniture making
- FSF - usually used for outdoor work, moisture resistance is high. Formaldehyde resins are used as glue, so furniture is not made from FSF plywood
- FKM - synthesis of FK and FSF, veneer sheets are glued with melamine resins, suitable for any work, characterized by high moisture resistance and strength
- FBA - albumin casein glue is used to join sheets; the material is highly environmentally friendly, but has low moisture resistance
- FOF - laminated plywood. The material is covered with a film of various colors, is used in construction and furniture production, and is more expensive than other materials
It turns out that plywood for furniture is selected from materials marked FK, FKM, FOF. Standard sizes of sheets are given in table No. 1.
Table No. 1
| Brand | Width, mm | Length, mm | Thickness, mm |
| FC | 1525 | 1525 | 3 4-10 (in 2 mm increments) 9-30 (in 3 mm increments) |
| 1500 | 1500 | ||
| FKM | 1220 | 2440 | |
| 1250 | 2500 | ||
| 1525 | 3050 | ||
| FOF | 1220 | 2440 | 4, 6 9-30 (in 3 mm increments) |
| 1250 | 2500 | ||
| 1500 | 3000 |
What to make kitchen furniture from
When choosing plywood for furniture, attention is paid to the following indicators:
- Quality of gluing, wood
- General view of the sheet
- Wood species - deciduous is more resistant to temperature changes and high humidity
- Country of origin - preference is given to Russia, since Chinese materials do not have the necessary environmental friendliness, and Finnish plywood is too expensive
Taking into account the standard size of a plywood sheet, the properties of the material, quality, grade and price, the FC brand becomes the optimal choice. The selected grade is ½, sheet size 1525×1525 with a thickness of 6, 12 and 18 mm. You can make plywood products with your own hands from laminated sheets, but the cost of the material differs significantly from the FC brand.
Laminated plywood will help you build a beautiful kitchen
Why plywood?
Plywood for a kitchen unit will be the most attractive option for a number of reasons:
- Persistence. Due to high humidity, constant temperature changes and increased air circulation in the kitchen, ordinary wood will suffer, crack, warp, dry out or swell. Plywood is impregnated with glue and, if you choose the right type, it will withstand daily cooking for at least a dozen years.
- Ease of processing. Plywood is easy and pleasant to work with. Even with a minimum of skills, you can independently cut and assemble all the elements according to the drawing if you have the right tool.
- Cheapness. Even the highest quality furniture plywood and related materials (fasteners, corners, handles, etc.) are very inexpensive.
- Style. Even without special finishing and processing, a kitchen made of plywood will look good due to the natural wood texture, and if you have imagination, it will fit perfectly into any interior.
By the way! Plywood kitchens are rarely sold in domestic furniture stores or offered to order in workshops. This is a feature of the domestic market, but by making a kitchen out of plywood with your own hands, you can surprise your relatives and friends!
Kitchen measurements and design project
Accurate measurements plus a verified sketch of the headset will allow it to be manufactured with high quality and reliability. The main advantage of such furniture is the individuality of execution.
When making a kitchen set yourself, you should take into account ergonomic standards, the height of the housewife, the geometry of the kitchen, and the wishes of family members
Stage No. 1 - kitchen measurements
The dimensions of the room are measured taking into account protrusions, niches, and passing communications. The parameters are transferred to a sheet of graph paper in accordance with the scale. Instead of drawing by hand, using computer programs to create 3D sketches is suitable.
Stage No. 2 - sketch development
An initial version of what a plywood kitchen looks like, taking into account the arrangement of household appliances, is being worked out. Then the specific dimensions of the furniture sections - cabinets, shelves, drawers - are thought out. Taking into account the individual characteristics of the project, adhere to the developed ergonomic standards for kitchen furniture (Table No. 2). Dimensions are given in centimeters.
Table No. 2
| Floor cabinets | Wall cabinets | ||
| Height | 85 (including countertop) | Height | 70 |
| Width | 60-80 | Width | matches floor |
| Depth | 45-50 | Depth | 30 |
Additional sizes:
- For drawers, a width of 30-40 cm is suitable
- Plywood shelves are placed at a distance of 30 cm from each other
- Shelf width = cabinet width - 36 mm (frame is made of 18 mm sheet)
- The distance between the upper and lower tiers is 45-65 cm
Please remember that these are approximate dimensions and may be adjusted depending on specific circumstances.
Stage No. 3 - drawing up a design project
The sketch is complemented by the verified dimensions of cabinets, cabinets, drawers, and shelves. Additionally, the dimensions of the facades are calculated taking into account technological gaps. An individual calculation is carried out for each furniture unit. The drawing of the modules is made in two projections, indicating the dimensions, dimensions of technological holes and grooves. This will help you choose the dimensions of the plywood sheet to minimize the cost of purchasing materials.
Kitchen design made of plywood can be the most fantastic, it all depends on your imagination
Preparation of materials and accessories: plywood sheets and more
Let's consider which plywood, fasteners, and accessories to choose.
The sizes of plywood sheets that need to be purchased depend on the elements being manufactured:
- Thickness 18 mm - used to assemble the frame; for cabinets, shelves are cut from plywood of the same thickness.
- Thickness 12 mm - selected for the manufacture of facades of floor cabinets.
- Plywood thickness 6 mm - suitable for wall cabinet doors that are reinforced with stiffeners.
Fasteners
The next step is to decide how the parts will be attached to each other. As experience shows, when making furniture from plywood with your own hands, it is enough to use only screws. Plywood sheets do not delaminate, do not crumble, and hardware does not come loose in the holes. Using furniture minifixes to fasten elements at home is more than problematic, since the highest precision in cutting holes in three planes is required. Having an accurate drawing, you can contact specialized workshops to make holes.
Be sure to make a drawing and then you will understand how much material and what shapes you need
So, to connect the parts you will need:
- Screws, minifixes or confirmats - European screws with a countersunk head
- Glue, silicone sealant
Fittings and finishing
This includes handles, hinges, closers, decorative plugs, if minifixes are not used. It should be remembered that kitchen furniture made of plywood is not overloaded with fancy fittings.
For painting you will need putty and paint, for pasting with film you will need putty and self-adhesive. Furniture can be covered with stain and varnish.
Preparing the details of the future kitchen
When you have prepared the project and purchased everything you need, it’s time to turn the sheets of plywood into elements of your future kitchen. To do this, you can take the sheets to a specialized workshop for a small fee, or if you have the necessary tools, you can do it yourself:
- Mark the outlines of future elements.
- Saw sheets of plywood into blanks.
- Clean the resulting workpieces with sandpaper and sand them further.
- If you plan to paint or cover with film, then it is advisable to additionally treat the workpieces with putty and sand them again.
Tool preparation
The kit depends on how you plan to cut plywood. It is recommended to do this in a furniture workshop, since the process requires high precision and the presence of a plunge-cut saw with an attachment for cutting sheet materials. To assemble the furniture you will need:
- Cordless screwdriver or screwdrivers, drill, drill set
- Hammer, chisels, files, chisel, plane, hammer, mallet
- Plunge saw, jigsaw, hacksaw
- Tape measure, ruler, square
A standard set of tools should be in every home
Making a headset: assembling the frame and beyond
To make furniture from plywood, you will need to assemble a frame, hang doors, install shelves and drawers.
Plywood has sufficient strength, so timber is not used to assemble the frame. The parts are marked for screws or confirmations. Using a special stepped drill, holes are made with threaded and non-threaded parts, and a recess for the Euroscrew head. For a regular screw, countersinking is carried out with a drill of a larger diameter. Fastening from the front side is carried out using minifixes, then there is no need to install decorative plugs, but euroscrews are also suitable.
Before tightening the parts, the ends are coated with silicone sealant.
Headset assembly
The kitchen set made of plywood will be finally ready when the doors are hung on the frame, shelves and drawers are installed. The holes for the fittings are marked and drilled in advance, and the guides for the drawers are installed before the frame is assembled.
Assembling the headset requires care and painstaking approach
The doors are made of 6 mm thick sheets, and stiffening ribs give them stability. To cut out plywood shelves with your own hands, take material 18 mm thick. The front edges are chamfered, the sections are puttied or sanded for painting or covering with film. When processing with varnish, sanding is sufficient.
When covering your headset with self-adhesive film, give preference to expensive and high-quality material - Chinese film does not stick well and looks bad
Furniture made of laminated plywood has an ideal look - a variety of shades allows you to choose a material that suits a specific design.
How to do it?
Material cutting
The main advantage of this material is its easy workability. Smooth sheets are easy to saw, sand, and join. There are a number of recommendations that will allow you to get a much better result:
- Before cutting with household saws, you can stick thick masking tape or screw thin plywood onto the cutting line. The saw teeth are capable of chipping wood fibers, and the cut will be “ragged.” If the fibers are pressed, the cut will be clear, the fibers will not chip;
- Marking lines should be as thin as possible. You can use a marking cord or a finely sharpened pencil. The cut is made so that the line remains visible from the side of the finished part;
- If you have a ready-made project, it is better to cut the plywood on a sawing machine in a specialized company. When designing, you can think about how the parts will be cut out - this will save the usable area of the sheets, and will also allow you to avoid troubles when purchasing, when you have to buy a whole sheet for the sake of a small shelf;
- Tenon or miter joints can be sawed either manually or using CNC machines. Inquire about the presence of enterprises with such equipment; cutting on such a machine will improve the accuracy of the part and make any curved cuts;
- the ends after cutting can be sanded, rounding the edges, or processed with a manual milling machine if desired;
- in places of future fasteners on thick parts, you can make “plugs” from wood or anchor compounds. A place in the end is drilled out, a soft dowel lubricated with glue is hammered in, or liquid polyurethane anchor compound is poured. The hole should not exceed 1/3 of the thickness of the plywood. This technique will increase the strength of the perpendicular joint; it will be possible to put a larger load on the shelf.
Assembly
Having a detailed drawing will make this stage much easier - you can only keep simple dimensions and parameters in your head .
Before assembly, you should lay out the parts on the floor and sign them with self-adhesive paper and a felt-tip pen.
As a rule, assembly begins from the main perimeter - load-bearing walls, ceiling and bottom. If there are several walls, be sure to assemble them at once. The help of a partner, clamps, and a jig for adding holes will help make assembly easier.
After assembling the perimeter, be sure to check the perpendicularity of the surfaces; if it is rectangular, you can check the diagonals. We secure it with temporary bevels on the back side.
We “clog” the structure with shelves and nests for cupboards. After this, we attach the back wall - it will give shear rigidity.
We put the cabinet in place, assemble the cabinets, shelves, hang the fronts and other planned fittings - mirrors, hooks, handles, legs, plugs.
Important . The cabinet should stand level, not swing on its legs, and the doors should open and close easily.
Finishing
To finish the cabinet, you will have to disassemble it again - remove drawers, fronts, hooks, mirrors and shelves.
Surfaces are sanded manually with sandpaper or sanding machines. It is better to do this in several stages, reducing the abrasive grain by 50%: No. 180 - No. 240 - No. 320. The movements of the sandpaper when sanding by hand should follow the grain of the wood - this way, scratches from accidentally trapped grains of sand and coarse abrasive are less noticeable.
Plywood with thick face veneer can be fired or wire brushed. This will add a vintage feel, making the coating “older” and more prominent. This treatment is suitable for finishing hardwood veneer - oak, ash, hornbeam, birch.
The smooth surface of plywood can be coated with various coloring compounds:
- oil-wax .
Gives a natural look and withstands tinting. Not suitable for saturated colors, used in designs that preserve the appearance of wood. The oil impregnates the top layer of wood, protects it from moisture, but the wood itself will absorb mechanical loads (scratches, abrasions). It is practically odorless and can be used when working “on the balcony” or in an apartment. Easy to apply and rub in with a rag. It is important to know that it is better to burn rags after oil, otherwise they can spontaneously ignite at any moment; - tinting + varnish . Suitable for “glazing” wood while maintaining its natural appearance. It is better to use tinting based on solvents with a high dry residue - nitrobes. They give a uniform, rich color, do not raise the pile, and are easy to apply. Minus - pungent odor during application, if there is no workshop;
- opaque enamels for wood .
They create a protective film that completely covers the grain of the wood. There are different types of materials that differ in properties and application technology. Oil-based pentaphthalic paints are popular, but they are short-lived. For furniture, it is better to use nitro enamels or acrylic varnishes - they are absorbed into the upper layers of wood and do not “snap off” over time. Impregnation will help reduce paint consumption - impregnation of plywood with inexpensive compatible bases (primer, drying oil, oily solvents); - combined options . Using masking tape, you can finish unpresentable ends with opaque paint, and treat beautiful veneer surfaces, for example, with oil or clear varnish. The “game” of imagination when using different colors adds uniqueness to the product.
DIY tabletop
A work surface made of laminate looks great. It’s easy to implement an economical option yourself by choosing a coating to match the headset or playing with contrast. The joints of the panels must be coated with sealant to avoid the harmful effects of moisture on the laminate. The front edge is closed with a decorative metal corner.
The high moisture resistance and dimensions of laminated plywood also allow it to be used as a tabletop. The film reliably protects the material from the penetration of liquids, and the edges are impregnated with a moisture-repellent composition.
Making a dining table
To give your kitchen a finished look, try making your own rectangular shaped plywood dining table with two wide legs.
A plywood table can be made of absolutely any shape
To do this you will need the following supplies:
- Plywood for the tabletop - sheet 80×120 cm, thickness at least 18 mm - 1 pc.
- Horizontal strapping - plywood strip 15×110 cm - 1 pc.
- Tabletop and leg supports - timber with a section of 7.5×20 cm and a length of 68.7 cm - 2 pcs.
- Table leg - timber with a cross section of 7.5×20 cm, length 60.0 cm - 2 pcs.
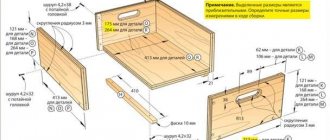
You will need to work on every detail to make a plywood table.
Supports for table top and legs
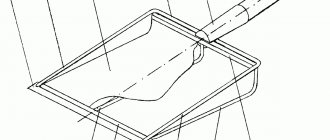
The beam is sawn lengthwise, resulting in 4 pieces measuring 7.5x10x68.7 cm. The elements that are adjacent to the floor are shaped into legs. Marks are placed at a distance of 20 cm on each side, between which an arched line is drawn with a maximum height of 5 cm. The outer part of the support for the legs is rounded or left rectangular.
In each tabletop support, a part of a rectangular block is cut out in the center to a depth of 40 mm - the table leg should fit into the recess. The outer edges are rounded.
Table legs, horizontal strapping and table assembly
The legs are left rectangular or given a curly shape. A horizontal strap holds them together, and the part is chamfered.
After sanding the workpieces and treating them with an antiseptic solution, a plywood table is assembled:
- Connect table legs to tabletop supports and floor elements
- Tighten the structure with a horizontal strap, installing it between the legs
- Place the tabletop, tighten it with screws from below through the supports - you will need at least 4 screws on each side
All parts are fastened together with euroscrews, the caps of which are closed with plugs. The table is coated with varnish that dries for 36 hours.
WATCH THE VIDEO
Decoration
After painting, the furniture is assembled and installed in place. The use of decors - patina, overlay elements, panels, metal corners - will help to give a complete appearance.
Most often, the appearance is spoiled by multilayer ends ; they can be sealed using U-shaped profiles made of plastic or aluminum, self-adhesive melamine tape with a wood pattern, or paint.
If you are considering making cabinets from other materials, we recommend considering furniture board, chipboard, plasterboard and cardboard.
Summing up
Preparing materials, furniture diagrams and drawings, and directly assembling a kitchen from plywood is a painstaking but interesting task. The headsets are durable and beautiful, the release of harmful substances is minimized. Self-manufacturing of the design allows you to take into account the nuances of a particular room and the individual characteristics of family members. If the set is a complex structure, then the table can be assembled in 1 day. Try to start with this to understand how plywood behaves and what skills will be required to make more complex structures.