After the renovation, you still have an old gas stove and it’s a pity to throw it away? You can, of course, take her to the dacha or throw her away. But let's not rush. So: What can you make from a gas stove with your own hands? Let's figure it out.
I recommend articles:
What can be made from a ballpoint pen. 8 ideas for crafts made from fountain pens.
What can you make from an old door with your own hands? 18 crafts.
6 ideas. What to make from an old kettle with your own hands?
Stationary barbecues
A stationary barbecue is made in different ways, although such differences are not significant.
First option: minimum welding
This option can be implemented if there is a sheet of metal on which the entire pattern can be placed, both the bottom and the walls. Excess elements are cut out using a grinder, after which the bends are also cut to a small depth with a grinder to make bending easier.
We start everything by drawing dimensions on a sheet of metal, then cutting out the extra corners
After the sides have appeared in the grill, they should be secured using electric welding, using a welding machine of any design. Even a novice welder can handle this job, since no sealing is required. Even if some kind of hole appears, it will only be beneficial: oxygen will flow to the combustion site. By welding the seams in 4 corners, you get a kind of box.
Bend the workpiece, then weld the seams
If too thin metal is used, about one and a half millimeters, then the bottom and walls may warp under the influence of high temperature. To prevent this from happening, the structure is reinforced with corners or a profile pipe.
All that remains is to weld the legs using corners or pipe sections. In the photo you can see how pipe legs are welded to a metal grill. The collapsible barbecue is assembled according to the same scheme, but it is necessary to accurately select the dimensions of the pipes so that the connection is tight and reliable
This is very important, since an unstable structure will not improve the process of preparing barbecue outdoors
How to attach pipe legs to the bottom of a metal grill
Corner legs are a simpler option, especially for a stationary structure. They are simply welded in the corners of the box, especially since they fit perfectly together. The same can be said about the profile pipe. By the way, it is easier to use a profile pipe in a collapsible barbecue, since it is more technologically advanced compared to an ordinary pipe.
As legs for the barbecue, you can use an iron corner or a small-section profile pipe
Second option: using welding
If you have pieces of metal, you can make a grill only using electric welding. All pieces of metal are adjusted to certain sizes, cutting off the excess with a grinder. This option requires higher quality welding, since the entire structure will be held together by welding seams.
The second way to make a metal grill with your own hands is to cut all the necessary parts for the box and then weld
The manufacturing sequence is the same, therefore, after welding the box, they begin to attach the legs, also by welding, if the structure is not collapsible.
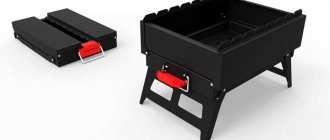
DIY barbecue with removable legs
Watch this video on YouTube
Third option: using a frame made of corners
When making such a structure, the sequence of making the barbecue is somewhat different, since first of all, a frame from corners (pictured on the left) or a frame from a profile pipe (pictured on the right) is welded. This design is more durable. The manufacturing sequence is as follows:
- The frame is welded.
- The bottom is welded, and then the walls.
If the structure of the barbecue is stationary, then it can (even should) be supplemented with a frame in the form of a tabletop, where you can place skewers and more. The photo below shows just such options. To do this, it is enough to strengthen the upper edge of the fryer using a profile pipe. As a result, there are holes along the edges of the roasting pan into which you can insert additional elements, in the form of a grid for skewers or in the form of a solid stand, on the other side, on which you can install a frying pan, saucepan, etc.
Homemade metal grill with options: table and stand for skewers
There is an option for a more substantial design, which includes not only a grill, but also a cover, a rack for skewers and a tabletop. This option looks great. The advantage of the design is that it can be welded by a novice welder. Alternatively, you can practice welding technology on such a structure. Excellent, both the idea and the execution.
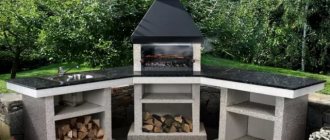
Homemade barbecue under a canopy with a “kitchen” corner
There is another simple option - making a barbecue from a gas cylinder.
DIY barbecue from a cylinder in 2 hours! DIY idea!
Watch this video on YouTube
Rules for safe operation
When working with gas equipment, do not forget about the rules of safe operation. Improper use of the cylinder may result in an explosion or fire.
In addition, homemade gas stoves are devices that pose a hidden threat, so you need to be as careful as possible when working with them. Even at the stage of constructing a homemade product, you need to take care to do everything exactly according to the instructions.
You should also not neglect checking the connections, since even the slightest leak can lead to dire consequences.
The most common way to check gas equipment for leaks is to lubricate the connections with soap suds. If it does not bubble, then the equipment is in good condition and you can start using it.
If you are not sure that you can make a really high-quality device, then it is better to purchase a gas stove in a store. Factory devices are subject to mandatory certification and control, therefore they are much safer to operate.
Why gas?
Gas heating stoves for the home have many advantages. First of all, this is the affordable cost of natural gas itself. Maintenance of a liquid fuel device is cheaper than a solid fuel unit with similar power and functionality.
The advantages of this fuel also include:
- There is no need to load or prepare fuel. To start heating, simply turn on the heater;
- Warming up of the premises reaches its peak already 1-2 times after switching on. While to warm up a room using a wood-burning fireplace with your own hands, it will take about 3-4 hours;
- The particular effectiveness of such devices is achieved when installed in a bathhouse;
- A gas cylinder lasts for a long period of use, unlike coal or logs.
biofireplaces are safer, but less efficient than gas variations
Main tasks of the divider
The divider protects the dishes from contact with the open flame of a gas burner. It looks like a metal single- or double-layer disk with small holes around the perimeter. Its functions include uniform distribution of gas, which entails more efficient use of it. The best material for a divider is stainless steel. Black metal quickly loses its original appearance, becomes covered with rust and stains from the juice of vegetables and other food.
- Prevents the handles of the cookware from overheating during the cooking process (this is especially true for small pots and ladles).
- Thanks to the divider, you can use ceramic and glassware.
- Even small containers will remain stable on the burner and will not tip over from a strong flame, which means they will not flood the fire with their contents.
- The dish will be evenly heated during the cooking process, which will make it perfectly fried or boiled.
- Regardless of the material of the cookware, milk and porridge will not burn to the bottom of the pan during cooking and boiling.
- Due to the divider, the flame power will be significantly lower in relation to small dishes.
- The divider allows dishes to infuse even after turning off the gas, thanks to slow changes in heat flow.
- Cooking over low heat is safer. This mode is suitable for cooking jams, preserves, etc.
Smokehouse with smoke generator
Making such a smokehouse is a little more complicated than previous options. At the bottom of the side wall you need to make a hole for supplying smoke. There should be holes on the top of the opposite side to allow smoke to escape. Detailed instructions for making a smoke generator with your own hands can be found on the Internet. The principle of operation is as follows: wood chips are poured into the structure of the smoke generator and set on fire. The air, supplied by an air compressor connected to a generator, inflates the wood chips and the smoke is supplied inside the smokehouse. In this case, you can regulate the air supply, thereby improving the taste of cooked products.
Summarize. How many interesting things can be made from old objects that, it would seem, could have been gotten rid of. By using your ingenuity, you can do a lot of interesting things, as well as refine existing options.
Source of the article: https://sdelat-iz-starogo.ru/chto-mozhno-sdelat-iz-staroy-gazovoy-plity/
How to choose a barbecue oven
Most people consider a barbecue grill and a barbecue roaster to be exactly the same in design and operating principle. In most cases, for homemade metal structures this is an absolutely fair statement. Masters do not particularly attach importance to the intricacies of arranging barbecue grills, whereas for true connoisseurs and admirers, all the nuances and secrets of the design of “branded” braziers are extremely important.
How does a barbecue oven differ from a barbecue box?
There are two fundamental differences.
Firstly, despite the similar principle of operation and general structure, the grill and barbecue roaster are slightly different in the operation of the combustion part. Accordingly, the generated heat affects the cooked meat or fish differently, resulting in a different final effect. In a barbecue, food is heated by the combustion products of wood and partly by the heat of hot coals. In a barbecue, the main heating and cooking occurs due to radiation, since the flow of air to the burning surface is much less organized and directed towards the interior.
Secondly, in a barbecue the process of heating the product is much softer, the main part of the heat is spent on heating the metal and coals, and the use of a grate allows cold air to flow around and simultaneously cool the fried surface. What this means for the process of cooking meat can only be explained by a chef who specializes in baking meat and fish dishes. Moisture and fat remain inside the product and are not carried away with a stream of hot gas. For a barbecue, cooking a juicy steak on a metal grill is not particularly difficult; on a barbecue, to obtain a similar result, the product will need to be wrapped in metal foil.
The classic design of a barbecue roaster involves the presence of a metal bowl in which charcoal is lit and smoldered. In older versions of barbecue, instead of coal, ordinary firewood was used, which was piled up in metal containers and burned to the state of coals. As soon as the volume of burning coal filled the metal container to the brim, a metal grate or just a few steel rods was installed, and the cooking process began.
To get a similar effect in the grill, you have to constantly turn the skewers with meat and try very hard not to dry out the baked product, and at the same time thoroughly fry it.
BBQ grill design
The classic barbecue device involves the use of a round bowl made of metal or stone, over which a metal grate is installed; it is better to choose a nickel-plated one, but you can also use a regular one welded from thick steel wire. Modern designs of metal barbecue roasters, as in the photo, have special heating glasses in the bottom of the cauldron.
The air entering through the glass burns part of the coal, after which the combustion products flow through the metal walls and are removed outside. Thus, you can maintain the high temperature of the coals and the container without tedious fanning with a metal fan, as is the case with a barbecue.
There are no small details in a metal barbecue; each design element serves its own purpose.
Before choosing plans for a barbecue to build yourself, pay attention to two main features of metal construction:
- In the design of the brazier, the metal grate should have an adjustable installation height, from the highest position at the cut level of the cauldron to the lowest position - 4-5 cm below the edge of the container;
- Barbecue experts and connoisseurs advise equipping the roasting pan with a removable protective side that covers the leeward part of the fireplace, which avoids splashes of fat, smoke and coals on your hands and clothes;
- A hot barbecue roaster should be, first and foremost, safe, so the heavier and more stable the container with hot coals, the less chance of getting burns.
For your information! To avoid burns, the side surfaces of rectangular barbecues are often lined with metal screens.
In exclusive versions, the furnace structure is installed on a steel or ceramic base fixed to the ground. For mobile and portable structures, the supporting legs of the furnace are fixed to the ground using special metal pegs.
Metal smokehouse made of stainless steel
The main advantages of a stainless steel smokehouse are a long service life and safety of use. Its size depends on the user's needs for smoked products. To provide delicacies to a small family, a rectangular compact device will be sufficient. To supply a large family with smoked meats, the smokehouse must have an impressive size.
Case manufacturing
To make the body of the device, you will need sheets of stainless steel suitable for cooking, for example, AISI 304. If you use an old grill made of the same metal as a base, then all that remains is to close the extra holes, make a lid and grooves.
Photo 3. A shape cut out of sheet metal with dimensions of 300x300x400 is quite suitable for the body of the smokehouse.
Algorithm for making a smokehouse:
- Sheets of material are cut in accordance with the selected dimensions of the device.
- The parts are welded together.
- Grooves for the grille or grilles are fixed inside the housing.
- A lid is made from sheets of steel, equipped with a handle and a small hole for smoke to escape.
- There are grooves for water under the cover inside the device.
How to make a lattice
The grille is made of unpainted wire. A frame is made from it, the size of which corresponds to the internal size of the smokehouse. Pieces of wire are fixed to the frame at a distance of 4 cm from each other. All grating parts are welded together.
Assembly
A tray with sawdust is placed inside the smokehouse, a tray is fixed onto it to collect fat from the products, and a grate or grates are installed on the grooves. The grooves are filled with water. This smokehouse is placed on an open fire.
To do this, dig a hole 40 cm deep. Its width and length must correspond to the dimensions of the smokehouse. Next, it is laid out with refractory bricks. Next, fuel is placed here, the smokehouse is lit and installed. It can be used even in an apartment. For this purpose, the device is placed on the stove and left for cooking.
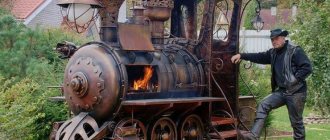
Second life of an old gas stove
Home craftsmen have always been famous for their ideas; they have learned to benefit even from a gas stove. If it is not in working order and there is no way to dispose of it, and you cannot simply throw it in the trash according to the law, we offer several DIY options.
Only special services should dispose of the stove
Gas stove cabinet
To do this, you need to refine the facade and side walls. First of all, remove the old paint, clean it and apply a new coat. Any colored aerosol intended for painting metal surfaces will do. Or you can use the decoupage technique, you will get a rare thing that will immediately attract attention.
First, before starting work, you need to dismantle the burners and close all the holes. The thermal insulation in the stove is quite good, so it is quite possible to store various cereals, flour and sugar in it on the balcony or at the dacha.
Using a can of spray paint you can give the surface any shade.
Waste incineration container
Ash in summer cottages is worth its weight in gold; it is an excellent mineral fertilizer for feeding many crops. When burning garbage on a regular fire, it is quite difficult to collect the ash later, and there is not always room for this. Therefore, a special waste incinerator will come in handy.
For this purpose, preparatory work is carried out.
- The burners, all pipeline elements, thermal insulation and plastic parts are dismantled.
- The glass is removed from the oven door and replaced with a regular sheet of tin.
- A hole is cut out on the back panel and an elbow with a pipe is inserted into it.
- Under the oven you need to assemble a grate from bricks and grates.
This creates a simple and completely safe waste incinerator for a summer residence, on the top surface of which you can heat water while burning waste.
Ash is an excellent plant food
Gas stove grill
In order to make a barbecue from a stove, it will take a little more effort. First you need to carry out all the manipulations, as for the incinerator, and additionally cut off the cooking surface.
- In place of the panel, install a grill, which can be taken, for example, from the gas stove itself or from an old refrigerator. Subsequently, skewers with meat, fish or vegetables will be placed on it.
- On the back wall at the top of the oven, cut a hole with a diameter of about 100 mm, into which a metal pipe should then be inserted.
- Make several holes in the utility drawer under the oven for ventilation.
- Leave 1 baking sheet in the oven and place a grate above it on which the wood will burn.
- After the wood burns, the coal will fall onto the baking sheet, which is then easily cleaned.
If the grille is larger than needed, you can trim it yourself.
The simplest design of a barbecue
DIY smokehouse from an old gas stove
Dishes prepared in a smokehouse have a unique taste that is loved by many.
For a future smokehouse from an old gas stove, you will need many of its elements:
- you will need a wire rack to store food;
- a baking tray is needed to collect fat;
- all grooves in the block walls or guides will be used for their intended purpose: for extending grates and baking sheets;
- the thermal insulation of the oven will maintain the required thermal conditions inside the smokehouse;
- sealing rubber bands are needed to ensure the tightness of the chamber.
It is important to thoroughly clean the internal surfaces after each smoking.
In order for the smokehouse to last for a long time, you need to follow the required food processing regime and the correct approach to supplying smoke.
From old equipment you can make two different smokehouses, which differ from each other only in the principle of fuel loading; we will consider both options.
How to clean a copper frying pan?
Lightweight and elegant copper frying pans are durable and environmentally friendly. Such dishes look stylish and have excellent performance characteristics. Due to the characteristics of the metal, soot and grease do not accumulate in a thick layer, but it is quite difficult to clean them off - the shiny surface can be damaged.
Here are a few ways to restore copper cookware to a respectable appearance:
- Soap solution. A piece of laundry soap is dissolved in warm water and the mixture is poured into a bowl. After 2–3 hours, burnt fat is removed with a soft brush.
- Salt and lemon. Fine table salt is mixed with lemon juice and rubbed on the surface of an old copper frying pan. After 30 minutes, wash off the mixture with cold water, carefully removing dirt particles with a soft sponge.
After use, washed copper utensils must be wiped dry. Otherwise, the specific shine will completely disappear.
How long can the new coating last?
How to ensure that the restored stove decorates the kitchen for as long as possible and pleases the eye? This is real, just follow a few simple rules for caring for the product and its operation:
- do not drop heavy objects onto the painted surface (the enamel coating breaks off under the influence of high force point loads);
- do not use sharp objects or abrasives to remove dried dirt (adhered dirt should be soaked before washing);
- do not wash the surface with aggressive agents containing strong acids or alkalis (it is better to use low concentration solutions for cleaning and wash away dirt and grease gradually without harming the paint).
Recommended methods and care products:
- steam cleaners with a brush or microfiber cloth attachment;
- gentle Teflon-coated dish sponges;
- melamine sponge.
If the dirt does not come off when washing in the usual way, soaking old stains in a mixture of baking soda and 9% table vinegar or 10% hydrogen peroxide helps. From personal experience, I note: it is much easier to remove all splashes of food and grease immediately after they enter using an absorbent napkin, microfiber or terry cloth.
This manipulation takes no more than a few seconds and is performed while cooking. You can continue the process and splash a little water on the stained area to clean up after cooking. It is important that the dirt does not dry out.
Caring for an aluminum frying pan
Aluminum frying pans can rarely be found in modern kitchens, but still some housewives still use them - and with great pleasure.
If you don’t want to part with old aluminum utensils, you can clean them using the following recipes:
- Heat the aluminum vessel over a fire. This way you can not only remove stubborn dirt, but also disguise minor scratches.
- Mix 500 g of salt, 100 g of laundry soap shavings and 300 g of silicate glue. The mixture is diluted with water enough to immerse the pan. The bucket is heated over low heat. After 30–40 minutes, the carbon will begin to gradually disappear from the surface.
How to use?
Operating the removable flame diffuser will not cause any difficulties even for novice housewives. Before using a new device, it must be heated over a low flame for several minutes. This manipulation will make it possible to remove factory grease and prevent the spread of an unpleasant odor during cooking.
The device must be installed only on a switched-off burner. The best level of fire to use is low to medium. A strong flame can damage not only the divider, but also the surface of the pan.
Do not remove containers from the stove using the handle of this device, which can easily become deformed. To change the flame flow and the diameter of the holes during cooking, carefully rotate the handle of the top plate.
Following simple rules will help extend the life of gas equipment:
- regularly remove food debris and various debris from the surface of the hob;
- do not leave household appliances unattended during their operation;
- lubricate components in a timely manner;
- Carry out repairs at the first sign of damage.
Preparation for manufacturing drawings and optimal dimensions
Before cutting a prepared cylinder, you need to remember safety precautions. Sedimentary vapors always remain in gas cylinders, which, when interacting with a spark or welding, can lead to unpleasant consequences.
Making a barbecue from a gas cylinder begins with emptying the container; for this, the main valve is unscrewed and the gas is released
The procedure is carried out with extreme caution, in a well-ventilated area, away from sources of fire or direct sunlight. You can visually verify that the cylinder is empty using a soap solution; just apply it to the outlet nozzle and observe the formation of bubbles
If gas escapes, the soapy water begins to bubble, after which you need to unscrew the valve with a wrench and completely remove it from the cylinder.
Sketch of a barbecue
After bleeding the gas, it is necessary to turn the gas container over and drain all the condensate. After that, water is supplied under high pressure, which will displace the residual vapors and completely remove the condensate. The water must be drained away from residential premises; the properties of the gas are such that a fire can occur at low concentrations. Compliance with the sequence of all procedures makes the work safe for humans.
Grill drawing
To make a barbecue with your own hands, you need to use the drawings. The dimensions are selected in accordance with the volume and shape of the cylinder; with standard equipment, the height is 98 cm, the diameter is 30 cm. The thickness of the walls of the gas container is standard, but may differ from the intended purpose of the cylinder, it is 0.3 cm, the weight of the cylinder is 22 kg.
Cylinder markings
Before making a barbecue from a gas cylinder, you need to mark it according to the necessary parameters. For marking, ordinary chalk is used, the process proceeds as follows:
- The defined diameter is 96 cm, it is easily divided into equal parts. For uniformity, markings are made along the longitudinal seam.
- Marks for placing skewers are set in a horizontal position, 24 cm in each direction from the seam.
- The lid is installed at a distance of 3 cm from the seam.
- A 10 cm deviation is made from the two resulting lines; this is done for parallel fastening of the legs in the future.
- The cut lines for the lid act as boundaries, which were drawn at the first stage (24 cm of indentation).
- If there are internal rings in the cylinder design, it is necessary to carry out the work carefully so as not to damage them. In the future, they will act as a lid holder.
Gas cylinder marking diagram
Markings and dimensions of the future barbecue in the drawing
The work of making a barbecue does not require special drawings. It is necessary to mark the parameters of the future barbecue based on the size of the cylinder. A specific design for a barbecue made from gas cylinders is not required, it all depends on the functionality and size of the device. The height of the cut and the lid is adjusted depending on the flammable substances used. If ready-made coals are used, it is possible to cut the cylinder in half; if firewood is burning, the lid should be higher so that the pieces do not fall out.
Selecting a gas cylinder
For a gas barbecue, suitable material is used, including a cylinder. You can find the appropriate cylinder for the barbecue at the dacha, if you used a propane gas burner, at scrap metal collection points or private advertisements. The gas barbecue is usually made from a cylinder with a capacity of 50 liters. The main criteria when choosing is a complete body without rust and oxides, in order to prevent further destruction of the finished product.
The process of making a barbecue from a cylinder
Drawing, cylinder preparation, installation
Create a detailed plan that will indicate all the necessary dimensions, which will help you not make mistakes when performing metal cutting work.
The lid of the future grill should be positioned so that the lower part of the cylinder is deep enough, because coal will be placed there.
The cylinder itself must be prepared for use. First, release all the gas. Even if the cylinder is empty, there is still residual gas there. Unscrew the valve and wait a while. Turn the bottle over and drain the condensate. To control the gas output, you need to apply soap suds to the valve; it will help determine whether all the gas has escaped or not. When the foam stops bubbling, you can move on to the next step.
Now cut off the cylinder valve. It is better to use a hand tool, this way you can control the sparks that are generated and avoid overheating of the tool. At this stage, you need to constantly water the cut area with cold water. Insert a hose into the hole formed and fill the container with water. Leave it with water for a day. During this time, the water will dissolve all remaining hydrocarbons. After this, the water can be drained away from buildings. You can proceed to the next stage of making a grill from a cylinder.
Divider, cover, jet
Dividers and jets
An incorrectly installed jet will cause an explosion. The part is replaced by a specialist. The need arises when switching to a new type of gas. The cylinder pressure is much higher than the network pressure, the nozzle opening is smaller. Conscientious manufacturers include two sets of injectors with your purchase:
- Bottled gas.
- Main gas.
The instructions include: replacement procedure; a special key is included with the kit. Will you ignore the replacement? Through the enlarged hole of the home nozzle, bottled gas will flow in an intensified stream at the dacha. The gearbox is often powerless to properly regulate the system. The gas will partially burn, producing orange flames, and a characteristic pungent odor will appear. Disasters are not far away. A crookedly installed jet leaks gas. The result is the same - an explosion. The opposite situation of installing a dacha kit at home will not lead to good things.
Purpose of the flame diffuser
Flame diffusers have been in demand and popular devices for many years, which perform the following functions:
- protection of porcelain, ceramic and earthenware from the destructive effects of fire;
- increasing the efficiency of gas use;
- preventing the handles of utensils from heating up;
- creating ideal conditions for frying and stewing;
- adjusting the flow of supplied heat;
- long-term heat retention after turning off the gas;
- the ability to use enamel cookware on induction cooktops;
- maintaining the attractive appearance of the dishes;
- adapting large burners to containers that have a small bottom diameter;
- increasing the stability of any type of container;
- uniform distribution of heat flows;
- preventing food from burning and sticking to the bottom of a container with a thin bottom;
- the ability to bake vegetables like on a grill;
- independently heating food wrapped in foil;
- sterilization of glass jars.
This device is needed not only for solving domestic problems, but also industrial ones.
Experts distinguish three types of flame diffusers:
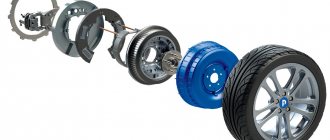
The nozzle is an integral part of the gas stove, which has the shape of a bolt with holes of different sizes and performs the function of supplying gas to the burner. The power of the plate depends on the diameter of the holes on the surface of the jet. For natural and bottled gas, special nozzles must be installed. Ignoring this rule will lead to the appearance of soot and burning, and may also cause an explosion of a flammable substance.
On the working surface of all gas stoves there are special dividers, which have different shapes and diameters. The most common devices are round and toothed. The manufacturer independently selects the type of divider for the manufactured models of gas equipment.
When replacing a device, you must take into account its code and model of the stove. Products of another brand may not only not be suitable, but also cause serious damage to the device.
A removable divider is an overhead cover that has the shape of a metal disk with rounded edges. The main feature is the ability to separate discs to remove various contaminants.
On the shelves of specialized stores you can see several types of removable devices for gas stoves.
- Double-plate - a simple device that consists of a lower support plate and an upper adjustment plate. Both plates have a fire distribution function thanks to special holes. The air between the plates prevents the device from burning.
- Double-sided with perforated mesh on one side - an improved device that has holes only on the bottom side. The top may be completely flat or have wavy indentations. This design evenly distributes thermal energy and increases the distance between the fire and the cookware.
- Mesh - a device whose surface consists of a fine mesh.
- With a central hole - a unique design, the central hole of which does not allow the flame to pass through, but increases the amount of heat in the center.
Manufacturers produce dividers in two forms:
The choice of device size depends on the diameter of the burner and the cooking container. This indicator ranges from 200 mm to 300 mm. It is not advisable to purchase a divider with a smaller diameter than the bottom of the pan.
For containers with large volumes, it is necessary to choose durable devices that are not subject to sagging and mechanical deformation. Many devices are equipped with special metal handles, which can be stationary or removable. The presence of a special non-heating pad on the handle will prevent thermal burns.
Installation
If the sacrament of frying shish kebab or barbecue takes place at home, then we install the grill on the floor, making sure that there are no flammable things nearby, it is advisable to protect yourself from them with fireproof materials, for example, a sheet of iron. But rarely anyone wants to make shish kebab or barbecue at home - they will be drawn to nature, that is, to the street.
And there you need to choose a flat, preferably strong and hard surface for the equipment you made yourself. Make sure that gas equipment stands confidently and reliably. And place the gas unit on the leeward side so that no unforeseen situations occur.
Stove made from an old stove
Another interesting idea for your summer cottage would be a stove made from a gas stove. It will perfectly replace the stove in summer kitchens and will look creative. This option will cost virtually no modifications. All you have to do is remove the burners, or the entire top panel and replace it with a flat sheet of iron, get rid of the glass in the oven door, if any, and also replace it with a sheet of iron. Place bricks inside the oven in one row for greater heat transfer. A fire will be lit in the oven, and on the top panel you can cook, or simply use such an oven for heating.
Algorithm for preparatory work: safety rules
It must be remembered that even if the cylinder valve is open and gas does not come out of it, vapors remain inside that can flare up when cutting metal with a grinder. This means that you need to protect yourself as much as possible when carrying out such work. To do this, you need to perform some actions.
First you need to open the tap and, making sure that there is no hissing, turn it out of the cylinder. In this case, it is better to clamp the lower part (stand) in a vice, which will prevent the container from rotating. After the tap is turned off, you need to fill the bottle with plain water. When the cylinder is filled, the tap is screwed into place. Only after this can you start cutting.
Before cutting, you need to unscrew the tap and fill the bottle with tap water PHOTO: pochini.guru
Marking and cutting a gas cylinder
First you need to remove the stand. This is not difficult to do; it is not boiled in a circle, but is held on by several spot tacks. After this, you should find the welding seams, which are located in a circle at the top and bottom of the cylinder, as well as along it. They will serve as guidelines.
The marking is done as follows. From the longitudinal seam, measure a distance of 300 mm in any direction and draw a straight line. This will be the cutting line. The second cut line is the longitudinal weld seam itself. The side ones may not be marked at all. Transverse welds will be sufficient. The result should be a hole measuring 300x920 mm. The cut out part is suitable for making a lid (provided that the grill will be used for barbecuing). If all he is required to do is prepare regular barbecue, then a lid will not be required at all, nor will the installation of a chimney.
Approximate markings of a gas cylinder with dimensions PHOTO: metmastanki.ru
However, it is better if the lid is made. Its production does not require much effort, but it will add functionality to the finished product.
Installation of the grill cover
To prevent the lid from falling inside the grill, it is necessary to weld a strip of metal along the length of the cylinder in the place where the edge will come into contact with the body. After this, regular door or window hinges are welded to the back of the slot, as well as the lids. A handle is welded to the outer part. It is better if it is wooden, fixed on metal brackets.
You should also consider that the lid does not tilt back completely. A bicycle chain welded with one end to the cover and one to the body will help with this.
This chain can be used as a limiter PHOTO: youtube.com
Features of additional elements of the barbecue body
In the body itself, at the required distance from each other, holes are drilled on the side of the lid hinges, with a diameter slightly larger than the width of the skewer. On the reverse side of the sawn opening (in mirror image to the holes), slits are made using a grinder. It turns out that the skewer fits exactly into the slot, while its other end easily rotates in the hole. If you move the skewer forward, it will rotate thanks to the twisted part.
Making legs or stands
There are 2 options that can be used here. The legs can be made removable, or you can weld them to the grill. It’s probably not worth dwelling on this point in too much detail. The only thing is to weld a platform underneath to place dry fuel. It will also play the role of a stiffening rib, preventing the barbecue from swinging.
The legs can be made removable or stationary PHOTO: drive2.ru
Related article:
Rework process
We will follow the path of least resistance. We still won’t be able to achieve some miracle of design thought, so there’s no point in perverting it. We are faced with the following task: remove the top platform, burners and innards from the stove. There is no point in removing the handle or door. They won't interfere.
Removing the cover
@youtube.com, channel Sergey Samodel
If you can’t dismantle the top platform with a screwdriver, a grinder . As in the case if the grate turns out to be significantly larger than the vacant area, it can also be trimmed to the required size. You can also use a baking tray of the appropriate size or use skewers.
Attention! Do not use an enamel grill. Take ordinary stainless steel.
Smoke removal and ventilation
For the chimney you need to do the following. Cut or drill a hole with a diameter of 60-120 mm , into which to insert the corresponding pipe with an elbow. But this is optional; it is quite possible to do without a chimney.
Several 15-20 mm holes are drilled at the bottom of the utility box for air flow.
I recommend leaving one baking sheet in the lower part of the oven , above which a wire rack with a fairly fine mesh is placed. The wood will burn on it. After burning, the coals will fall into the pan, and can then be easily removed.
That, in fact, is the whole alteration. Cheap and cheerful, just right for a dacha. Quite a transportable thing, by the way, and even with legs. If your soul wants some kind of aesthetics, then welcome to the store.
Device Features
A modern barbecue is most often presented in the form of a low rectangular box, and the hemisphere is “attached” to another type of portable brazier - a barbecue.
An explanation for this division can be found in the particular preparation of products, or more precisely, in the accessories with which they are prepared.
In a barbecue, meat and vegetables are threaded onto skewers, and they are best placed on the sides of a rectangular roasting pan.
At the same time, several identical portions are fried on the fire, so it is important that the heat is distributed as evenly as possible along the entire length of the skewer and throughout the entire cooking zone, which is impossible to achieve in a spherical fryer.
In a barbecue, food is placed on the grill. The maximum heat from the coals is concentrated in the center, but this disadvantage, from the point of view of the barbecue, turns into an advantage for the barbecue - by changing the position of the products on the grill, you can adjust the cooking temperature, or the degree of roasting
This is especially important for steaks - one of the “signature” barbecue dishes.
There are other differences between the two most popular types of fryers:
- The grill, as a rule, does not have a lid, but the barbecue usually has one.
- In a barbecue, firewood is often used, which is burned to the state of coal, and to speed up the combustion process, holes are made in the walls. In addition, using wood of different species, you can achieve different aromas and flavors in each case.
- The barbecue is filled with charcoal, which does not require a lot of air to burn. Therefore, there are no holes in the walls of the fryer. In addition, birch firewood is used to produce charcoal, and this “standard” of fuel does not affect the taste.
But there is also a “compromise” type that combines the characteristics of a barbecue and a barbecue - its fryer is made in the shape of a hollow cylinder with an opening lid. This is the shape of a homemade grill made from an old gas cylinder or a container from a water heating boiler.
The second life of an old gas stove - interesting transformations
After purchasing new equipment, the question always arises: what to do with the old one, for example, with a gas stove. It often happens that they replace an obsolete model that is still in working order. You can take it to a country house or country house and attach it to a cylinder, or simply give it through an advertisement to people who need it. And if you show a little imagination and think about what you can do for your dacha from an old gas stove, several interesting solutions immediately come to mind.
Don’t rush to throw away old things – you can give them a second life
How to install the lid and handles with your own hands
They make barbecues from a gas cylinder with high functionality with their own hands, including by installing lids on them. Recesses are made for the hinges under the lid, then the rivets are distributed and welded. If you leave this step aside, the heated lid will fall off.
If a removable lid without hinges is needed, metal strips are fixed to the transverse sides of the product on the inside. Such a lid will definitely not fall inside.
Use bolts to secure the handle. Look for handles that won't deteriorate under the influence of heat. Craftsmen offer a simple and inexpensive option - bend a metal rod and weld it to the lid. A limiter on the lid wouldn't hurt either. Make it from a corner or pipe. Secure the lid with a chain, adjusting the tilting feature.
Disassembling the cylinder
It is impossible to cut a gas cylinder to the required sizes and shapes immediately without checking its contents. First of all, you need to empty the cylinder, in case there is gas left in it. Therefore, the valve must simply be opened, releasing the remaining contents.
Then you need to unscrew the tap. They do this with a gas wrench. Usually it unscrews easily, but sometimes this becomes a problem for those who are faced with a similar situation for the first time. It’s just that in some models of cylinders the tap is locked with two pins. They must be removed with pliers. After which the tap can be easily unscrewed.
The next stage is washing. The container is filled halfway with water, shaken or pumped, then the water is drained. The gas itself has a specific smell, which is given to it by a special additive - an odorant. To get rid of this smell, detergent or bleach is added to the rinsing water.
The gas cylinder tap is unscrewed with a gas wrenchSource pochini.guru
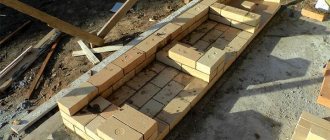
Do-it-yourself stationary barbecue made of brick and metal (with photo)
You can make the brazier directly removable. To do this, it is necessary to weld a strap along the top of the legs from pieces of suitable corners to the size of the bottom. After this, you can install the fryer box. In this case, the design of the legs can be left as in the basic version. Carrying handles must be welded on the sides of the box to the bottom and walls. To make them, you can use a stainless steel rod with a diameter of 10 mm.
If, when making a stationary metal barbecue with your own hands, you show ingenuity and bend their ends into a half ring, you will get hooks on which you can hang a poker and other accessories.
You can build a small table on which it will be convenient to place various little things while preparing barbecue. To do this, you need to make one of the handles longer than the other, and attach a metal plate to it on top.
You can build a stationary barbecue in the yard, and line the bottom of the brazier with stove bricks. This work is not yet completed. It is also necessary to make accessories for the barbecue. Look at them and the stationary brick grill in the photo, which shows the main devices:
Since a stationary brick grill is built with your own hands most often in the open air, you need to make a lid for the brazier. It can also come in handy in cases where you urgently need to move a barbecue that has not yet cooled down. To make it you will need a galvanized steel sheet 0.9 mm thick. The lid should be slightly longer than the grill to prevent rainwater from getting into the grill.
The long edges of the lid should be folded so that they fit snugly against the front and back walls. In this case, the lid will not be blown off even by a strong wind. Before you make a stationary barbecue with your own hands, you can think about a more substantial design - a gazebo.
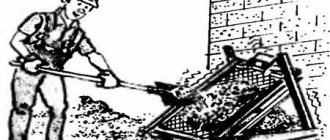
A grill poker is similar in shape to a stove poker, but wider, as it serves to rake and distribute coals evenly. It is made from steel strip.
The scoop also looks like a stove scoop, but differs in that its handle is raised above it. This design is necessary so that your hands do not get dirty when cleaning the fryer. The scoop is made of galvanized steel sheet, and its handle is made of steel strip. A poker and scoop for a stationary metal grill are shown in the photo located further on the page:
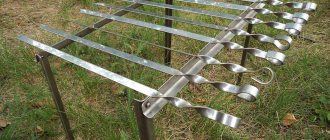
The main equipment for preparing shish kebab on the grill is skewers. They are made from 8×2 mm stainless steel strip.
At one end you need to make a point for piercing the meat, at the other end you need to bend the handle-ring. To be able to rotate the skewer to evenly fry the kebab, a small section of the skewer near the handle should be curled. Look at the skewers for a stationary barbecue in the yard in the photo, where you can see the different types of these accessories:
The fan is a square (200 x 200 mm) plate made of duralumin with an overhead wooden handle riveted to it. In order to hang a fan on a hook, you need to drill a hole in its corner.
Review of manufacturers and models
On sale there are many different versions of the device, which is simple in concept and additionally equipped with various elements for practical convenience. In all the variety of products produced, the leaders are the following barbecues - manufactured in South Africa;
Below is a description of each brand.
Barbecues brand "Weber"
The brand represents a wide variety:
- grill equipment;
- kebab makers
Popular models:
- Q 1200;
- Q 2200;
- Q 3200.
The first is a compact solution.
This is a grill device that can be carried or transported.
The second and third models are suitable for installation in gardens and summer cottages. The original design will fit into any landscape and become a functional solution. Models are equipped with many additional elements.
Model Q2200
Model Q3200
Cobb roasters
The company produces a mobile version of the barbecue, which is suitable for traveling or any outdoor recreation. Its weight is about four and a half kilograms.
Outwardly it resembles a saucepan.
The model is very functional, it combines:
- grill;
- smokehouse;
- oven;
- steamer;
- stove.
Installation does not require compliance with certain rules: a plastic table will do.
During operation, the surface on which the device stands does not heat up.
The s3000s model is shown in the photo.
Roasters "Campingaz Rotario"
There is a kebab maker on the market with a “grill” option. The system provides:
- automatic rotation of skewers;
- piezo ignition;
- uniform steam distribution.
Additional benefits:
- ease of washing;
- transportation of mobile options;
- manual rotation of skewers is possible;
- compactness.
Secrets and subtleties
Volkotrub says that while cooking on a grill is very simple, cooking meat on skewers requires some tricks
“It is important that the skewers are thick, because the meat is cooked not only from the outside, but also from the inside. The metal heats up and it cooks from the inside
The hole is clogged with a skewer, and a crust forms on the meat inside. There is nowhere for the juice to escape, it stays inside and the kebab turns out juicy. And if the skewer is thin, then you will have a dry kebab,” explains the interlocutor.
Chef Stromilov notes that it is easier to use ready-made charcoal to quickly prepare shish kebab: “Charcoal is made only on an industrial scale, in production. Oxygen is pumped out in a furnace with a high temperature of 400 degrees, and the logs are dried at high temperatures. Fire there does not burn without oxygen. From a practical point of view, it’s better to use charcoal.”
He also advises using lighter fluid more carefully: pour it into the grill only at the beginning, so that it flares up, and not while cooking the kebab.
Mokin is a supporter of making coal yourself, if you have time for it. According to him, birch is considered the most organic for these purposes. Poplar burns quickly, and pine is resinous and gives off a smoky taste.
“I once spied such a secret as a Tajik friend of mine was frying a large number of fish steaks and skewers on coals. He leveled the coals evenly along the entire length of the grill and sprinkled everything with a large amount of coarse table salt. He said that this makes the heat more even, because rock salt, it absorbs the heat, and then releases it more evenly and longer,” says Mokin.
Barbecue and smokehouse - what's the difference?
Frying shish kebab on a grill is one of the types of quick hot smoking, during which the product is exposed to high temperature and smoke, so any grill is a smokehouse.
However, there are other methods of smoking, so not every smokehouse can be called a barbecue.
In addition, the grill runs on wood, and many types of smokehouses, even for hot smoking, are used as fuel:
- wood chips;
- shavings;
- sawdust.
In a barbecue, the combustion zone is optimized for converting firewood into charcoal, the combustion of which produces the highest temperature; in smokehouses, the combustion zone is optimized for its type of fuel.
Preparatory work
At the preparatory stage the following work is carried out:
- The place is being prepared.
- A design project is selected.
- Drawings are being prepared.
The surface on which the fryer will be installed must be level. To do this:
- The soil is cleared.
- The foundation is being made.
Bases can be made from:
- sand;
- gravel;
- paving slabs.
The selected materials require careful compaction.
If the barbecue is installed indoors, it is necessary to cover the floor with fire-resistant material.
The selection of the optimal model must be treated with special attention. This will help you draw up a drawing correctly and accurately calculate the amount of materials.
A correctly drawn up drawing is a guarantee of a good result.
The drawing must indicate all structural elements and the distances between them.
All lines must be clear.
Folk recipes
This approach involves the use of simple improvised devices and components that can be found in almost any housewife. They act more delicately, preventing the destruction of cast iron.
Baking soda is a gentle abrasive, suitable for scrubbing steel and cast iron rods and does not leave scratches.
Instructions for use:
- Prepare a paste from a pack of baking soda and a small amount of water.
- Spread the baking soda paste over all surfaces and leave for 30 minutes.
- Wipe all areas with a brush and rinse off dirt under running water.
Soda is a universal remedy; you can even use it to clean the stove from carbon deposits.
Instead of water, you can take hydrogen peroxide - it will enhance the beneficial properties of soda.
- It is possible to process a small grille in a garbage bag.
- 200 g of soda are poured into it and a couple of glasses of hot water are poured in.
- Place all the removable elements of the gas stove in a bag, tie the bag and shake 2-3 times.
- After a few hours, begin the final cleaning under running water.
Boiling water
This cleaning option involves treating the grates in the oven or oven.
Act according to the algorithm:
- Heat the oven to maximum.
- Choose a baking tray that will fit the dirty wire rack.
- Pour water into the pan so that the liquid completely covers the rods.
- Place the pan in the oven and leave to simmer for a few minutes, not allowing the water to completely evaporate.
- As soon as the components have cooled, begin to remove dirt using a rag or brush.
You can also make an improvised steam cleaner using an oven. Hot steam, just like boiling water, will help soften soot, grease and carbon deposits, making the maintenance procedure easier.
How to proceed:
- Fill a baking tray with water and place in the oven.
- Turn on the unit at maximum temperature.
- As soon as the water in the pan comes to a boil, place a wire rack on top of it so that it is directly exposed to the steam.
- After an hour, remove the grill, cool and clean with a scraper.
Make sure that the water does not completely boil away; add liquid to the pan if necessary.
You can try this method not in the oven, but in the microwave, then you will be able to clean the microwave from grease.
With a stove for a cauldron of 3 cylinders
The design is vertical. For its manufacture, a large diameter gas cylinder and 2 smaller ones are used. A cauldron compartment is welded to the side surface of the body, equipped with an individual firebox and a door located on the front side of the unit.
A blower with an adjustable damper plate made of steel sheet is equipped on the lower surface of the combustion chamber. The side planes of the main tank are equipped with additional longitudinal ventilation holes.
You need to make a lid for the cauldron. It is cut out of sheet steel and complemented with a handle. The upper part of the cylinder, which serves as a cauldron, can be equipped with a detachable burner from the solid fuel stove. This solution will allow you to use a frying pan for cooking.
How to use?
A factory-made slab divider usually consists of two plates: lower and upper. The plate at the bottom is a support plate, and at the top is an adjustment plate. Both of them have holes for distributing the flame, and the top one also has a handle for easier movement.
An adjustment disk is installed on the support disk and the structure is placed on top of the gas stove grate. After which the burner is turned on and the minimum flame level is set. To ensure even cooking, you can turn the handle of the top plate of the divider during cooking, thereby opening or closing the holes. The existing gap between the lower and upper plates can significantly reduce the thermal effect of the divider discs on the dishes. In order for the stove to function normally and be easy to use, care should be taken to select additional parts for it from the same company. These include a divider for a gas stove. At first glance it may seem that the detail is not particularly important, but it is not!
Dividers perform an important function - they evenly distribute the gas flow, and, therefore, the flame from the burner. Thanks to this, the food will be perfectly cooked, without burning or remaining raw.
Equipment
A homemade grill from a gas cylinder is half ready. It turns out not a simple brazier, but a convenient barbecue with a lid. Now you can start arranging it.
A convenient handle for opening must be welded to the resulting lid. You can come up with variations of this largely decorative element yourself.
From the inside of the cylinder, along the edge of the cut, it is advisable to weld thin strips of metal so that when the lid is closed, the gap is closed more tightly. You can use steel rulers; they bend quite easily.
A lid opening limiter is required. Without such a limiter, the lid, being open, may tear off the hinges and fall off. You can make small stops from the corners and weld them on the outside so that the open lid rests on them. Or you can build a more decorative option, using, for example, chains that will not allow the lid to open more than necessary.
You can weld a pipe onto the hole left from the valve - it will be needed to allow smoke to escape when the lid is closed. It is better to make the pipe high enough so that the smoke does not disturb you when working at the grill.
You need to drill rows of holes in the bottom of the grill to allow air access to the burning coals. They can also be used to clean the grill from ash.
At the edge of the cut, cut shallow grooves into which the flat handles of the skewers will fit; on the other hand, holes are needed where the ends of these skewers will stick out.
The barbecue also needs legs, which can be made from pipes, corners, or some ready-made old structures, for example, a stand from an old sewing machine. You can make a massive and stable stand, because such a barbecue is unlikely to be convenient to take with you on picnics. It is too heavy and would be more appropriate on a summer cottage in a stationary version. The height of the stand can be adjusted so that it is convenient for you to work at the grill without bending over.
After you have installed your barbecue on its legs, it is advisable to remove the ring rim at the bottom of the cylinder, on which it is usually placed, since it is no longer needed.
If you wish, you can make a removable grid (here is a link) that can be placed in the grill. You can, for example, fry meat on it, or place a barbecue grill on it. Make sure that the grill lid can still be easily closed all the way.
What can be made from an old gas stove
Have you purchased a new gas stove, but feel like throwing away the old one?
Then you can dream up a little and breathe new life into it. First, you will need to free the tile from the burners, remove the flame adjustment knobs from the control panel, and clean the entire surface of the stove to prepare it for painting. In order for the cabinet to be airtight, the extra holes should still be sealed. Then you can start painting the future box. What color will he choose for you, will the box be monochromatic or multi-colored? Perhaps you have already decided what will be stored in the new place and will decorate it in this theme. After painting, the box can be decorated with decoupage or your own drawings. There will be room for your imagination to run wild.
How to make a barbecue from a barrel with your own hands (with photo)
Traditionally, such designs have a rectangular shape, but in pursuit of originality of ideas, rounded versions of barbecues are becoming popular. In this case, the easiest way is to construct a barbecue from a barrel, since there is no need for welding operations.
Before making a barbecue from a barrel, it is very important to choose the right base for the barbecue body
In this case, you should pay attention to what was previously stored in it. Under no circumstances should barrels of fertilizers, fuels and lubricants, toxic liquids, etc. be used to make barbecues.
P.
To work you will need a barrel, a steel angle, a metal mesh, steel sheets, door hinges, a handle, a welding machine, an angle grinder, cutting and grinding discs, an electric drill, a jigsaw for metal, bolts and a tape measure. To ensure that the structure is not stationary, but can be easily moved, wheels will be required.
Look at the barbecues made from barrels in the photo and we will understand the process of their manufacture:
If you don’t have an old metal barrel, you can replace it in manufacturing with an old gas cylinder.
First, you need to make a frame for the barbecue from a barrel with your own hands, and its height should be approximately 90-100 cm, and its width should correspond to the width of the barrel so that it can be firmly fixed.
To make a stand, metal corners should be welded at an angle of 90°. On each side you need to install two racks, then connect them together with a metal jumper. The jumper should be located at a height of 25-30 cm from the ground, which will ensure good stability of the entire structure.
To move the barbecue as easily as possible, you need to install 4 wheels on the stands. When assembling the frame, you need to constantly monitor it to avoid distortions.
After this, you can proceed directly to making the grill itself. The metal barrel needs to be placed on its side and, using a grinder, cut a rectangular hole in it, which will be used as a lid.
The height of the side sides should be at least 15 cm, and the size of the container for installing skewers should be 30 cm. In this design, you can simultaneously place up to 10 skewers, which is quite enough for a country picnic.
The two parts of the barrel must be fastened together using hinges. They can be welded or bolted. Thanks to this, it will be possible to open and close the lid. For greater convenience, it is recommended to install a handle on it.
In the sides of the barrel, using an electric drill, it is necessary to make holes that will provide air flow and thereby create draft. If you plan to use the grill for smoking, then you should also make a small hole in the lid.
To equip the internal part, plates or corners should be welded to it on which the roaster will be installed.
When mounting a barrel on a frame, it is important to ensure that the drain hole is in its upper part. It will act as a hood into which you need to insert a piece of pipe
The following photo shows a barbecue made from a barrel, made with your own hands using improvised means:
Grill from a gas cylinder: making a brazier
The first thing to do is place the cylinder on the goat and weld it securely to it. When this operation is completed, we arm ourselves with a tape measure and mark the place where the opening lid of the grill will be.
- First, you need to mark the horizontal cuts - measure the perimeter of the balloon and divide it in half.
- Now we draw a horizontal line on one side and, setting aside a size equal to half the perimeter from it, mark the same horizontal line on the other side of the cylinder.
- After this, we connect these horizontals with crossbars that pass near the weld on one side of the cylinder and at the same distance from the edge on the other side.
- We cut out the resulting contour with a grinder. Just not completely - first we make a cut on the side on which the hinges will be installed.
- Immediately after cutting, the hinges need to be welded - only after this we cut out the lid completely and get a finished movable structure. You will need to make stops for it on the side of the hinges so that it does not recline more than necessary.
Next up is the fryer equipment. Here you can do the following things.
Chimney. We already have a hole at one end of the cylinder and now we cut exactly the same one at the other end, after which we make a chimney using a turn and a pipe with a diameter of 100 mm. If you want to have not just a barbecue, but a so-called barbecue smokehouse made from a gas cylinder, then you need to install another cylinder-like container equipped with a door on the chimney. In this place it will be possible to hot smoke almost any food product.
Air supply damper. It is made from a small piece of pipe of one hundredth diameter. Holes are drilled on the sides of this piece into which a long pin is inserted, and a sheet metal washer is welded onto it, in turn, right inside the tube. Now, by rotating the pin, which will need to be equipped with a handle, you can adjust the draft in the barbecue.
Inner part. Here it would not be amiss to do two things: firstly, slots for skewers on one side and round holes for them on the other edge of the grill. And, secondly, a stationary barbecue grill - you need to make it removable, so that, if necessary, it can be removed and grilled shish kebab on skewers
It is very important to make this grille from thick iron - high temperature will not stand on ceremony with thin metal. Simply put, he will be led, and he will burn out quickly.
By and large, this is the entire barbecue smokehouse made from a gas cylinder with your own hands. Now it's just a matter of small things - again, you should clean the welded joints, thoroughly open the structure with a primer, and then paint it with heat-resistant paint. By the way, in order to save a little, expensive heat-resistant paint can only be used to decorate the cylinder itself and the chimney - everything else can be safely painted, usually with nitro enamel.
Brazier smokehouse barbecue from gas cylinders photo
And to conclude the topic of how to make a barbecue from a gas cylinder with your own hands, a few words about the advantages of such a design. The first thing to note here is its versatility - in one product you get a device for cooking food on skewers, a grill and a smoker. Moreover, thanks to the chimney and air flow, you can burn fuel in such a barbecue even with the lid closed, this makes it possible to install the barbecue under a canopy or even indoors and use it as a potbelly stove. The second is the cooking mode; if on a regular open grill the meat is simply fried, here it is also baked at the same time. A closed lid turns the grill into an oven. You can also cook various dishes in a frying pan or pan on a thick grill - pilaf and fish soup turn out excellent!
Author of the article Alexander Kulikov
Overview of different types of flame diffusers
WEBBER brand stainless steel flame spreader with wooden handle is made in China. The accessory is attractive for its price (around 150 rubles) and is ideal for those who plan to use it infrequently for its intended purpose.
The Metaltex divider is made of stainless steel with mineral fiber. The design ensures uniform heat distribution along the bottom and prevents burning. Ideal for preparing porridges, mousses, jelly. Can be used as a hot stand.
A large round divider for glass pans and ceramic roasting pans from a Chinese manufacturer costs around 100 rubles. Radial grooves speed up the cooking process and additionally help protect the bottom by reducing contact with hot metal.
The fire spreader is made in Italy and is made of durable stainless steel. The lower part is mesh, the upper plate is embossed. Steel handle. The handle is convenient for quickly removing the device from the stove. Suitable for large diameter pans.
You need to use a flame divider for a gas stove correctly. You shouldn’t turn the gas all the way up, plunging the circle into a strong fire. Place the device on the burner and light the gas at medium or low power. You cannot create a strong flame; it will not produce the desired effect, and a glass or ceramic pan may crack.
The handle is used to remove the empty divider . Under no circumstances try to lift it together with the pan. The only exception can be something very light.
The diffuser needs to be cleaned periodically; especially thorough cleaning is required if peppers or eggplants were baked directly on the flame diffuser without foil. It is better to have several cooking utensils and an adapter.
Source: vidy-posudy.ru
Replacement
To replace the divider, you need to contact a specialist. If the problems are minor, you can fix them yourself.
- Carefully read the instructions for the device you are replacing. Prepare special tools.
- Replacing the jet is the most difficult operation of all, and it is recommended to entrust it to a specialist.
- If the nozzles are faulty, then it is necessary to replace absolutely all the jets of the plate.
You will need:
- Phillips and open-end screwdrivers;
- several spanners.
Follow the instructions:
- Remove the grille.
- Remove the dividers and burners.
- Unscrew the bolts of the burners and dismantle them.
- Inspect the traverses, nozzles and jets.
- Squeeze the latches and release the tip.
- Disconnect the jets from the fasteners.
- Install a new device.
To replace the injector, follow the instructions below:
- Open the bottom drawer.
- Remove the oven floor.
- Unscrew the screws on the burner.
- Examine the injectors carefully.
- Remove the left cover of the stove.
- Remove the nozzle body.
- Install the new part.
Varieties
Double-plate : the lower one is for support, the upper one is created for adjustment. There are distribution holes for fire to enter. The plates form hot air between themselves, a layer of which prevents burning.
Double dividers with mesh. With perforation – bottom. The top side may have waves from the center. Controls proper heat dissipation.
Mesh - prevent the appearance of burning and are used to replace the lid; they have a strong and dense structure.
With a large hole in the center. It is designed to protect against flames. The heat is concentrated in the center.
Purpose and use of the divider
A stove divider is an indispensable assistant in the kitchen, taking on contact with the flame and insulating the bottom of the cookware from the fire. The device takes the heat and fire, creating ideal conditions for pots and pans.
Purpose of the fire cutter:
- Insulating from fire cookware made from materials that cannot withstand contact with flame. For example, heat-resistant glass saucepans, porcelain teapots, ceramic stewpans, clay braziers.
- Protects the bottom of frying pans and pots not intended for gas stoves. This includes dishes with delicate enamel, which easily loses its attractiveness when exposed to fire, as well as the bottom for induction cookers (may darken).
- Adaptation of the burner for containers with a small diameter, for example, a Turkish coffee maker, coffee pot, portioned frying pan or small saucepan. The result is a stable burner on which nothing will tip over and the handles of the pan will not overheat.
- Distributes heat and ensures even heating. When cooking in a dish with a thin bottom, the diffuser prevents the food from burning and food sticking, especially during prolonged stewing and simmering, as well as when cooking porridge, baking pancakes, and frying cutlets.
- Cooking on a hotplate without utensils. Some housewives bake bell peppers and eggplants on flame dividers, like on a grill. But for such tasks it is better to have a separate device with holes. You can also bake and reheat by wrapping the food in foil.
Some housewives use perforated flame spreaders to sterilize jars - they place them on boiling pans instead of lids, and place the jars upside down on top. The more daring ones sterilize directly on the circle, but this method is only suitable if there is no perforation.