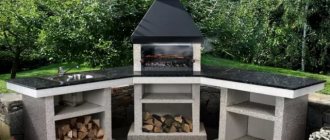
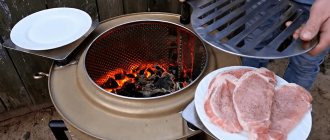
A barbecue is a device for preparing dishes using an open fire. It has a long history, and over time its original external characteristics have changed a little. The brazier in its homeland, the East, has a bowl-shaped shape, while in Russia it is rectangular. There are many modifications and options for this device.
Some options are designed for carrying, while others perform not only the function of cooking, but are also decorative elements in landscapes.
The barbecue locomotive
can be located on the site or in the yard , thereby becoming an original decoration.
How to do it?
Roasters in the shape of steam locomotives have a very attractive appearance and fit well into the designs of cottages and courtyards. A purchased barbecue, made by the hands of a master, will cost a considerable amount. If you make it yourself, the financial costs of the product will be lower. Work on its production must be carried out in stages :
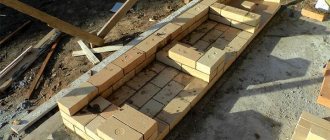
- Selection of the optimal project option. At this stage, it is very important to decide on the final look - this will help in the future to make all the necessary calculations on the amount of material and not make a mistake.
- Drawing up a drawing or diagram. A correctly drawn up drawing guarantees a good result.
- Selection of all necessary tools and materials.
- Making the frame.
- Manufacturing of the body.
- Making wheels and decorating. It is better to prepare the wheels and weld them to the frame before installing the body.
- Creation of additional devices.
- Cleaning up.
- Coloring.
It is unlikely that you will be able to make such a grill in one day, but in a few days, provided that each stage is quickly completed, it is quite possible.
Work on design
The first part of the work on creating a barbecue in the shape of a steam locomotive consists of carefully working out the design.
Determine the size, number of functions and degree of decorativeness of the design. There are no general rules here - everyone proceeds from their imagination and financial capabilities. The main thing is that the grill is stable, fireproof and easy to use.
Some create a small work surface with a stylized roof and a “locomotive” chimney. Others are huge, carefully designed structures, not only equipped with all possible functions, but also externally corresponding to a specific brand of locomotive, down to the smallest details.
The locomotive-barbecue can be made to the smallest detail
Consider in advance whether the structure will have additional trailers for firewood or compartments for storing kitchen utensils. Determine whether your locomotive will stand on legs or wheels, and whether it will have rails.
Draw a detailed drawing and, based on it, calculate the required amount of materials.
A barbecue can be made from an unnecessary gas cylinder
Required Tools
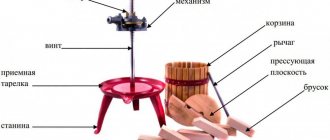
The selection of all the necessary materials can be carried out with greater accuracy on the basis of the finished drawing . After the project has already been selected, you can start by drawing up a sketch, from which the master will draw up drawings. If we are talking about doing the work yourself, the drawing should reflect all the elements, their sizes and distances between them. An example of the finished drawing is shown below (see image).
When the drawing is ready,
you should proceed to the selection of tools .
Required:
- welding machine;
- grinders (for cutting metal);
- pliers;
- hammer;
- screws;
- screwdrivers;
- fireproof paint (for painting the finished brazier).
Having selected all of the indicated items, you should proceed to the next stage.
Design of a barbecue-steam locomotive
When designing a device for preparing food over an open fire, you need to pay attention to 2 main elements:
- chimney;
- compartment where burning coals or firewood are located.
The first thing that distinguishes the locomotive design is the pipe.
It performs two functions :
- smoke exhaust;
- distinctive element.
Secondly, the design must necessarily include a place where coal or firewood is burned. Through the combustion process of these materials, delicious dishes are prepared.
The grill performs aesthetic and practical functions. It can be equipped with maximum comfort if you provide:
- shelves where dishes and firewood are located;
- grates (grill, barbecue);
- chamber for hot or cold smoking.
A diagram of a standard locomotive-shaped roaster design includes:
- grill chamber - located in the horizontal direction;
- barbecue chamber located in the horizontal direction;
- camera located in the vertical direction.
Preparation for production
This design option is considered very successful, because it has many different functions. In addition, it can act as a decorative element on the site.
Making such a smokehouse with your own hands is not at all difficult. It is enough to prepare all the materials and tools that may be needed during the assembly process of the unit, as well as familiarize yourself with possible diagrams or drawings, or create your own project.
Description of appearance
The most important element in the design is the brazier, which should have a small compartment into which burning wood, coal or other fuel will be placed. This compartment plays a very important role. Otherwise, there is no point in making a grill in the structure, because it will then act only as a decorative element.
An obligatory element in a steam locomotive smokehouse is a pipe. It is at the same time considered a decoration of the device, and also serves as a smoke exhaust. It is worth deciding in advance where exactly the compartment for dishes will be located. It is also worth choosing a place where meat or other products will be marinated.
On a note! A smokehouse-steam locomotive can be made in such a way that the prepared products can be laid out on grates or strung on hooks directly next to the unit.
Thanks to this, less dust and dirt will fall on the food, which can get on future smoked meats while walking.
Scheme and drawings
To ensure that the work process takes less time and that no difficulties arise during the assembly of the smokehouse, it is worth familiarizing yourself with the diagrams and drawings in advance. You can also make a project yourself, because in the case of this design, there is room for your imagination to run wild.
Required tools and materials
In order to build a steam locomotive smokehouse with your own hands, you should prepare the following tools:
- Suitable drawings and diagrams;
- Welding machine;
- Screwdriver and pliers;
- Paint that will not be afraid of high temperatures;
- High quality screws.
You can make the drawings yourself or find ready-made options on the Internet that will completely suit the owner of the future smokehouse.
Additional tools and materials should be prepared depending on what kind of structure will be assembled.
Manufacturing
Manufacturing begins with checking the quality of drawings according to the following parameters:
- presence of accurate markings;
- indication of the sizes of all elements.
After checking the quality of the drawing, you need to carefully consider the design according to:
- number of wheels;
- number of wagons.
If you can imagine the finished structure in your imagination and the result is satisfactory, you should begin preparing the materials.
Each stage of construction is carried out by repeatedly comparing the assembled structure with the drawing.
The base should be a durable fireproof metal. Suitable:
- gas cylinders with a volume of 50 liters;
- steel, cast iron products.
The recommended thickness of materials for surfaces in contact with fire is from 8 mm . Otherwise, with a smaller thickness, deformation and distortion of the structure are possible.
Product Features
The main task of a barbecue is to cook food over coals. The model in the form of a steam locomotive copes well with it, but also has a number of additional features and functions. This was largely possible thanks to the material used for its manufacture. All this is worth talking about separately.
Material of manufacture
Absolutely all models of such barbecues, without exception, are made of metal. This is the best material, as it is strong and durable, can withstand high temperatures, and is also easy to process and modify. We recommend that you study the article on creating a metal barbecue oven on our portal.
For factory production, as well as to make a grill for a locomotive with your own hands, cast iron or steel is used. Absolutely all structural elements are made from them.
Please note: due to its properties, metal allows you to cook juicy meat with a crispy crust.
In order for the product to last a long time, it is important that the metal used is of sufficient thickness. For surfaces in contact with fire and coals, the sheet thickness must be at least 8 mm. Otherwise, over time, the material will become thinner to such an extent that the grill will begin to deform under its own weight.
Design features
The main advantage of such complex models is their versatility. The barbecue in the shape of a steam locomotive has several compartments that provide a full range of devices for cooking in natural heat:
- grill - for open cooking of kebabs on skewers or vegetables on the grill;
- barbecue - juicy steaks on the grill seep in the aroma of smoke, and the lid creates oven conditions;
- hot smoking - the barbecue section can be used as a chamber for hot smoking;
- cold smoking - some models have a side chamber, which is intended for cold smoking of products.
We have previously written about a complex grill with barbecue, its features and manufacturing methods.
This model combines the functions of a grill, barbecue and smokehouse.
In addition, the design of the locomotive provides for the presence of shelves that can be used to store firewood, dishes, stove accessories and other equipment. Most products also have a visor. It will protect the roaster from rain and partly from strong winds.
Design
There are simply countless options for making a steam locomotive barbecue. Metal and complex complex design require the presence of a large number of specific decorative elements.
To give the barbecue thematic differences, parts are welded around the body that imitate the characteristic spare parts of the original locomotives: pistons, cylinders, grilles, etc. Also, most variations have a smoke exhaust pipe, a visor and wheels. You can also experiment with these details when creating a design project for your own barbecue. The decor is complemented by forged and cast inserts.
It is also worth noting that depending on the design and construction, the functionality of the product may change. At the same time, even in a small model it is fashionable to fit everything you need, without compromising its appearance.
The small design has additional shelves and has an interesting design at the bottom.
Having additional surfaces for processing food and placing items is a huge plus. As for the wheels, they play not only the role of decoration, but can also serve their intended purpose. This is especially true for large cast iron structures that are not easy to move manually. The wheels allow you to move the grill.
Advice: to avoid deformation and distortion, it is recommended to move the product only on a hard, flat surface.
Price
As for the price of the product, it all depends on a whole group of factors. Indicators that influence the final cost of the product are:
- type and quality of materials used;
- dimensions of the structure;
- functional;
- number of working sections;
- complexity and amount of decor;
- the presence of auxiliary elements: shelves, canopy, etc.;
- product weight;
- the complexity of its production.
We recommend that you read more about the barbecue made from car rims on our website.
A grill-smokehouse of this type costs several tens of thousands of rubles
The amount that you will have to pay for such beauty can range from several thousand to tens of thousands of rubles.
Because of such a huge cost, some craftsmen decide to make a grill-steam locomotive with their own hands. This can reduce the cost by several tens of times. In addition, if you have the skills to work with metal, there should not be any particular difficulties in the process.
Design
There are a lot of design options for a barbecue in the shape of a steam locomotive. Parts from:
- casting;
- forging
Decorative parts are distinguished by their specificity and diversity thanks to the unlimited imagination of the master.
Decorative elements can simultaneously perform a practical function: wheels move the product and serve as decoration. The diameter of the wheels can be the same or different in pairs (front, rear), the number of pairs of wheels can be two or more. Individual decorative elements (bell, lantern) serve as illumination.
The dimensions of the barbecue are determined by the amount of space for installation, but are not a limitation on functionality. A small Dutch oven can combine all the necessary elements (see example in the images below).
How to make a barbecue in the shape of a steam locomotive from a gas cylinder
The barbecue is one of the key structures needed for every summer cottage. It helps brighten up evening gatherings with friends and serves as home decoration. If you want to do something unusual, then a barbecue steam locomotive is a good idea. Stores sell ready-made roasters, but they are expensive. Cunning craftsmen decide to make a grill-steam locomotive from a gas cylinder with their own hands.
One of the options for a grill-steam locomotive on wheels along with a smokehouse and a chimney
Necessary materials
For the independent process of manufacturing this version of the fryer design you will need:
- metal in large quantities;
- various combinations of metals.
A large amount of metal includes a list of required materials consisting of:
- pipes (profiled ones are suitable);
- tank;
- barrels;
- sheet metal;
- empty gas cylinders;
- fittings, steel rods;
- corners.
It is possible to use other materials besides those listed.
Some elements can be made separately in a workshop to order; they are made from:
- become;
- cast iron
Selection of materials and set of tools
To make your own grill-steam locomotive you will need various metal bases. Depending on the capabilities, the appearance of the structure will vary.
The main materials used for the main body, frame structure, chimney, wheels and canopy are:
- steel pipes of the required diameter;
- profile pipe;
- tank, barrel, gas cylinder, can and other similar configuration products;
- sheet metal;
- construction fittings, rods;
- corners, etc.
Photo 5 Part of the steel pipe used to lay the gas main line is ideal for arranging the main body of the grill-steam locomotive.
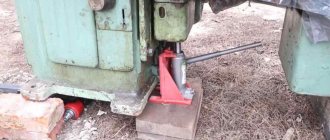
Since metal can be processed and deformed, this will require a special tool. In a factory setting, cutting large-diameter pipes will be done with a hacksaw; for home purposes, it will be enough to use:
- Bulgarians;
- rasp;
- welding machine;
- a device for artistic forging called a “snail”. This device is used to process metal workpieces.
- Electric drills.
- Hammer and sledgehammer.
It is important to know! At home, you can make your own mechanisms for bending rods and forging decorative elements. The presence of such devices simplifies the process of manufacturing decorative elements (curls of various shapes)
Photo 6 Pipe scraps can serve as wheels.
Welded frame
A welded frame is manufactured according to the prepared drawing . It represents the frame of the future product. A welded frame can be made from:
- profiled pipes (the cross-section can be square);
- round pipes;
- corners;
- reinforcing bars.
Once the appropriate material has been selected, you will need :
- Using a grinder, cut the elements.
- Connect all structural elements using a welding machine.
- Leave until the finished frame has cooled completely.
- Clean the seams on the cooled frame using a grinder (you need a sanding attachment) or a file.
- Inspect the finished frame.
- If a defect is identified, you need to remove excess metal and repeat the welding.
When all the steps are completed and no defects are detected on the frame, you should move on to the next stage - manufacturing the body.
Handles and blower for fire
Now you need to weld the grill handles. Their shape and appearance are unimportant. Any heat-resistant material will be useful for the job. It is easiest to use concave reinforcement. However, then you will have to attach a piece of wood to it to avoid heating the metal. Stages:
- The lid may fall inside the cylinder, so it is recommended to weld a metal strip (2x3) around the perimeter.
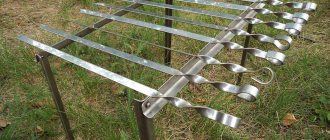
- Using the old marks in the grill, recesses for skewers (10 mm) are made. On the back side of the cylinder (opposite the holes) small cuts are made in the plate.
Next we proceed to blowing up the barbecue-steam locomotive, since the fuel burns poorly without the supply of oxygen. The frypot turns over. Process:
- You need to move 10 cm away from the seam in both directions.
- Measure 10-12 cm from this line so that you end up with longitudinal stripes.
- Small slits are made across each one, 5-7 cm apart. These may be holes, but then the number will have to be increased.
It is better not to make holes in the bottom of the cylinder. The first reason is that it is recommended to leave the factory seam intact, otherwise the structure will lose its rigidity. The second is that fat from the meat falls to the bottom and clogs the holes, which is why air will eventually stop flowing to the fire.
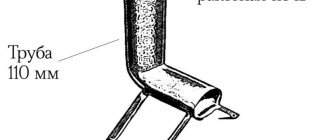
The final touches to arranging the brazier are cutting off the tap. In its place, you need to attach a bent metal pipe to remove smoke and ventilate the system.
The chimney allows you to remove excess smoke, smoke meat and simplifies the cooking process
The base of the barbecue is ready - all that remains is to attach the frame for the stand and fasten the wheels, and weld the decorative elements so that the structure looks like a steam locomotive.
Welded frame and rack housing
You need to measure the finished grill. This determines where the wheels, frame and additional elements will be attached. Job:
- Racks can be made of reinforcement, solid sheet or pipe. The corners are cut into 4 pieces of equal length (50-70 cm).
- Then they are welded to the grill at the marking points at an equal distance from each other.
- Next, the frame is formed - additional corners are attached diagonally from the bottom point of one leg to the top of the other (the junction with the cylinder).
- Thin metal sheets are welded on top of the frame on the sides to form a kind of box. They should protrude slightly from the front, then cut at an angle. Rings are welded onto the sheets - they can be made from car wheels or cut into circles from another cylinder. Important! The frame must firmly fix the grill so that it cannot tip over.
At this stage you will have to use your imagination to make wheels, side covers, and other decorative elements reminiscent of a train
Painting the structure
You need heat-resistant paint - the container heats up to 800 degrees Celsius, and this coating will also prevent rust from forming.
The old coating must be removed before applying a new layer. To do this, use sandpaper or a special attachment on a drill. The metal is degreased with acetone and primed. Next, paint is applied to the container using a brush or spray.
Frame
To create a horizontal body, use :
- empty gas cylinders;
- tank;
- can.
It is possible to use other items that are suitable for this. If an empty gas cylinder is used as a housing, it must be properly disassembled.
Rules and sequence of working with cylinders:
- Remaining gases are released.
- The crane is twisted.
- If you cannot twist the tap, you must use a gas wrench.
- If the transitions from the tap to the cylinder are covered with rust, water is poured inside. The balloon is completely filled with water through a dropper.
Water is poured into the cylinders under cover to prevent clogging.
When clogging, water is poured in small portions .
When the cylinder is prepared, proceed to the construction of the hull structure:
- The top is cut using a grinder.
- The cut out part is welded and placed on the hinges.
- A handle is mounted to the resulting lid.
- If pipes are used, the side parts are plugged.
It is recommended to make handles from wood. This will prevent skin burns.
The first body element is ready. Now you need to build a side chamber:
- Using sheet steel, the box is welded.
- Through the channel there is a connection between the box and the tank.
The chamber may have a lid or door.
When two parts are ready:
- The body and frame are connected by electric welding.
- The sides of the frame are covered with metal sheets.
This completes the creation of the frame.
Frame and body
The frame is the frame of the structure on which the working surfaces will be placed: the grill itself, additional barbecues, smokehouses, etc.
To create it, profile pipes, fittings, angles and rods are usually used. Most often it looks like a rectangle on legs, reinforced with crossbars. One of the sides can be beveled to imitate the front of a steam locomotive.
To create a frame, use a grinder to cut the required number of sections of profile pipe, then connect them by welding.
After the structure has cooled, the seams are cleaned using a grinder attachment and a file.
Be sure to check the integrity and strength of the solder
If you notice defects in the soldering, be sure to cut the problem area and repeat the procedure again, otherwise in the future the fall of a large structure with burning firewood may cause an accident.
The next step is making the case.
If you are using an old gas cylinder, it must be vented beforehand, otherwise it will explode if you try to cut the body!
Cleaning the cylinder of gas residues is a necessary part of the work.
To release the remaining gas, turn off the tap. The stopper can be knocked down, and if it is rusty, use a gas wrench. Also open the passage to the tap. Using a dropper or hose, completely fill the container with water - it will displace the gas. The liquid must reach the tap adapter.
Drain the water, let the container dry, then cut out a long rectangle from one side, slightly short of the edges. Weld the hinge to the cut out area and the base to form a door. A handle is also welded to the door. It is advisable to have a wooden attachment on it - this will protect your hands from burns while working.
If desired, you can make a smokehouse from the second cylinder. A side door is also made in it, and grates for food are installed inside. It is connected to the first cylinder with an adapter tube.
The smoking room can also be rectangular. In this case, it is welded from solid sheets of metal in the shape of a box. In a “locomotive” it is often installed in place of the “driver’s cabin”.
All body elements are secured to the frame with a welding seam.
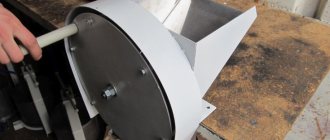
Wheels and decor
It is recommended that the installation and manufacture of wheels be carried out before the body is mounted. They are welded to the frame first, and then the body.
The number and diameter of wheels is determined by the selected design option. Most often they are prepared from pipes:
- Select the diameter of the pipes in accordance with the parameters in the drawing.
- Mark the segments.
- Using a grinder, cut out elements of a given width according to the markings.
Decoration is done:
- twigs;
- curls;
- with rivets.
Decorations can be made additionally . Forged elements made to order by a craftsman will perfectly decorate the product and make it unique.
The grill can be made entirely of forging.
An example is shown in the image.
A forged barbecue can only be made by a master.
Price issue
The total cost of the finished product depends on many factors. The main parameters that absorb most of the product estimate:
- the selected material and its quality;
- overall dimensions of the grill;
- equipping with additional functions;
- number of functionally significant departments;
- the number of decorative elements, as well as the complexity of their execution;
- auxiliary parts: canopy, shelves, etc.;
- weight of the structure;
- technical manufacturing features.
You may be interested in additionally reading the material on our website about a barbecue made from car rims.
Photo 4 The price of a barbecue with a smokehouse of a similar model starts from 20 thousand rubles.
It is worth noting that the amount spent on a grill-steam locomotive ranges from a thousand to several tens of thousands of rubles.
The first option is only possible if you manufacture it yourself and have the basic metal parts available. The main requirements are skills in working with metal and strictly adhere to the design plan.
How to make legs for a barbecue?
There are braziers with legs. Craftsmen recommend equipping them with wheels. This will make the structure capable of transportation.
The height of the legs is prepared based on the wishes of the owners:
- In accordance with the parameters, markings are made on the selected pipes.
- The corresponding areas are cut out.
- The bottom of the device is equipped with four holes.
- Bolts are inserted into the holes with the threads facing outward.
- Each bolt is tightened and welded. With the help of them the legs are attached to the bottom.
- Nuts are welded at the top of the legs, with which they will be connected to the fryer.
Drawings and calculations
The next step in preparation will be drawing up drawings and carrying out calculations. When drawing up a drawing, you need to carefully consider all the details. These include the location:
- blower holes;
- legs;
- smoke exhaust pipes;
- cutouts for skewers;
- loops;
- corner;
- pens;
- shelves for firewood;
- cylinder stand.
Afterwards, you need to place markings on the cylinder according to the drawing. It is advisable to make the cut for the lid of the future grill exactly in the middle of the cylinder, and do not forget to leave small indents at the ends. For example, for a 50 liter container, the indentation on each side will be 20 mm.
Precautionary measures
When making a fryer from a gas cylinder, you should be very careful and take precautions before starting work. Even empty, it contains propane residues and condensation, which can lead to an explosion if you try to open it. Before making a grill from a gas cylinder, you must carefully release all the gas from it.
Before making a grill from a gas cylinder, you must carefully release all the gas from it.
To remove condensation, you need to use a gas key to open the valve and turn the cylinder upside down for several hours. After this, the empty container is filled with water containing detergent. Leave the solution for several days. During this period, all harmful and dangerous substances will leave the walls of the future grill, and you can start working with it calmly.
Manufacturing stages
Making a grill yourself consists of several stages - marking, sawing, assembling, installing legs, installing a lid and handle. After the balloon has been treated with soapy water, you can begin work.
Marking of a container with a standard diameter of 50 liters, which is 96 cm:
- put the cylinder on its side;
- from the longitudinal welding line, measure 24 cm in both directions, which will divide the container exactly in half, and draw the first horizontal line;
- measure 3 cm from both ends and apply more markings in a circle;
- leave several marks for skewers on the first line, the distance between them should be no more than 8-10 cm;
- Use the last marking to mark the covers, while on the front side measure 10 cm upward from the first horizontal line and draw another one.
Sawing and assembly:
- cut the cylinder in half along the first line using a grinder;
- weld or bolt one edge of the cover;
- only after this cut out the sides of the lid along the second horizontal line;
- weld limiter corners on the outside and inside, between the hinges, that will prevent deformation of the lid;
- At both ends, attach steel strips by welding, which will allow you to fix the lid when closing the grill;
- to prevent the lid from tilting back, chains are welded to it on one or both sides;
- on the first longitudinal line, make notches according to the markings using a grinder;
- on the parallel side opposite each recess, drill holes Ø 1 cm;
- Use a drill to make several holes at the bottom of the roasting pan in a checkerboard pattern (for good traction);
Weld a pipe in place of the former valve.
Installation of legs.
The legs are attached to the ends of the grill, two pieces on each side. It is advisable to strengthen them together with the help of corners, which will provide the structure with greater stability.
Before installation, you should determine the height of the fryer. 1 meter is considered the most optimal, but you can make it a little higher or lower, focusing on your height.
To secure the legs, the grill is turned upside down. Then 4 holes are drilled in it, into which the bolts are inserted with the threads facing outward. They can be either welded or screwed to the legs. In the first case, the fasteners are first welded to the bottom and then to the support. In the second, nuts are welded to the legs, to which bolts, previously inserted into the bottom, are screwed.
Below the grill, you can attach a grate to the legs for firewood and other barbecue accessories.
Installation of the handle.
Drill 2 holes on the front side. Insert the bolts into them and screw the handle. You can use both ready-made ones, made from heat-resistant materials, and those made independently from a metal rod.
Additional accessories
Additionally, the roaster can be equipped with:
- hooks;
- shelves;
- hood;
- canopy
Dishes are stored on the shelves, hooks serve as hangers.
The material for the hooks is wire or nails. Excess smoke is removed using hoods.
Their construction:
- A pipe is mounted in the front of the housing or next to the chamber.
- A cone-shaped plate is welded at the top - thanks to it, precipitation will not get inside.
Sheds are made from sections of metal barrels.
After all additional elements have been installed and the structure is ready, it needs to be painted, which includes the following steps:
- Cleaning the surface with sandpaper.
- Degreasing the surface with a solvent.
- Coating with paint.
Corrosion protection is provided by the use of special fire-resistant thermal paints. All paint containers must state that they are suitable for use on metal surfaces. For the coloring composition, the following must additionally be indicated:
- use at high temperatures (from 650 to 1000 degrees);
- application tool (brush).
There are paints on sale that can withstand heat up to 1000 degrees.
They use composite materials and heat-resistant glass.
Grill-steam locomotive with smoking function
The element that distinguishes the grill-smokehouse is called the firebox. The manufacturing sequence is identical to the one above, but you need to make a firebox and a place for it separately. To do this you will need to do the following:
- The bottom of the cylinder is cut off by 1/2. This is where the firebox will be located.
- The cut is polished.
- A lid is attached to the bottom of the barbecue base on hinges.
- Holes are drilled at the bottom of the firebox.
- A box with a diameter of 10 to 15 cm (pipe) is welded to the bottom of the base.
- The chimney and smoking chamber are attached to the pipe. Any containers can be used for smoking chambers.
Examples of barbecues-steam locomotives with a smoking function (smokehouse) of industrial production (top) and do-it-yourself (bottom) are presented in the images below.
DIY materials and assembly
First of all, before you start assembling the locomotive barbecue with your own hands, you need to decide on its exact location in the garden, make a detailed plan drawing showing all the features and dimensions of the structure. Next, we proceed to preparation, purchasing the necessary materials, tools, and accessories.
To assemble it yourself, we will need to acquire:
- Steel pipes with different diameters;
- A tank, barrel, empty gas cylinder, can or any other similar object;
- Sheet metal;
- Profile pipes;
- Steel rods, fittings;
- Corners.
In order to work comfortably and safely with metal components, sheets, and fittings, you will need to buy or rent:
- Bulgarian;
- File;
- Welding machine;
- “Snail” for creating forged elements;
- Drill, hammer or sledgehammer to choose from.
If necessary, you can design your own devices for assembling forged parts - this will help you produce products of any level of complexity from simple metal rods.
At the first stage of assembly work, it is necessary to assemble the so-called support or frame, which is based on profiled pipes; they provide the installation with maximum strength and stability. The cross-section of the pipe can be either round or square; for additional fixation, strengthen the frame with corners and reinforcing rods.
The overall dimensions and shape of the unit are selected individually in each case and adjusted using drawings; it is important that initially there is space left for the main part of the grill, wheels, and auxiliary elements. Cutting metal rods and pipes is carried out using a grinder; for a reliable, strong connection of structural elements with each other, it is necessary to use a welding machine, then wait until the seams harden well and perform processing using a grinding wheel or file
If adhesions and defects are detected, they are cut off and welding is repeated
Cutting metal rods and pipes is carried out using a grinder; for a reliable, strong connection of structural elements with each other, it is necessary to use a welding machine, then wait until the seams harden well and perform processing using a grinding wheel or file. If adhesions and defects are detected, they are cut off and welding is repeated.
Now we proceed to assembling the body of the product - it can be either a horizontally located grill and barbecue, with a vertical chamber (smoking zone), or an open grill, next to the adjacent firebox.
To make the body you will need a pipe with a large diameter, a gas cylinder (completely empty), a tank and a can. We adjust the material or container to the required dimensions indicated in the drawing; under the barbecue it is necessary to cut off the upper part of the pipe. We install the cut element in its place and fix it with hinges, it will serve as a cover, we make a hole for the handle and install it, it is best that the handle does not heat up while using the barbecue, it is equipped with a protective cover made of wood.
It is best to use an empty gas cylinder as a base, since in this case you will not have to think about how and what to make the rounded sides, which are not left, for example, when cutting off the top part of the pipe.
Now we begin assembling the side compartment, which is made of steel sheets, has a square shape and is equipped with a lid. This structural element is connected to the main part of the barbecue through a special channel; the assembly can also be made from corner profiles. All structural elements, including the frame and body, must be welded together, the sidewalls are also covered with sheet metal.
To give the device stability, it is necessary to prepare special wheels; they are assembled in advance and welded to the body before the equipment is installed. To achieve maximum resemblance to a steam locomotive, you will need to create and secure about 4-6 wheels, which can have different thicknesses and diameters.
Wheels are made from pipes of various diameters, which must be cut and given a characteristic shape and outline. The elements located at the rear of the train will have a larger diameter than those at the front; the interior is decorated at your discretion with various patterns, curls and forging elements, which can be made from sheet steel.
This video provides an overview of the garden grill of a steam locomotive for frying barbecue, made by yourself:
Work examples
Below are examples of ready-made, already implemented projects of roasters in the shape of a steam locomotive, which can be taken as a basis, reproduced entirely by the hands of a craftsman, to order, or independently. An interesting version of the barbecue is shown in the video
A grill-smokehouse in the shape of a steam locomotive with golden finishing elements.
Model with stripes on wheels.
Option on 4 pairs of wheels with a pipe.
Each of the presented models will be an original solution.
The video describes the product in detail
Cylinder marking diagram
- Since the circumference of the large balloon is 96 cm, it should be divided into 4 parts, starting by marking the distance from the outer longitudinal seam to ensure uniformity.
- Then you need to retreat 24 cm from this seam on both sides and draw 2 lines with a marker. After this, place the cylinder on the ground and make the necessary marks in the places where the skewers will be located.
- You should step back approximately 3-4 cm from the lower and upper transverse seam and draw a cutting line with a marker. A standard cylinder contains steel rings inside, so it is necessary to cut it in such a way as not to touch them, since they will serve as a support for the lid of the “Train Locomotive” barbecue.
- From the first and second marks it is necessary to place points of 10 cm for attaching the wheels of the locomotive.
- The boundaries of the lid will be 2 lines that were marked from the longitudinal seam of the cylinder (24 cm each).