Simple and clear instructions on how to make a guitar out of cardboard at home, especially for those who like to make musical instruments with their own hands.
If your child, after watching the cartoons “Rock Dog”, “Kubo: Legend of the Samurai” or “The Secret of Coco”, is fired up with the idea of learning to play the guitar, this does not mean that you need to immediately run to the store to buy an instrument. First, make a guitar out of cardboard with your own hands. It is quite possible that this will be enough for children to set their teeth on edge.
We offer three ways to make a guitar out of cardboard with your own hands.
How to make a guitar out of cardboard
Before work, you need to prepare materials and tools. It’s good if the master has the desired sample in front of him, for example, a picture or photograph of a guitar.
First you need to collect what you need:
- durable cardboard;
- hot glue;
- PVA glue;
- small nails;
- fishing line;
- ruler, pencil;
- stationery knife;
- finishing putty, wood putty;
- varnish;
- spray paint;
- sandpaper;
- old guitar string.
Now the process of creating a small masterpiece:
- Find a suitable image of a guitar, print it and cut it out. Transfer the template to thick cardboard.
- Sand the edges of the cut guitar with sandpaper. Cut out the second part and sand it the same way. Then put the parts together and grind them again.
- Measure the side inserts and cut strips of cardboard to the required size. Glue the parts together with hot glue. Glue stiffening ribs inside the guitar, which will help keep the body strong.
- Glue the upper deck onto the lower one. Cut off the dried glue with a knife. Sand again.
- Coat the body of the guitar with PVA. Dry and apply putty, previously diluted with PVA, in 2-3 layers. After each drying, prime with glue diluted with water in a 1:1 ratio.
- After drying, go over the workpiece with sandpaper. Apply wood putty. Sand again. After this procedure, the surface of the guitar will be very smooth and even.
- To make the neck, we cut out three cardboard pieces according to the template. We glue all parts with PVA. Using the familiar system, we treat the fingerboard with finishing putty, primer and wood putty.
- We use the same principle to make a stand for strings.
- Using hot glue we assemble all the parts of the guitar.
- We paint the instrument in the desired color and apply varnish.
- From a guitar string or fishing line, we cut out small strings for a micro guitar and attach them.
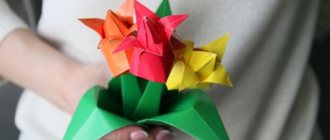
As it turns out, making a rock guitar out of cardboard is not that difficult.
Cute little thing
A musical instrument made from scrap materials is not so much a practical item as a decorative one. If you make a guitar out of cardboard, like a real one, big and with strings, you might even be able to play it.
Small cardboard instruments are used as souvenirs, for home decoration and as original gifts. A small cardboard guitar, made with love and decorated with cool inscriptions, will undoubtedly delight a friend on his birthday.
How to make a guitar out of cardboard with your own hands, and what is needed for this? Let's consider this issue in more detail, because, for sure, everyone has someone who will be pleased with such a gift.
Create a template
Draw the outline of a playing guitar on a piece of paper. The toy can be any size. It all depends on the age of your child. But, of course, the guitar will in any case be much smaller than a real standard adult instrument. Cut out the drawn guitar with scissors.
If you have no drawing experience at all, you can try looking for a guitar template on the Internet. In this case, the found file will simply need to be printed on a printer and cut with scissors.
The final stage
The next step is to glue the third large piece of cardboard cut out to the guitar. This part should be located on the side of the paper clips.
Next, glue two small parts of the guitar body without the hole and neck on the back. This way you will make the toy instrument thicker and more realistic.
Upper holder
Take a short piece of pencil and make 4 grooves on it for the strings. Simply cut out the nests using a utility knife.
Make a short, shallow cut on the guitar neck just below the headstock. Just like under the hole on the body, run your finger along the cut, pushing through the groove. Apply glue to one side of a short piece of pencil. Glue a short piece into the groove. This way you will make the top string holder.
Place 4 dots above the holder at equal distances from each other. Make through holes in these places.
How to make an electric guitar left-handed
Many left-handers are naturally concerned with the question of how to properly make an electric guitar left-handed. To do this, you will need to remove all the strings from the instrument and turn it over. It is also optimal if you purchase a new string nut.
All that is necessary is to insert a new one in place of the glued threshold. This must be done in such a way that the hole for the sixth string is in place of the first, and the first in place of the sixth. The remaining strings must be tensioned in a mirror order. That's all.
In this article, we looked at only one idea on how to make an electric guitar yourself. There are others. Therefore, have patience and confidence in your abilities and dare - create. This hand-made electric guitar will become a source of pride for you.
A simple way to make a tool
Boys love to play rock musicians. You can make a toy instrument for a little guitarist in a matter of minutes. You will need:
- cardboard;
- scissors;
- stationery knife;
- pencil;
- fishing line or thread;
- popsicle stick;
- hot melt adhesive.
Let's start making:
- Let's cut out 3 parts of a whole guitar from cardboard according to the template.
- We glue all the parts together. We process uneven edges with a stationery knife.
- Cut a circle in the drum of a cardboard tool. Glue an ice cream stick as a stand for the strings. Under it we cut out or drill holes for future artificial strings.
- If desired, the guitar can be painted in any color, coated with varnish or PVA glue.
- After drying, thread strings made from fishing line or elastic.
The guitar for the young musician is ready!
My daughter is a big Hana Montana fan, so the guitar is her dream. Buying a “real” small guitar turned out to be an impossible task, so they decided to create their own guitar out of cardboard.
To create such an unusual musical instrument you will need:
cardboard, A4 paper - two sheets; PVA glue; glue gun; rubber; the knife is sharp; scissors; ruler; two paper clips; an awl or large needle; a simple pencil for drawings and two for a guitar, or two straight sticks, small in length and thickness.
Draw the outline of a guitar on A4 paper. I offer you a ready-made drawing for this paper format. By saving and enlarging it, as well as printing and cutting it out, you will receive a finished stencil of the product.
I printed the bottom of the drawing on one sheet, the top of the drawing on the other, and stapled them together. I traced the stencil on cardboard. The procedure had to be repeated several times.
You need to make four to five parts. Two or one of them without the top. This is the “back” wall of our instrument.
Make a hole in the middle of the three “full” parts.
Glue two pieces of each type. One part with a hole remains untouched.
We will prepare bridges for our strings from a pencil or sticks.
To do this, cut out 9 cm and 4.5 cm segments from a pencil. Make four notches on them at equal distances for future strings. I did 1 cm between each notch.
The photo shows pencil segments for bridges and paper clips for tensioning strings.
On the part fastened from two parts, make indentations for pencil segments.
Glue the already prepared sticks or pencils with notches. I made three (an additional one in the middle of the instrument) to better secure the strings.
Glue the free “full” part to the “rear” double wall of the guitar.
Now you need to thread the strings themselves into the “front” part. To do this, draw a line at a distance of 1-1.5 cm from the bridge and make marks opposite the notches.
Use a large needle or awl to make holes.
When threading the elastic, fasten it on the reverse side with paper clips. Stretch the rubber band well, then the sounds from it will be clear, like a real guitar.
Glue the paper clips themselves (don't forget to slightly pull them away from the holes) using a glue gun.
Connect the “front” and “back” parts and secure with glue.
The musical instrument for the future mega star is ready! I propose to give the instrument to the future owner or owner of the guitar, according to his or her taste and desire.
Hello!
I’ve already painted a lot of guitars (for example, an acoustic guitar from the back, an acoustic guitar from the front, a bass guitar) and I didn’t know that it’s now popular to make mini guitars out of paper.
I decided to try to make my own guitar out of paper.
. I made my own copy of a real Martinez guitar.
I immediately apologize for the carpet on which I did all the work, although almost everyone had it (and not only it).
We will need:
1) Cardboard or thick paper (the base of the guitar.)
2) Colored paper (depending on the model of guitar you chose. I have black and brown)
3) Molar tape (paper)
4) Scissors and utility knife
5) Stationery glue (any other can be used) and “moment” or “second” glue
6) Toothpicks (for pegs)
7) Threads (for strings)
 White paint (for drawing on the guitar. I used PVA tempera. You can also use gouache.)
9) Varnish (I used nitro NC)
10) Crazy hands
1. Making the decks. Cut out two identical decks from cardboard. First draw an outline with a pencil. We make a hole in only one of them. I used scissors and a utility knife to make a hole in the deck.
2. Cut out the sides of the deck. Two strips and small strips for gluing the entire deck.
3. We begin to glue the deck in small strips. I used masking tape. I glued these small strips in sloppy pieces and glued the two parts of the guitar soundboard together.
4. Let's continue
5. Let's continue
6. Now it’s more difficult. We begin to glue the second side of the deck. Before doing this, it is advisable to place spacers in different places vertically so that our guitar does not bend further. At this stage you will have to be smart. It will turn out differently for everyone. At the end there is a small gap that can be easily filled with glue (we will glue colored paper on top anyway).
8. Glue colored paper onto the deck itself. The edges can always be trimmed.
9. Stripe mode for the future neck. I measured the length by first drawing the layout on paper. We glue them together.
10. Glue the fingerboard. After that, we glue colored paper using the same pattern. Let's put some points in order. To strengthen the neck (stiffness), you can first insert a wire into the middle of the neck.
11. We make the headstock according to the same principle as the neck itself (depending only on the model of the guitar you choose). We also glue 3 strips together for the threshold.
Glue everything together.
Finally I varnished it.
I made the pegs from toothpicks. I glued everything with “moment” glue.
The drawing was done by myself with a brush and paint. You can use a pen or a fine marker.
The most difficult thing is how to make strings for a paper guitar
?
I took a regular white thread and made 3 threads out of it using a needle. This is a very inconvenient and stupid task, but the main thing is the result.
I glued the threads with a drop of glue. First at the threshold. Waited for it to dry. Then at the stake.
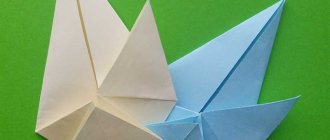
Make a paper guitar with your own hands
possible in 2-4 hours, taking into account the drying of the varnish.
And my result:
If you have any questions, ask! I will answer.
front side
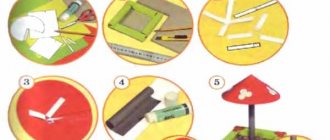
Master class for teachers “Making a balalaika using decoupage technique”
1. Draw a template on paper and cut out balalaikas from plywood with a jigsaw.
2. Prime the balalaikas with acrylic paint. Let it dry.
3. Apply the design of the neck and paint it with black paint. We paint the deck brown.
4. Select the desired design on a napkin.
5. Cut off the desired element of the picture.
6. Using a file, apply the design to the balalaika.
7. Glue with PVA glue from the middle to the edges
8. Paint over and draw on the background of the balalaika.
9. Then we draw the balalaika strings using a corrector.
10. Open with varnish in the air.
11. BALALAYA is ready.
Speech formation in preschool children
Formation of speech in preschool children In children without speech pathology, the development of coherent speech occurs gradually along with the development of thinking and activity.
Abstract of the educational activity “Excursion to the farm yard”, senior group
Abstract of the educational activity “Excursion to the household yard”, senior group Integration of educational areas: “Cognitive development”, “Speech development”, “Social and communicative development”, “Artistic and aesthetic development”, “Physical development”. Goal: development.
Health-forming and health-saving technologies in working with preschoolers
Health-forming and health-saving technologies in working with preschoolers The profession of a teacher is an extremely responsible one, requiring full dedication and maximum responsibility from the specialist.
Cognitive leisure in the senior group "Fire Safety"
Cognitive leisure in the senior group “Fire Safety” Program content Educational tasks 1. To consolidate knowledge about fire safety, rules of behavior and fire fighting c.
Master class on decorating the Balalaika attribute with your own hands
Natalya Belogurova Master class on decorating the Balalaika attribute with your own hands
One summer, in our kindergarten, we were going through the attributes for matinees, removing old ones that had become unsuitable for use. Among them were balalaikas - or rather an imitation, a thin plywood silhouette on which three strings were painted in gouache. The gouache has smeared or worn off from use. The appearance of the balalaikas was, it must be said, quite deplorable and they had to go into the trash container. Oh, how they didn’t want to end up in a trash container after the stage and applause for the young artists they helped perform at matinees. But what to do if a harsh sentence is passed and the verdict is signed? We can only hope for a miracle. Do miracles really happen? Of course they happen, but not everyone notices them. Everyone is waiting for the big and incredible. But small miracles also happen, and whoever believes will definitely see them, and they will not go unnoticed.
I was tasked with taking the balalaikas to the landfill. For some reason I felt sorry for the attributes that had expired. And the thought came to me: shouldn’t I give them a second life? Taking them in her hands and twirling them a little, she asked permission not to get rid of them, but to give them a chance to change their appearance. Having received consent, I got to work. I myself was interested in what would come out of this venture, especially since there was no risk, there was enough time at that moment, and I also needed visual material for the art studio.
The first thing I did was remove the old gouache from the blanks and clean them with sandpaper.
Then, I prepared it for painting.
For Gorodets and Ural-Siberian painting I painted it with light yellow paint. I painted two blanks with gold-colored artistic acrylic paint for Khokhloma painting. There was still one more, the scariest one, I decided to give her a strict black background. When the blanks had dried, I began painting directly. I painted with artistic oil paints, taking my time and enjoying the work. It was summer, there were no classes in the art studio, the window could easily be opened for ventilation, since I used a thinner to work with oil paints, and it has a specific smell. For painting I took squirrel brushes and it was a pleasure to work with them. They are soft, obedient, hold paint well, and can be used to make a stroke of the desired shape and size, a curl, and draw lines of different widths, either with the whole pile or with the end.
On the first balalaika, with a gold helium pen, I drew elements of Gorodets painting: leaves, flowers and roses.
For the second balalaika I used Ural-Siberian painting; it is little known here, but I decided that it would not be superfluous.
Since childhood, I really love Khokhloma, so the other two received Khokhloma outfits. For one I chose the “berry-like” motif, and for the other I chose “curl”.
The last one remained in strict black. I left it for later, thinking about what outfit to give her. I spotted a pattern for it on a toy – there was a dog from Sergiev Posad standing on a shelf. The pattern is simple, but it is the black background that makes it attractive and elegant.
When the oil paints had dried, I coated the balalaikas with varnish. I covered the ones that were painted with Khokhloma painting several times, I wanted them to last longer. I had to work with the varnish outside and left the balalaikas there to dry because of the smell of the varnish.
And after that, they were no longer recognizable. Transformed with paintings of folk crafts, balalaikas in elegant skirts remained in the art studio and took their rightful place on the shelf and began to serve faithfully.
In the art studio they always help in decorative drawing classes, and act as exhibits when organizing exhibitions dedicated to folk crafts and traditions of the Russian people in our mini-garden museum. And of course they fell in love as an attribute at holidays and matinees. And again they saw the balalaikas full of guests, heard applause, were able to show off and show off their new outfits. And most importantly, they again felt the warmth of human hands, those that transformed them and small children's ones that held them like real instruments. And quiet joy flowed that they were useful and could still serve faithfully in introducing children to the arts and crafts and traditions of the Russian people.
More than ten years have passed and despite the fact that they were actively used and continue to be used, they have not lost their aesthetics and attractiveness.
Perhaps you, too, may have a case when you don’t have to rush to the trash container, but give an outdated attribute a second life by transforming it, you just have to want it, show imagination, patience and accuracy in your work.
Thank you for your attention and wish you creative success!
www.maam.ru
Materials for decoupage - what to stock up on
The need for certain auxiliary means and tools is dictated by the specific goal of the master, or rather, the subject with which he is dealing. Beginning creators are not recommended to immediately move on to valuable exhibits, to comprehend the basics of decoupage and to hone basic skills better on the simplest objects - cardboard boxes or wooden plates (if necessary, blanks can be easily found in handicraft stores).
The surface should be as flat, smooth and clean as possible, otherwise disappointments are unlikely to be avoided - the appearance of the finished product will be spoiled by an unaesthetic relief
In the future, it will be possible to use items that have already been used (for example, an old kitchen board), it is only important to carefully clean off the remnants of the past decor
So, what materials should you stock up on for the decoupage technique:
- Sandpaper is primarily needed for sanding wood, but even if you have a completely smooth workpiece at your disposal, it will be useful for further sanding the primer base. When starting to sand, remember that the slightest roughness or unevenness can have a detrimental effect on the quality of the future product - fine-grained sandpaper will always have a job!
- Special brushes - they are divided into two types for distributing soil and for gluing paper. The size of brushes belonging to the first category is selected in accordance with the size of the surface, the main condition being a flat shape and sufficient width. Today you can easily find special brushes made of foam rubber, which look very similar to ordinary ones, with a wooden handle - the only difference is that a flat foam roller with a cut edge is offered to replace the bristles. Such a tool is very economical because it does not tend to absorb a lot of liquid. As for glue brushes, they should be quite soft so as not to damage the fragile paper. It is best to get a wide fan-shaped brush - it is equipped with long, silky bristles, applies glue extremely delicately, and is also easy to clean. By the way, the same brush is ideal for distributing varnish.
- Scissors will be needed to carefully cut out the transferred images. The dimensions of the tool are not decisive; the main thing is your personal convenience.
- The alcohol-containing composition is intended for degreasing the working surface. Absolutely any product will do - cologne, perfume, colorless pharmacy tincture or even facial tonic. Pure alcohol is also not forbidden - it will ensure the most reliable adhesion of the picture to the base.
- Primer is a primary coating that prepares the surface for direct contact with the image. At first, it is permissible to use an ordinary acrylic base for wood. The priority color is white.
- Glue - during the learning process, regular PVA can be used for work; it serves to secure the picture. More advanced craftsmen prefer to buy special glue for decoupage - less thick in consistency. However, PVA can also be safely diluted by combining it with water in a ratio of 21.
- The picture is the most important element of decoupage creativity. At first, as a rule, colorful napkins are used, but there are also a lot of special thematic cards - individual or grouped into sets. Experienced craftsmen often incorporate rice paper, which varies in shades and types, into their creativity. When handling a napkin, it is necessary to separate only the topmost, painted layer - it is this layer that is assigned the role of decorating the object.
- Varnish is a material that carries increased responsibility. A good coating cares not only about the appearance of the product, but also about its service life, so the practicality of decorated items depends on this factor. Decorators are not used to skimping on varnishing - the more layers, the better the result. When working at home, it makes sense to use less toxic varnishes - for example, acrylic or special decoupage, and outside your home you can safely use construction (for wood processing) and even yacht varnishes.
Mechanical processing of a converted fishing rod
After the resin has hardened, the final mechanical processing of the winter fishing rod made by hand into a balalaika takes place, which includes adjusting its shape and size to the requirements you need.
For these works you will need a flat file and “mixed-caliber” sandpaper. Sometimes additional impregnation of the joint between the foam pad and the reel container of a converted fishing rod is required.
To increase mechanical strength, you can also coat the entire surface of the foam with resin and then grind it.
Finally, the fully processed, dried overlay of the converted balalaika fishing rod is painted with nitro varnish in a bright color that is visible from afar in the snow.
Puncture of the channel for passing the fishing line
Next, in the lining for the winter balalaika fishing rod, you should pierce a channel hole for passing the fishing line. To do this, unscrew the screw and remove the coil. Inside the case we see a small hole for passing fishing line.
Using a needle or pencil lead, we apply a mark on the radial surface of the foam pad through this hole.
But here you should pay attention to the position in space of the two channels. One of them is designed for attaching a whip to a balalaika fishing rod in fishing conditions
The other is located under the reel and is used for transportation in the stowed position of the hook.
Before puncturing the channel in the lining for passing fishing line from the reel, both of the above-mentioned holes must be on the same line, although only in the same plane.
If this condition is met, we set a marking point from the coil container through the hole that already exists in it on the cover. Using a thick needle or thin awl, we pierce a through channel through the foam pad.
Ideally, this hole should run parallel to the previously formed blind hole, which serves as a seat for the whip of a winter fishing rod.
According to the second option, you can pierce (burn or drill) a channel to exit the container with a spool of fishing line at the very last stage, when the balalaika fishing rod is completely ready. Let it be new next to the existing one.
To better understand what you just read, take a look at the drawing of a completely self-made balalaika fishing rod at the bottom of the page.
After forming a channel in the foam pad for the passage of fishing line from the reel of converted tackle, we begin assembling the winter balalaika fishing rod.
Tags
by size.by size.dolls by size of their sizes and different sizes by size.for thicknesses and steel thickness 1 required thickness.sheet thickness 1for thicknesses and according to thickness selected large thickness and steel thickness 1 pile of materials analysis of materials and research material. The final material is presentedIllustrated material for analysis of materials and research material.Final material presentedIllustrated material for material for
thicknessmaterialblankschildrenrussiancountryproductscharacteristicsgoalnotesmassofcoursepopularoccupationsprojectdrawinggrouptree