Felt jewelry has become an essential accessory for women of all ages, regardless of status. Bright, original, stylish items can transform a girl dressed in a simple plain dress or blouse into a real fashionista. The interior of your home will only benefit if it is diversified with stylish felt decorations.
Can you crochet? Publish your work on kru4ok.ru
What is felt and where can you buy it?
This material is similar to felt, but is made from more delicate raw materials - wool, down with or without the addition of synthetics. Felt is available in various thicknesses, ranging from 1 mm to 5 mm, and is available in the following types:
- leafy;
- roll.
There are differences in density: felt for decorations can be used thick, soft or medium. But the choice of colors and shades of this material is extremely wide, which allows you to make jewelry bright, colorful, and rich.
Felt for decorations is sold in stores specializing in materials for needlework. The craftswoman can choose a set of sheets or strips, and, if necessary, sheets or rolls of the desired colors. The choice of felt depends on the type of decoration.
- interesting selection on kru4ok.ru!!!
- A selection of patterns and descriptions for crocheting jewelry
What kind of decorations are there?
Felt makes excellent decorations, because this material does not fray and does not require processing of the edges. You can make the following decorations with your own hands:
- hairpins;
- necklace, necklace, beads;
- earrings, bracelets, brooches;
- collars, belts;
- flowers;
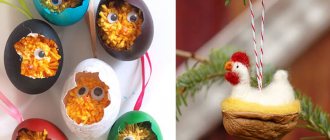
- Christmas decorations;
- keychains, etc.
You can decorate a bag, a wall panel, a photo frame, etc. with felt crafts. interior items. Felt parts are perfectly sewn, glued, fastened with metal rivets or shaped elements.
You can glue beads, rhinestones, buttons, etc. onto a felt base. Good decorations are obtained when roses are rolled out of felt or three-dimensional flowers are obtained by layering petals, fastening them in the center. The edges of the felt parts can be simply smooth, or when using special scissors, they can be curly.
Even from flat elements, skillfully arranged into multi-colored motifs, you can make an exclusive felt decoration with your own hands using chains and stitches with threads of contrasting colors. With minimal expenditure of money and time, craftsmen will be able to decorate a home and transform dull clothes into an exclusive fashionable outfit, one of a kind.
Flower clips, master class!
Today I will present to your attention a universal decoration that anyone can make!
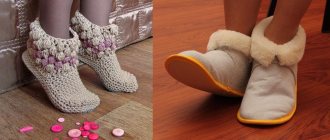
These decorations are available both in terms of materials and ease of execution. A lot of felt jewelry is presented at the Crafts Fair in the form of elastic bands, headbands, elastic bands, hairpins, and headbands.
I suggest you try clip-ons. No, not for the ears, but for the shoes. But their use is not limited to shoes.
They can be used as:
- brooch;
- barrette;
- decoration of a bracelet or belt;
- nursery decor (curtain ties, mobile decor, garlands, etc.).
We will need:
- felt in three colors (ivory, crimson, green);
- bases for tight buttons (I didn’t use the legs, only the hats);
- threads to match the felt, needle;
- clips;
- glue gun;
- scissors.
Interior bouquet of flowers
To make the decoration you will need the following materials: felt, floral wire, floral tape, glue gun, floral materials, polystyrene foam, scissors, awl, stamens, leaves, foam ball, dried flowers, jar.
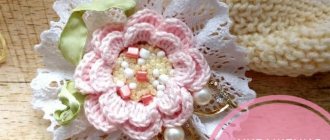
Decoration brooch
I’ll warn you right away - it’s not at all difficult to make such a beauty for yourself, or you can please your mom or beloved friend. To do this you need the following:
- felt 2-2.5mm thick, I have vanilla color for the flower and 2 shades of green for the leaves, close to natural greenery.
- beads, beads, buttons, etc. for the middle of the flower.
- clasp for a brooch (if you decide to make a flower brooch).
- thread, bead needle or just a very thin one.
- scissors
- heat gun
- a device for burning
DIY brooch made from zipper and felt
I would like to share with you the process of creating a brooch using mixed media, using zippers, felting wool and felt.
For work we need: a piece of felt, a little (very little) wool for felting, a needle for felting, a zipper with metal teeth, transparent “Moment” glue, a clasp for a brooch.
Candy bouquet - interior decoration
- Fleece - diameter 6.5 cm (finished flower diameter 3 cm)
- Felt - 16*3 cm.
- Ready-made polymer clay candies.
- Floss threads.
- Wire for creating stems for flowers, sushi sticks will also work.
Decoration - poppy
To make poppy seeds we need:
- Felt.
- Petal pattern.
- Button on the stem (for the middle of the flower).
- Beads.
- Floss.
- Brooch pin.
Simple and beautiful decoration - flower
Today I want to show you how to quickly and easily make a charming felt flower. In the settings for publication, the production time is set to at least 1 hour, but in fact this flower is made in just 10 minutes!
We will need:
- Felt strip 29x10 cm
- Scissors
- Fabric glue or thread and needle or sewing machine
- We cut out a strip of felt 25-30 cm long, 10 cm wide, or smaller, depending on what size flower you need.
Following this description you can make a very beautiful decoration:
Felt decoration butterfly
Difficulty: medium. Materials: Korean felt, scissors, glue gun, brooch base, beads, metal zipper.
Magic decoration Bird
At first I wanted to make a fabric bird, but it turned out that there was no suitable fabric. Well, the desire to create a bird can’t be avoided! I had to be content with what I had.
To make the decoration you will need:
- thin felt;
- thread or fishing line;
- modeling mass;
- pin or brooch base;
- beads, beads, sequins;
- scissors;
- paper;
- glue "Moment";
- synthetic fluff.
The bird should be small and interesting in shape. As a rule, many masters see such forms in hummingbirds, and they are right. But we also have our own bird! True, not so small, but quite large and well-fed. It's called bee-eater. We have golden bee-eater and green bee-eater. I decided to mix them up and make something in between.
Volumetric flower - hair decoration
I would like to bring to your attention a master class on making flowers like these. They can be used in many ways: brooches, decoration of children's hats, curtain holders, hair clips, and I think your imagination will suggest dozens more options.
How to make a bright bracelet from beads
You will need:
- large connecting rings
- small connecting rings
- beads or beads
- thin-nosed pliers (long-nose pliers)
- clasp.
1. To make the bases of the chain, open one large ring and place one bead on it, then close the ring.
2. Open another large ring, connect it to the first ring, add a bead and close the ring.
3. Repeat this step until your chain is long enough to fit comfortably on your wrist.
4. Add one clasp to each end of the bracelet.
5. Open one small ring, insert one bead into it, connect it to the larger ring and close it. Repeat this twice for each large ring - each large ring will have two small ones attached to it.
6. Continue these steps until the end of the chain and you will have a beautiful bracelet.
Felt jewelry, ideas and photos
The author of these striking works, Jane Smallcombe, lives in the UK. She opened an electronic store in 2008. She maintains her own blog, where she shares her successes, talks about where exhibitions are held, what inspires her, and posts her new works.
How to make flowers, photo master classes
A very beautiful flower from craftswoman Megan (news.holidash.com)
A delicate scattering of hydrangea flowers made of felt. Idea and master class from.
The author of the following work and master class is
Please note that leaves can be borrowed from other artificial flowers.
Variegated felt flowers
Author of the idea
Wonderful cute felt flower from
From felt you need to cut a strip of the following shape:
Fold the strip in half, stitch with thread and pull together.
Roll into a bud and secure:
Sew on leaves:
Beautiful decoration with a vintage touch
Author of the work.
As you can see, we need six petals of two sizes, large and smaller:
Fold them in the center and glue them together:
We form a flower on a circle of felt from petals:
Add a dainty center button or bead and you're done!
Another option for a voluminous flower is a felt decoration
Spiral flower - felt decoration
The spiral wrapping of the flower fits perfectly when using felt. The author of the work and master class is .
A cute three-dimensional flower from a craftswoman.
A very beautiful decoration - a felt flower
Author - craftswoman Sarah, resource. Elegant felt peony.
We will need a lot of petals: first we cut out rectangles, then we slightly “fringe and shape” one edge, and round the second edge. The craftswoman used 20 petals of different sizes to make the flower.
Apply glue to the rounded edge and pinch lightly.
Forming the main flower
We cut out a strip from yellow felt, cut one edge, roll it into a roll - we get stamens.
Cross weaving
This technique of weaving beaded baubles is best suited for beginners. Its schemes are simple and understandable, allowing you to quickly gain the necessary experience that allows you to move to the next level.
To make the simplest bracelet in 1 row, you will need beads, fishing line and 2 needles inserted into both ends.
- String 4 beads onto the fishing line (let's designate them as A, B, C, D).
- Using the 2nd needle, pass the fishing line crosswise through bead D, tighten and close the first cross.
- On the 1st needle (on the right) we string 2 beads (we will designate them as K and M), on the 2nd - one.
- We pass the second line through bead M in the same way as indicated in paragraph 2.
- Continue weaving until you get a chain of the desired length.
- When finished, close the chain by passing the 2nd line through bead B and tying it with a knot. Or attach a clasp.
- Melt the line so that the knot does not come undone.
This pattern of beaded baubles for beginners can be diversified by adding not one, but 2 - 3 beads on the sides, or passing a fishing line crosswise through a couple of nearby ones.
By combining beads, bugles and beads in one chain, you can achieve an interesting effect and end up with an original decoration.
Types of material
Felt is distinguished according to the following parameters:
A thickness of 1-2 mm is used for finishing, for openwork, carved parts. It is convenient to work with, it is easy to glue, sew, and assemble into multi-layer compositions and appliqués. A thicker base of 2-5 mm is suitable for large products and jewelry: handbags, books, emblems, patches;
Composition. Felt is made from 100% wool, acrylic and synthetic threads. Wool material is denser and retains heat better, but after washing it shrinks and pills appear.
Synthetic is more wear-resistant, with a minimum thickness of 2-1.5 mm it does not tear and holds its shape well. The acrylic version retains the properties of wool felt, but has a smooth structure; due to this, products made from it do not lose their original appearance for a long time.
Weaving patterns
For elementary products, creating a diagram is not necessary. But in order to weave a bracelet with a pattern, you either need to have phenomenal constructive thinking and memory, or still use a pattern.
Even the easiest master class for beginners is not complete without getting to know them, without teaching them to read and understand, because:
- They reflect the weaving technique: cross, flower, linen
- Allows you to build a pattern and match the color scheme
- They make it possible to calculate in advance the amount of material that will be needed for work
- Helps control the process and avoid mistakes
Homemade diagrams are drawn, as a rule, on a notebook sheet, adhering to the conventional scale of 1 bead = 1 cell. In the process of work, controlling the sequence of its implementation, so as not to get lost and not make a mistake, already woven rows in the diagram can be crossed out.
Choose or come up with a design, draw a pattern, weave and wear your own hand-made baubles with pleasure.
Step-by-step master class: bouquet
Clear your workplace and prepare the necessary materials.
Note!
How to make a rose from paper - the best ideas for DIY crafts + master classes on creating a rose from paper (160 photos)- Craft letter - TOP 120 photo reviews of craft letter. Simple diagrams + step-by-step DIY instructions
- Crafts made from nut shells: the best step-by-step master classes on creating DIY crafts with photo examples of finished works
Step 1. Print (draw) flower templates: daisies (3 tiers: large, 8-10 cm in diameter, medium 6-8 cm, small 4-5 cm - for one flower), roses (circles 3-4 cm, 15 pieces per one rose), tulips (rectangular strips, 15 cm long), leaves.
Step 2. Cut out the pieces from the fabric.
Step 3. Collect the flower.
Chamomile
Glue the tiers for the chamomile together, aligning the center. Place a yellow circle in the middle. Glue the sepals to the bottom. Attach the wire wrapped in fabric.
Roses
Collect petals for the rose from the center, starting with the smallest ones, in a circle. Glue at the base.
Note!
Mushroom craft - reviews of ready-made DIY crafts + step-by-step instructions and diagrams for children (180 photos)Crafts from toilet rolls: step-by-step instructions for creating crafts. Master classes with simple work schemes (140 photos)
Crafts from corrugated paper - step-by-step master classes on how to create crafts from corrugated paper with your own hands + photo diagrams
For the outermost, large petals, make a small fold in the middle (this way the flower adds volume and splendor) and glue it. Attach to wire and decorate with leaves.