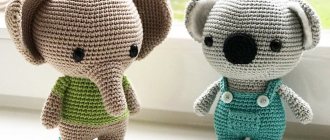
To knit an elephant, you don’t need a lot of different equipment; just some leftover yarn and a hook of the required diameter are enough. However, the thing can be of any size, it all depends on the intended purpose of the toy and the intention of the craftswoman.
Can you crochet? Publish your work on kru4ok.ru
Where is this soft toy used?
The elephant is a smart, strong and kind animal, which is the hero of many children's books and cartoons. Children adore elephants, which are easily recognized by the presence of a trunk, large ears and a small tail. This soft crocheted elephant toy can be used as the following items:
- key rings;
- sofa cushions;
- decorations on rugs, panels;
- backpack;
- children's toys for kids of different ages.
A crocheted elephant can be either a boy or a girl, and depending on the gender, the animal is equipped with appropriate accessories - a hat, bow, bow tie, handbag, beads, brooch, cane, etc. A toy crocheted elephant can serve as a wonderful gift.
Crocheted elephant: what materials is it made from?
An elephant for a child is crocheted from the following types of yarn:
- wool, half-wool;
- synthetics;
- mixed fibers.
An excellent option for working with crochet is velor, plush or simply boucle yarn. As for the color scheme, a soft elephant toy is most often made in gray, although it is quite acceptable to use white or brown yarn. Children will not refuse a cartoon elephant in pink, blue or other colors.
What are the advantages of a crocheted elephant
A cute, kind elephant evokes extremely positive emotions in a child playing with this soft toy. In addition, a crocheted elephant has the following properties:
- safety - does not have sharp, piercing or cutting parts;
- when dirty, it can be easily cleaned by washing in an automatic machine;
- carries a cognitive load;
- can have any size, from pocket size to pillow size.
Crocheting an elephant does not require large material costs: you can use the remains of any yarn. A soft elephant turns out to be an interesting, original toy that children like.
How to sew a soft elephant with your own hands, where can you find patterns?
How to sew a soft elephant with your own hands, where can you find patterns?
- In order to understand how to properly sew an elephant, you need to thoroughly study its pattern, because you must not forget about such an extraordinary detail of our elephant as the trunk. And he can be anyone! For example, let’s take a regular pattern for a toy elephant:
From this pattern it is easy to understand how many and what parts are needed to make an elephant. Please note that this product is proposed to be sewn from fluffy mohair, which means the companion fabric should also be soft and delicate.
We cut out the parts on the fabric with a seam allowance of 0.5 cm - this will be more than enough and carefully sew the parts together, not forgetting to leave room for turning the parts inside out and filling them later with any kind of filler. It is important.
Elephant eyes can be purchased in advance at a craft store, or you can look for beads or buttons at home.
As a result, you will get something like these nice elephants:
- All the elephants are just super! Let's do it with the kids!
- It turns out that an elephant with its trunk raised brings good luck, stability, prosperity to the house, and protects against all risks and dangers. You can sew such an elephant from any fabric that you like and stuff it with cotton wool, or you can make one as fragrant as this one, which is filled with coffee beans, vanilla and cinnamon.
here is a pattern for such an elephant
- I found several wonderful master classes on sewing an elephant toy.
Calico elephant pattern:
We cut out, sew together the parts and stuff them with cotton wool or padding polyester.
It’s not difficult to sew such a cute elephant. For a detailed master class with a pattern, see here:
Another elephant in the form of a pincushion or a small toy. Detailed description and sewing with pattern here:
The cutest elephant. See details here:
.
Another elephant. See here:
- I came across such an elephant, so cute, I couldn’t resist telling about him.
I just fell in love with him. For decoration, you can come up with something interesting yourself, but here is the pattern of a cute elephant, where everything is written out very conveniently and clearly
- In order to sew an elephant, you will need to decide what you will make it from. The most popular items now are fabric elephants. The second point is that you need to choose the size; if the elephant should be large, then the pattern will need to be enlarged. The next point is the color of the fabric - you can choose it to suit your mood, or you can choose it to suit a specific decor. Next, if you plan for the elephant to have decorative elements, then find ribbons, sequins, etc. Here, in the answers, they have already suggested a lot of different elephant patterns, but still, if this is not enough, then you can familiarize yourself with the master classes on this site. In the search, type fabric elephant.
- Baby elephant made of felt, sewn by hand.
You will get such a cute elephant with button eyes.
Pattern for a toy
How to sew:
First, cut out the toy parts from felt using the templates. The elephant itself is gray or gray-blue, blue, and the ears inside are made of pink felt.
We sew the parts together, leaving room to fill the toy with filler. Sew the pink inner part to the ears. Then we connect the parts. We sew the ears to the head, the head to the body. Finally, we sew on the baby elephant’s eyes using buttons or beads. I suggest crocheting the tail from yarn (for some reason there is no tail in this toy (and in the description). It needs to be fixed).
- It is very easy and simple to make an elephant pillow toy. It will be made of soft fabric, so the baby can not only play with it, but also sleep sweetly. It sews quite easily. Making such an elephant will not take much time. First you need to cut out a pattern from paper. A simple pattern can be drawn by hand, for example, like this:
To decorate the elephant pillow, cut out clouds. The most common and simple ones, the kind we used to draw in childhood:
Place the patterns on the fabric and carefully cut them out, remembering to leave seam allowances.
On the finished halves of our elephant we sew clouds pre-cut from fabric in random order. All that remains is to sew the two halves and stuff the toy with padding polyester. We sew on the elephant's eyes, ears and tail and the wonderful toy pillow is ready.
- I really like Tilda's soft toys. I don’t know why, but they evoke real affection, even though such toys have a certain disproportionate structure. For example, an elephant has a larger head than standard toys.
Here I found these adorable elephants:
https://vk.com/tildasworld
more pink baby elephants:
After a long search, I found a pattern, I’ll definitely sew it, the main thing is to choose fun material and not abandon what I started!
info-4all.ru
So, let's start making the rocking chair
First of all, we take a scale grid and transfer the enlarged part templates onto it (pictured below). If you have the opportunity to cut out elements using a laser machine, then the drawings of the parts will need to be transferred to media. But, alas, I don’t have such an opportunity, so I transfer all the large-scale details onto a sheet of plywood so that I can then cut them out using a jigsaw. At the end of the work, sand the edges thoroughly with sandpaper or a sanding machine.
The second step is to carefully work out all the elements of the blanks, focusing our attention on the curly cutouts. If you have little experience working with wood, then I advise you to use hand tools. For example, the eyes of an elephant can be drilled out using a drill and a drill bit. We need to make a hole in the back to attach the elephant's tail.
After all the parts are ready, they need to be assembled into a single whole.
The homemade elephant rocking chair has been assembled, you need to check its strength and ensure that it swings well (otherwise, adjust the elements a little)
Third step. If you are going to paint the rocking chair and varnish it, then first widen the openings for the fastenings by a few millimeters.
Fourth step: Round off all corners using sandpaper or a sander.
The fifth step is to cover the rocking chair with paint. We use high-quality and hypoallergenic paint especially for children's products. Leave the painted elements until they dry completely (about two days). After complete drying, apply varnish over the paint and again leave it to dry for a while.
Seventh step According to the pattern, we braid the elephant’s tail, fasten it and fluff the lower part (as in the photo).
The homemade elephant rocking chair is ready. Not only the children were delighted, but also the wife (I didn’t even expect that her husband was such a great guy)
Source
Baby elephant toy with free pattern
Added: 04/26/2010Author of the article: Ekaterina Vinnichek
One day I came up with the idea of giving a baby elephant toy. After looking at several patterns of elephant toys from the Internet, I realized that I’d rather make my own (I wanted a real elephant, not a flat one like a pillow, but a real one, standing on four legs)!
I took 2 patterns I found as a basis and made the one you see below and can download for free.
Materials needed to work on a baby elephant:
- fleece (preferably two colors);
- filler;
- eyes (beads, embroidery threads, fabric paints...);
- threads
Operating procedure
1. From fleece of the same color, cut out:
- 2 body parts,
- 2 abdominal parts,
- 2 ear parts,
- 1 forehead piece,
- 2 parts for the ponytail.
Attention: if two parts are indicated in the cutting, then they need to be cut out in a mirror image.
Leave a seam allowance of 5 mm and cut it out. The photo above shows all the details from the front side.
2. We sew the forehead of our baby elephant toy into the head, aligning the l marks on the pattern. 3. Sew the parts of the abdomen together. We fold the parts of the baby elephant's abdomen along the seam line with the wrong side inward, and then put these parts into the main parts of the elephant's body. 4. Sew the elephant’s body (when sewing in the abdomen, you must ensure that marks A and B are aligned). Attention: we leave the top of the trunk and the bottom of the legs unsewn! 5. Turn inside out through a hole in one of the legs (This method is only suitable for toys with thick legs; for small toys, leave a hole in the back or belly unsewn, turn inside out and stuff through it). We stuff the toy (again through the legs). 6. From fleece of a different color, cut out the feet and nose (unsewn top of the trunk) of the elephant. We sew these parts to the stuffed body of the toy using a hidden seam. 7. Sew the tail. Turn it inside out and sew it to the elephant with a hidden seam. We don’t stuff the tail!
8. Cut out 2 more ear parts from fleece in an additional color (in a mirror image).
We sew the ear pieces together and turn them inside out.
My Elephant will have white ones on the inside. We sew on the ears using a hidden stitch (you can experiment with the placement of the ears on the elephant’s head).
Attention: you don’t need to stuff your ears either!
9. Now we’ll make a tightener for the baby elephant’s eyes. How? We stitch the head all the way through with a long needle with a strong thread inserted into it in the designated places and pull it together, fastening the thread well (but so that the place of fastening is then covered by the baby elephant’s eye).
10. All that remains is to glue (sew, draw or embroider) the eyes. You can also make eyelashes (I painted them with acrylic paint directly on the eyes.
Now the elephant is ready.
PS If you wish, you can glue a tongue and a bang to the elephant, sew an elegant blanket... I thought about it for a long time, but didn’t do it. (My toy was intended for a little boy and for the sake of safety I sacrificed a little beauty).
The original of this master class can be found on the author’s website.
www.vsehobby.ru
We sew an elephant toy with our own hands
You can sew many different toys with your own hands, which will simply serve as decoration or can be useful as pillows. But, perhaps, nothing could be simpler than this elephant pillow.
Even a novice needlewoman or a child who wants to learn how to sew toys can make such an elephant. And the lilac elephant looks a little fabulous and magical. Due to the fact that it is made of soft fleece fabric, it is very pleasant to rest your head or face on.
So, to make such an elephant, you need, first of all, to prepare a paper pattern. The entire body of the elephant is one solid piece, which is why it is so easy to make.
The only “added” parts to the elephant’s body will be small ears and a tail, but they can be made without paper patterns, straight from the fabric.
The size of the elephant pillow can be absolutely any, at the request of the needlewoman. The paper pattern is transferred to a piece of fleece folded in half. After this, the fabric can also be cut out, do not forget to leave seam allowances.
Next, you need to cut out clouds from fleece of a different color. For beauty, they can also be first prepared on paper and then transferred to fabric.
Before sewing the parts of the body, you need to stitch clouds on both sides and make magic ladders in contrasting shades.
After this, you need to make ears and a tail of any shape and size. When stitching the main body, these parts need to be placed inside the front side. When sewing up an elephant, you must leave a small hole in the fabric through which the filling will be stuffed. It is better if this place is between the front paws and the head. Then the hidden seam will not be visible there.
When the stuffing of the elephant is finished, all that remains is to sew on its beady eyes. They should be small so as not to press on the cheek of the person who will be lying on the elephant. The pillow is ready.
zhenomaniya.ru
So, let's start making the rocking chair
First of all, we take a scale grid and transfer the enlarged part templates onto it (pictured below). If you have the opportunity to cut out elements using a laser machine, then the drawings of the parts will need to be transferred to media. But, alas, I don’t have such an opportunity, so I transfer all the large-scale details onto a sheet of plywood so that I can then cut them out using a jigsaw. At the end of the work, sand the edges thoroughly with sandpaper or a sanding machine.
The second step is to carefully work out all the elements of the blanks, focusing our attention on the curly cutouts. If you have little experience working with wood, then I advise you to use hand tools. For example, the eyes of an elephant can be drilled out using a drill and a drill bit. We need to make a hole in the back to attach the elephant's tail.
After all the parts are ready, they need to be assembled into a single whole.
The homemade elephant rocking chair has been assembled, you need to check its strength and ensure that it swings well (otherwise, adjust the elements a little)
Third step. If you are going to paint the rocking chair and varnish it, then first widen the openings for the fastenings by a few millimeters.
Fourth step: Round off all corners using sandpaper or a sander.
The fifth step is to cover the rocking chair with paint. We use high-quality and hypoallergenic paint especially for children's products. Leave the painted elements until they dry completely (about two days). After complete drying, apply varnish over the paint and again leave it to dry for a while.
Seventh step According to the pattern, we braid the elephant’s tail, fasten it and fluff the lower part (as in the photo).
The homemade elephant rocking chair is ready. Not only the children were delighted, but also the wife (I didn’t even expect that her husband was such a great guy)
Let's sew a children's toy pocket elephant together
Soft toys
Do you want to always have a piece of a bright miracle with you? Easily! Let's make this tiny and very cute baby elephant. It will easily fit in your pocket and will warm your hands on a cool autumn day. This is also a wonderful gift for a friend, sister or brother. Can you imagine how happy they will be to receive such an unusual gift!
For work, please prepare: a small piece of fabric (you can choose cotton), felt for the ears, a fabric marker, 2 black beads, threads, lace, scissors, a needle, material for filling the toy (cotton wool, holofiber).
1. Print out the elephant pattern and cut out the details.
2. Fold the fabric in half, right side inward. Using a fabric marker, trace the baby elephant template and stitch along the outline. Don't forget to leave a hole for filling the toy with cotton wool.
3. Use scissors to make a “zigzag” near the outline of the toy.
4. Turn the toy inside out using the opposite end of a brush or any thin stick.
5. Fill the elephant with cotton wool or other stuffing. First, carefully fill the trunk, and only then the whole body.
6. Time to make a tail for the animal.
Take a thin cord and tie a knot on it at one end. Pull the lace into the eye of the needle and pierce the toy from the inside where the tail is, pull out the lace.
7. Tie a knot in the tail and fluff out the tip.
8. Sew the hole for stuffing with a blind stitch.
9. Cut out the baby elephant’s ears from felt. Hem their outer edges with thick colored thread, as shown in the picture. If you can’t handle it on your own, ask your mom for help. I am sure that She will not refuse You in such a matter.
10. Using the same seam, sew the ears to the elephant’s body. Make sure your ears are positioned symmetrically relative to each other.
11. Using a needle and black thread, sew on beady eyes, piercing the toy right through. Using the same thread we embroider the baby elephant's eyelashes.
Finally! Our elephant is ready to live in your cozy pocket.
Or maybe you want to sew a whole herd of elephants?)
pustunchik.ua
Elephant made from bottles (simplified version)
To make this craft, you will need the following:
- one two-liter and two one and a half liter plastic bottles;
- the wire is dense enough to hold its shape;
- 6-7 lids with through holes in the middle of the bottom;
- thin foam rubber or foamiran in gray and pink colors;
- scissors;
- glue gun;
- a pair of plastic eyes;
- gray acrylic paint and a brush (to add color, you can use not only paint, but also adhesive colored paper (tape) or cling foil);
- sand (cereals) as a filler.
Step-by-step description of working with photos:
- Cut 1/3 of the entire length from the top of one and a half liter bottles.
- To make the finished figurine more stable and not fall even from a slight breath of wind, pour a little filler into the cut parts. This can be ordinary dried sand, small pebbles, cereals, etc.
- In a two-liter bottle, make 2 holes along one of the sides, the diameter of which coincides with the diameter of the cut blanks.
- Insert the filled parts into the holes and secure them with a glue gun.
- Place plugs on the bent wire and secure with hot glue.
- From foam rubber (foamiran), cut out the details of the ears (2 large pieces of gray and 2 small pieces of pink), tusks (2 pieces) and nails (4 for each bottle - 8 pieces in total).
- Cover the body of the future elephant with gray paint. This craft will look good if you use regular food foil instead of paint. In this case, you just need to wrap the workpiece with 1-2 layers of foil and press tightly.
- Glue on the eyes, ears, tusks and nails.
- Attach a tail from a short piece of wire and a foam rubber brush to the back.
As a result, you should have such a wonderful baby elephant. The figurine will not only decorate the garden plot, but will also become an excellent toy for children.
